
I’m obsessed with figuring out solutions to problems. One problem I recently encountered when I was putting together some files for the Alias8 PDF Guide, was trying to get the Alias8 Rack Extension Fader to double for a second control. I wanted to be able to use it to adjust two different parameters (let’s say Amplitude and Pitch of a SubTractor). The idea and thought process behind it is pretty easy. You adjust the Amplitude by moving the Fader, then click a button, and the Fader switches to adjust the Pitch. Click the same button again, and it goes back to controlling the Amplitude.
You can download the example files here: Alias8-Multi-Function-Fader. There are two Reason documents (.reason) and two Combinators (.cmb), which are explained below. The files will work in Reason 6.5 and above. To use them, you will also need the Alias8 CV Controller Rack Extension, which is available in the Propellerhead Rack Extension shop. To use, open up the file and go into the Combinator. Press the “Run Pattern Devices” on the Combinator, or press “Play” on the Matrix. The Matrix is used to gate the Subtractor, and is only used as an example so you can hear something when you tweak the Fader. A more comprehensive explanation is provided below.
To start, what I found is that you can’t completely get this type of functionality to work. Not completely. BUT, here are two ideas that get you pretty close.
1 Control with 2 Functions (V.2).reason / F1 2-Function Control (V.2).cmb Files:
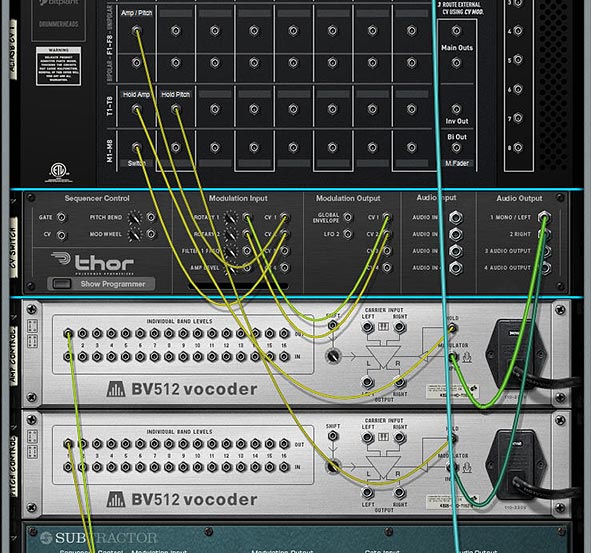
I’m starting backwards here, because this was actually the second idea I had (hence, this is Version 2 in the filenames above). This idea uses two toggle buttons, one for Amp and the other for Pitch. Then, with the proper CV routing and an additional Thor to process the CV, you can map both parameters to the Fader. Click the first Toggle, and the Fader will control the amplitude. Click the Second Toggle, and it switches to control the Pitch. When the Amp toggle is off, you adjust the amplitude. Then click the Toggle button on, and the Amp level is held at the current Fader position. Then click the Pitch Toggle off, and the same Fader now controls the Pitch. Click the Pitch toggle on, and the Pitch is held at the current Fader position. The drawback is that you have to have both Toggle Buttons on to start with, and you can’t turn off both of them, since this would screw up the functionality. One of the buttons always has to be “On.” To get it “set” right again, you need to turn on both Toggles, then, turn one of them off and use the Fader. Sounds confusing, I know. But it’s the most efficient way I’ve found to set it up, as it only uses two Toggle Buttons (aside from the Fader).

1 Control with 2 Functions (V.1).reason / F1 2-Function Control (V.1).cmb Files:
This next idea uses three additional buttons (aside from the Fader). The two Toggle Buttons act as the Amp / Pitch selection (as above), but a Momentary Button is used to switch between the two Fader states. The benefit of doing it this way is that you can’t screw up the functionality of the Fader in any way. The two Toggle Buttons act to “Hold” or “Freeze” the Level’s position for the selected parameter. The selection of which parameter the Fader controls is determined by the Momentary button. While I think this is a better method in some respects, it suffers from one disadvantage: You can’t tell which parameter is selected via the Momentary Button. There’s no real visual indication to tell you which of the two parameters are selected. This isn’t a big concern when you have only two parameters switched via the Momentary Button, but if you have several parameters you’re cycling through on that Button, things will get confusing quickly (though you could add a visual indicator with the DDL-1 or BV512 Vocoder, but it’s still not perfect – if interested in how this works, see the Kong FX Chain Builder tutorial where I discuss it at the bottom of the page).

How Does It Work?
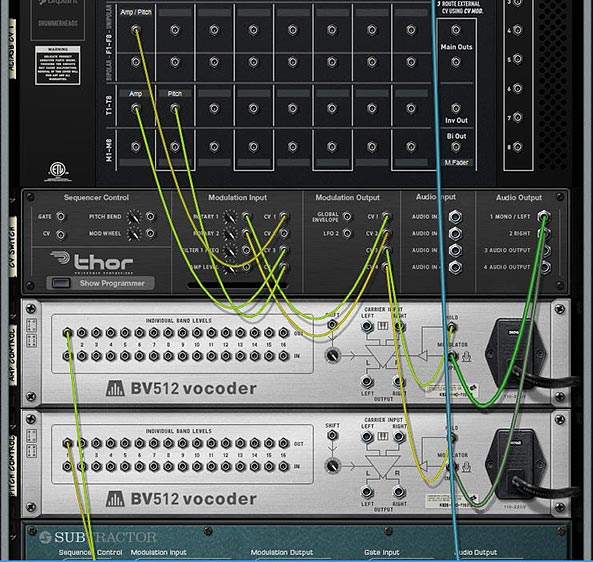
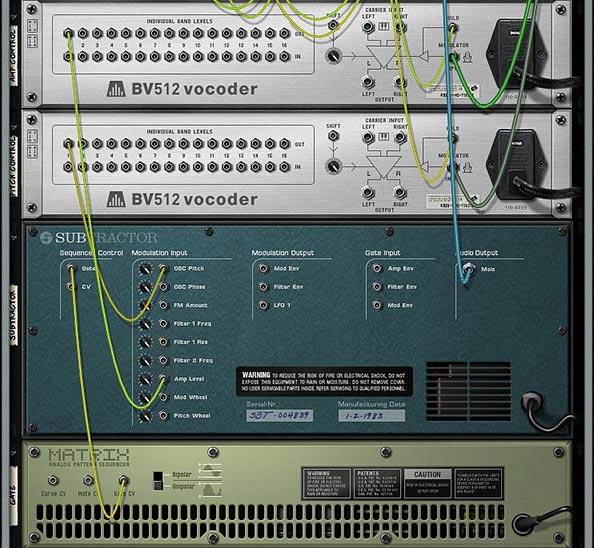
The engine of this CV trick is the Thor device. What’s happening is that you are sending the CV value from the Fader into Thor, converting that CV value to Audio, then sending it through the BV512, where it gets converted back to a CV value that is sent out by Band 1 to control the SubTractor parameter (Amp or Pitch). The reason you need to convert it to Audio is because the BV512 Modulation input can be “held” — this allows you to “hold” the Fader value via the Toggle buttons on the Alias8. Note that this is also useful for a lot of other things because it allows you to “Freeze” any CV value in place (for instance, you could freeze the value of an LFO at any time by mapping the “Hold” button to a Combinator button, but that’s going a bit off tangent). There are 2 different BV512 devices because you need to be able to “Hold” each parameter you want to control with the Fader.
Another thing to keep in mind is the CV amount value of 39 in the Modulation Bus Routing Section on the front of Thor. This seems to be the correct value to correctly scale the “CV > Audio” conversion going out from Thor to the BV512 Vocoder. Note that the Rotary is used to Scale this “CV > Audio” conversion, and then the Fader value is going into Thor and modulating the Rotary, which in turn modifies the CV value being sent into the BV512 device. It seemed like the easiest way to set it all up, and the other benefit is that it doesn’t use any routings or mappings in the Combinator device itself.
A Few Additional Notes:
- The value sent to the Fader seems to be Scalar, not Linear. Anyone who knows how the CV value can be sent to the Fader in a Linear way, please let me know.
- I also would have loved to have one Toggle or one Momentary button switch between the two Fader parameters (keeping everything in one column in the Alias8), but I honestly don’t think this can be done. However, if you figure out a way, please let me know.
- Even though this concept creates a multi-function Fader, there’s nothing saying you can’t set it up on a Rotary control instead, to produce a multi-function Rotary.
- Why is this an important concept? Because it extends the functionality of a single Control on the Alias8, and the Alias8 device itself. For example, with a little thinking, you could create 8 different controls on 4 of the Alias 8 Faders, and still have 4 Free faders left over for more tweaking. Or have all the Toggle Buttons switch 8 different destination parameter controls on a single Fader, and free up the other 7 Faders for more tweaking.
Update
Eric Kloeckner was kind enough to expand on this idea and improve upon the above design. He managed to put the whole setup on a single Toggle button to switch the operation of the Fader between the two modulations. It solves the need for having two separate toggle buttons to drive the two different parameters.
I then took his design and tweaked it a little to make it as straightforward as possible. The concept uses 2 Thors to control the Toggle switch. This, in turn switches the Fader between the two modulation controls. The only downside is that you have to first “initialize” it by pressing the Toggle button at least once. But this is a huge improvement. And my thanks goes to Eric for finding a solution to one of the problems that was bugging me. Download the Files here: Alias8-Multi-Function-Fader-v2. There are two files in this zip:
- Example File Combinator: Press play, and then toggle between adjusting the Pitch and the Level using Fader 1 on the Alias8.
- Template File: Use the Output A / Output B spiders to send CV values to target multiple parameters as you wish. “A” parameters are adjusted when the toggle button is “off” and “B” parameters are adjusted when the toggle button is “on.” Use this setup to create a template where all 8 faders can have multiple-functions if you like.
Note: There’s still a slight discrepancy between the CV input & output. In other words, it’s still not 100% Fader value CV : Destination value CV. You’ll still get slightly off results (where moving the fader on a single CV value will bump up the Output CV value by a value of “1,”). However, this is very slight, and shouldn’t be a problem in most cases.
That’s it for now. Don’t forget that the Alias8 PDF Guide I put together contains many other creative ideas for this Rack Extension, so check it out as well. Happy Reasoning!