39 – Kong Beat Repeater

This time, I’m going to work off my previous OctoKong device with a series of loopers and show you how to add Beat Repeat and LFO Panning ability inside Kong. The pads are used to trigger both of these effects on and off as a toggle. Hopefully this shows a little more of the capability you can achieve with Kong.

Welcome once again to another little trek down Reason lane. This time, I’m going to work off my previous OctoKong device with a series of loopers and show you how to add Beat Repeat and LFO Panning ability inside Kong. The pads are used to trigger both of these effects on and off as a toggle. Hopefully this shows a little more of the capability you can achieve with Kong.

Here’s the Beat Repeater project files. There are two Beat Repeater Combinators inside an RNS file (zip file). You can download it here: Kong-Beat-Repeaters. The first Beat Repeater under the mixer uses one pad to trigger the Beat Repeater (turning it off and on), and another pad to cycle through all 16 synced steps inside the DDL-1 Digital Delay Line. There’s also an LFO Pan Pad, which turns panning ability on or off. The second Combinator is a different way you can apply Beat Repeating inside the Kong device. It sets up 3 pads with 3 different Beat Repeat settings.

A big thank you to Peff at Peff.com and Hydlide at The Sound of Reason website. They got me thinking about Beat Repeating in general. Have a look at Hydlide’s Beat Repeater tutorial video and be sure to look up Peff’s great Beat Repeater Combinator which is included in the Record Factory Soundbank (in the Effects > Delay folder).

So here’s how you can create a Beat Repeater triggered from a Kong Pad. The Kong Pad is a velocity-sensitive toggle to turn the Beat Repeater on and Off. A second Pad acts as a correlated synced Step Time switch that cycles through all 16 Step units in the Digital Delay Line:

Next, this video shows you how to set up an LFO Pan trigger on another pad in Kong. In the same way, this is a velocity-sensitive toggle to turn the Panning on and off. The harder you press the pad (or key on your keyboard), the heavier the Panning becomes (the amount of Panning is increased the harder you hit the pad). What’s even nicer is that the panning affects both the dry signal and the Beat Repeat signal. Check it out here:

As you can see, the process can be very useful, especially when you set up a lot of loop devices or other synth devices and hook them up into the Mixer inside the Combinator.
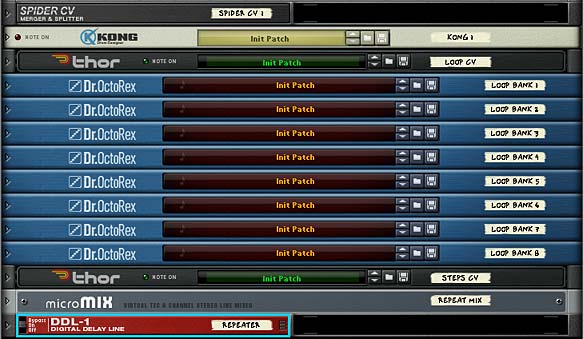
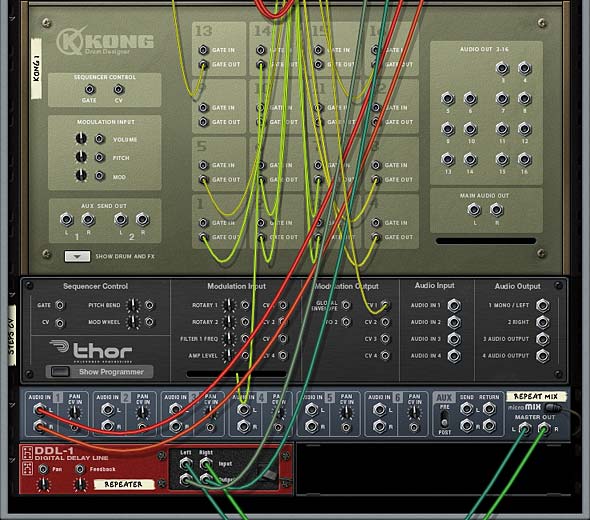
The front of the Reason rack showing all the devices in the Kong Beat Repeater (minus the mixer)

The back of the Reason rack showing the Kong Beat Repeater-related connections.

A few notes about the Combinators

  • Both Beat Repeaters work by processing any audio that is connected to the Mixer inside the Combinator, so you can Beat Repeat any audio that is connected to the Kong or not. So don’t let this setup stop you from adding any audio, even that which is not triggered by Kong. Great flexibility here.
  • The Beat Repeater pads and LFO Panning Pad are all velocity sensitive. This means the amount of these effects can range from very low to very high, depending how hard you hit your keyboard or Pad controller.
  • Beat Repeater 2 provides 3 pads with 3 different Beat Repeaters (all with different settings). The cool thing about this Combinator is that you can use them in tandem by pressing 2 or all 3 of the pads together to apply a lot of variation to any of the sounds coming out of Kong.
  • In Beat Repeater 2, feel free to change any of the settings on the 3 different DDL-1 devices, to create custom effects that suit your own purposes. For example, change the step, unit, or resolution settings of any of these devices to come up with your own custom beat repeaters.
  • After all is said and done, you can still add any parameters to the Combinator knobs and buttons. Since all this CV trickery only uses the 4 new Combinator CV inputs, it leaves all the Combinator Rotaries and buttons free for you to program as you wish.

Feel free to post a comment if you find these useful or to make any suggestions on ways you can improve these Combinators or alternative ideas. I’d love to hear from you. Until next time, happy Reasoning!

38 – Kong as Scene & FX Selector

Calling Kong a “Drum Designer” is like calling a Computer a “Typewriter” — sure that may have been the original intent, but it’s so much more. Here I’ll show you a whole new side to Kong. This tutorial will use Kong as a mini Scene Selector, to imitate Ableton Live’s Session view and then also use it as an Effects selector for any audio you like. In this way, you can switch between clips (Rex Loops) and Scenes (groups of Rex files). We’ll also use one of Kong’s pads to cycle through as many FX as your processor can hold. Hours of fun.

It’s very easy to think of Kong as a “Drum” designer because of course that’s what it is called. And indeed that is its primary purpose. However, it would be a mistake to think of Kong as only a “drum” programmer. That’s like calling a Computer a “Word Processor” — sure that may have been the original intent, but it’s just so much more. Here I’ll show you a whole new side to Kong. This tutorial will use Kong as a mini Scene Selector, to imitate Ableton Live’s Session view and then also use it as an Effects selector for any audio you like. In this way, you can switch between clips (Rex Loops) and Scenes (groups of Rex files). We’ll also use one of Kong’s pads to cycle through as many FX as your processor can hold. Hours of fun.

To start, I’m going to use a Combinator I came up with which you can download here: OctoKong-Scene-Selector-3. It’s a single Combinator inside an rns file. The Kong inside the Combinator has been given its own track because I find it easier to play the Kong outside the Combinator and place all the midi data there, as opposed to sequencing midi data on the Combinator track.

A little Off Tangent: Recreating Ableton “Live” in Reason?

As an aside, I have to give a huge thanks to Dioxide for inspiring the idea behind this Combinator. He wanted to try to mimic Ableton Live’s Scene / Clip system. This comes pretty close and allows you to select between different clips in a mini 9-pad way. The pads along the right side trigger all the loops within their respective rows, while the pads on top cycle through that specific row’s Rex loops (8 loops in total). When you open it up, you’ll have to press the “Run Pattern Devices” button on the Combinator. This sets all the loops running freely. I’ve also set up the first 3 buttons on the Combinator to act as your “Mutes” — so you can mute any of the columns at any point in time. You can also play each loop individually by playing the other pads alone or in combination. In this way, it’s a mini scene/clip selector for Reason.

If you’re interested, here is a 2-part series on how to create that patch:

But moving on, the real focus of this article is that lonely little pad 16 up there in the top right corner. What to do with that little pad all empty and lonely. Let’s add a ton of effects and use the pad to cycle through each of those effects one after the other. Let’s load in as many as your CPU can handle!

Well, actually, let’s focus on the PROCESS to add in as many as your CPU can handle. I’ll give you the tools and know-how to add in a few effects, maybe 4 or 5, and then you can use the same technique to load up as many effects as you like. This way, you can take the FX Pad in any direction you like. Sound good? Ok. Let’s get started.

Adding 5 FX at once, and tying them to the Pad

The basic idea is to send all the FX into a separate Mixer and then back out to the main output. All the levels of all the channels are turned off and CV is used to determine which channel gets heard. The first Channel is the original (untouched) audio without any FX applied. Then you have five different FX applied to the audio chain which goes through the different channels on the mixer. The CV is then sent out from the two Thors and turns up each respective channel to level 100  on the 14:2 Mixer. The Thor Step Sequencer is used to move step by step through the different FX, and the Pad (Pad 16 here) is the main catalyst moving the step sequencer forward.

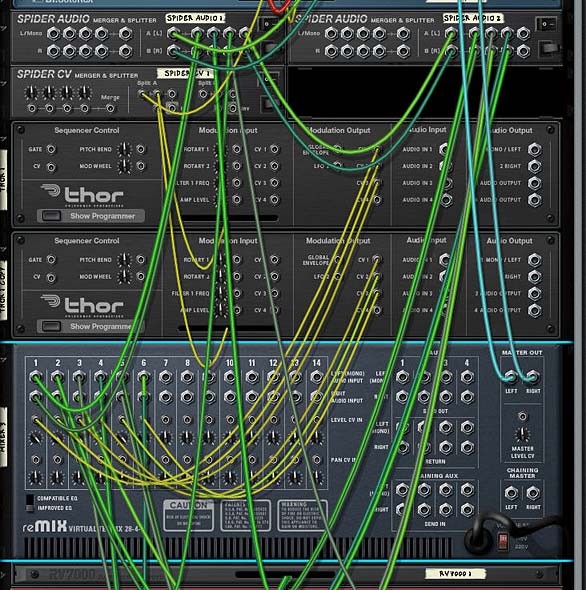
The main FX setup. Yeah I know it looks crazy. But follow the video and you can't go wrong. Try to understand the concepts, and you can add any number of effects.
The main FX setup. Yeah I know it looks crazy. But follow the videos and you can't go wrong. Try to understand the concepts, and you can add any number of effects.

In conclusion, pad 16 cycles through all 5 Effects devices. And the cool thing is you can create any number of devices inserted into the chain. So if you want to create custom FX devices, you can insert them into the chain in any way you like. You can also create more than just 5 tied to a single Pad in Kong. But I think this shows you a pretty good example of the possibilities. And that’s what I hope you take away from this.

So what do you think? Any other interesting ideas or uses for the new Reason 5 devices. Is it time for me to move on to Neptune? As always, comments here are welcome. And stay tuned for more to come. Good luck in all your Reason projects!

37 – Dr. OctoKong Looper

In this tutorial, I’m going to show you how to use Kong and the Dr. OctoRex together to create some continuous looping fun. You’ll learn how to continually loop and play a series of OctoRex files with Kong. This way each pad turns the loop on and off as a toggle, with Velocity sensitivity too.

In this tutorial, I’m going to show you how to use Kong and the Dr. OctoRex together to create some continuous looping fun. You’ll learn how to continually loop and play a series of OctoRex files with Kong. This way each pad turns the loop on and off as a toggle. And it’s super easy to do. In addition, when played on your keyboard (C1 – D#2), you get velocity sensitivity.

You can download the project file here: DrOctoKong1-v4. There are 2 RNS files containing 2 Combinators in this zip file. Both Combinators contain the Kong device and 10 Dr.OctoRex devices. The first rns file shows you ways you can play the loops and switch from slot to slot to cycle through all 80 loops. The second one is an update I did which shows how you can use a separate pad to Re-Trigger the loops at any point while they are playing. Keep in mind that what you need to play is the Kong device, and not the Combinator (though you could play the Combinator if you want to. But it might be easier to lay down the midi note clips on the Kong track so you can see what’s going on inside Kong itself). Also, make sure you press the “Run Pattern Devices” button on the Combinator. Alternately, press the “Play” or “Record” button on the Transport. This ensures everything runs as it should.

To see how this setup works, take a look at the video below.

So here’s the basics of how it all works

You create your Kong device without any audio routings. Then you create a series of up to 16 OctoRex devices, all with their audio routings sent to different channels on a 14:2 Mixer. Load them up with your favorite Rex files, flip the rack around and send the “Gate Out CV” from each pad in Kong to the “Master Volume CV In” on each Dr. OctoRex device. Then press “Run Pattern Devices” on the Combinator to initiate the “Run” button for all the OctoRex devices at once (or alternately, press the “Play” or “Record” button on the Transport), and your pads become a play/stop loop toggle for each of the attached OctoRex devices.

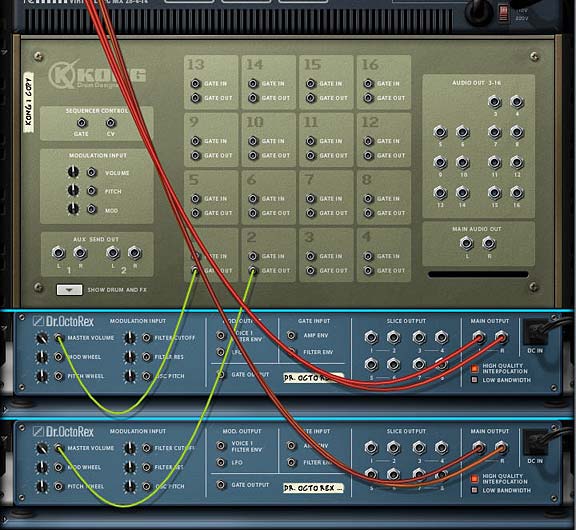
The Routing necessary on the Back to link up the Kong with the Rex files
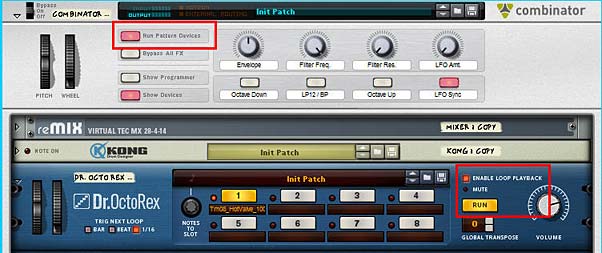
The front panel of the Combinator and Dr.OctoRex devices - Turning on "Run Pattern Devices" will enable all the Rex files to continuously run

A few notes here:

  • The way it works is by having the Rex files continuously looping and running. All the Pad is doing is turning up the volume. For this reason, the rex files are free-running and do not re-trigger when the pad is pressed again. But as I said in the video, don’t let this discourage you. It’s still a very simple and great way to play the Rex loops from Kong.
  • The best way I’ve found to play the loops is by using the Keys from C1 – D#2 on your keyboard. I haven’t tried using a Korg or Akai pad controller to play the loops in this way, but I have a feeling if you do, the pads will end up running the loops continuously without a way to shut them off (you’ll have to press the pad with your mouse directly on the Kong device to stop it again). It’s a little quirky, but I’ve tested the keyboard, and it works great. Press a key and the Rex file sounds. Lift up the key and the Rex file sound stops.
  • One of the benefits of this setup is that the Pads (or keys rather), are velocity sensitive. The result is that the Rex loop volume can be controlled via the Velocity of your pads. This adds a nice dimension to your loops and dynamics to your sound.
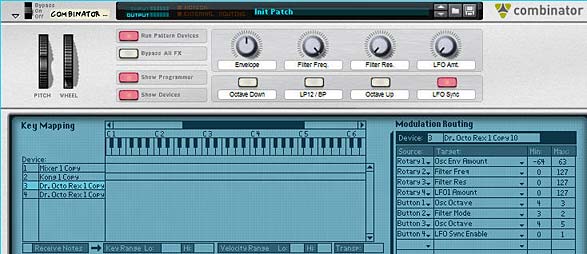
  • You can setup the Rotaries and Buttons as I did here. For each Dr. OctoRex, you’ll need to set up the following Modulation parameters in the Combinator’s Modulation Bus Routing:
The Combinator's Modulation Bus Routing - Just a suggestion. ;-)
The Combinator's Modulation Bus Routing - Just a suggestion. 😉

Taking things a step further

One thing you can do is load up the other slots of the OctoRex devices, and then tie the Loop Slot to a free Rotary (you’ll have to give up one of the parameters above). This way, you not only have the ability to play multiple loops using the Kong device, but you can also switch slots for new Rex Loops by turning one of the Combinator Rotaries. Add to that the various parameters you can tweak at the slice level of each Rex loop, and you have some very powerful fun at your fingertips.

I decided to go ahead and implement this. However, I realized that there’s a nice little way to keep all our parameter automation in place in the Combinator, and still provide the ability to switch from loop slot to loop slot in all the OctoRex devices. It’s really not too complicated. Here’s a video to show you how it’s done.

The nice thing about this method is that it uses the new CV inputs on the back of the Combinator in conjunction with Thor’s step sequencer and triggering provided by Pads 15 and 16. So you can see how some of the Reason devices can be interconnected and operate together to provide some useful functionality.

The idea that you can trigger 80 Loops (and if you used all 14 pads you could trigger 112 loops!) using a single Kong can be pretty overwhelming, but can provide some interesting chaotic possibilities. And even structurally, you can create some amazing songs using little more than Rex loops. For example, think of having each OctoRex device contain 8 loops related to a single instrument. So the first OctoRex contains your drums, the second contains the basslines, the third contains guitar loops, and so on. You have a complete band that you can switch from verse to chorus with one press of a key or a pad.

Extra Bonus: Let’s add some Effects

Here’s a quick video to show you how to simply add an FX or two. I’ve also updated the main project file so be sure to download that at the top of this post. For now, here’s the method I used to show how to add the effects to some of the free pads. There’s also some Delays and Reverbs on two other pads that you can cycle through (5 delays and 5 reverbs). The cycling is somewhat similar to how the Loop Slot Changers work on Pad 15 and 16, except the audio gets split between a bunch of different FX devices with different settings. I didn’t go over how to set that up, but you can look at the file and figure out the routing. Hope you have lots of fun with this one. I had a really great time making it. And now… the video:

Re-Triggering the OctoRex Loops

This video is an update to the main tutorial above. A big thanks has to go out to EditEd4TV at Bauman Productions for helping me figure out how you can re-trigger all the loops as they are playing. Essentially, it uses the note function of the Thor step sequencer to start the loops from the beginning again. Very cool indeed. I also placed the finalized file in the project file download at the top of this article. So go check it out there. And if you want to know how it was put together, check out the video below:

As always, any comments or suggestions or ways we can improve upon this are welcome. So please let me know what you think and what other ideas you might have. And have fun Reasoning!