What Makes Glitch?

According to Wikipedia, Glitch is a term used to describe a genre of experimental electronic music that emerged in the mid to late 1990s. The origins of the glitch aesthetic can be traced back to Luigi Russolo’s Futurist manifesto The Art of Noises. But what makes good Glitch?

As defined by Wikipedia:

Glitch is a term used to describe a genre of experimental electronic music that emerged in the mid to late 1990s. The origins of the glitch aesthetic can be traced back to Luigi Russolo’s Futurist manifesto The Art of Noises, the basis of noise music. In a Computer Music Journal article published in 2000, composer and writer Kim Cascone used the term post-digital to describe various experimentations associated with the glitch aesthetic. Glitch is characterized by a preoccupation with the sonic artifacts that can result from malfunctioning digital technology, such as those produced by bugs, crashes, system errors, hardware noise, CD skipping, and digital distortion. Cascone considers glitch to be a sub-genre of electronica.

Production Techniques: Glitch is often produced on computers using modern digital production software to splice together small “cuts” (samples) of music from previously recorded works. These cuts are then integrated with the signature of glitch music: beats made up of glitches, clicks, scratches, and otherwise “erroneously” produced or sounding noise. These glitches are often very short, and are typically used in place of traditional percussion or instrumentation. Skipping CDs, scratched vinyl records, circuit bending, and other noise-like distortions figure prominently into the creation of rhythm and feeling in glitch; it is from the use of these digital artifacts that the genre derives its name. However, not all artists of the genre are working with erroneously produced sounds or are even using digital sounds.

Popular software for creating glitch includes trackers, Reaktor, Ableton Live, Reason, AudioMulch, Bidule, Super Collider, Usine, FLStudio, MAX/MSP, Pure Data, and ChucK. Circuit bending — the intentional short-circuiting of low power electronic devices to create new musical devices—also plays a significant role on the hardware end of glitch music and its creation.

Great. But what makes good Glitch? I’ve often pondered this question and think I’ve come up with a few characteristics of the genre.

  1. First, Glitch music has to have some balance of “randomness” or “chaos” and structure. It’s the tension between these two that give the song its listenable and deep quality. Something to be thought about, something difficult, and something that is not easily taken in by a single pass.
  2. Second, I think good Glitch music explores sonic possibilities, or rather, sonic IMpossibilities. If you listen to the works of Autechre and Aphex Twin, some of their glitchiest of tunes are interesting sonically because they use sounds that are not created by traditional musical instruments, and they explore speeds at which no human can play, even if they were created from a human instrument. Or, they create layers of sounds that are so out there and other-worldly that people would question the notion of the sounds being musical at all.
  3. Third, Glitch is not imitative. It does not try to mimic anything found in nature, but rather tries to break new ground by creating something completely new that you wouldn’t necessarily find in nature. I think this is why a lot of glitch artists turn to mechanic or machine sounds to create their music. It takes them further away from nature and more in the realm of the “man-made.” It’s not organic sound. It’s synthetic.
  4. Fourth, good glitch makes you think. Period. Perhaps that’s why us Americans refer to it as “Intelligent” Dance Music (or IDM). And while I know my brethren in the U.K. cringe at this very notion of terming any kind of music “Intelligent” (the argument as I see it stems from the fact that by labelling any one music “Intelligent” you automatically relegate all other music into the “non-intelligent” dogpile — something which I doubt was ever intended), I still think that you have to use what’s between your ears to fully appreciate glitch. I’m not saying any other music is any less intelligent or intellectual. But Glitch is not pop either. It’s not for the masses, and it’s not for those that want to immediately glean everything from one listen. It’s not background music.
  5. Finally, I think good Glitch uses the unexpected and surprising to capture or hold one’s attention. Whereas most music uses traditional hooks, such as filter openings, drum fills, or other crafty ways to keep a listener’s attention, I think Glitch tends to use more chance happenings and unexpected “free-for-alls” to keep you moving forward through the track. For example, a sudden switch from a wide-open reverb to a small space reverb, or a sudden jump in EQ. Or perhaps a major shift in tempo (as Autechre is fond of doing). All of these things seem to pay homage to the origins of the word Glitch: “erroneously” produced or sounding noise. The art of mistakes.

I would say if anyone has a further interest in the subject, they should definitely read up on the Art of Noises, a Futurist manifesto written by Luigi Russolo in 1913. A nice little summary can be found on Wikipedia. If Russolo were alive today, I think he’d be a fan of works by Autechre and Aphex Twin. I think he’d be supremely impressed at how we use computers as tools to create an infinite array of “noise-sounds” which we couldn’t create before. What I find very interesting is how so many sound designers work so hard to re-create sounds of traditional instruments. I think if Russolo were around he’d probably encourage them to forget about traditional instruments and instead focus on creating new experimental sounds that are unlike anything we’ve heard before. But perhaps that’s a thought for a future(ist) post.

What are your thoughts on the subject?

5 – Create a Grain Sampler

Learn how to create your own homemade grain sampler. This allows you to take a single sample, and affect the playback, sample start position, Repeat length, Grain Length, and Filter Frequency, among other things.

If you’ve ever used the Malstrom in your projects, you’ll undoubtedly see the benefit of grain synthesis. It’s like sound design under a microscope, as you can take a very short piece of sound and chop it up into little bits and start/stop the playback where you like. The fact that you can’t add your own grains into the Malstrom is somewhat disconcerting, but there’s a simple way you can create your own grain sampler, where you can add any sound and use that sound as a grain. This can be very effective in adding some new creative spark to your musical projects. And it opens you up to adding any sound you like and deconstructing it as you see fit. So let’s see how we can do this.

The files used for this project can be downloaded here: grain-samplers. It includes 4 Combinators that are set to play a clip of random notes on the sequencer. To try each one out, you’ll have to mute all the other Combinators via the Main mixer channel. I’m sure this is self-evident, but it never hurts to explain it here. As always, this is open source so feel free to use it in your own projects. Just please provide a link back here or a credit or kudos of some kind. After all, I do this for free. 🙂

Creating the Basic Grain Sampler

  1. Start by creating a Combinator, and in the Combinator create an NN19, Subtractor, and Matrix in that order. 
  2. The NN19 is what we will use to contain the sample or “Grain Table.” This is our sound generating device. So starting there, initialize the device so we have a base from which to start. Bring the Polyphony down to “1,” and set the Spread Mode to “jump.” Finally, change the Pitch Bend  Range to “0.” Don’t worry, I’ll explain why we made all these settings after we’ve set everything up.
  3. Load up your favorite sample into the NN19. You only need one. Alternately, you can wait until the end of the setup to load your favorite sample. If you load the sample at the end of this procedure you can then test out the various samples and play around with them at will using the Combinator rotaries that are going to be setup in just a minute. But for now, just have something loaded so you hear some sounds.
  4. Moving to the Subtractor, bring the polyphony down to “1,” and change the Pitch Bend Range to “0.” More importantly, change the Mod Envelope settings to the following: A=0, D=0, S=127, R=0.
  5. On the Matrix, change the number of steps to “1,” and raise the gate to 127 on the first step.
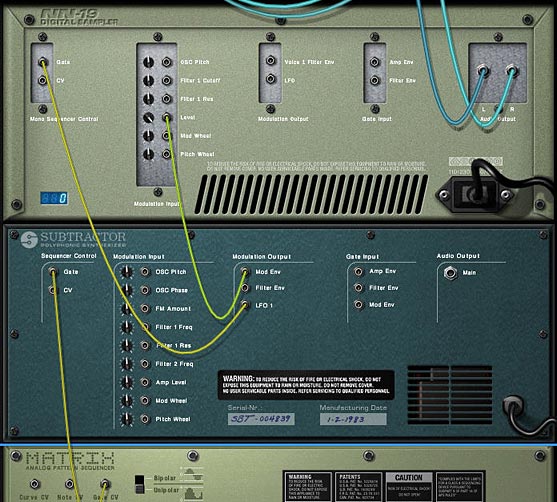
  6. Turning to the back of the rack, there’s really very little to cable. First, cable a CV connection between the “Mod Env”  in the Modulation Ouptut section of the Subtractor to the Level input on the NN19. Also, raise the pot next to this input to 127. Second, cable a CV connection from the LFO1 on the Subtractor to the Gate input on the NN19. Third, cable a CV connection from the Gate CV on the Matrix to the Subtractor’s Sequencer Control Gate input.
  7. The basic cabling for our Grain Sampler
    The basic cabling for our Grain Sampler
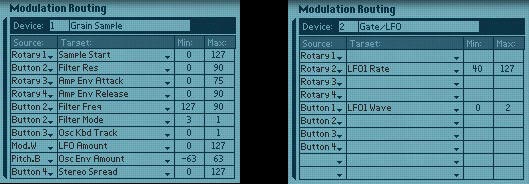
  8. Now comes the fun part: Programming the Combinator. Flip the rack around to the front and show the Combi’s programmer. Here are the settings that we have to make:

For the NN19 (Grain Sampler):

Rotary 1 > Sample Start: 0 / 127

Rotary 3 > Amp Env Attack: 0 / 75

Rotary 4 > Amp Env Release: 0 / 90

Button 2 > Filter Res: 0 / 90

Button 2 > Filter Freq: 127 / 90

Button 2 > Filter Mode: 3 / 1

Button 3 > Osc Kbd Track: 0 / 1

Button 4 > Stereo Spread: 0 / 127

Pitch.B > Osc Env Amount: -63 / 63

Mod.W > LFO Amount: 0 / 127

For the Subtractor (LFO):

Rotary 2 > LFO1 Rate: 40 / 127

Button 1 > LFO1 Wave: 0 / 2

The modulation for the NN19 Sampler (Left) and the Subtractor (Right)

Here is an example of the various things you can do with a basic grain sample:
[ti_audio media=”277″ repeat=”1″]

Explanation of the Functionality

Now for some explanation. The NN19 acts as the grain sampler and the heart of everything. This is why it’s so heavily programmed. The amplitude is controlled by the Subtractor because we set up the Mod Envelope’s Sustain to 127, and cabled the cv from the mod envelope to the level input. And the mod envelope of the subtractor remains “on” because we are sending a gate signal from the matrix. This is simple and effective, and makes our grain sampler very “light weight” by only containing 3 devices.

But don’t let this simple setup fool you. The way we programmed everything gives you a very wide degree of control over the sound — and that sound can be any sample you choose to load into the NN19. Let’s take a peek at what’s going on at the front of the Combinator.

Pitch Wheel: This is set to control the oscillator envelope amount from the NN19.  This is probably one of the coolest and freakiest uses of the Pitch Wheel you could have, and is great for mangling sounds into weird and wonderful effects. 

Mod Wheel: This is set to control the LFO amount on the NN19, for more strangeness, giving the sound a warped and warbled effect.

Rotary 1: Controls the Grain Index, much like the Malstrom’s “Index” function operates. What this is doing is controlling the start position of the sample on the NN19

Rotary 2: This controls the rate of the LFO from the Subtractor, or the speed of the grain playback. All the way left and you get a very slow speed, but turn up the knob and it can get extremely fast.

Rotary 3: Controls the Amp Envelope Attack of the NN19. All the way left gives you fast attack, and all the way right gives you a slow attack.

Rotary 4: Controls the Amp Envelope Release of the NN19. All the way left gives you a short release, and all the way right gives you a long release.

As for the buttons, they are all set up to provide some further sound morphing capabilities.

Button 1:  Switches the LFO Type on the Subtractor. You can program this button to switch between any 2 of the 6 LFOs available on the Subtractor, depending which ones you like best.

Button 2: Controls the Filter mode of the NN19. When off, it uses the default LP12 settings, with a fully open frequency and no resonance. Turn it on, and it turns into a HP filter with the frequency somewhat open, and the resonance dialed up high.

Button 3: This is a very important button in my estimation. It controls the Keyboard Tracking of the Grain Sampler’s Oscillator. This is going to largely depend on how you want the notes in your sequencer to be played by the Grain Sampler. If you look at the project files included here, you’ll see I placed a bunch of random 1/32 notes in a clip on the sequencer. The notes are all different pitches between C2 and C4. If you leave the Key Track button off, the pitch of the notes do not affect the sound. The sound remains constant. If you turn the Key Track button on, then the pitch of the sequencer notes affect the Grain Sampler’s oscillator, and have an affect on the pitch heard. To me, this gives you a great deal of control over how you play your sequencer clips. All with a simple switch.

Button 4: This controls the Stereo Spread of the Sample playback. With this button turned off, there is no spread. With it turned on, full spread is applied across the entire stereo field. Also, since “jump” was selected on the NN19’s Spread mode, it will jump back in a random fashion between the left and right fields.

Exploring Alternate Grain Sampler Ideas

Now that we have the basic grain sampler idea laid out, there’s a few variation Combinators that are included in the project file which you can explore in greater detail. I’ll lay out some of the highlights here.

Mal Grain Sampler: This Combinator inserts a Malstrom and uses it’s “A Curve” in place of the Subtractor’s LFO. It’s then tied to the Rotary 3 on the Combi, so you can use any one of the 31 Curves to affect the gate of the Grain Sampler. The “B Curve” is also plotted to the Oscillator Pitch on the Grain Sampler, and is also plotted to the Rotary 3 on the Combinator. Button 1 on the Combinator turns the B Curve on or off. This means that when you press button 1, it creates all kinds of weird sound morphing (or pitch morphing) to the sample, based on the position of the Rotary 3 knob.

Thor Grain Sampler: This Combinator uses the Thor’s LFO in place of the Subtractor. This isn’t that big of a deal or much of a change. But what’s nice about the Thor is that you can map the Thor’s Sequencer Curve 1 to affect the Oscillator Pitch of the Grain Sampler. Turning on Button 1 on the Combinator starts Thor’s sequencer to Run and provides some Pitch shifting to the sample. The added benefit of using the Thor is that you’re not limited to using the Global parameters. Since the Thor Gate is always on, you should be able to utilize any of the Thor parameters to affect your sample sound. You just need to program them in the Modulation Bus Routing System (MBRS).

Triple Thor Grain Sampler: This Combinator layers 3 Grain Samplers together, all playing different samples. The curves on the 3 Thor’s are all different, and the Mode of the step sequencers in them are set to play randomly. This creates a lot of pitch variation when you press button 1 on the Combinator. Instead of Rotary 3 and 4 affecting the Attack and Decay of the Grain Samplers, I set them to control the level of Sample B and C respectively through a line mixer at the top of the Combi stack. This way, the sample you add into the “Sample A” NN19 is always playing at full level, while Sample B and C’s levels can be adjusted (I didn’t want to give up the functionality on either of the first two rotaries, so that’s why Sample A is always at full level. However, you can create a sequencer track for the Line mixer and adjust the level via automation in the sequencer if you like). Try adjusting the programmer settings on the first two rotaries if you want to have the various samplers playing at differing speeds and at different index points. This can create some pretty elaborate sound designs.

As a final tip, you can try automating the Rotaries for any of the Combinators to randomize things. I would also suggest you read a great article by Lewis72 on the art of Granular Synthesis on his blog. He also created a very nice grain sampler which you can download for free. If you find any other ideas out there on the web on the art of Grain Sampling within Reason and Record, please feel free to post them here in a comment. And if you find these useful or create something interesting with them, please let me know. I’d love to hear how you can use these in your own work. All my best!

Panning to Punch out your Mix

Kevin Parks is a former architectural designer, artist, and boatbuilder with a life-long love of music. Learn how he uses Panning in Record to punch up his mixes, giving them enough sonic space to have a fighting chance.

Your mastering will go a lot better when your mix is fine tuned.

These are some procedures that have evolved for me through time, advice, and experience. Everyone’s work flow is different, but we are all trying to solve the same sorts of problems, so I hope what follows will add something to your bag of tricks.

Before adding a lot of FX to try to punch out a mix, there are some things I like to do to give my mixes enough sonic space to have a fighting chance.

Working with Audio

First of all, since Record gives us audio capability now, let’s start with audio.

For all audio recording, I want to get the cleanest signal possible going into my computer.  Electronic noise takes up space better used for actual audio content.

I spent weeks routing and re-routing cables, getting rid of bad connections, separating all my power cords from my audio cables, and gain-staging to get the cleanest signal I could going into my computer.

While my input signal is *much* improved, it isn’t perfect, and electronic noise is cumulative. So if you mix a lot of tracks, each with a little noise, it adds up. If you don’t have noise reduction software, what can you do?

One thing you can do about that in Record is to use the razor tool and cut out the silent stretches in each audio track.  That will eliminate your hardware’s noise profile, at least from those stretches.  Nothing worse than teaching people’s ears how to tune into the static, just as they are ready for the music to start. This can make a really surprising difference. Noise can hide rather nicely within the audio content when the listener isn’t being trained how to hear it.

So now that we have gotten off to a good start by getting rid of obvious  problems with the audio tracks. Now what?

Next step , before adding a lot of FX to the mix, is to make sure to give all your tracks a place to be in the mix,  their own sonic space. No sense to start cutting freqs with EQ to solve problems that will go away with proper panning.  So start out with panning before using EQ.

To pan your tracks well, the first thing to consider is what goes center stage?

Be careful not to stack too many things in the center. 

Keep in mind that bass  frequencies are non directional to a great extent, so try to avoid panning low freqs very far if at all. The farther you pan a low frequency track the muddier your mix will get. (I have sometimes panned a bass and a kick a little bit, say 10-15%, and then gone back later to help separate them with some judicious EQ work.)

Separate freq ranges work OK together in the center, but if the freqs are too close to each other it will get “crowded” very quickly.  Think in terms of low, medium and high frequencies, and choose what  tracks you will stack in the center. Then  preview just  those tracks in your center channel.  You can try out different instruments until your center shines.

Next idea to remember:  The higher the frequency, the easier it is for it to sit farther from center. Since I use a lot of guitar tracks, I often balance the rhythm and lead guitars by placing them approximately the same distance from center, say 30-50%.

I like to continue to keep balance in my mix by pairing up higher freq tracks and placing them likewise the same distance apart. Higher freq tracks I place farther out than the guitar tracks. More often than not, it is better not to go all the way to 100% .  

Placing higher freqs farther apart is a good rule of thumb to start off with. I  get a sense of how many pairs I have and then divide up the space between pairs accordingly. Then preview different ideas; it’s fun, it’s free, and it’s going to improve your mix.

On the psycho-acoustic side, keep in mind that people tend to rely more on their right ear for things that they pay more attention to, so I like to place the lead somewhat, but not extremely, to the right. It helps hold peoples attention.

So remember,  you will need to do less fiddling with EQ when the tracks each have their own place in the sound field. Panning is powerful stuff.

Now, just to touch on EQ and Reverb:

OK, at this point,  panning has just given you the ability to place your tracks/instruments in different locations from left to right across the sound field. Then if there is a conflict, if  there is an instrument or track that is masking another one, then use EQ to tweak that  problem specifically.  Using a bass track and a kick drum as an example, solo those two tracks and tweak the EQ gently on each  until you can hear them both clearly. (Research this aspect if necessary.) 

Apply reverb last: Now I evaluate where I need/want reverb. Reverb will push a track farther back in the mix.  Sometimes you might need some reverb on a guitar track to help it cut through the mix. I often like to give my guitar tracks an ethereal feel with reverb. Avoid using reverb on low freqs; it makes muddy, harmonics. Reverb is much more pleasant and clean when used on higher freqs.

Once in a while I find that a *little* reverb applied globally to the finished song, can help integrate the tracks. Be careful though. If you are having to do very much of that, chances are that there is a track that needs more attention.

That’s all for now.  Knock ’em out, baby!


Kevin Parks is a former architectural designer, artist, and boatbuilder with a life-long love of music.  Translating uncharted realms of emotion using rhythm, space, and harmony..weaving real world instruments and software synths into experiential ambient synthesis. You can visit his website at http://www.soundclick.com/ambientsynthesis where he showcases several of his musical works.

My Reason/Record Wishlist

Reason and Record together constitute one of the best all-in-one music creation and sequencing packages. I’ve tried out most all of the major DAWs out there, and I keep coming back to Reason and Record time and again. So here is my wishlist of items I’d like to see in future versions of the software; in no particular order.

Let’s just say Reason and Record together constitute one of the best all-in-one music creation and sequencing packages. I’ve tried out most all of the major DAWs out there, and I keep coming back to Reason and Record because of a few things: a) it’s easy and intuitive. This is the biggest draw for me. b) it allows me a wide latitude in sound creation. Sure some of the FX are a little lacking, but nowhere else can I create my own setups in such a simplistic way without having to know any programming or high level math. c) It’s instant and quick. Yes, I’m a little ADD, and I just love the fact that Reason and Record caters to me. I can jump in and add midi and audio tracks in a snap. I can go with an idea and get sidetracked into all kinds of wonderful tangents. It’s great. d) Finally, it’s stable and light-weight. My computer isn’t struggling unless I have an insane amount of Thors packed into a project. Sure I’d love access to VSTs but not at the expense of stability. Besides, I could spend a lifetime alone exploring the factory soundbank alone (not to mention all the great refill packages out there). So why go further.

All that being said, here is my wishlist of items I’d like to see in future versions of the software, in no particular order. I’m sure there are lots more that could be added, and this list is not meant to be exhaustive. It’s just a few of the major things I’d like to see in future versions.

For Record:

  1. Automatic Routing of the Reason mixer channels to the Record Main Mixer. Right now you can bring Reason songs into Record, but there is no mixer routings set up. You have two options: delete the mixer in Reason and then open the song in Record so that all devices get their own channels, or you can manually reroute in Record once your song is brought in. A user preference or dialog which opens and allows you to select the mixer you want to automatically route to separate channels should be available so that bringing a completed Reason song into Record maps all the Reason channels to new channels on the Record main mixer. Maybe in the next version PLEEEEEEZE!
  2. Comping for Midi as well. The new Comping Feature is great. Love it. However, it is reserved for Audio Lanes. If you want to do something similar in Note Lanes you have to use the New Dub / New Alt features. Overall, these two concepts are very similar. I’m wondering if there is a way to be more consistent with implementation. Why can’t we implement comps, for example, in note, and even in parameter automation lanes, and then do away with the new dub/new alt features altogether. This would make recording in loop mode in a Note Lane so much easier and workable. When you’ve laid down 4 or 5 takes in a note lane, you go into comp mode where you can have all the note lanes right there automatically waiting for you. The only real difference would be that in note lanes, you can have overlapping takes (audio and parameter automation can’t do this). But everything else would be pretty much identical for all types of track lanes. Seems a little clunky to have different methods which essentially do the same thing.
  3. Split Performance Controller Data into Separate Lanes. Would be nice to have the ability to split performance controller/note data from each other into two different clips on two different lanes. Right now it’s a tedious process of copying clips, deleting notes out of one clip and then deleting performance automation out of the other.
  4. Record Performance Controllers as automation. Would be nice if you can elect to record the “Performance Controllers” (Pitch Bend/Mod/etc) as automation instead of performance. Currently you have to record once for the notes, and once for the performance to get them on separate lanes OR you have to draw in the performance controller data. There is no way to click a button to record performance controllers as automation lanes (opposite to the “Automation as perf ctrl” button).
  5. Tempo automation/changes on a per-track basis. In the documentation on Page 161, it says “Automating tempo is done much in the same way as with other parameter automation. You record the tempo changes by changing the Tempo value on the Transport Panel. When you later play back, audio clips will automatically be stretched to follow the tempo changes (unless you have disabled stretch for the clips – see “About disabling Stretch for audio clips”). Note clips and automation clips will always follow tempo changes.” It woud be nice if you could opt to leave note lanes at the current tempo, thereby being able to change some note lanes or clips to a different tempo, and leaving other note clips / lanes as they are. This would be a nice advance in both Reason and Record.
  6. Display Masked Audio portion in the Audio Clip. In the documentation on page 169: Nice touch showing whether or not a clip has masked notes/areas! Nice improvement (Having this same feature added to audio clips would be nice as well). What would be even nicer is if masked areas were displayed the same way muted clips are displayed in the Arrange view, as there is really very little difference between the two. In fact, if you take this idea a step further, when you resize a clip (making it smaller) so that a masked area is created, it should automatically create the masked area as a new muted clip separate from the “active/visible” clip. When you resize back, it should automatically join the clips again. I think that would make sense, but I’m not sure if this would have undesired consequences in other places? But off the top of my head, it’s a suggestion. The benefit is that you would then be able to visualize how far the masked area goes in a given direction. Right now, there’s no visual indicator to show how far and wide the masked area is. It’s worthwhile to note that this is already pretty much implemented in the audio comp tracks. Now if we could bring that into the main arrange view, we’d be golden.
  7. Synch Reason / Record Favorites. I wish there was a way to automatically import your reason favorites into the Record Favorites and synch them together. I don’t like having to recreate all my favorites over again. It’s one of those time-wasters.
  8. Cut Note Events in the Clips. It might be nice to have the option when cutting clips, to cut the note events in the clip as well (if the note goes between split clips). This should be a toggle button on every track. Sometimes you DO want to split the notes, and it’s easier than going into edit mode for each clip and cutting them manually one by one (especially over several tracks). By doing this, you could select which tracks split notes and which don’t. Would be ideal if you are cutting several clips along multiple lanes, or inserting bars between locators.
  9. Scale Transposition of Notes. This is imminently more useful than chromatic transposition of the notes. Having both in the software would be a wonderful addition.
  10. Multiple Left and Right locators. When using Record to master a series of tracks, it would be nice if you could set things up with L/R locators and bounce all the tracks at once instead of bouncing them one at a time.
  11. More Training/Tutorials and videos included in the user documentation. At 850+ pages, the manual is getting absurd. Time to start moving with the times. More creative and advanced documentation please!

For Reason:

  1. Adding some new Effects, especially a glitch box such as “Glitch
  2. Having the ability to Randomize the entire Matrix or Redrum device with one click of a button. Currently you have to create random patterns in each and every slot in all the banks, and then (if you want), you need to randomize the Steps AND Resolution. Having a button, which when clicked, allows you to select what you want to randomize on the matrix or redrum (steps / resolution / how many patterns, notes, curves, both notes and curves) AND also providing the ability to randomize percentage-wise (for example, randomize 10% gives you less randomization than 90%). This would turn a very tedious process into a simple one. Same thing in the automation lanes. How about random automation? This would be a godsend for glitch music.
  3. Combinator updates: In the Programmer, subdivide the right-click context menus into submenus (a la Thor modulation matrix menus). Also, adding an option for step increments for the Rotaries would be welcome. In cases where steps are needed, you could switch the Rotary to use steps. If you need the rotary as it is, you could switch it back. Also, give the user the ability to choose how many steps are required (up to 16 or 32 would be nice).
  4. Integrate ReCycle into Reason (or Record). Yes, Reason and Record are not considered DAWs, but when most other DAWs have slicing capability built in, it makes for a good justification to integrate this capability into the software.
  5. The ability to reverse midi and audio for backward playback. You can reverse a small sample in the NN-XT, but it would be nice if you could reverse the midi notes (and in record if you could reverse the audio) within the sequencer.
  6. Tap Tempo. This is important on so many levels.
  7. When in edit mode in the sequencer, providing the ability to move notes from one clip into another. Right now you need to combine the two clips, then move the notes around, then cut them up again. It’s very finicky to do this. Further to this, having the ability to see all the tracks while in edit mode is important if you’re trying to line up one set of notes or automation with another track. You can get around this somewhat by using the L/R markers, but it’s limiting.

Do you agree with these points? Is there anything in your wishlist that isn’t here? Anything else you want to see improved in Reason?

Distorted Guitar

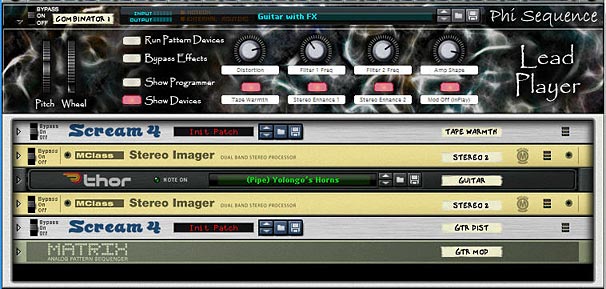
A distorted guitar I created with the use of a Scream and a Thor Synth. There are also a few Stereo enhancements that were added. I needed this type of sound for one of the songs I was working on.

Play Example or Download the File: distorted-guitar.zip
[ti_audio media=”251″ repeat=”1″]

Description: This is a distorted guitar I created with the use of a Scream and a Thor Synth. There are also a few Stereo enhancements that were added. I needed this type of sound for one of the songs I was working on, and it fit perfectly in my mix. Maybe you can find a use for it as well.

distorted-guitar

Features: For the Thor, the Pitch Bend is set to +/- 7 semitones. Mod Wheel controls the Comb Filter (Filter 1) Frequency. The  Thor Rotaries and Buttons aren’t mapped to anything, so you can play with those if you like. The nice part of this Combi is the fact that it uses a Scream to control distortion. On the Combi, you can control the following:

Rotary 1: Controls the amount of Distortion of the Scream (along with Parameter 2). The higher you go, the more distortion.

Rotary 2: Controls the Thor’s Comb Filter (Filter 1) Frequency. Lower = more cutoff, Higher = less cutoff.

Rotary 3: Controls the Thor’s Low Pass Ladder Filter (Filter 2) Frequency. Lower = more cutoff, Higher = less cutoff.

Rotary 4: Controls the Thor’s Amp attack and Release. Lower = faster attack/less release. Higher = slower attack/more release.

Button 1: Adds Tape Warmth from the first Scream (Bypasses the Scream or enables it)

Button 2: Turns on the first Stereo Enhancement (Widens up the Hi band greatly and Lo band a little bit). The button enables or bypasses this Stereo Imager.

Button 3: Turns on the second Stereo Enhancement (Widens both the Lo and Hi bands quite a bit). The button enables or bypasses this Stereo Imager.

Button 4: Turns the Guitar Modulation on or off. This is some modulation that was set up on the back of the second scream unit and since it’s controlled by a Matrix, you need to have the song in play/record mode to hear it. Otherwise, you won’t hear anything. So, for example, if you are simply playing the combi without setting the song in motion with the play button, the matrix won’t be triggered and you won’t hear the modulation. This basically adds a certain amount of randomness to the sound, which worked out well for one of my own songs. Otherwise, you can turn it off by pressing this button (keeping the button on).

Usage: Used as a Lead Guitar.

Other Notes: Use the pitch bend wheel to create some pretty realistic string bending (at least to my ears).

4 – Map Reason Songs to Record

Learn how to transfer all settings from one channel in the Reason Mixer to one channel in the Record Main Mixer. With this technique you can properly tranfer any song with any mixer settings from Reason to Record.

As a beta tester, when I got Record I was super excited. I promptly downloaded and installed, and went to open it up. I was salivating by the time all three record windows were opened stacked in front of me on my screen. The “AHHHHH” moment. A halo emanated around my computer. Come on, you know what I mean. I first saw the double rack and was amazed. Then I looked at the main mixer and my jaw hit the ground. Beautiful! A work of art. now I can finally work on making my tracks truly sing.

Then I opened a Reason song. And everything that I had hoped and dreamed got shattered in one swift moment. What? My mixer with 9 tracks and automation applied to the sends, EQ settings, panning, levels got reduced to a measly single track attached to the new main mixer in Record. All my earlier praise now turned to dismay.

I’m sure most of you know exactly what I mean. You’ve been there. You’ve gone through the same agony. So what do you do now? Curl up in a ball? Send Record back to the Props? Well, you could do that. Or you can read this tutorial and learn how to properly transfer all your settings from the 14:2 mixer in Reason into the SSL Main Mixer in Record. It’s not that hard, as you’ll see. But it is a little time consuming, depending how many tracks you have. And I’m not going to undertake doing an entire song mix. What I’ll do is show you how to transfer all settings from one channel in the Reason Mixer into one channel in the Record Main Mixer. Once you have that down, you can do any number of channels, no matter how complicated the song. So let’s get busy.

Before starting, I’ve put together a zip package with the project files. It contains the Reason song with a single channel and the Record version of the same song once it was converted: Download the Project Files.

It should be noted here that if you have not yet done any serious mixing in your main reason mixer, and don’t have any automation set up for any mixer parameters AND don’t have any CV setup for the Pans/Levels on the back of the mixer, then you can safely open the Reason song in Record and delete your main mixer. Then you can select all the (now disconnected) devices, right-click, and choose “Auto-route Device.” This will create Mix Channels for all the devices. Depending on how creative your connections were to begin with, you may find a few devices that require some custom routing after you do this. [thanks to Mattpiper from the Props forum for this excellent tip]

However, if you already have your mix set up with a lot of automation applied to the Reason main mixer device, then read onward, because this article is for you!

  1. First thing, open the Reason song, mixer and all, in Record.
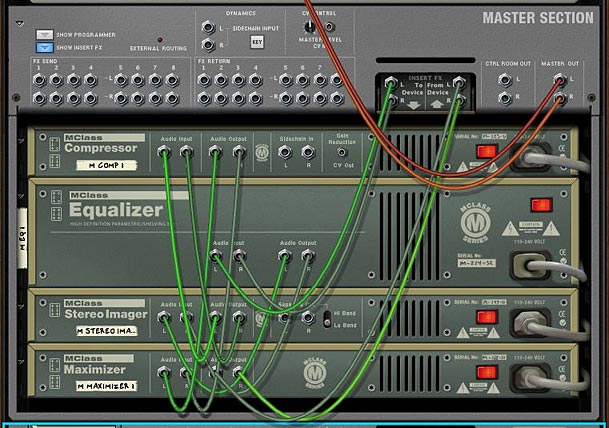
  2. Next, you’re going to have to move any mastering Combinator or devices into the Master Section in Record. Let’s say we have a “Dance” Combinator inserted between the Reason Mixer and the Hardware Interface. Select all the devices in the Dance Combi and move it into the Master Section. Flip the rack around, and move the “From Devices” and “To Devices” cables from the Dance Combi to the same ins/outs of the Master Section. Then delete the audio ins/outs from the dance Combi, and delete the Dance Combi altogether. You don’t need it anymore.
  3. Adding the mastering Combi into the Master Section
    Adding the mastering Combi into the Master Section
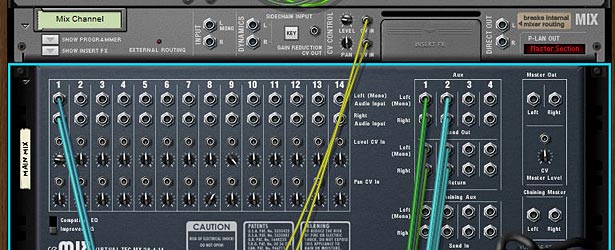
  4. Now let’s assume you have a Matrix set up to control the Panning of the channel, and another Matrix set up to control the Level of the channel. You’ll have to flip to the back of the rack, and move the CV inputs from the Reason Mixer to the CV inputs of the Mix channel. Then adjust the pots to the same settings they were at in the Reason Mixer. Level and Pan is done. Note that if you have several channels set up in your song, you’ll have to create the same number of Mix devices in Record.
  5. Pan / Level CV rerouted through the Mix Device
    Pan / Level CV rerouted to the Mix Device
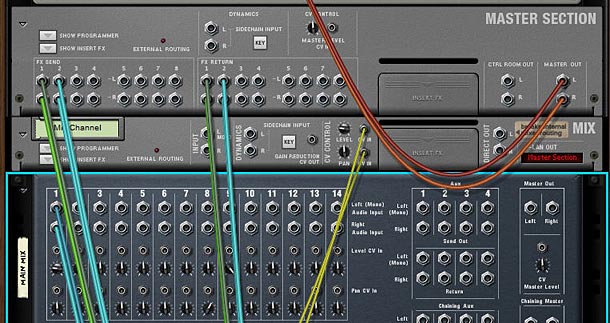
  6. Next, let’s move the Aux Sends/Returns from the Reason Mixer to the Master Section’s Sends/Returns in Record. This is pretty straightforward. Plus in Record you can now set up 8 Aux sends if you want, which is more than enough power. But in the example I’ve provided there was a Reverb and a Delay set up. So we’ll move those over now.
  7. Send / Return cable rerouting to the Master Section
    Send / Return cable rerouting to the Master Section
  8. Our last cable job is to move the Lead Audio Cables from the first channel in the Reason Mixer over to the Main L/R input on the Mix Device. You can now flip the rack around. You’re done with the cabling.
  9. Cabling the Main Audio outs from the Lead track
    Cabling the Main Audio outs from the Lead track to the Input on the Mix Device
  10. Now let’s move to the Record mixer. Press F5 and F6 at the same time to show both the rack and the main mixer in record. If your channels have any settings that ARE NOT automated, but are static for the entire duration of the song (and are different from their default setting), then you can adjust those settings on the main mixer channels in Record. For example, if a channel is set to a level of 90 in the main Reason mixer, and stays at 90 through the duration of the entire song, then you can change the dB level on the Main Record Mixer’s channel to -2.8 dB and leave it there. If the Level stays at 100 for the duration of the entire song in Reason, then you won’t need to change a thing in Record, because the level is already set to 0.0 dB. Make sense so far?
  11. At this point, you’ve probably realized that the new Mixer in Record use decibel values, not midi values. This is a good change, however, it makes it a little difficult to translate levels and send values from the old mixer. So I put together this little chart in PDF format that you can download to see the values. You may not get to use those exact values shown in the chart due to the jumps between values in the Record Mixer, but you can get pretty close. Thanks to Selig on the Props forum for the chart values. Download the Midi to dB Conversion Chart. Note that the chart is also included in the Project Files zip above.

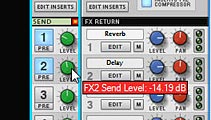
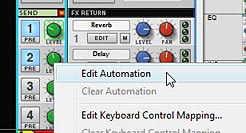
  12. Next, turn the sends 1 and 2 on in the Main Mixer’s Send section in Record. Since the example file has automation set up for these sends, right-click and select Automate. Do this for both sends. However, don’t move to the sequencer just yet. Instead, Look at the other elements on the channel that are automated, and do the same for those as well. So in our example, the solo and level parameters are automated, so right-click and select “Edit Automation” for those two parameters as well.
  13. Turning on and adjusting the Send settings
    Turning on and adjusting the Send settings
    Selecting "Edit Automation" for all parameters which were automated in the Reason Mixer
    Selecting "Edit Automation" for all parameters which were automated in the Reason Mixer
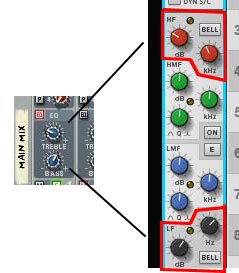
  14. One last thing in the Mixer. If you’ve adjusted the Reason Mixer’s EQ settings for Bass and Treble, you’ll have to map that over to the Record mixer as well. The best way to do this is to adjust the HF (High Frequency) and LF (Low Frequency) settings in the EQ section of Record’s main mixer. This is a shelving EQ which controls your bass and treble. Note that it gives you more control over the Bass/Treble settings that you’d find on the 14:2 Mixer in Reason, because it allows you to dial in the proper frequency range to affect. So you’ll have to use your ears for this one. For more on the EQ settings found in the new Record Mixer, you should read Ernie Rideout’s great article: Tools for Mixing: EQ (Parts 1 and 2).
  15. Converting the Treble and Bass EQ settings
    Converting the Treble and Bass EQ settings
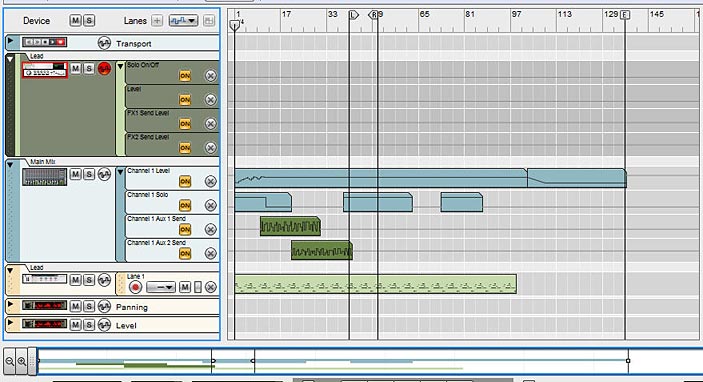
  16. Finally, we move to the sequencer. Press F7 on your keyboard to open the Sequencer. Notice that you have the Mixer with all the parameter automation, but since you selected “Edit Automation” for all those same parameters in Record’s mixer, you have all those lanes set up under the Mix Device. Now it’s just a matter of moving the clips from the Mixer into the proper lanes in the Mix Device. To make things easier (if your song is very long), expand the view by dragging the view window along the bottom of the sequencer all the way to the right, or click the “Zoom Out” magnifying glass at the bottom-left in the horizontal scroll view.
  17. Zooming out to see the whole track in view along the timeline
    Zooming out to see the whole track in view along the timeline
  18. When you move the automation over, some lanes may show “Alien Clips.” To convert the lanes to proper automation, right-click and select “Adjust Alien Clips to Lane.”
  19. Adjusting Alien Clips to Lane
    Adjusting Alien Clips to Lane
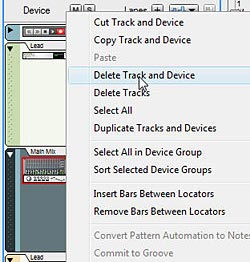
  20. And last but not least, right-click on the Mixer device in the sequencer and select “Delete Track and Device.” You won’t need it anymore. You’ve now converted your Reason song into Record and are free to mix and master your song using the SSL Mixer in Record. The sound should be pretty darn close to the original mix in Reason.
  21. The Final step: Deleting the Mixer
    The Final step: Deleting the Mixer

Be sure to save your song as a .record file. You’ll still have the original Reason song saved away which you can open as a reference, as opening Reason songs in Record does not overwrite your Reason song. It leaves it as is. The really nice thing about the Record mixer is that it gives you a wide array of other options which cannot be found on the Reason mixer, such as High and Low Pass filters, Compression, and a Main Compressor you can apply to the overall mix. More Sends, and handling of rotary and button controls for your devices makes this mixer a huge and powerful addition to your Reason software. So go forth and convert. It takes some time, but the more you do it the better you’ll get at it.

What are your experiences with song conversion from Reason to Record? Did you find this helpful? Is there anything I’ve missed? Please comment and let me know.

Top 10 Reason Pitfalls

This post is intended to answer some very common pitfalls that new Reason recruits have when it comes to using the software. Let’s face it, we were all new once, and we all had the same questions. So let’s get all of this out of the way right now so that we never lock our keys inside our cars again.

This post is intended to answer some very common pitfalls that new Reason recruits have when it comes to using the software. Let’s face it, we were all new once, and we all had the same questions. So let’s get all of this out of the way right now so that we never lock our keys inside our cars again.

The Top Ten list below is an attempt to answer the most frequent questions that are heard time and time again, and to help you in the event you get caught up in the program and can’t untangle yourself. Use it as a checklist before posting on the Props forum or elsewhere for answers.

  1. Coming in at number 1 is the Midi In/Out and Audio In/Out question. Reason is Midi In / Audio Out. Plain and simple. You can’t directly record audio into Reason (try using Audacity to do that – it’s a great free audio editor). And you can’t use Reason to output to Midi of any kind. It should be noted, however, that you can record something in Audacity or any other editor for that matter, and then bring the audio into Reason as a sample in one of the Sampler Devices in Reason (the NN-19, NN-XT, Dr. Rex, or Redrum). It should also be noted that if you want to bring audio into Reason, Propellerhead offers “Record” as a solution. As a third and final alternative, you can ReWire Reason as a slave to your favorite DAW, which essentially opens up the possibility of using Reason devices as VSTs within the DAW environment (though they are NOT VSTs per say, they just act like them). This also allows you to tempo synch Reason to other instruments in your DAW environment. You also can’t use Reason to control external midi instruments. It just doesn’t do it. Keep thinking Midi-In/Audio-Out and you’ll be safe in understanding the Reason workflow.
  2. HELP! There’s nothing displayed in the Browser. I can’t see any samples or patches. Did I lose or erase them? Relax, grab a cup of coffee and listen carefully. You didn’t lose them and you didn’t erase them. Chances are that you opened the File Browser from a specific device (from the little folder icon on your device), and you started to navigate through the other folders in the Factory Sound Bank. When you do this, the Browser is only going to report back any samples or patches that can be loaded into the device in question. This is a feature, not a mistake, as it’s meant to keep the browser focussed on only the right areas. For example, let’s say you create an NN-XT and click the patch browser icon — little file icon — to open the Browser again. Then you navigate to the “Combinator Patches” folder. You won’t see anything, because there are no NN-XT patches for the Browser to report back to you. Here’s the fix. Look at the top right side of the File Browser where it says “Shows: NN-XT Sampler Patches.” Click the drop-down and select “All Instruments.” You’ll now see all the Combinator Patches, as well as any other instrument patches that are available. Furthermore, if you select a Combinator Patch after doing this, the NN-XT device you were working with changes to a Combinator automatically. Note that it’s usually a good idea to right-click in the rack and select Create > Instrument or Create > Effect when creating new devices. This way, when the Browser opens you’re not limited to a specific set of patches for a specific device. Note also that the File Browser does distinguish between an instrument and a device, and this is hard-coded into the software. So you can’t truly see all patches and samples at once. You can only see “All Instruments” or “All Effects.”
  3. How come I can’t automate the parameters in an NN-XT or elsewhere, or rather, how do I know what I can and can’t automate? First off, you can automate any parameters that are in the main NN-XT device (Global and Performance controls at the top). You cannot automate any of the parameters you find within the Remote Editor. This is because automation would get out of control. Think about this: if you have 100 samples and each of them have separate parameters within the Remote Editor, that’s way more parameters than your computer could handle if you were to start automating them. So think of this as the price for power. You have complete control over all samples, but you just can’t automate them (note that you can adjust them in real-time and during performances). As for finding out what can and can’t be automated, there are 2 easy ways to figure it out. First, you can right-click on any parameter and look at the context menu. If you see “Edit Automation” and it is available, you can automate it. If you don’t see “Edit Automation” or it is grayed out, then you can’t automate it. Alternately, click on the device in question, then go to Options > Remote Override Edit Mode. You’ll see small blue downward arrows over all the controllable (ie: automatable) parameters. Anything you can control from a controller, you can automate in the sequencer. Once in edit mode, you can click any other device to see their automatable parameters as well.
  4. Why can’t I record anything into “x” device? Why don’t I hear anything? Why is there no sequencer track? This is most likely because you are trying to record parts for a device that is inside a Combinator. By default, when you create a Combinator, the Combinator gets a sequencer track. But devices that are combined within the Combinator do not. If a device is created on it’s own (not part of a Combinator), it will automatically get its own track. To record parts into a device which is nested inside a Combinator, first select the device inside the Combinator (the device you want to record on a sequencer track). Right-click and select “Create track for ‘x'” which will create a sequencer track for the device in question. Then you can go into the sequencer, give the track focus (if you just created it, it will already have recording focus), and start recording parts for it. This goes for all instrument devices, FX devices, and mixers (basically everything except the spiders).
  5. I’m recording via my controller, but nothing is recorded in the track on the sequencer. This could be due to the fact that you didn’t give the right track Recording focus (Enable Recording) on the track in question. First, look to the sequencer and see if anything was recorded. Do you see a clip on any of the tracks that was just generated. If so, that’s the track you’ve been focusing. To enable recording on a sequencer track, click the circle located next to the device thumbnail to the left on the sequencer track. Also, click the track itself to make sure it’s highlighted. Then click record in your transport and start recording. You should be all set.
  6. I added an Arpeggiator and adjusted settings, but it’s not affecting the sound. This is another common pitfall. The Arp is much like the Matrix in that it doesn’t generate any sound, it is used to sequence another sound device, but your parts need to be located on the Arp track, not the sound device track. You probably have your clips on the sound device track in the sequencer. You’ll hear the sound device, but the arp won’t be affecting it. Just move the clips to the Arp track and you’re done. Once your parts are on the Arp track, you’ll hear the sounds. If you want to make the notes permanent, give your sound device track focus in the sequencer, then go to the rack and right-click on the Arp device, and select “Arpeggio Notes to Track.” Don’t forget to delete the clips on the Arp track or delete the Arp device and track entirely, otherwise you’ll be doubling up on the sound.
  7. I can’t load samples or Patches in my NN-XT. The NN-XT is divided into two sections: 1. the top section is the Global Parameter section for the entire device. Here you can load patches, but not samples. 2. The Remote Editor. If you click the tiny drop-down arrow at the bottom left of the device, you’ll open the “Remote Editor” which is similar on the RV7000 Advanced Reverb. Basically, this opens up the sample editor. Here you can load your samples, but not patches. It’s important to note that the NN-XT and NN19 are the only devices where you can load both patches and samples, and it’s important to note the different areas where each can be loaded.
  8. The Matrix doesn’t start or stop where I want it to start and stop. The Matrix can be thought of as a mini-sequencer. It’s monophonic so it will only play a single synth voice if you are connecting the notes via CV to another device. But another area that trips people up is the fact that it is synchronized to the timing and beats of the song tempo when playing in Real-time. It starts and stops based on the bar of your song. It cannot switch patterns between bars. It needs to follow through to the end of a bar before it can adjust to a new pattern. For this reason, it’s important to think through how you want your patterns to play. You can insert up to 32 patterns for each Matrix device, so if you need things to switch differently, it pays to have a plan and insert your patterns as you want them played for a full bar of your song (at least as much as a bar). The other alternative is to speed up the tempo of your song or track as fast as you can. Then the switching can be extremely quick between your patterns. It should be noted that you can have the Matrix start and stop as you wish if you add pattern clips on the Matrix Sequencer track. What I’m referring to here is Real-time use of the Matrix device.
  9. I am not hearing anything from the Vocoder I just inserted. The BV512 Vocoder is a special FX device which requires two sounds: 1. a Source or Carrier and 2. a Modulator. The Carrier signal is Stereo and is used as the main sound source. The Modulator, on the other hand, is monophonic and requires only a single input. If you need to cable a stereo sound into the Modulator, you can do so by spidering the left and right outputs of the sound together in a spider audio merger, and then send the output into the Modulator input. The modulator is what affects the sound. It pays to have a Modulator signal that has a lot of harmonics, while the carrier can be any kind of sound. The best way to see for yourself is to set up a nice lead synth connected to the Mixer. Then record your parts onto the lead’s sequencer track. After this, cable the lead outputs into the Carrier inputs on the back of the Vocoder. Then add a Subtractor and cable the Subtractor’s output into the Modulator input on the Vocoder. Play with the settings on the Subtractor to hear how the Subtractor is affecting your lead. You can get some really nice sounds out of this type of setup, and the Subtractor is a good Modulator with a lot of options. Of course, don’t let that limit you. You can use any sound as a source and any sound as a modulator. So experiment until you find some useful setups. After a while, you’ll instinctively figure out what works best for the Vocoder according to your own tastes.
  10. I lost the data on my hard drive / My hard drive is corrupt / My computer freaked out and I can’t find my songs. This isn’t a Reason pitfall, but it is most certainly important no matter what music you make or what software you use. So I’m adding it here. Make sure you first verify with someone who knows all there is to know about computers (your local IT guy, geek squad, brother-in-law super computer genius, or some other computer freak) that you did indeed lose the data on your hard drive. If that’s the case nothing can help you now. You’ve lost your data. You’ve lost your music and songs, and you’ll need to get a new hard drive or reinstall windows or something along those lines. Once you’re back in business with your computer, go get your backup drive, CD, or DVD media that has all your songs on it and transfer them back onto the computer. Oh wait. You don’t have a backup huh? Well then I think you’ve learned a very valuable lesson here right? ALWAYS ALWAYS ALWAYS BACKUP YOUR SONGS. Here’s my strategy. First I have a single folder called “Reason” and under this folder I have subfolders for songs, refills, output, misc, etc. Keep this folder outside the realm of the Reason folder (when you upgrade reason, you wipe out the reason folder, so you don’t want your files wiped out. This prevents that from happening). Back up the entire folder once a month on two different formats (I back it up onto a portable hard disk AND DVD media). The chances of both hard drives crashing and all my DVDs breaking at the same time are astronomically slim (incidentally I keep all the DVDs in a firebox just in case — call me paranoid. That’s ok with me ;-). I back this folder up in both places once each and every month. I even have a reminder setup in my email so I don’t forget. Every first of the month, it takes me about 1 hour. Call that hour an insurance policy against what could take me 5 years to remake all my songs, sounds, etc. and it’s doubtful I could remake it the exact same way twice. So it’s a good bargain if you ask me.

Do you have any pitfalls that weren’t covered here? Do you think there are other “common” ones that weren’t mentioned?

3 – Filtering Audio through Thor

In this project I’m going to demonstrate a few ways you can use Thor’s filters, FX (Delay and Chorus), and LFOs creatively by routing any of your audio sources through Thor. This can be a great way to punch up some drums or create new innovative sounds from any of the synths. So let’s start our exploration.

In this project I’m going to demonstrate a few ways you can use Thor’s filters, FX (Delay and Chorus), and LFOs creatively by routing any of your audio sources through Thor. This can be a great way to punch up some drums from a Redrum, or to create some new innovative sounds from any of the synths. Furthermore, you’re not limited to using only 1 filter. You can connect your audio through a series of Thor devices to gain access to more than 1 filter at a time. So let’s start our exploration.

Basic Audio Filtering through Thor:

  1. Open Reason. In the rack create a Combinator and inside the Combinator create a Thor, initialize the patch, and then create a Redrum underneath. Add a drum kit and create a simple pattern with a kick, high hat and a few other drums. Don’t make it too complex. Use about 4 or 5 drum samples to create the pattern.
  2. With all the hard work done, now we’ll do some routing. Flip the rack around and route the Left and Right audio output from the Redrum into the “Audio In 1” and “Audio in 2” on the Thor.
  3. Basic cable routing to pipe audio through Thor
    Basic cable routing to pipe audio through Thor
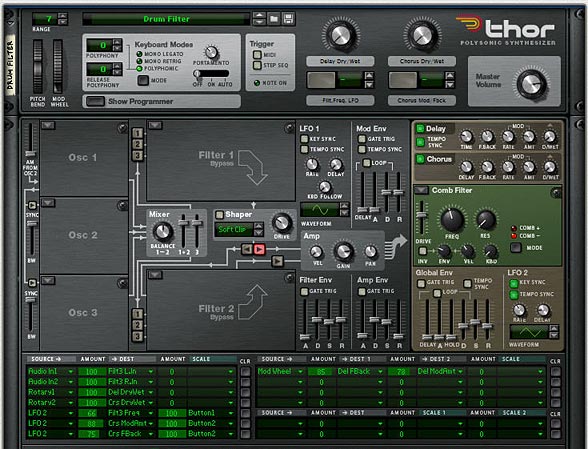
  4. Flip the rack back around, show the Programmer for Thor, and uncheck all the little green lights in the “note” section (the section that is dark and not light brown). Also, turn the analog osc.1 off, and bypass the Ladder Filter (Filter 1). Then turn off the routing between Osc.1 and Filter 1 (the little red “1” light). In the top device section, set Polyphony and Release Poliphony to “0” and turn off both trigger lights (Midi and Step Seq). The point is that you don’t need any of that mumbo jumbo.
  5. Add a Filter into the third Filter slot of Thor. A Low Pass Ladder or Comb filter works well with Drums, but you can use any filter you like.
  6. At this point, most people will press play and think that they should be hearing something. But we’re not finished yet. We need to reroute the default Thor audio signal. Here’s how to do that: In the MBRS (short for “Modulation Bus Routing Section”) of Thor, in the first row on the left, click on the “Source” and select the bottom-most option “Audio Input > 1” then set the “Amount” column to “100.” Click the “Destination” column and select “Filter 3 > Left In.” On a new row, do the same thing, but for Audio Input 2 as a source and “Filter 3 > Right In” as the destination.
  7. The MBRS at the bottom of Thor
    The MBRS at the bottom of Thor
  8. Now press play. You’ll hear the drum pattern, which is routed through Filter 3 in Thor, then to the Chorus and Delay section, and back out to the mixer.
  9. Optionally, you can use the FX (Delay and Chorus), or route the LFO2 to affect any of the parameters in Filter 3 or the FX. One thing I like to do is turn on both the Delay and Chorus. Then in the MBRS section, program the two FX Dry/Wet parameters to the two Rotaries. If you use amounts of +100 for both, then turn the actual Dry/Wet knobs on the FX all the way down, you create a controllable Delay and Chorus effect via the Rotaries. I also use the Mod wheel to control the Filter 3 Frequency or Resonance or both. That way, it’s all controllable. If you want to push it further, you can assign the LFO2 to affect the Frequency or Resonance via one of the Thor buttons. This all gives you a great degree of control over affecting the sound. Download the example file (at the bottom of this post) to see these routings.
The front of Thor, with all routings for the FX and LFO2

First, here’s an example of the original sound:
[ti_audio media=”177″ repeat=”1″]

Second, here’s an example with the audio filtered through Thor (remember, you can adjust the filter to taste):
[ti_audio media=”175″ repeat=”1″]

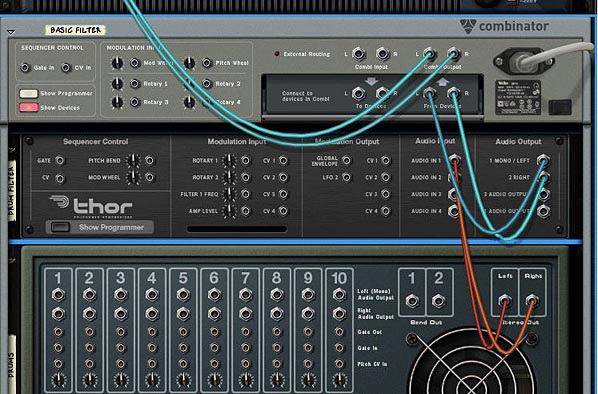
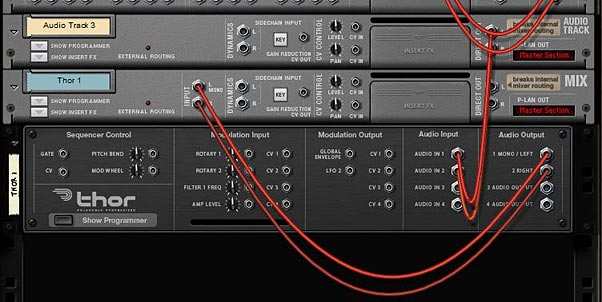
As an aside, if you’re using Record and have an audio track, you can still route your audio through Thor, by cabling the direct output of the audio track to the Thor inputs 1 + 2 as shown below.

Routing an audio track in Record through Thor

Audio Filtering through a Series of Thor Filters:

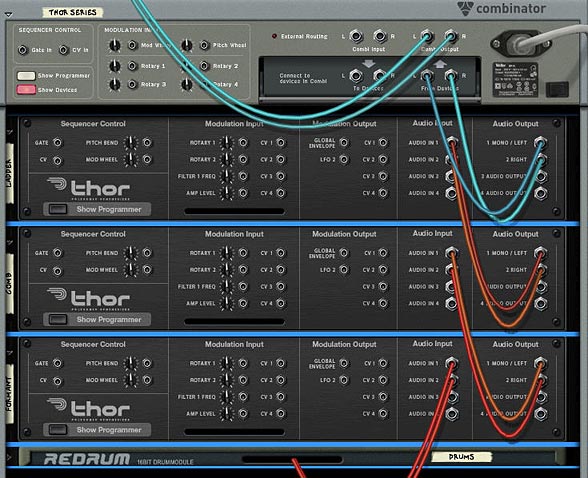
By now, you will have noticed that plugging audio through Thor gives you access to the global section (the parts of Thor that are light brown). What if you want the use of more than one filter. Let’s say you want your audio path to move this way: Audio Device > Formant > Comb > Low Pass Ladder? Well, it’s really quite simple. Follow the above directions to set up your first Thor, and then build upon that as follows:

  1. Flip the Rack around. Right-click over Thor and select “Duplicate Devices and Tracks.” Do this one more time. You should now have 3 Thor devices.
  2. Move the “Audio In” cables from the first Thor to the bottom-most Thor’s “Audio Ins” and then cable the “Audio Outs” from that bottom-most Thor into the Thor above’s “Audio Ins.” Finally, cable the “Audio Outs” from the middle Thor to the “Audio Ins” of the top-most Thor.
  3. Flip the rack around again to see the front. Then switch the bottom-most Filter 3 to “Formant” and top-most Filter 3 to “Low Pass Ladder.”
  4. Press Play and adjust the three filters to taste. It might help to bypass the filters on the top two Thors. Adjust the bottom filter, then turn the middle filter on, adjust it, and then finally turn the top Thor filter on and adjust it. That’s all there is to it. 3 filters affecting one sound source.
Routing Thor filters in series to affect a sound source

Example of the Filters in Series:
[ti_audio media=”178″ repeat=”1″]

Audio Filtering separate Drums through Thor:

All of the above is fine and dandy, but what if you don’t want all the Drums filtered the same way. Let’s say, for example, you want the Bass Drum to be filtered by a Low Pass Ladder filter and the High Hat to be filtered through a High Pass in a State Variable filter. Well, without getting too complicated, here’s what you do:

  1. Follow the steps to create a Basic Thor Filter above.
  2. Create a Line Mixer 6:2 and move it to the top of the Devices in the Combinator.
  3. Flip the Rack around, and delete the audio output cables from the Redrum.
  4. Duplicate the Thor device (so you now have two Thor devices under the Line Mixer.
  5. Move the Audio Outputs from the first Thor into the Master Audio Outputs of the Line Mixer.
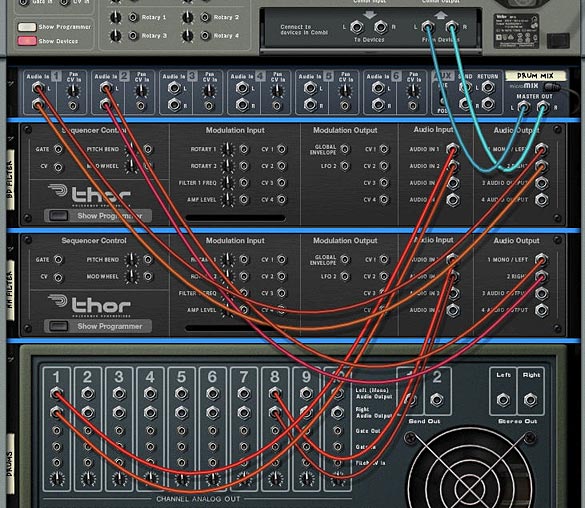
  6. Cable the Bass Drum Audio Outputs from the Redrum to the first Thor’s Audio Inputs 1 + 2
  7. Cable the High Hat Drum Audio Outputs from the Redrum to the second Thor’s Audio Inputs 1 + 2
  8. Cable the Audio Outputs from the two Thors into Channels 1 & 2 on the Line Mixer.
  9. Routing two separate filters to control the Bass and High Hat Drums
    Routing two separate filters to control the Bass and High Hat Drums
  10. Cable the other Drums into the free channels on the Line Mixer.
  11. Routing all the drums to the Line Mixer
    Routing all the drums to the Line Mixer
  12. Flip the Rack around again to the front, and then insert the Filters of your choice into the Filter 3 slots of both Thors. Adjust them to taste in order to affect the Bass and High Hat Drums

Example of separately filtered Drums (with a little delay on the High Hat):
[ti_audio media=”176″ repeat=”1″]

Some Final Thoughts:

Finally, just because you filter one sound through the Global section of Thor, this doesn’t mean you can’t use the Thor to generate a sound of its own. This way, you end up merging two sounds together in a kind of layering. If you want to see how this is done, look at the “Synth+Filter – Droid Chatter” Combinator in the example files. You can do some pretty interesting things this way. Additionally, you can take one sound source, split it into two different Thor filters and then route them to two separate channels in the mixer, or back into one channel if you like. A wealth of options and possibilities, for sure. 

Example of a Synth Arp + Thor with an Analog Oscillator, both generating sound. The Synth Arp is being filtered through Thor while Thor is generating a sound of it’s own. This creates a layered effect:
[ti_audio media=”179″ repeat=”1″]

So as you can see, routing audio through Thor is not difficult, but most people miss the step about the Modulation Bus Routing Section. If you remember to reroute the audio signal, you’re golden. That’s it in a nutshell. nothing fancy.

I mainly use Thor’s comb or Low Pass Ladder filter to affect drums and then put it all in a combinator. But that’s just one way you can use Thor.  Are there any other ways you Route your audio through Thor? Do you have some creative ideas that I haven’t covered here? Please share them. I’m curious to see how people are using Thor to affect external sources.

Download the Example Files

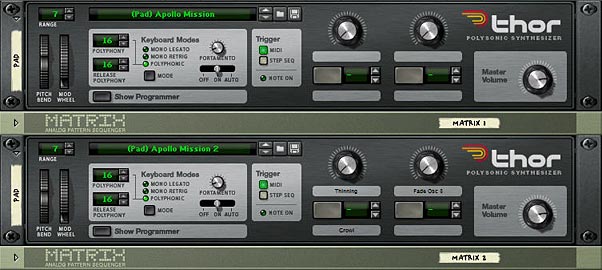
Apollo Mission

These are two Pad sounds based on an FM tutorial I read on the Propellerhead site. However, this sound is completely different from the sound I heard there. I just love the space of the sounds. One is clean, the other is distorted with a moderate dose of noise.

Play Examples or Download the File
[ti_audio media=”130″ repeat=”1″]

[ti_audio media=”131″ repeat=”1″]

Description: These are two Pad sounds based on an FM tutorial I read on the Propellerhead site. However, this sound is completely different from the sound I heard there. I just love the space of the sounds. One is clean, the other is distorted with a moderate dose of noise.

Two Pad sounds - one clean, the other with noise

Features: The “Apollo Mission” Pad does not have any programming tied to it. It’s pretty much a one-off sound. The “Apollo Mission 2” Pad, however, has a few things going on. First, use the Mod Wheel to control the State Variable Filter (Filter 1) Frequency and Resonance. Turning up the wheel on it’s own will give it a new dimension, not quite as noise-laden, and the Resonance gives it a sweet warbling sound that I really like. Rotary 1 will increase the resonance on the third filter and at the same time reduces the shaper’s effect on the sound. The second Rotary fades the level of Oscillator 3, and removes a good portion of the noise. Turned fully up and you get a completely clean Pad sound. Using Button 1 will make the Pad Growl more. Essentially it Reduces the Pitch of Oscillator 3. You gotta love these FM sounds. They can do so much more than bells with very little effort.

Usage: Used as a Pad or Texture.

Other Notes: Try using a combination of the Mod Wheel and Rotary 1 together. This gives the whole pad a very soft and far away sound. I’m not partial to the sound made if you raise both Rotaries together to full max. So I would stay away from that. It can get to be a little too high-pitch for my taste. But see if you like it (obviously now that I said not to try it, you’ll go ahead and try it. 😉 If you want extra growl, Turn Button 1 on, and then push the Mod Wheel up. This provides a nice growling edge to the sound.

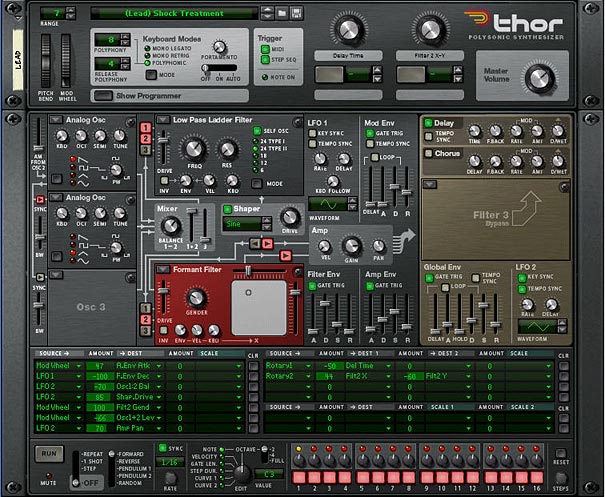
Shock Treatment

This is one of my signature Lead/Bass sounds. I used it for my song “A View from the Edge” found on my Phi Sequence Mount Royal & Fairmount page.

Play Example or Download the File
[ti_audio media=”104″ repeat=”1″]

Description: This is one of my signature sounds. I used it for my song “A View from the Edge” found on my Phi Sequence Mount Royal & Fairmount page.

Shock Treatment Lead

Features: Pitch Bend set to +/- 7 semitones. Mod Wheel controls the Formant Filter (Filter 2) gender (positive 100), as well as the level of Oscillator 1+2. Rotary 1 controls the global Delay Time from 142 ms backward by 50% to 72 ms for a very interesting spacey effect which makes the sound get more closed in, as if you’re using a “small space” reverb. Rotary 2 plays around with the X-Y of the Formant Filter (Filter 2).

Usage: Used as either a Lead or a Bass.

Other Notes: Try playing with the BW slider between Oscillator 1 and 2. I find that can generate some nice new sounds.