31 – Kong Drum Pad Hit Types

In this tutorial, I’m going to cover and give a thorough explanation of how the hit types work for the Kong drum pads. Depending on which Drum Module you select in Kong, the hit types will change. So having a clear understanding of how each one works is important. After reading this tutorial and watching the accompanying videos, you’ll have a good grip on how they work.

In this tutorial, I’m going to cover and give a thorough explanation of how the hit types work for the Kong drum pads. Depending on which Drum Module you select in Kong, the hit types will change. So having a clear understanding of how each one works is important. After reading this tutorial and watching the accompanying videos, you’ll have a good grip on how they work.

First, A word about Hit Types.

First, the Hit Types can be found on the bottom right side of Kong’s main interface. You’ll see access to all four types, as outlined below. By default all pads are assigned to Hit Type I, no matter what drum module is selected. Each Pad can only be assigned to a single Hit Type (as opposed to Support Generator Modules, which can be assigned to any number of the four Hit Types – more on that below).
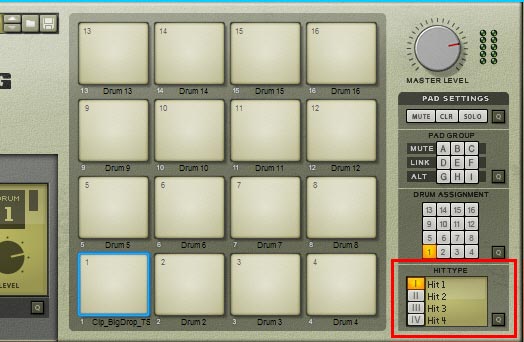
Kong Hit Types and their Location

In addition, there is a “quick edit” mode button. When accessed, you can easily set up the Hit Types for all 16 pads at once. That’s what this button is for (see below).
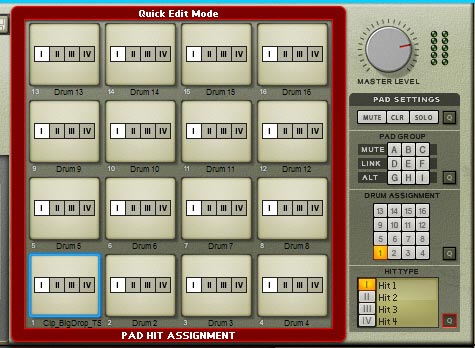
Kong Hit Types "Quick Edit" Mode

Lastly, there are Hit Type assignments on both of the Support Generator Modules (Noise and Tone) at the top left side of each unit. This means that you can assign which hit type will make use of the Support Module (this can be one single Hit Type, or all four Hit Types). By default, all four Hit Types are affected by the support modules. Click any of the Hit Types to essentially turn off the support module for said Hit Type. For example, you may want to have a Closed Hi-Hat module make use of the Noise Support Module FX, but leave the Open Hi-Hat unaffected. In this case, you would keep Hit Type I (Closed Hi-Hat) selected, and deselect Hit Type IV (Open Hi-Hat).
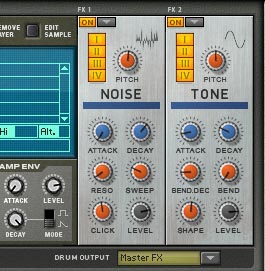
Kong's Support Generator Modules and their Hit Types

Now that we’ve got the basics down, here are the various Hit Types you will find, in order of the Drum Modules that appear in Kong:

NN-Nano Sampler

The NN-Nano Sampler has four Hit Types, as follows:

  • I: Hit 1 (references sample 1 loaded into the NN-Nano)
  • II: Hit 2 (references sample 2 loaded into the NN-Nano)
  • III: Hit 3 (references sample 3 loaded into the NN-Nano)
  • IV: Hit 4 (references sample 4 loaded into the NN-Nano)
NN-Nano Hit Types
NN-Nano Hit Types

The idea behind the hit types provided by the NN-Nano Sampler is pretty straightforward. Each Nano Sampler can load up to 4 samples that can be adjusted both Globally by the global parameters and locally by the local parameters just below the sample. Note that you can load more than one sample into a single hit using the “Add Layer” button at the top of the Nano Sampler. This will create additional lanes below the selected Hit type, where you can load additional samples. If multiple samples are loaded, you can use the “Alt” function (checkmark below the samples) to alternate between the various layers when the Pad is pressed.

Note: In the video, I jump a little ahead of myself and go over creating Sample Layers in the first Hit Group within the NN-Nano. It’s important to understand that when you layer samples, by default all the samples will play at the same time when the pad is pressed. Not sure I got that across in the video, so I’m explaining it here. This is a common question that comes up: how do you layer pads together. This is one way in which you can layer Samples. To layer actual drums, like the Physical Bass Drum or Synth Snare, you would have to put the two drums inserted into two different drum modules, assign them to two different pads, and then create a “Link Group” between the two pads (assign the link group “D,” for example, to both pads). Then when you hit one pad, the other pad would automatically play at the same time. I hope that clarifies things.

The 4 Drum Pad Hit Types here correlate directly to the 4 Sample slots on the Nano Sampler. Nothing too fancy. In this way, you can select four pads and tie them all to the same Nano Sampler. Then tie the different Hit Types to the different Pads (Hit Type I on Pad 1, Hit Type II on Pad 2, Hit Type III on Pad 3, and Hit Type IV on Pad 4). This way you can trigger different samples from all four pads. The only downside is that the Nano’s global parameters are the same for all four Pads. But this, in essence is how you use the four Hit Types for the Nano Sampler.

Nurse Rex Loop Player

The Nurse Rex has arguably the most interesting selection of Hit Types. While the NN-Nano Sampler looks pretty boring in this regard, the Nurse Rex is completely opposite and has many different possibilities. Here are the Hit Types:

  • I: Loop Trig (Plays the entire loop once from start to finish)
  • II: Chunk Trig (Divides multiple pads into equal Chunks or sections that can be played back. Note that Chunks can be resized over the samples, but cannot be non-contiguous between each other)
  • III: Slice Trig (Allows you to select single or multiple slices to be triggered. Note if multiple slices are selected to be triggered by a single pad, the pad will trigger the various slices as if they were an Alt group; alternating between slices.)
  • IV: Stop (Stops loop, Chunk, or Slice playback)

Before jumping into an explanation of these Hit Types, I put together a short video that explains how they are used:

Nurse Rex Hit Types
Nurse Rex Hit Types

The first Hit Type is the most basic default: Loop Trig. This simply plays the entire loop once over from start to finish. Note that you can resize the loop’s start and end points by dragging the start and end markers just above the rex loop.

The second Hit Type is Chunk Trig, which is only really useful if you have multiple pads assigned to the same rex file. If you have a single pad assigned to use the Chunk Trig Hit Type, then it acts the same as if you were assigning Loop Trig to the Pad. So if multiple pads are assigned to the same Nurse Rex Loop Player, and all those pads are assigned the Chunk Trig Hit Type, the rex loop is subdivided into equal parts or “chunks” of slices. It’s important to note that you can reshape the various chunks to include/exclude slices, but moving one chunk left, will also move the adjoining chunk left. In this case, one chunk gets smaller while the other chunk gets larger. You cannot have non-contiguous chunks (gaps between any of the chunks).  One easy way to get around this is to assign each pad to its own drum, then copy / paste the same rex into all the drum slots. Have all the pads set to Hit Type I (Loop Trig), and then you are free to independantly set up any sections of the various rex loops to any of the pads. They are all independant. The other benefit is that you have the ability to set independant levels and Nurse Rex settings. If all your pads are set to use the same Nurse Rex Drum module, then most settings become global parameters affecting all Pads across the board. This may be what you want, but for more control, copy/pasting the same file into multiple drum pads is a better way to go.

The third Hit Type is the Slice Trig, and this is probably the most confusing Hit Type of the four. Put simply, at default, the Pad will Trigger the first slice of the Rex file. This is because the “Trig” checkbox for the first slice is selected (checked). This checkbox tells the pad which slice to trigger. You can turn it off and select a new slice by clicking on the slice, and then placing a checkmark in the Trig checkbox. The new slice is now triggered by the pad. It’s very important to note that you can select multiple slices to be triggered by the pad. Simply select the next slice, place the checkmark in the Trig box, and so forth, for as many slices as you want to be triggered. If two slices are selected, hitting the pad will alternate back and forth between the two slices. If more than two slices are selected to be triggered by the pad, then the slice selection is random between all the slices. But any way you slice it (pardon the pun), only a single slice will be triggered with the pad.

The fourth and final Hit Type is Stop. This may be confusing, but it works well when you have 2 pads assigned to the same Nurse Rex module, and one pad is assigned to Hit Type I (Loop Trig) and the second pad is assigned to Hit Type IV (Stop). In this scenario, pressing on Pad 1 will start the loop playing, and pressing on pad 2 will stop the loop from playing. A simple Start / Stop scenario. Although, I must say, it would be nice to be able to assign both Start/Stop to the same pad as a toggle. Not sure why it wasn’t implemented in this manner, but I’m sure there’s some complex Thor workaround for this too. 😉

Physical Bass Drum, Physical Tom Tom, Synth Bass Drum, Synth Snare, and Synth Tom Tom

The Drums without Hit Types

For the Physical Bass Drum, Physical Tom Tom, Synth Bass Drum, Synth Snare, and Synth Tom Tom drum modules, there are no variations on the Hit Types. Selecting any of the four Hit Types with these modules will have no effect on the output you hear from the drum module. Or put another way, you only get one sound out of these drums, no matter what Hit Type you select. There are no Hit Type variations here.

Physical Snare Drum

The Physical Snare Drum has four Hit Types, as follows:

  • I: Center (Plays the drum sound as if the drum stick struck the center of the drum)
  • II: Position 2 (Best described as closer to center.)
  • III: Position 3 (Best described as closer to the edge.)
  • IV: Edge (Plays the drum sound as if the drum stick struck the edge of the drum)
Physical Snare Drum Hit Types

These Hit Types are pretty self-evident, and they depend somewhat on the setup of your drum parameters. However, all these Hit Types revolve around where the drum is struck with the drum stick. In this way, you can easily create variations on drum sound by associating four pads to a single Physical Snare Drum module, and then assign each Hit Type to each pad. Then create an “Alt Pad Group” between all four pads. This way, each subsequent hit of one of the pads will result in a slightly different sound emanating from the drum.

Alternately, you can associate two pads to the same Physical Snare Drum module and have Hit Type I (Center) on pad 1 and Hit Type IV (Edge) on pad 2. Then play a pattern whereby the first 3 drum hits use pad 1 and the fourth drum hit uses pad 2. This can have the effect of creating a jazzy kind of feel with a slight change in sound between the center and edge (or center and position 3 if position IV is too harsh). These are just some of the setups you can try out.

Synth Hi-Hat

The Synth Hi-Hat has a few options when it comes to Hit Types. Here they are:

  • I: Closed (Plays a closed Hi-Hat)
  • II: Semi-Closed (Plays a semi-closed Hi-Hat)
  • III: Semi-Open (Plays a semi-open Hi-Hat)
  • IV: Open (Plays an open Hi-Hat)
Synth Hi-Hat Hit Types

As with the Physical Snare Drum, the Synth Hi-Hat is pretty self-evident when it comes to Hit Types. And you can use the variations in smilar ways to what I’ve outlined above. However, you probably would want to create an alt group between Hit Type I and II (the closed positions), as well as a separate alt group between Hit Type III and IV (the open positions).

One other thing you can do which is unique to the Hi-Hats is mimic the old “Exclusive 8 & 9 Channels” on the Redrum. What this button used to do, for those who may need a refresher, is provide the ability to play channel 8 and channel 9 exclusively on the Redrum. These two channels were usually reserved for an open and closed Hi-Hat. The rationale was that you would never hear the open Hi-Hat at the same time that you would hear the closed Hi-Hat (since usually this was one and the same Hi-Hat in the real world). So this “Exclusive” button allowed you to ensure that when either the open or closed hi hat (on separate channels in Redrum) was played, the other channel was muted.

In Kong, you can create the same setup by assigning 2 pads to the same Synth Hi-Hat module, then assigning Hit Type IV to pad 1 (open) and Hit Type I to pad 2 (closed). Label both pads so you don’t get confused which is which. Now by default, the drums are exclusive if both pads are tied to the same Hi-Hat drum module. However, if you use two different Hi-Hat drum modules assigned to two different pads, you’ll have to make both pads part of a “Mute Pad Group”  (either A, B, or C). Now when you play either drum by pressing pad 1 or pad 2, the opposite pad will be muted. Simple as can be. See the video below for an explanation and example (and yes I screwed up a little at first, but the main points are there). As always, thanks for watching!


In the end, by looking at the various Hit Types, it seems pretty evident that the Props went a long way toward trying to make alternate drum sounds and Alt groupings a big part of the new Kong Drum Designer. So use them when you can in new and creative ways, because the possibilities are truly endless. Now go forth and make beats! And drop me a comment if you want to add to this post or let me know what you think about the various Kong drum pad Hit Types. Your comments are always welcome.


30 – Automating Kong FX & More

In this tutorial, I’m going to present two ways in which you can automate the FX parameters in Kong that you probably thought could not be automated. I’ll also show you a method to create an automated Drum Roll and tie it to a Combinator button. So let’s automate what at first seems unautomatable (say that five times fast!).

In this tutorial, I’m going to present two ways in which you can automate the FX parameters in Kong that you probably thought could not be automated. I’ll also show you a method to create an automated Drum Roll and tie it to a Combinator button. So let’s automate what at first seems unautomatable (say that five times fast!).

You can download the project files here: Kong Automation Examples. There are 3 Kong examples in .rns format for you to look at. The first one goes over automating Kong FX parameters by cross-fading two Kongs. The second provides an alternate “Step Sequencer” example to automate an FX parameter from one state to another. And the third .rns file is a way in which you can create a note-repeater (not a true note repeater but a drum roll creation) using an RPG-8 Arpeggiator and Thor tied into a Kong Drum module. The Combinator in this file provides 2 buttons: 1 button acts as the drum roll (note repeater) and button 2 acts as a single-shot note player. Enjoy!

The “Cross-Fading 2 Kongs” Method

The first method is my favorite, and it comes from Kloeckno on the Propellerhead User Forum (PUF). He suggested that you could automate any parameter on the FX or Drum Modules by creating a secondary Kong device and cross-fading between the sound source Kong device and that secondary Kong device. So here’s my take on his suggestion. Let’s try it out and see how it stands up (here’s a spoiler: it works amazingly well!).

The “Kong Parameter Step-Sequencer” Method

Next, let’s take a look at an alternative approach, which uses a single Kong device as a step sequencer for a single drum hit. With each pad, you increase the parameter slightly, so that you can step between multiple instances of the same FX parameter. This can be a good idea for things such as a drum roll (so you get the added benefit of seeing how you can create a drum roll as well). Take a look and tell me what you think of this approach?

So there are two methods which you can use to automate those parameters that you thought you couldn’t directly from Kong. With a little ingenuity you can find workarounds for almost any kind of problem that you face in Reason. I’m firmly convinced of that. Though, admittedly, there are some problems that involve a lot of routing and hard work and thinking through the routings on paper to get it right. Reason always amazes me for its ability to be flexible and provide solutions for some of the toughest audio problems. In fact, it’s this flexibility and a strength of the software that you can find so many workarounds and alternate ways of thinking. Perhaps that’s why the props are at the forefront of audio software.

Automating a Drum Roll

The easiest way to re-create a drum roll and automate it is to use an RPG-8 Arpeggiator to “Hold” the note that is being played. In a Combinator, place a Kong, RPG-8 and THor. With a little routing, you can use the Thor step sequencer to play the note via the Combinator Gate in (the Arp), and then let the RPG-8 hold that note, which in turn is triggering the Kong Drum 1 module. To see an example of this, refer to the Project files. The example is included in there. When I have some time, I’ll try to put together a video for this idea as well, if time permits.

What are your thoughts? Any cool workarounds in Kong or the other new devices that you’d like to share?

29 – Synth Drums from Scratch

The subject of today’s tutorial is how to create your own standard drum sounds via synthesis. Here, I’m going to show you a few techniques to bring these drums to life, with little more than a Thor, Malstrom, or Subtractor synth, and some supporting modules. This is a great alternative to using Drum samples or relying on sample CDs for your drum sounds, though those are both great alternatives that should not be overlooked.

Often times we don’t have access to a real drum kit and it’s not feasible to get real true-to-life drum samples to use in your own work. Or you may just want the sound of a synthetic drum as opposed to the real thing. One option is to purchase some sample CDs. Another is to create your own drum sounds from scratch, using the synths provided in Reason. That’s the subject of today’s tutorial. Here, I’m going to show you a few techniques to bring some standard drums to life, with little more than a Thor, Malstrom, or Subtractor synth, and some supporting modules.

I should start by saying that with the addition of Kong in Reason 5, creating drums has never been easier. Load up a physical drum or a synth drum module and you’re more than halfway there. However, for those that don’t have Reason 5 yet, then this tutorial is for you. Everything below is created using the Reason 4 devices. This goes to show you that you don’t necessarily need Kong to create interesting drum sounds. So let’s get started.

You can download the project files here: Synth Drums from Scratch. This is a zip file that contains 3 Combinators and 1 Thor patch outlining the different drum sounds from the tutorials below. The Combinator parameters will affect the sound of each drum. I’ve tried to tailor them so that you can get a very wide variety of drum sounds out of each Combinator. Have fun with the various buttons and rotaries to get the sound you want out of them.

The Bass Drum

The first drum we’ll emulate is a Kick or Bass drum. This is probably one of the easier drums to emulate because it has that very bassy deep and punchy feel to it. The hardest part about programming this kind of drum I think is in the Compression, which most every Kick drum should have. How it is compressed is really a matter of taste, but getting just the right sound you want is probably going to rely on the way you compress it. A close second in terms of seasoning your Bass Drum is using EQ to accentuate the correct frequency or frequencies. Here’s how I would go about creating a Kick Drum using Thor.

The Tom Drum

The second drum type we’ll create is a Tom Tom drum. This time, I’ll use a Malstrom with a TubeSlap Oscillator to emulate it. This oscillator is great for sounds like these, and can produce just the formant sound that is needed with a typical Tom drum. Of course, you can emulate all of these different drums using any of the synths. This is just one way to recreate the sound. You could instead, try using a Thor oscillator with a Formant filter to get the Tom Drum sound you’re after. Be sure to explore more on your own to find the sounds that truly inspire you.

The Snare Drum

The third type of drum I’ll recreate is a Snare drum. For this, I’ll use a subtractor with two Oscillators and a Bandpass filter. Then we’ll use a Noise Oscillator in Thor to add that extra tail that a Snare drum can have. To wrap it all up, we’ll combine them both and set up a little programming to the rotaries in order to get a little more out of our Snare sounds. Using these parameters we can create a variety of Snares, instead of a single type of sound. See how it’s done:

The Hi Hat

Finally, there is the tried and true Hi Hat sound, both open and closed. To emulate this one, we’ll use a Thor FM pair and Noise oscillator going through two State Variable filters set to High Pass and Notch mode in Thor. I’ll emulate the open and closed Hi Hat and tie it to a Thor button. This way, you can access both the closed and open state of the drum with the click of a button (and from within the same Thor synth, which makes it very CPU friendly). Of course, if you want to separate them, you can duplicate the Thor device and use one Thor for the “Open” Hi Hat position and one Thor for the “Closed” Hi Hat position. It’s all up to you and very flexible.

So there you have it. Four basic drums created with the three different synths in Reason 4. If you have any other drum sounds that you would like to contribute or tips for drum creation, please feel free to share with us. Until next time, have fun working your own magic in Reason and Record!

The Musician’s Manifesto

The Musician’s manifesto. Or, subtitled: “The Reason Guide to getting Zen and Musical” — these are just some of the things I’ve learned throughout my life and more specifically being a musical-minded person working with Reason for the past 5 years

Or, subtitled: “The Reason Guide to getting Zen and Musical” — these are just some of the things I’ve learned throughout my life and more specifically being a musical-minded person working with Reason for the past 6 years.

I caution that you might find these points a bit preachy or moral or spiritual or whatever, or you might find it total bunk, but these are some of the rules by which I try to live, and they have served me pretty well over the past years. I keep coming back to them again and again because I realize nobody is perfect, and on a day where I find I’m slipping or feel like giving up, they are there to help me get out of that funk.

  1. Admit you know nothing and start from that vantage point. Everyone has something to teach us. Open yourself up to realizing that, humble yourself, and learn wherever and whenever you can from whomever you can.
  2. Ultimately be creative and make music! We all have the ability to be artistic and creative. We just have to find it inside ourselves and turn on the tap to let it out. Easier said than done, I know. But the journey is so worth it.
  3. Experiment, experiment, and then experiment some more. Devote as much time as you can each and every day to music. If you truly love it, then this will simply come naturally.
  4. Challenge Everything. Don’t be complacent. Question things. Come to your own conclusions. Think outside the box. Never sit still. Be your own person. Set artificial limits for yourself. Cherish the mistakes and the accidents. Be better than good. Music does not have to be formulaic, so don’t be satisfied with a formula. Challenge yourself to make things different.
  5. It’s all about the journey, not the destination. Be mindful of your past while looking forward to your future. As Winston Churchill wrote: “The farther backward you can look, the farther forward you will see.”
  6. If you are truly enjoying working in music, then count yourself lucky. You’ve found something that really does help fulfill you! And buddy, that means you’re ahead of about 90% of the population. Don’t believe me? Next time you’re on public transportation during morning rush hour, look around and see how many happy faces are in your vicinity.
  7. Never stop learning, because knowledge is truly power. Suck it up like a sponge. Be as curious as you can. Seek out the answers to all your questions. If you don’t know how a chord is created, go online and read about chords. Don’t know what an ADSR is? Look it up! Don’t be afraid to admit you don’t know something. And don’t be afraid to make mistakes. They are just as important as your successes.
  8. Stop lamenting what you don’t have or don’t own, and focus on what you do have and what you can do with it. Specifically learn Reason and Record inside out. Believe me, you can spend a lifetime solely exploring the base Reason Package with Factory Sound Bank and still never know it all. In addition, Google is your friend. YouTube is your friend. Wikipedia is your friend. Bloggers are your friends. The 800+ page Reason/Record manual is also your friend. Get to know them all intimately.
  9. Stop blaming the tools. It’s not the guitar’s fault you don’t know how to play it. Just as it’s not Reason nor Record’s  fault you don’t know how to use them. The blame and responsibility are squarely on your shoulders. Put on your big girl panties and suck it up Rockstar!
  10. Check your ego at the door. Don’t step on those around you to get a leg up, or fall into the trap of trying to “be better than the next guy.” It’s stupid, petty, unnecessary, and worthless. There’s nothing competitive about music and art. It’s not a competition to get to the top. It’s a fundamental ability that all humans have to let their voice be heard. It’s the most free-spirited part of being human. Focus on honing your voice and market yourself with respect as you would expect others to market themselves to you. Don’t belittle others in the process. That’s just counterproductive.
  11. Stand up for your art!
  12. It’s not wrong to be a perfectionist, but it may as well be. 90% of tracks are completed in 10% of the time. Stop spending 90% of your time trying to perfect the last 10% of a track. Learn to let go at some point or stop if you find yourself struggling or getting nowhere. Nothing is more frustrating than going nowhere for a long period of time. Avoid getting stuck by stopping and/or focusing your attention on something else: another song, another device, a new genre or just stop completely and take a break. Also learn how to brainstorm and finish things at a quick pace. Try completing a song in an hour just for the hell of it. Creating these artificial deadlines can help your creativity, just as brainstorming can.
  13. Seek out help, discussions, collaborations, and healthy relationships in general. They might be able to help you  finish up that last 10% of a track in less time than you could. You just have to realize that no man or woman is an island. We all need the help of others from time to time. And you’ll find great friendships in the most unusual places, or partnerships that you never thought would come about. They can often inspire you by steering you in different directions. It’s a natural form of networking. And it’s important. Probably more important even than your music, your art, or anything else really. It’s our connections with each other that make us who we are and define us.
  14. Give back to your community in some way, shape, or form, and to the best of your own abilities. You’ll feel more positive, and you may provide the spark in someone else’s life which ignites their passion or sends their life on a careening course which fundamentally changes who they are for the better! Charity is important and fundamental. And you’ll feel good too.
  15. Ignore negative chatter. Pay close attention to positive criticism. It’s the same 90/10 rule all over again and in various respects. 90% of the internet is mere chatter. 10% of the internet is solid and where you should focus. Also, spend 90% of your time on this 10% which is important. Also, knowing the difference between negativity and positive criticism is crucial. We all need — no, we must have criticism in order to grow as artists. Be mindful and humble of that. Believe me, I’m humbled every day at some of the songs I hear, videos I watch, images I see, places I visit. I could go on and on.
  16. Never under any circumstances send out an email, post, Soundcloud message, YouTube comment, etc. which starts and ends with “yo check out my track” or any variation thereof. Guess what? No one will check out your track. And people will purposely ignore your track. Your time can be better spent by getting to know people and checking out THEIR tracks and their work, and talking to them about their work, not yours. This requires a fundamental shift away from what you are doing. This is just common sense.
  17. In opposition to the point above, if you are providing free resources, such as tutorials and refills, then do the opposite. Shout it from the rooftops. In this case you should let everyone know and open everyone up to discussion about it and make it available. Here there be free things!
  18. Understand the difference between “I really hate this” and “God this is difficult but worthwhile and enjoyable.” In the former, if you really hate what you’re doing, try to figure out what you really do enjoy and go out and do that instead. Give it your all, no matter what anyone says. If you find that working in music or with Reason is incredibly difficult, but you just spent 10 hours without realizing it in front of Thor, then hey, you’re on the right track. Keep at it. And don’t stop. You do enjoy it.
  19. Use your ears 90% of the time and your mouth 10% of the time. I know this goes right back to the 90/10 rule, but it’s vital. If you think I talk too much here on my blog, what you don’t see is the other 90% of the time when I’m reading posts, watching videos, seeking out the latest tips and tricks from everyone out there, digging through refills and song files for more ways I can abuse Reason. And now we’ve come full circle back to points #1-3.
  20. Finally, remember that there’s a life outside of Music and Reason and Record. And that all of this alone cannot fully sustain you. Make time for all the other people in your life, vacation, hobbies, work, breaks, taking your sweetheart out for a night on the town or a quiet evening in. We are all made up of many facets. Try to gain a deep understanding of all those facets in your own life.

So there you have it. My views on what it takes to succeed and more importantly, what it takes to live up to your full potential as a creative and artistic human being.

And for some further reading, I would recommend the following:

Any other thoughts?

28 – Weird Sci-Fi Synth Sounds

Here are a few ways you can create some trippy and out-there sounds using the synths in Reason. I’ve had a lot of requests for these kinds of sound creations, so I thought I would throw a few ideas out there. These sounds provide you with three different patch ideas for three different Sci-Fi type sounds. Enjoy!

Here are a few ways you can create some trippy and out-there sounds using the synths in Reason. I’ve had a lot of requests for these kinds of sound creations, so I thought I would throw a few ideas out there.

Sure. This time around I’ll provide the patches found in this project here: weird-sci-fi-patches The file contains 2 Thor patches with 2 variations on the Sci-Fi sound, a Malstrom with an Alien voice, and a Subtractor ominous spacey patch. Enjoy!

First off, here’s an idea which uses the Noise Oscillator and a Multi-Oscillator to create some really weird sounds in Thor. The key features here are the use of the Bipulse Shaper and the Self-Oscillating filters. In this example, they are probably even a little more important than the actual Oscillators that you’re using. So here’s the video:


The second kind of other-worldly sound is brought to you by the Malstrom. In this case, I tried to create an Alien from outer space voice using the Electronik voice and the Jews Harp grains inside the Malstrom. As you’ll see, the Malstrom is exceptional for these kinds of crazy effects. You can have a field day tweaking knobs on here. The main focus should be on utilizing the Pitch knob, as well as all the other knobs to affect the Oscillators. In this way, you can mangle your audio beyond any human recognition. Makes for exactly what we need to build our Alien Voice. Here’s the video:

Now of course we shouldn’t forget the Subtractor in our quest to create some freaky sound effects. So let’s try giving it a whirl. This time I’m going to go for a more Ominous space sound, almost a Pad-like sound. This seems like it would be great as an intro for a huge and ominous scene and reminds me of when the Borg attacked the Enterprise in the feature-length movie: “Star Trek: First Contact.” Yes, I know. Major geek right? Well, anyway, this uses some FM for the deep bassy sound, and a low Octave Oscillator. From there, you just need to adjust the filter. One other interesting thing you could do is sweep the filter frequency from Closed to open and back again. The key of course is to experiment, experiment, and experiment some more!

So there you have it. A few different Sci-Fi sounds for you to jump into. There’s billions more sounds just waiting to be created. If these help as a starting off point for you, then great. Glad I could help. And if you have any comments, suggestions, tips or tricks, please let me know. It’s from your requests that I end up making these tutorials in the first place. So keep the requests coming. And Happy Reasoning!

27 – Kong Drum Creation A to Z

Like the title says, I’m going to provide you with a 45-minute video / blog tutorial on how to create an entire Kong 16-Pad design, using nothing more than a Rex file and some imagination. This is the A to Z of Kong drum design. And lots of tips along the way. Don’t miss it!

Like the title says, I’m going to provide you with a 45-minute video / blog tutorial on how to create an entire Kong 16-Patch design, using nothing more than a Rex file and some imagination.

Those familiar with the methods for my tutorials know that I usually provide the project files along with the technique. Nope. Not this time. Instead, I’m providing the rex file I used to create most of these drums. That way you can try it out yourself and follow along with the tutorial. Give a man a fish, they say, and he’ll eat for a day. Teach him how to fish, and he’ll never go hungry. So here’s the single Rex in a zip file: trails-rex

This method starts off with a Combinator, then two 6:2 Mixers, a spider audio/merger, and the obvious Kong Drum Designer. Then I go into how to set up the drums one at a time, starting with the Kick Drum. Using the Nurse Rex player, you load the rex file (and this can be any rex file, and start copying/pasting the rex loop one at a time into the first 8 pads. That gives you enough room to work creating all the drums you need, such as the Kick, a few toms, some snares, an open and closed hi hat, and even a reverse drum, and some other more off-the wall sounds.

After you do this, I’ll show you how you can set up the top 4 pads in Kong to trigger other devices (in this case Thor, but you can trigger any other device in Reason that accepts a Gate trigger, which is just about everything).

Finally, I go into programming the Combinator and adding some extra global Effects to play around with the tone and reverb of your drums as a whole. So check out the videos below for a complete tutorial on how to mess around with Kong and create some kick butt drums!

So that’s how you do it, or at least one of a million ways in which you can design a few drums in a Kong patch. What’s your favorite new Kong trick, and do you have any other suggestions or ideas? Please share them and let us all know.

Until next time, happy reasoning!

Organizing your Files

I would diverge a bit and talk about a subject that everyone needs to understand: organizing your files. Hopefully this will shed a little light on how Reason files operate, and at the same time provide some ideas with a safe method of organization.

There’s been a lot of talk lately about how to best organize Reason and Record refills and files and such, so I thought I would diverge a bit and talk about this, since it’s important for everyone. It’s also tied closely with another subject: how does Reason handle files. In my opinion, everyone needs to have a basic understanding of this subject, as understanding this will help you put together a foolproof file structure on your hard drive or external drive. In the process, I’ll provide my own method for file organization, which I think has some pretty good benefits.

First and Foremost: How the heck do these files work?

First, what must be understood is the idea that samples in Reason and Record are not automatically part of the song files. Note that wav files loaded into a track in Record is a different story. Any wav files loaded on their own channels are saved along with the song. When it comes to samples, the only thing saved with the song file is a link to the sample location. This means that each time a sample is loaded into a song, the location and name of the sample is noted and stored. When the song is saved, the sample’s file name and location are saved along with the song. When the song is reopened, the program performs a check to see that all the saved sample links are still valid. If not, you get a warning telling you that the sample is missing. UH OH. Now you’re in trouble.

But what causes a sample to go missing. If you’ve understood the above paragraph, it’s not a great leap to figure out that if you change the sample’s location or file name (or both), Reason’s sample check will fail. So why am I telling you this? Because once you understand how samples are treated in Reason, you’ll understand how best to organize them. Knowledge is power after all.

Second, we must also understand the difference between a sample and a patch. A sample is a .wav or .aiff file which can be loaded into any of Reason’s sample players (the NN19, NN-XT, Redrum, Kong, or Dr. Rex). A patch is completely different. Patches do not rely on any outside files, and instead are built wholly inside Reason. This means that you can rename and relocate patches anywhere you like. They will still load fine within Reason or Record. Patches can be loaded into any of Reason’s Synthesizers (Subtractor, Malstrom, and Thor), as well as the advanced FX devices (Scream and the RV7000).

A special case exists with the Combinator, NN19, NN-XT, Redrum, and possibly Kong, which can make things a little confusing. All three of these devices can load both samples and patches. While the Combinator does not have the ability to load a sample per se, it can contain instruments which do load samples, therefore it has the possibility of containing samples. The NN19, NN-XT, and Redrum can all load both samples and patches (Kits = Patches in the case of Redrum). Lastly, if you use the NurseRex or Nano-XT in Kong, you’ll realize that Kong can also hold samples. Point is this: if you have a sample contained inside a Reason device, be it Kong, Combinator or NN-XT, etc. then you’ll have to be extra careful to ensure that those samples are not changed. No renaming, and no moving around from folder to folder. If you change sample file names or move them to another folder, the link is broken and you get the dreaded “Sample not found” dialog.

Truth be told, moving them from folder to folder is really not a huge issue if you follow my advice for file organization below (in other words, if you keep all the Samples in a single parent folder — create as many subfolders under this as you like, and move the samples around freely under this main parent folder). The more dangerous culprit is renaming the sample file, as this will make it almost impossible to find later, especially if you have thousands of samples on your hard drive or if you do some massive renaming of a bunch of sample files. Just don’t do it. Force yourself to think of a naming convention that makes sense to you (and it doesn’t hurt to make it somewhat logical in the event you’ll be collaborating with others).

Note also that if you trade files between others that don’t have your samples or the same refills you do, you’ll also get the dreaded “File not found” message. In this case there are two easy solutions: 1. If the samples are your own creations, self-contain the song (from the file menu) and send the song to your colleague. When the song is opened on the other end, all the samples are contained and will open up properly. 2. If you are using samples from a refill which your colleague does not have, tell your colleague to download the refill if it’s free or pay for it if it’s commercial. Problem solved.

In conclusion, you have to simply be cognizant of the fact that if samples are used anywhere in your Reason devices, Reason is only storing a link to those samples. Now let’s look at things from the other side of the coin. Let’s see how we can best optimize the samples and other Reason files so that we never lose any samples, songs or other files ever again.

The Simple File Organization Method for Reason or Record

One of the simplest solutions to file organization is to create a directory outside the “C:\Program Files\Reason” directory entirely (I put mine under the C:\ drive directly and I call it “Reason” for lack of a better term — call this folder anything that makes sense to you like “Audio” or “AudioWork” but I would stay away from “Music” because Windows creates a “My Music” folder automatically — looking back I probably would have chosen a name other than “Reason” so as not to confuse it with the Reason directory under the Program Files on my hard drive, but I’ve never been tripped up by this).

Then under this folder I created the following sub-folders:

  • Main Refills (where I place all 3rd party refills)
  • Working Refill (where I place my own patches for my own refill development)
  • Samples (Where I place all my sample wav or aiff files)
  • Songs (all .rns, .rps, and .record files go here)
  • Output (all .wav or .mp3 output goes here)
  • Miscellaneous (files others provide me, documentation, charts, etc)
  • Scratchpad (any stupid experiments or playful fun stuff goes here – usually in .rns or .record file format).

You can create any number of sub-folders under the above folders as you wish. The idea though, is to keep the samples in their own folder and keep some basic top level organization.

I personally have the whole above “Reason” folder backed up on 2 different hard drives and I do a DVD backup twice a year. This takes care of ensuring I sleep like a baby each and every night, and even if my computer explodes or gets accidentally hurled off the balcony after receiving that final blue screen of death straw during the best jam session I’ve had in a decade, it’s unlikely all 3 hard drives will crash at the same time. And even if they do, I have everything stored on hard media (DVD). At the absolute very least, and if you only do one of the above, back up your stuff onto a DVD! Hard Drives fail. DVDs seldom do. But even with that recommendation, I still would highly suggest in backing it up in at least 2 other places above and beyond your main computer (a secondary hard drive and DVD).

Some of the benefits of the above organizational approach:

  1. Easy to find what you want quickly
  2. You can always uninstall/install reason without ever worrying you’ll overwrite something or having to move something outside the main reason folder every time you uninstall/install
  3. Saving all my scratchpad stuff in .rns or .record format means that I can go directly into windows explorer and double-click on the file to open the Reason or Record program with my song loaded in one shot, which saves time.
  4. Separating the output (.wav) from the songs (.rns or .record) means that I can organize my output in whatever way I want without touching the main song files — which is nice when trying out different track listings. Note that all the output files are further organized into sub-folders for different full CDs or genre, etc. Whatever works for you.
  5. Keeping all the samples in one folder means that you’ll never lose the samples or the link to the sample from a song. You could also subgroup samples underneath in sub-folders based on sample type: drums, nature sounds, urban sounds, etc. As long as they stay in this folder, you can subgroup them any way you like and you can even change the samples from one location to another under this folder — if the song ends up losing the connection with the sample, just point to the “Samples” folder, and let Reason/Record find the samples for you. Since they will always be in this folder. Only thing you can’t do is rename a sample. That’s always unwise.
  6. Finally, this type of system means I have one folder to backup. Not a bunch of folders and files all over the place on my hard drive.

I know some people advocate the opposite approach of saving everything related to a song in a single folder and creating separate folders for each song. But this approach means you end up with several copies of the same samples and patches all over the place, and I think it can become a mess very quickly. Also, with the “self-contained” settings in Reason and Record, the program can do this for you on the fly.

Here’s another idea if you really want to keep all the patch and sample files with your songs. Try using the “favorites” feature in the Reason song browser to create a “favorite list” for each song you create. This way you have all the files and patches for each song stored in a favorites list. And you can duplicate patch listings in multiple favorite lists without duplicating the patches themselves.

The other added benefit is that it can help you when you’re looking for a specific patch from a specific song. You don’t need to open up the song file. Instead, open the song browser, click on the “favorite list” for the song that contains the patch, and there it is.

Building a Refill: How do I organize that?

Well you’re on your own for that one jack. Mainly because I’m way too tired from writing this long post. But here is an example on how I would probably try setting things up. Usually I create several folders for each instrument or device at the top level, then the sub-folder would contain the various instruments. If I don’t have any patches for a specific instrument, I omit that folder entirely (no need to have an empty folder). Here’s an example:

  • Instrument Device (for instance, Thor)
    • Bass
      • Acoustic
      • Synth
    • Bells & Mallets
    • Drums
      • Kits
      • Hits
        • Bass Drum
        • Snare
        • Toms
        • Rimshots
        • Assorted
    • Horns & Woodwinds
      • Sax
      • Oboe
      • Flute
    • Pads
      • Upbeat
      • Downbeat
      • Neutral
    • Piano
    • Strings
      • Guitar
      • Violin
    • Synths
      • Mono
      • Polyphonic

For the FX devices, I usually just list the device at the top level, and put all the patches directly under that folder. If it gets out of hand though, I might try separating even that into sub-folders based on sound types. For example, you could set up the RV7000 as according to it’s algorithms (Room, Arena, Spring, Echo, etc.). Or you could set up the Scream according to its damage types (Tape, Tube, Fuzz, etc.)

For Rex loops, I would probably list them based on purpose and then Tempo. For example:

  • Dr.OctoRex Loops
    • Drum Loops
      • 90 BPM
      • 100 BPM
      • 110 BPM
      • 120 BPM
    • Music Loops
      • 90 BPM
      • 100 BPM
    • Experimental Loops
      • 90 BPM
      • 100 BPM
    • Assorted Loops
      • 100 BPM
      • 110 BPM

In conclusion, when you’re dealing with file structures on your hard drive the idea is to make it as easy as possible for you to find what you’re looking for. When creating file structures for refills, the idea is to make it as easy as possible for the end user.

As an update, Vitor posted the following on EditEd4TV’s forum in this post. I wanted to reprint this, because it’s also good advice:

I already do what you say, I just don’t agree with the use of optical media to store backups. It’s slow and it’s destined to fail in less than 10 years, even if you store it carefully. And a 1TB HDD costs 50-60 bucks, how much would it cost to get that on DVDs? That’s almost 250 DVDs.

I prefer to keep buying new and bigger HDDs and keep rotating the old drives to become OS drives (my OS HDDs and work HDDs are distinct). Right now I have 320GB and 500GB for OS duties and 2x1TB for work and backups. Next year, I’ll just reassign the oldest 1TB to OS duties and buy a new HDD to become a new backup drive.
I also use an external USB 2.5 250GB to store the most important stuff and keep it in a different location.

Just don’t forget that you should not trust a new HDD, at least not until a week has passed and you’ve been able to test it all. Sometimes they fail on the first week. Remember this to prevent disaster.


I hope some of this helps to demystify how files work in Reason and Record, and provides a helpful and simple approach to file organization on your computer. If you have any other advice in this area, please don’t hesitate to share it with us.