47 – Beyond Kong Pad Banks

In this tutorial, I’m going to dispel the myth that Kong can’t contain multiple pad banks — that is, multiple kits. Here I’ll show you two ways to extend Kong by either Layering multiple Kong devices, or switching between multiple kits (from one kit to another). Method 1 uses the Combinator buttons to trigger 4 different kits (which can be layered). And Method 2 uses a Kong pad to trigger 4 different Kong banks, making it self-contained in a single Kong device.

It’s come up on more than one occasion that Kong does not have the ability to provide multiple pad banks; that is, multiple Kits inside the same Kong. This is a feature that most other MPC controllers have: usually providing 4 entire kits from which you can select. In this tutorial, I’m going to dispel the myth that Kong can’t do this, and in turn I’m going to show you two different ways you can trigger multiple “banks” or kits for Kong. Method 1 uses the Combinator buttons to trigger 4 different kits (which you can also Layer on top of each other, and also adjust the master volume for each kit independently using the Combinator Rotaries). On the other hand, Method 2 uses a Kong pad to trigger 4 different Kong banks, and is therefore, a self-contained method where everything can be switched within Kong.

The project files can be downloaded here: beyond-kong-pad-banks. There are two Combinators included in a .rns file which is zipped up. These files outline the two different approaches discussed below.

Method 1: Kong 4-bank Kit (Layered)

This is not my favorite way to create banks, simply because you need to use the Combinator controls to determine which bank is being played, and it takes two clicks to a) turn off one bank and b) turn on the other. However, the advantage is that you can layer these banks on top of each other and adjust the volume for all 4 banks. Something you can’t do with the other method. Also, if you need to switch banks instantaneously, your best bet is to program the switch in the sequencer, otherwise you’ll have a slight lag which even the best two fingers pressing on both buttons at once won’t be able to do at precisely the same moment. Automation to the rescue.

Ok, so here’s the low-down. You create a Combinator with a 6:2 Line mixer. Then create four Kong devices underneath the line mixer so they are automatically routed to the mixer’s first four channels. Then load up your favorite drum kits into all four Kong devices.

Once the kits are in place, you open up the Combinator programmer, and for each Kong device, enter the following:

Kong 1 – Button 1 > Receive Notes : 0 / 1

Kong 2 – Button 2 > Receive Notes : 0 / 1

Kong 3 – Button 3 > Receive Notes : 0 / 1

Kong 4 – Button 4 > Receive Notes : 0 / 1

That takes care of the Buttons. For the Rotaries, we’re going to use the Line Mixer to provide level adjustments for each bank, so select the 6:2 Line Mixer in the Combinator programmer and enter the following:

Rotary 1 > Channel 1 Level : 0 / 100

Rotary 2 > Channel 2 Level : 0 / 100

Rotary 3 > Channel 3 Level : 0 / 100

Rotary 4 > Channel 4 Level : 0 / 100

That’s pretty much all there is to it. Now you use the buttons to switch between banks; turning them on or off. You use the rotaries to adjust the level of each bank. Notice that you can layer the banks on top of each other, depending which buttons on the Combinator are active.

Method 2: Kong 4-bank Kit (Self-Contained)

Now for a somewhat different, and possibly more robust, way to create 4 Kong banks. The upside to this method is that you can control everything from the Kong pads directly. You don’t need to use separate Combinator controls. The downside (if indeed this is a downside) is that you cannot layer the pad banks. Each bank is either on or off. And in my mind at least, this seems to work the way most Pad Controllers and MPC devices work. And another downside is that you have to give up one pad to act as the “Pad Bank Switcher.”

Keep in mind that even though this method does not layer the pad banks, there’s nothing to prevent you from building up layers using the NN-Nano drum type inside the Kong kit itself. It’s for this reason that I call this method much more flexible, because you can both switch between pad banks with one pad press and at the same time use layered drums inside the kits you are building. It’s the best of both worlds.

This method employs multiple Kong devices that are chained to each other via Gate CV connections. So first, create your Combinator, and then a 14:2 Line Mixer. Hold down your Shift key and create a Kong device underneath the Line Mixer. This Kong is going to be used as the Main “Player” but will not require any audio to be sent to the Mixer. Everything this Kong does is CV-based, to trigger the other Kong devices.

The next step is to chain all the Kongs together. So starting with the first Kong, send the Gate Out CV from each pad to the Gate In from the corresponding pad in the second Kong. Do this for Pads 1-15, and when finished route Kong 2 to Kong 3 in the same manner, and finally Kong 3 to Kong 4.

Now create a Thor device underneath the Main Kong (hold the “Shift” key down so nothing is routed). This Thor is merely used for CV purposes, so initialize everything, and turn on the “Step Seq” button in the “Global” area of Thor (top panel). Inside the step sequencer, change the Run Mode to “Step” and turn the Edit knob to “Curve 1.” Enter the following: 4 steps, with the first step CV value of 100, and the other three steps to CV value 0 (zero). Here’s what it looks like:

Curve 1 setup in the first Thor's Step Sequencer

Now change the Edit knob to “Curve 2” and enter the following: 4 steps, with the second step CV value of 100, and the first, third, and fourth steps to CV value 0 (zero). Here’s what it looks like:

Curve 2 setup in the first Thor's Step Sequencer

Enter the following in the Modulation Bus Routing Section (MBRS):

S.Curve 1 : 100 > CV Out1

S.Curve 2 : 100 > CV Out2

Flip the rack around to the back and send CV Out 1 to the Mixer Channel 1 Level CV input, and turn the trim knob all the way up to 127. Then send CV Out 2 to the Mixer Channel 2 Level CV input, and turn its trim knob all the way up to 127.

Flip the rack back to the front, select the Thor and duplicate the device. Inside this new Thor, you will have to make changes to the MBRS for the Curve 1 and Curve 2 values. Curve 1 will be set to 100 on the third step and Curve 2 will be set to 100 on the fourth step (with all other steps set to zero). This setup is shown below:

Curve 1 setup in the second Thor's Step Sequencer
Curve 2 setup in the second Thor's Step Sequencer

Flip the rack around to the back and send CV Out 1 to the Mixer Channel 3 Level CV input, and turn the trim knob all the way up to 127. Then send CV Out 2 to the Mixer Channel 4 Level CV input, and turn its trim knob all the way up to 127.

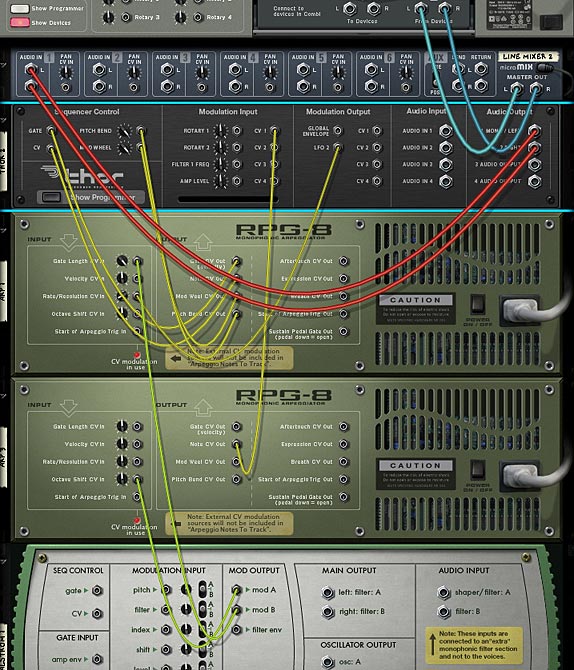
Under the Thor devices, hold the Shift key down and create a Spider CV Merger/Splitter. Then send the Main Kong’s CV Gate Out on Pad 16 into the Split A input on the Splitter. Send one split CV cable into the first Thor’s “Gate In (Trig)” CV input and another split into the second Thor’s “Gate In (Trig) CV input. Pad 16 on Kong will now switch between all the other Kong devices, and though they all play at the same time, only one will be heard, based on the Curve values you set up in the two Thor devices (which are used to control the level of the main mixer).
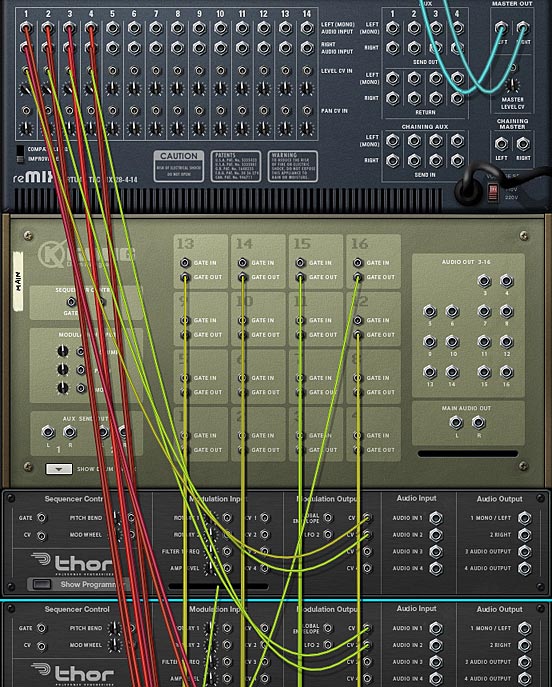
The back of the rack showing the CV routing from the Main Kong and two Thor devices

So what do you think of these setups? Personally, I think it’s nice to have everything self-contained inside the Main Kong device so that you can trigger any pad bank you like without ever having to leave your pad controller. Note also that you are not limited to 4 banks. You can setup as many as you like using this technique. You just need to increase the step values in the Thors, and duplicate the Thor device to create more inputs. It’s an easy way to extend the Kong functionality. Good luck!

46 – Kong Keyboard Piano Roll

Once again we have a new use for Kong. This time, we’ll turn Kong into a Piano Roll. On my Maschine, I can turn the entire device into a Keyboard by going into a special “Pad Mode – Keyboard (Button 1).” So I got to thinking if this was a possible setup for Kong in Reason. Sure enough, there’s an interesting way to work this out. Since most of the time, you’ll probably want to work on a Sampler device for this kind of feature, we’ll set it up within an NN-XT (or at least a group of NN-XTs). This way, you can insert the sample kit of choice, or your own samples directly into the device.

Once again we have a new use for Kong. This time, we’ll turn Kong into a Piano Roll. On my Maschine, I can turn the entire device into a Keyboard by going into a special “Pad Mode – Keyboard (Button 1).” So I got to thinking if this was a possible setup for Kong in Reason. Sure enough, there’s an interesting way to work this out. Since most of the time, you’ll probably want to work on a Sampler device for this kind of feature, we’ll set it up within an NN-XT (or at least a group of NN-XTs). This way, you can insert the sample kit of choice, or your own samples directly into the device.

You can download my sample .RNS patch which includes the Combinator setup here: kong-keyboard-mode. This is a zip file which contains both the .RNS and Combinator file we’ll be discussing below.

Note: A huge debt of gratitude goes out to Ed Bauman (EditEd4TV) for his help getting the CV on the Octave Up/Down pads working correctly. Without his help, you’d be cycling through all the octaves and looping around them using a single pad. Not the most intuitive design. Thanks a million for this Ed. I owe you big time! You can visit him at Bauman Productions or his Reason forum.

Setting up the Kong Keyboard

And now let’s get started creating a multi-purpose Kong Keyboard (aka: the Kong Piano Roll).

To start, create a Combinator and inside the Combinator create a 14:2 Mixer and holding shift down, create a Kong device. This is going to be the main device from which everything else is triggered. Underneath that (and still holding shift down) create two empty Thor devices, and three CV Spider/Mergers. Then without holding Shift down, create an NN-XT, which will auto-route to the first channel on the Mixer.

Inside the NN-XT, load your favorite patch or a group of samples that span the full range of the keyboard. For this example, I used a Wurlitzer Piano. You could even load up your favorite sound effects kit, and use the Kong pads to trigger each of the sounds associated to each of the keys. This is a very versatile little patch.

With the sounds loaded, select them all in the “Sample Zone” window. Then be sure that the Pitch Semitone is set to zero (0). Also flip to the back of the NN-XT and  Route the Gate CV output from Kong’s Pad 1 to the Gate input on the NN-XT. Also set the Osc. Pitch CV input trim knob on the NN-XT to 127.

Duplicate the NN-XT 12 more times, for a total of 13 NN-XT devices. Open each of these sampler devices fully so that you can see the sample editors. Select all the samples contained in the device so they are all highlighted, and then move the Pitch Semitone knob incrementally by 1. Do this for each NN-XT device, moving the semitone pitch upward incrementally by a value of 1. Note that the first NN-XT’s semitone should be set to zero (center). Then NN-XT 2 should be set to “Semitone = 1,” NN-XT 3 to “Semitone = 2” and so on down the line until NN-XT 13 is set to “Semitone = 12.” This gives you a full Octave range of 12 notes +1 (C to C).

Next, flip the rack around and route the Audio Outputs 1 & 2 (Left & Right) for each NN-XT to separate channels in the main mixer. Also route the Gate outputs for each subsequent Kong Pad into the Gate inputs of each corresponding NN-XT.

Now it’s time to set up the “Octave Up” and “Octave Down” pads in our Kong device. Octave Up is going to be placed on Pad 15. So we’ll start there. Rename the first Thor in the Combinator “Octave Up.” Send the Gate CV output from Kong’s pad 15 into this Thor’s  “Gate In (Trig)” CV input (located at the back of Thor’s Step Sequencer area). Also send the CV1 output from Thor to the Merge input 1 on the first Spider Merger/Splitter, and set the Trim knob to 84 (this is the “magic” CV number to get the octave switching correctly). Flip around to the front of Thor, and in the Step Sequencer set Run Mode to “Step” and Direction to “Forward.” Also set the number of steps to 1 only and with the Edit knob set to “note” adjust the Step 1 knob to C2 (which is set fully left).  enter the following in the Master Bus Routing Section (MBRS):

Seq.Note : 100 > S. Transp

Seq.Note : 100 > CV Out1

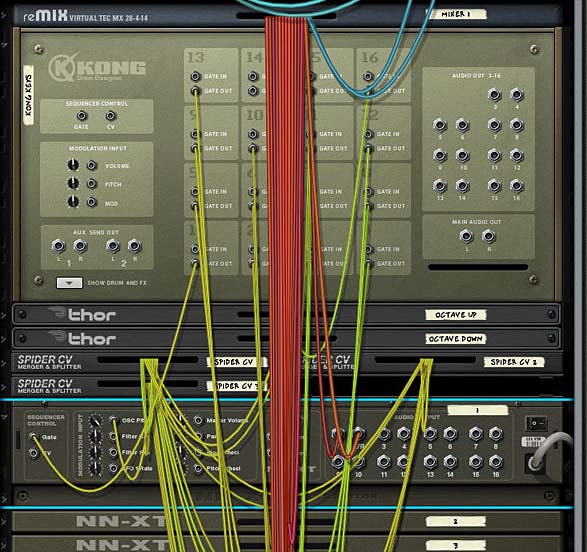
This is used to transpose the value of Thor, and thereby all the NN-XT devices upward by one octave. The only thing left to do is to ensure the CV Out1 gets sent to all the NN-XT devices (into the “Osc Pitch” CV input on each device). This is what the spider mergers/splitters are for. So flip around to the back of the rack, and send the Merged output from Spider 1 into the Split input of spider 1 (A), then daisy chain this input to the B side of the same Spider, and then over to the A side input on the second Spider, and so on and so forth to each A/B splits on all 3 spiders. This gives you 13 free splits to send to the “Osc Pitch” CV inputs on each of the NN-XT devices. Thus ends the setup for the Octave Up pad.

And now for the Octave Down pad. Same idea but in reverse. Here’s what you do: Octave Down is going to be placed on Pad 16. Rename the second Thor in the Combinator “Octave Down.” Send the Gate CV output from Kong’s pad 16 into this Thor’s  “Gate In (Trig)” CV input (located at the back of Thor’s Step Sequencer area). Also send the CV1 output from Thor to the CV Merge input 2 on the first Spider Merger/Splitter, and set the Trim knob to 84 (again, the “magic” CV number to get the octave switching correctly). Flip around to the front of Thor, and in the Step Sequencer set Run Mode to “Step” and Direction to “Forward.” Also set the number of steps to 1 only and with the Edit knob set to “note,” adjust the Step 1 knob to C4 (which is set fully right).  enter the following in the Master Bus Routing Section (MBRS):

Seq.Note : 100 > S. Transp

Seq.Note : 100 > CV Out1

Again, this is used to transpose the value of Thor, and thereby all the NN-XT devices down by one octave. Since you already set up the Spider CV Splitter/Mergers to take the incoming CV values from both Thor devices and merge them to send output to the Osc Pitch parameter of the NN-XT devices, you’re all done connecting your CV cables.

The back of the Rack showing an open NN-XT and the Kong. A little complicated, but honestly, it's not that difficult to set up

One last thing to do. . .

Open up the Combinator Programmer, and select the first NN-XT. Uncheck the “Receive Notes” checkbox at the bottom left corner of the programmer window. Do this for all the NN-XT and Thor devices inside the Combinator. The Kong is the only device that should be receiving notes. If you don’t do this, and end up playing on the Combinator device’s sequencer track, you’ll end up triggering all the NN-XT devices at once. Instead, I would suggest you create a separate track for the Kong device in your sequencer and then add all your midi clips/notes on this Kong track. That way, things are laid out a little more logically.

Note: there’s nothing to prevent you from using the Combinator itself and playing notes on the Combinator’s note lane. Just remember that if you do, you’ll need to play Kong via the proper “Kong note range” with your keyboard (which kind of defeats the purpose here — the whole idea is to use your pad controller to play the Kong device and use it as a keyboard).

Try playing a few notes by using Kong’s pads, and then switch the Octaves up or down accordingly. You’ve now created a fully-functioning keyboard in Kong, which can be used via any 16-pad controller to enter notes or chords for any sound device you can come up with in Reason. The only thing to keep in mind is that the sound coming out of all 13 devices need to be exactly the same (aside from being pitched upward by 1 semitone for each subsequent device).

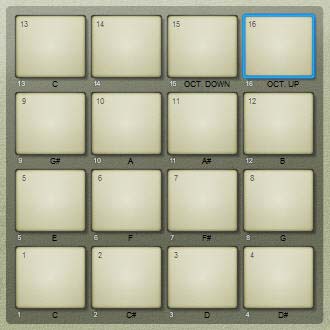
Now add some labels to the front of your Kong device. Here you can see how I labeled things very simply so that you can see the notes you’re playing via each pad. You can also play combinations (ie: chords) by playing multiple pads at once. Very simple idea, but a profound new way to play your instruments via your pad controller.

The labels on the front of Kong. Kong turned into a Piano Roll
The labels on the front of Kong. Kong turned into a Keyboard

Where do You go from Here?

Since all the devices inside Reason (except Kong and the Redrum) have a way to adjust pitch via CV (they all have an “Oscillator Pitch” CV input on the back), you can use this technique for any Reason-created sound. Furthermore, if you are creative enough, you could even apply this technique to a stack of Combinators. Yup. That’s right. You’ll just need to program the pitch changes via a Rotary in the Combinator Programmer, and then send the CV cable into the Rotary CV input. So this is perfectly “doable.”

As always, I’d love to hear what you think of this setup. Does this help you use Reason more creatively? Does it fill a need to perform all your music from your favorite pad controller? Tell me what uses you’ve found for this type of patch. I am always eager to hear what you come up with. Happy music-making!

More Substance

I’ve been thinking a lot lately about all the same questions I see over and over in the Reason forums. So I thought I would try to grab the best and brightest resources and tutorials (aside from my own. . . ahem!) and create a sort of compendium of the best things out there that every Reason and Record user should know about.

This is an article I’ve wanted to write for a while. I’ve been thinking a lot lately about all the posts I see and all the questions asked all over the place, and it usually boils down to a few simple questions:

  1. How can I give my drums more life
  2. How do I cross-fade in Reason
  3. How to I create fader groups in Record
  4. Where do I find the best patches?
  5. Where do I find a “Midi to Frequency” Converter?

And so on.

So I thought I would try to grab the best and brightest resources and tutorials (aside from my own. . . ahem!) and create a sort of compendium of the best things out there that every Reason and Record user should know about. These are tutorials written by others that are exceptional, and get to the heart of the main questions that 99% of people ask. Or additional information that you should become familiar with.

In an ideal world, this would mean that we can now devote 99% of our time to other matters and move away from asking the same old tired questions. Of course, if history is any teacher, that’s an incredible fantasy. We’ll still get the same questions, and we’ll still have to provide the same answers. However, as far as I’m concerned, when I now provide the answer, it will amount to a single link that reaches back to this page.

Enjoy.

The Top Resources (in no particular order)

Before listing out some great resources, I’m going to have to say that the grand-daddy of them all is the Reason User Manual or Online Help system (F1 when in the software folks). There is also the Record User Manual, if you have Record. Read it, know it, love it, kiss it at night before you go to bed. It’s your bible for all things Reason. Read it cover to cover!

1. I can’t do this or can’t do that in Reason? Well, some (if not, most) things you CAN do! Here’s a few you may have not thought possible:

So next time you say you can’t do that. Why not try doing it yourself or digging to find out if it can be done first.

2. How do I create better Mixes? How do I make my drums come to life? Mixing and Mastering.

3. And speaking of frequencies. . . And lots of other useful charts. . .

4. How do I make this or that sound? Synthesis Secrets.

4. Where do I get some great new patches, Samples, and Loops? The following make excellent Refills in my opinion. Some free. Some not.

now go out and make your own!

Honorable Mentions

. . . and all the other Resources you see in the right-side column on this blog.

Hopefully you all find this information as useful as I do. Any other great sites I should link here, please feel free to comment or email me and if they’re really useful, I’ll be happy to add them in. Until next time, good luck in all your musical pursuits!

45 – RPG-8 Arpeggio Fun (Pt.3)

And now for the third and final installment of my series which explores the RPG-8 in depth. In this tutorial, I’m going to go a little deeper and explore the CV and Pattern possibilities, using the Arpeggiator for some versatile sound control techniques.

And now for the third and final installment of my series which explores the RPG-8 in depth. In this tutorial, I’m going to go a little deeper and explore the CV and Pattern possibilities, using the Arpeggiator for some versatile sound control techniques. So let’s get started.

You can download the project files here: advanced-arp-setups. There is one .RNS file which contains the 3 setups discussed below. In addition, the 3 separate Combinators are included. The whole thing is in a zip file. Open them up to follow along with the ideas below.

The RPG-8 CV Inputs

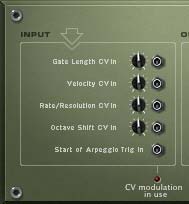
The 5 CV inputs on the back of the RPG-8 Monophonic Arpeggiator
The 5 CV inputs on the back of the Arpeggiator

Before jumping into the setups, it’s important to know some of the more advanced CV options that are available on the back of the RPG-8 device. These include the following 5 CV inputs:

  1. Gate Length CV In
  2. Velocity CV In
  3. Rate / Resolution CV In
  4. Octave Shift CV In
  5. Start of Arpeggio Trig In

Note that if you use any of these CV connections, the changes that they affect on your Arpeggio will not be reflected if you “Copy Arpeggio Notes to Track.” In other words, if you see the blinking light at the bottom of the CV connections on the back, AND you copy your arpeggio notes to track, the notes will not sound as intended (or with any CV input changes). But as I said in the first part of this series, there’s really very little need for you to copy the notes to track in the first place. Instead, keep any RPG-8 devices included in the .RNS file. This way, you’ll never come up against this problem.

Note: When using the CV inputs, the incoming CV is merged together with the setting on the front panel. For example, if your Gate Length is set to 40, and a CV value of +10 is sent to the Gate Length CV Input, then the resulting Gate Length will be 50. Same goes for the first 4 CV inputs. “Start of Arpeggio Trig In” is either in an “on” or “off” state, and therefore, this rule doesn’t apply.

If you look at how this graphs to the front of the RPG-8, you can make the following connections, which should help you to visualize what part of the RPG-8 is being controlled via CV:

The front of the RPG-8 highlighting which parameters can be modulated via CV input (on the back).

If you think about this for a moment, it takes a little to wrap your head around the concept. You are using CV to control a device, which in turn controls another device. That’s the gist of it. So armed with this knowledge, here are a few Arpeggiator setups to showcase some advanced Arpeggiator setups. Bear in mind there are probably a million and one ways to set things up. This is simply just a little taste of what can be done.

Note: For the following setups, you should add a simple chord that runs the length of 4-8 bars in a clip on the Combinator’s sequencer track. Then set the Left / Right locators at the start/end of the clip. In the transport bar, click the “Loop” button  so that the clip loops over and over (see the project download .RNS file for reference).  This ensures you can hear the effect of the Arpeggiator (s) as you play around with the settings.

Using 2 Arpeggiators to Control a Single Sound Source

This is a great way to get familiar with using both the CV input connections, as well as the Pattern section. First, let’s look at the video, and then I’ll briefly outline the setup.

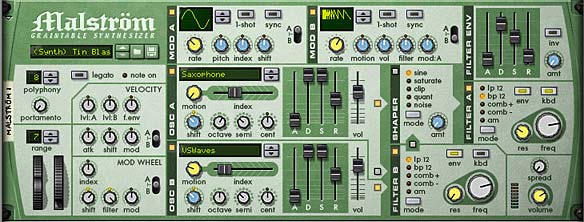
In this setup, you create a Combinator with a 6:2 line mixer. Then create a Malstrom. Set up a basic sound, as shown below. Then add an RPG-8 device underneath the Malstrom. It will automatically be routed to the Malstrom’s Note / Gate CV inputs.

The front of the Malstrom Panel, with the sound I've chosen to showcase this Arp setup

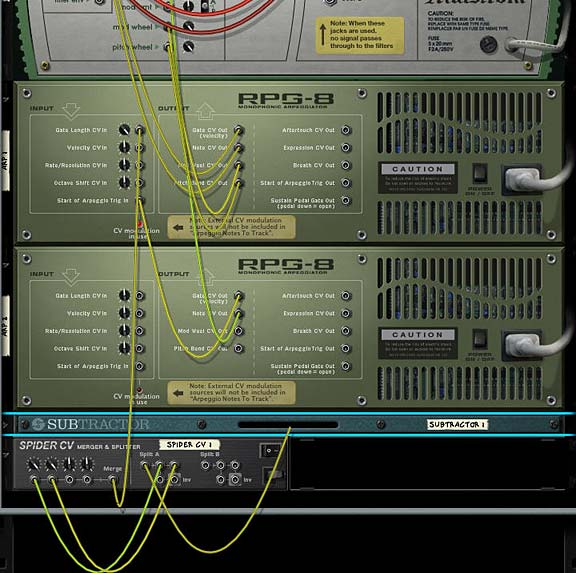
Now create another RPG-8 underneath the first. Flip it around and route the Note CV output into the “Shift” CV input on the Malstrom. Send the Gate CV output of the second RPG-8 into the “Start of Arpeggio Trig In” on the first RPG-8.  The note is now controlling the “Shift” parameter of the Malstrom’s sound. And the Gate is now controlling when the first Arpeggiator is going to start triggering (or rather, retriggering).

On the second RPG-8, press the “Pattern” button. Enter in a new pattern by skipping over a few steps (clicking the pattern step lights just above the Pattern window).

Now test it out by playing it. Notice that the notes played in the second RPG-8 determine how high or low the “Shift” parameter goes, and the “Gate” of the second RPG-8 determines the Starting of the first RPG-8 (retriggering). Since you entered a pattern on the second RPG-8, this pattern will determine when and which notes will be sent from the second RPG-8 to the first (as well as to the Malstrom).

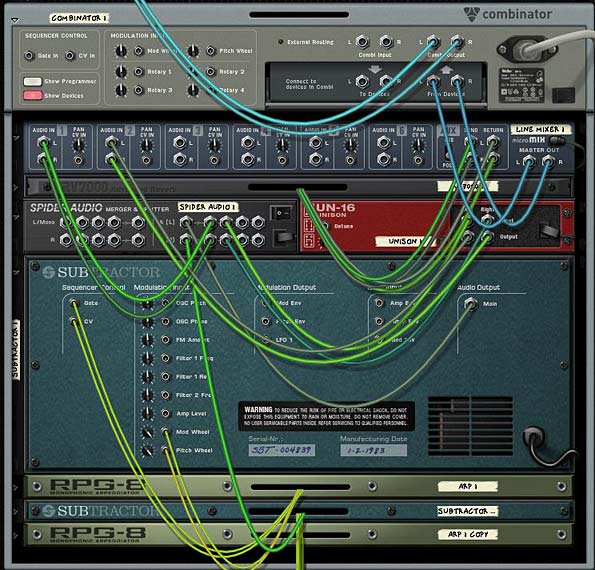
The main CV routings on the back of the rack. Note the Subtractor's LFO1 is going into the Spider A Splitter.

The real fun comes when you start applying various modulations to the Combinator Rotaries and buttons. For example, try setting the “Pattern” of the second RPG-8 as the source for Rotary 1. Now you have a real-time pattern switcher. That’s just one example.

Controlling and Controlled by a Single Sound Source

In this setup, we’ll use Thor to both Control the Arpeggiator, which in turn is used to control the note/gate of the Thor sound source. It’s kind of cannibalistic because you’re using parameters on Thor to control a device which in turn is controlling itself. But you can get some really nice results this way. Here’s how it operates:

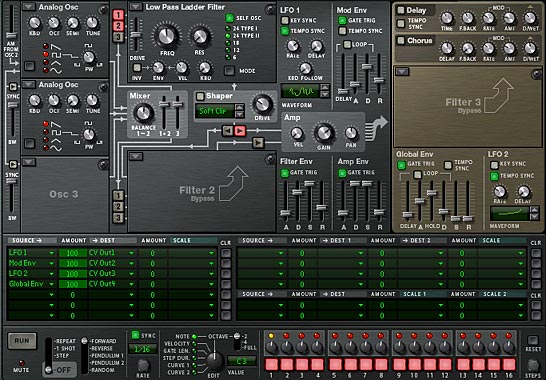
The first thing to do is create a Combinator with a 6:2 line mixer. Then create a Thor and RPG-8 device in that sequence. Everything will be auto-routed. Add in your favorite Thor patch. After this is done, create 4 CV parameters in Thor’s Modulation Bus Routing Section (MBRS) as follows:

LFO 1 : 100 > CV Out1

Mod Env : 100 > CV Out2

LFO 2 : 100 > CV Out3

Global Env : 100 > CV Out4

The front of the rack showing the Thor settings and MBRS routings.

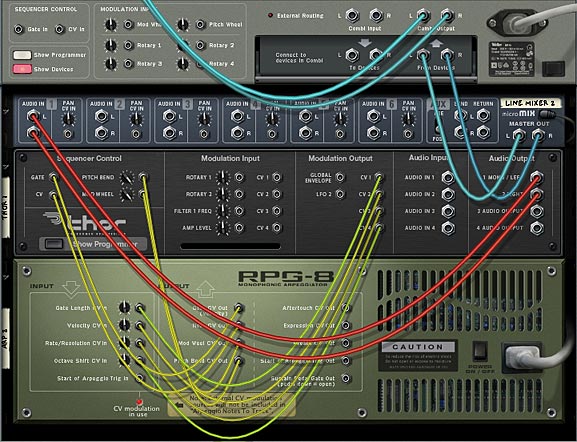
In this way, Thor has four modulations that can be applied to all four CV inputs on the back of the Arpeggiator. Next, flip the rack around and lead each CV Modulation Output to the four CV inputs in the RPG-8, respectively. From there, it’s just a matter of tweaking the settings for the front panel Thor modulations, as well as the front of the RPG-8 parameters and the trim trim pots on the back of the RPG-8 (Remember that the RPG-8 CV Inputs merge the incoming signal with the front panel parameter settings, so you have to strike the right balance between the CV input trim knobs and the front panel equivalents). All three of these things (Thor modulations, RPG-8 CV input trim knobs, and RPG-8 front panel settings) determine the final sound of the Arpeggio coming out of Thor.

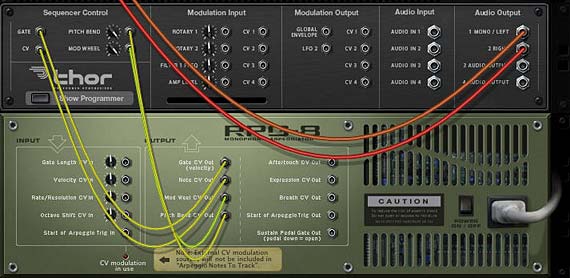
The back of the rack showing the Thor modulating the RPG-8, which in turn is creating Arpeggios for Thor

Bringing Multiple CV Sources together with the RPG-8

In this type of setup, I’ll use the Waveforms in a Malstrom to affect parameters in an RPG-8, and in turn use 2 RPG-8 Arpeggiators to affect a Thor sound source.

In this setup, create a Combinator with a 6:2 Line Mixer. Then create a Thor device, and RPG-8 device under that. This RPG-8 will auto-route to the Thor device. Then create another RPG-8 underneath that, and finally, holding the shift key down, create a Malstrom device under the bottom RPG-8. Make the following additional CV connections at the back of the rack:

Thor LFO 2 Output > RPG-8 1 Rate/Resolution CV Input (Trim Knob = 12)

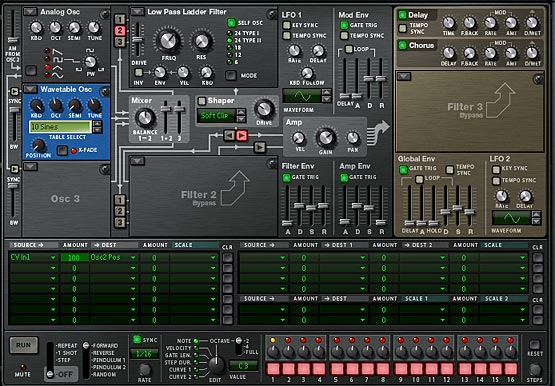
RPG-8 2 Note CV Output > Thor’s CV 1 Modulation Input (Thor’s front MBRS panel should be “CV In1 : 100 > Osc2 Pos”)

Malstrom Mod A Output > RPG-8 2 Octave Shift CV Input (Trim Knob = 64)

Malstrom Mod B Output > RPG-8 1 Gate Length CV Input (Trim Knob = 127)

The CV routings at the back of the rack

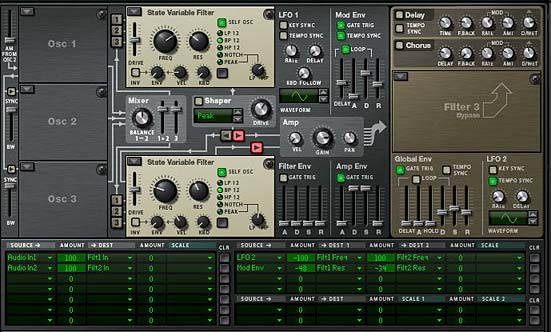
The front of the Thor device has an Analog Oscillator in the first slot and a Wavetable in the second slot, both going through a low pass ladder filter in Filter Slot 1. See below for the settings:

The settings on Thor's front panel.

Once this is done, set up the Malstrom to use both curves. The Curves should be set as follows:

Mod A:  Curve #3 (square wave) set to sync with a rate of 5/4

Mod B: Curve #2 (double saw wave) set to sync with a rate of 1/4

The following shows the settings:

The Malstrom Mod A and Mod B curves used to Modulate the Arpeggio

Now take a listen to what you’ve created. As in the previous examples, let the sound loop as you make any final settings to the Curve/Rates in the Malstrom, CV trim knobs on the back of the RPG-8 devices, and Arpeggiator settings on the front of the Arp devices. Remember, what I’m providing here are just a few examples of what can be done. There’s so much more you can explore on your own. So take it as a template and come up with your own designs.

Where do you go from here?

Anywhere quite frankly. Another thought I had, which I haven’t tried yet, is to try using the Arpeggiator to control the parameters of the Thor Step Sequencer. I haven’t tried it yet or worked on anything in that respect, but I think you could definitely find innovative uses like this.

I think, when it comes to the RPG-8, there are several interesting possibilities. Just always keep in mind the notes on the sequencer need to be on the Arpeggiator track. This one tip is the one that most pops up when people are trying to figure out how to use the device. So place clips either on the Arpeggiator track, or if the Arpeggiator is inside a Combinator, place the clips on the Combinator and ensure the RPG-8 is “receiving” notes in the Combinator’s Modulation section (it does by default).

So there you have it. A few different approaches to using the RPG-8 Monophonic Arpeggiator in Reason 4 or 5. As you can see, there’s a lot of flexibility to the device. Even those who claim to be purists; drawing in their notes by hand in the sequencer or playing them out on a keyboard controller should be encouraged to take a look at this versatile device. It’s not just for arpeggiating notes you know. Like Thor, there’s a lot under the hood of this device that may go unnoticed, even by professionals. I just hope this encourages them to take another look at one of my favorite Reason devices. Until next, time, thanks for reading and watching, and please leave a comment if you like what you see or you have any questions.

44 – RPG-8 Arpeggio Fun (Pt.2)

In Part 2 of my exploration of the RPG-8 Monophonic Arpeggiator, I’m going to dig a little deeper under the hood and see what kind of fun we can have with it. The arpeggiator is usually used to enhance the synth devices. But with a little tweaking, we can apply it to other areas as well, like Kong and Redrum, as well as using it to create multiple arp lines from the same synth. So let’s get busy.

In Part 2 of my exploration of the RPG-8 Monophonic Arpeggiator, I’m going to dig a little deeper under the hood and see what kind of fun we can have with it. The arpeggiator is usually used to enhance the synth devices. But with a little tweaking, we can apply it to other areas as well, like Kong and Redrum, as well as using it to create multiple arp lines from the same synth. So let’s get busy.

To start, the project files for both Part 1 & Part 2 can be downloaded here: arpeggiator-fun. The files are fairly self-evident. You have one .rns file which shows you the basic RPG-8 setup, and a few combinators to showcase some of the tricks I’ll show you. The file is available in zip file format.

Creating a Left/Right Double Arp Setup

Creating an RPG-8 to control a device is all well and good. But how about kicking it up a notch. Let’s create two Arps that are controlling the left and right audio signals and affecting them with different Arpeggios (actually, in this tutorial the Arpeggios are similar, but travel in two different directions and have different “Insert” parameters to play slightly different arpeggios left and right). In this case, create a Subtractor, adjust the parameters to get a synth line that you like (melodies work well). Then create an RPG-8 underneath and the Arp device auto-routes to the Subtractor. Once this is done, select both the Subtractor and RPG-8, right-click and Duplicate the Devices and Tracks. The following shows the routing setup at the back of the rack. Note that I also split the device signals and sent one audio pair through a Unison device to fatten it up a bit.

The Subtractor and RPG-8 routing at the back of the rack to set up your melodic synth lines.

The Subtractor becomes the perfect experimental sound source, because this synth is monophonic to begin with. The video below shows in more detail how this setup is put together.

Using the RPG-8 to Control Kong

This is just a quick little look at a different way you can play Kong. Everyone is always looking at new ways to use the Kong device, so here’s a new one. This procedure explains how you can pair the Kong device with the RPG-8 Arpeggiator. This opens the possibilities to use the RPG-8 to act as a sequencer for your drums, and if you turn up the rate you can get some wonderful glitch sounds out of Thor.

In this setup, you create the Combinator with a 6:2 Mixer (the mixer is optional though), and then the Kong device. Create the RPG-8 under the Kong device and it automatically routes up with Kong via the 4 outgoing CV cables.

Note: In the following three setups (with Kong, Redrum, and the Dr.OctoRex), the methods only use the Gate trigger, meaning that the Arpeggiator is only controlling the Gate of the drums. Kong doesn’t have internal CV pitch controls, so you can’t directly control the pitch of Kong. However, it should be noted that if you use the Arpeggiator to control Redrums, you could send the Note / Gate CV cables of an RPG-8 into the Gate / Pitch CV input on an individual drum. This type of setup allows you to create 1 RPG-8 device to control 1 drum in Redrum. So you can imagine a setup that uses 10 RPG-8 devices to control all the drums in a Redrum Kit. Try that out if you want pitch control (and who said Redrum was obsolete?).

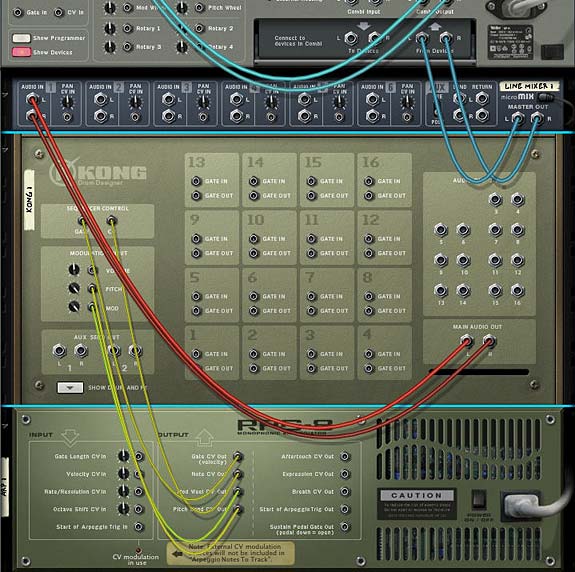
The routing on the back of the Combinator: The Kong and RPG-8 Arpeggiator

From here it’s a walk in the park to use the Arpeggiator to trigger Kong. You just need to create some notes on the sequencer in the usable range of Kong (either C1 to D#2 or C3 to B6). To do this, add the notes in the Combinator track in the sequencer, and with the note clip selected, open the Tools Window (F8). Then use the “Transpose Notes” function, select “Random” and enter the minimum/maximum note value and press the “Apply” button. Done.

Here’s the video to show you the setup details:

Using the RPG-8 to Control a Redrum

Now let’s see if it’s possible to have an Arpeggiator trigger the Redrum, so that Reason 4 drummers aren’t left out in the cold. The downside to using an Arp to trigger the Redrum is that there are no single set of CV connections to trigger the device as a whole. You could trigger the gates of each drum separately. However, you can’t trigger all drums at once. What’s needed is a workaround. And this workaround comes in the form of putting the entire setup inside a Combinator and having the Arpeggiator trigger the Combinator via its CV connections.

Create the Combinator as you did previously with the Kong setup. Then add your Redrum with your favorite kit. Now, instead of creating the RPG-8 under the Redrum, go outside the Combinator and create it underneath the Combinator itself. This will automatically connect the CV cables to control the Combinator. Once this is done, move the RPG-8 inside the Combinator (so you can save the entire Combinator patch later).

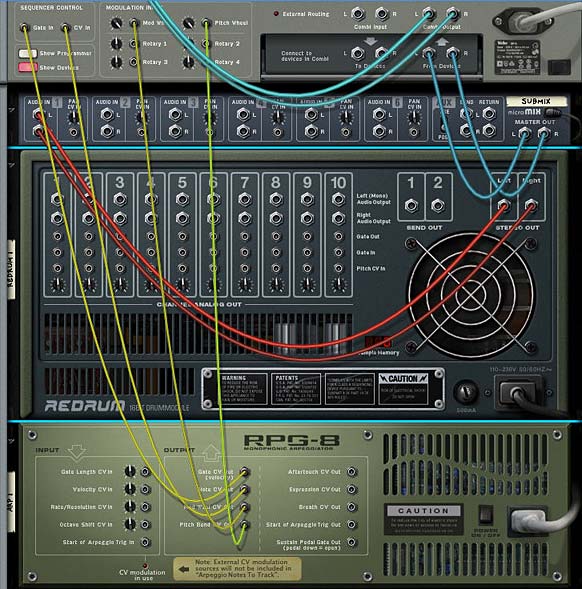
The alternate Redrum routing where the Arpeggiator triggers the Combinator and any devices inside.

Now, as we’ve done before, we can create some notes on the Combinator lane and adjust them from C1 to A1, which is the usable range of the Redrum device.

See below for the video which details this setup.

Using the RPG-8 to Control a Loop — That’s right, a Loop!

Ok so this one is a little out there. You’re going to get some very glitchy results, but in the same way we can Arpeggiate the Redrum, we can also arpeggiate the Dr. OctoRex loop player. Keep in mind this is really going to get glitchy. So be prepared. Because you’ll need to really really experiment with this one to get something you like out of it. And it’s ultimately completely unpredictable. But here’s the idea in the following video:

Now let’s look at the issue of Pitch. Since the above videos show you how you can use the Gate of the Arpeggiator to trigger the gate of the drum devices, we need to do a little adjustment to set up the Pitch correctly. With the Redrum, for example, you can set up the Arpeggiator to trigger the Gate / Pitch CV inputs on each individual drum. On the Dr. OctoRex, you can leave the Gate CV out from the Arpeggiator where it is in the Combinator, but move the Note CV out cable to the Osc. Pitch input on the back of the Dr.OctoRex. Here’s a video which outlines how these methods are achieved:

So those are just a few ways you can play with the RPG-8 to create interesting melodies and experimentation. Do you have any other ideas you would like to share when it comes to creative Arpeggios? Anything you would like further explained? Drop me a comment and let me know.

43 – RPG-8 Arpeggio Fun (Pt.1)

In this tutorial, I’m going to show you a few interesting ways you can use the RPG-8 Arpeggiator in Reason 4 and above. We’ll first cover the basics and then move into more interesting territory in Part 2. For this tutorial, I’ll run through setting up an RPG-8 device, and then explore all the device parameters.

In this tutorial, I’m going to show you a few interesting ways you can use the RPG-8 Arpeggiator in Reason 4 and above. We’ll first cover the basics and then move into more interesting territory in Part 2. For this tutorial, I’ll run through setting up an RPG-8 device, and then explore all the device parameters.

To start, the project files for both Part 1 & Part 2 can be downloaded here: arpeggiator-fun. The files are fairly self-evident. You have one .rns file which shows you the basic RPG-8 setup, and a few combinators to showcase some of the tricks I’ll show you. The file is available in zip file format.

Arpeggios for Dummies

The RPG-8 is a device that allows you to play arpeggios. What’s an arpeggio? In simple terms, it’s a “broken chord” whereby the notes of a chord are played successively rather than simultaneously. To think of this in simple piano terms, if you were to play three notes in a triad (first, third, and fifth, for example), you would place all three fingers on the three different notes and press the keys at the same time. This produces a chord. Instead, an arpeggio plays the chord in succession: your first finger goes down on the first note, second finger then goes down on the third note, and third finger then goes down on the fifth note. The notes are played one after the other.

Setting up the RPG-8

Before jumping into an explanation of setting everything up and exploring all the parameters, I thought I would put together this video and show you visually and audibly how it all works. Then you can read the full explanation below.

Setting up the RPG-8 is fairly easy. Create your sound device (Subtractor, Malstrom, Thor, NN-XT, for example), then create the RPG-8. Everything is automatically routed up for you. From then on, all you need to do is enter some notes on the RPG-8 track (NOT THE SOUND DEVICE), and you’ll hear the Arpeggios playing from those notes. Of course, if you set up the RPG-8 inside a Combinator, you might want to create a special track for the RPG-8 in the sequencer — though placing notes on the Combinator track will trigger the RPG-8 to play (because the RPG-8 is set to Receive notes in the Combinator). Just make sure that any notes you want to play arpeggiated should reside on the RPG-8 track or in the Combinator that houses the RPG-8 and you’ll be safe.

Default routing for the RPG-8 Monophonic Arpeggiator

It should also be noted that the RPG-8 is a monophonic device. In other words, it’s one note at a time. You can create polyphonic setups by duplicating the device (both the sound source and the RPG-8) and then sending the audio output from both devices to different channels on a mixer or merging them together using a Spider Audio Merger/Splitter. This is a common setup or workaround to making your arpeggios polyphonic. Yeah, it’s a bit of a pain. But it’s not a major hassle either IMHO.

RPG-8 Parameters

So now that you understand how an arpeggio operates, we can easily make a few connections on the RPG-8 device. Open one up and you’ll see the following controls:

The RPG-8 Front Panel, with all the Parameters shown

Note: The RPG-8 is divided into 3 main areas. On the left, you have the “Midi-CV Converter” area. Translated into english, these are your “Keyboard” controls. This includes the Velocity knob, Hold button and Octave Shift settings. Generally, these controls relate to how notes are input from the keyboard controller (or other midi controller device).  In the middle, you have the “Arpeggiator” controls, which affect the way the arpeggios operate. Finally, on the right side, you have the “Pattern” section, which can add a separate internal rhythm to the arpeggios.

Velocity: As with any other device, the Velocity value is determined by how hard you play your keys on the keyboard. The harder you play, the louder the notes will sound (depending, of course, on the velocity levels you set up in the device being controlled). When this knob is set fully right, you are in manual  mode, which means the velocity is determined by how hard or soft you play the keyboard (this is the default). If, however, you set the knob anywhere else on the dial (left of the manual position), the velocity level is fixed, based on the dial. For example, if you set the knob to 64, then no matter how hard or soft you play the keyboard, your velocity level will remain on 64 (ie: 50% or half-level velocity).

Hold: This is one of the best features of the Arpeggiator device in my humble opinion. Using this simple button can free you up to do other things on your keyboard while the arpeggio continues. The way it works is you turn it on, then play a chord. Then lift your hand off the keyboard (Release). Notice that the Arpeggio continues to play? Now play a new chord. The new chord will overwrite the old chord and continue to play. Turn the “Hold” button off, and the arpeggio stops playing. In this way, you can continue to maintain an arpeggio playing while jumping off to play other devices. Or you can create a series of Arpeggiators and play different rhythms on each device to have them all running their own rhythms and chords simultaneously, without ever entering more than one chord on each device. One of the most useful features of the RPG-8 to be sure!

Note: If you have the Arpeggiator On/Off button (see below) turned off, adding a new note will not overwrite previous notes. Instead, the Hold will leave the gate open, meaning the notes will be “additional” to the previously held notes. This may be what you want or intend. But usually, you want the notes replaced when they are held. Still, it’s nice to have options.

Octave Shift: This allows you to transpose the notes up or down 3 octaves each way. You can use this to shift notes up or down an octave in a “live” setting, or if you find you’ve input notes on the sequencer that are too high or too low, you can adjust them here. Nothing too exciting, and I think the idea behind this feature is pretty self-evident.

The Arpeggiator’s “On” button: 99% of the time you’ll want to leave this button on. It simply turns on/off the Arpeggiator section of the device. See the above note for a situation where you may want this button turned “Off.”

Mode knob: This can be thought of as the “direction” of your arpeggio. If you think in terms of the previous triad I was explaining, up would play the root, third and fifth in succession, while down would play the fifth, third, and root. Up/Down would play the root, third, fifth, third, root. Random would play the notes in a random order. Finally, manual creates arepeggios that move in the same direction that the notes are played when they are input. Input a C1 and then a C2 and then a C0, the notes will arpeggiate up from C1 to C2 and then down from C2 to C0. It basically follows the direction you play manually.

Octave: This determines the range of your arpeggio. Using our example, If you set this to 1 octave,  the arpeggio will not stray from the octave that is played. The triad will be played in succession and within the octave that is initially input. If you enter 2 Octaves as your parameter, the triad will play within the range of the current octave plus an additional octave above. It’s important to note that the octave range increases. It does not decrease. If you wish to extend the range one octave below the current octave, an easy solution is to set the Octave Shift parameter to “-1” and then select the “2 Oct” button. This essentially places the arpeggio within the two octave range; one octave below the current octave AND the current octave being played. Sounds confusing, but becomes obvious once you start applying the parameters to an arpeggio which is currently playing.

Insert: Probably the most complicated aspect of the Arpeggiator section, the best way to think of the insert function is to understand that it injects a rhythm to the Arpeggio by altering the sequence of notes being played. This is another one of those “great to have” features because it can add a lot of interest to the sound, without having the arpeggio sound static or dull.  “Hi Insert” will start by inserting the highest note, then play the next note in the arpeggio sequence; inserting the highest note after each subsequent arpeggio note (after every second note). “Low Insert” will start by inserting the lowest note, then play the next note in the arpeggio sequence; inserting the lowest note after each subsequent arpeggio note (after every second note). 3-1 and 4-2 are more rhythmic in nature and don’t actually add any new notes into the sequence. “3-1 Insert” plays 3 notes forward, and then goes back 1 note, then starts playing 3 more notes from there. “4-2 Insert” plays four notes forward, and then steps 2 notes backward, and plays the following 4 notes. Hi and Low Insert can be thought of as introducing new notes, while 3-1 and 4-1 Insert simply reshuffles and restarts the arpeggio sequence at a different point in time (either 1 note back after 3 notes are played, or 2 notes back after 4 notes are played).

Here are some examples using real-world arpeggios for a C Major chord (C, E, and G) with the Inserted notes listed in rounded brackets and restarted notes listed with square brackets (with the Arpeggio Mode set to “Up” and the Octave setting set to “1 Oct”):

No Insert: C – E – G – repeat

Low Insert: (C) – E – (C) – G – repeat

Hi Insert: (G) – C – (G) – E – repeat

3-1 Insert: C – E – G – [E] – G – C – E – [C] – E – G – C – [G] – repeat

4-2 Insert: C – E – G – C – [E] – G – C – E – G – [C] – E – G – C – E – [G] – repeat

Notice that the 4-2 insert is identical in sequence to the “No Insert” setting. This is because the way the algorithm works on a triad is indiscernible to not having any insert set. If you were to create a 4-note chord, however, the 4-2 Insert will have a noticeable difference. The moral of this story: Insert values sometimes don’t have any effect on the arpeggios you are playing.

Rate knob: This determines how fast the notes are played. Very simple. You can have it free-form, meaning that the rate is not tied to the song’s tempo, or you can have it synced, meaning the speed is tied to the song’s tempo.

Note: if you want to tie the rate parameter to a Rotary within a Combinator, you can expand the capability by assigning both the Free Rate and Sync Rate to the same Rotary and then tie the sync parameter to a button. With this setup, you can use one Rotary to change both the free and sync rate, and switch between the two via the sync button on the Combinator. Easy as pie!

Gate Length knob: This determines when the gate is triggered. If it is fully left, the gate is “tied,” meaning that the gate is always on. In other words, the notes are meshed together and seamlessly play from one to the next, with no “breather” or “break” between the notes. If the gate length is further to the right, the gate breaks up the notes more and give a sort of “staccato” feel. Fully right and the gate makes the note extremely short, if not inaudible.

Single Note Repeat button: This is one of those parameters I think should be under the “Keyboard” section, but anyway. It basically determines how the Arpeggiator works when single notes are played. If left on (default), playing a single note triggers the gate over and over. So the note repeats based on the “Gate Length” setting. If turned off, any single notes that are played will not repeat, but playing multiple notes at once (polyphony) results in the Arpeggiator being triggered. This can work very well if you want to play a monophonic synth line, and break into an arpeggio when more than one note is played simultaneously. Very dynamic when used correctly.

Pattern button: This turns on the “Pattern” section of the device. The pattern section can best be described as a mini-matrix or mini sequencer inside the RPG-8. You can use the +/- “Steps” buttons to reduce or add steps into the pattern. By default, when you turn on the pattern, all steps in the pattern are enabled. This means the arpeggio plays through from the beginning of the pattern until the end. If you click on the pattern step buttons above the pattern window, you end up removing notes inside the pattern. This means the pattern will “skip over” those steps and move on to the next step which is enabled. It’s very similar to the way the Thor step sequencer works. Use the shuffle button to add a sense of shuffle or swing to the pattern (similar to the shuffle button on other devices like the matrix and Redrum).

Note: One really neat thing is that you can program the pattern to be changed on the fly by controlling it via one of the rotaries on the Combinator. This gives you access to 127 different patterns. However, if you automate it directly in the sequencer, you have access from -32768 to +32767 pattern variations. That’s a total of 65535 pattern variations. Yup. You got that right. So automate this sucker in the sequencer if you’re in the studio, and map it to a combinator if you need to play it live.

Note: The pattern window helps to show you which notes are playing within the arpeggio. It can play the full range of notes from C-2 to G8, but the pattern window will only display notes from A-2 to D#7. That’s why the notes appear so flat. It has to show 8.5 Octaves worth of notes (103 notes in total). But it does! Perhaps that’s where the “8” comes from in the name of the device?

So that’s the RPG-8 in a nutshell. Stick with me and I’ll show you some further tips on how to use this device in my next tutorial. Drop me a line and let me know what you think so far, or if you’re looking to do something specific with the device. I’d be happy to try and help you out. All my best!

42 – Stacking Modulated Filters

In this tutorial I’m going to show you two things: 1. How to Stack multiple filters together to process a sound, and 2. How to use Thor’s filters to supplement other devices in Reason that don’t have those same filters (think of the Formant and some parts of the State Variable Filter).

In this tutorial I’m going to show you two things: 1. How to Stack multiple filters together to process a sound, and 2. How to use Thor’s filters to supplement other devices in Reason that don’t have those same filters (think of the Formant and some parts of the State Variable Filter).

You can download the project file here: stacking-filters. This is a zip file that contains the .rns file with the two Combinators used in the making of this tutorial. Those same two Combinators are provided separately as well. The files work with Reason 4 and above.

Stacking Thor Filters (In a Nutshell)

Before jumping into the tutorial, if you are a primarily visual person (or just a YouTube whore), you can watch the video below to see the process outlined:

It should be noted that this is merely one method to stack a few filters. I find this method gives you a lot of flexibility when it comes to processing the sound, because you can adjust the amount of filtered sound which is mixed with the original sound (in other words, parallel processing). So let’s get started.

  1. First off, Create a Main 14:2 Mixer at the top of your rack. Then create a Combinator. Then inside the Combinator, create in order a 6:2 Line Mixer, RV7000, Spider Audio Merger/Splitter, and Malstrom. Then holding the shift key down (to prevent auto-routing), create a Thor synth device.
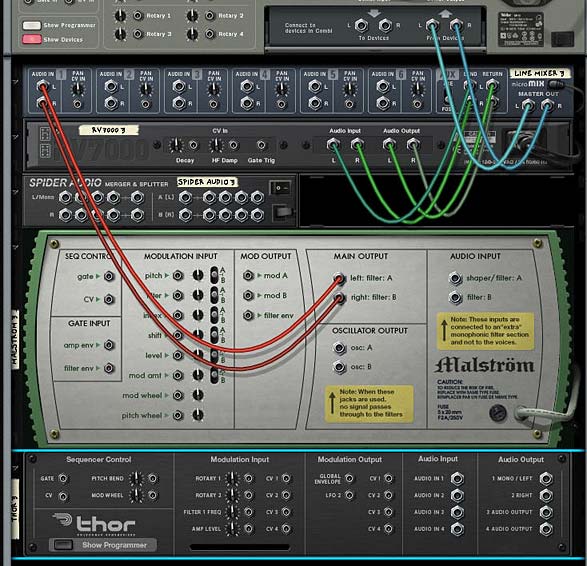
  2. Flip the rack around (Tab) and create the following routings: Remove the Malstrom Main A/B Outputs and reroute them to the Main Left/Right splits in the Audio Splitter. Then send one pair of splits to Channel 1 on the Line Mixer. Send another Split into Thor’s Audio Input 1 & 2. Then Send the Left/Right Audio outputs from Thor into Channel 2 on the Mixer.
    The view of the back of the Rack before all the routing
    The view of the back of the Rack before all the routing.

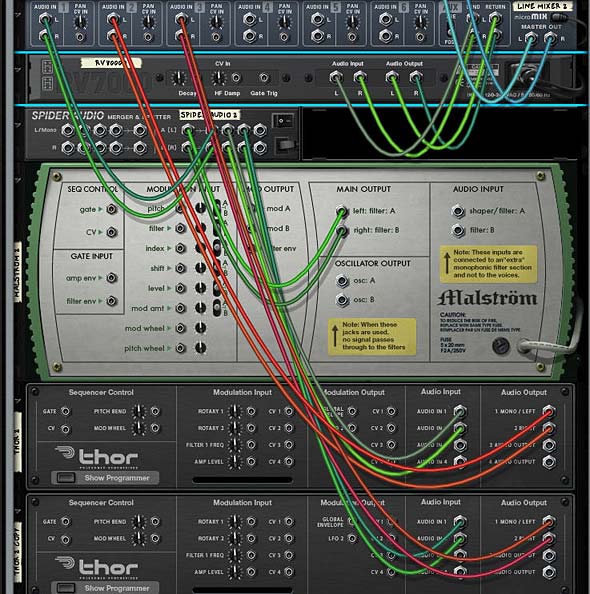
    The view at the back of the rack after all the routings -- we'll get to the second Thor's routing in a bit. . .
    The view at the back of the rack after all the routing -- we'll get to the second Thor's routing in a bit. . .
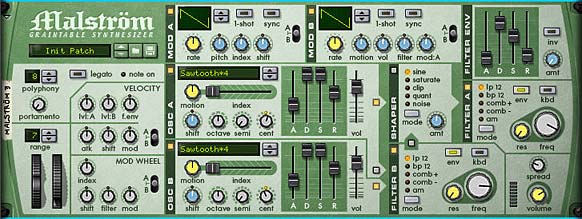
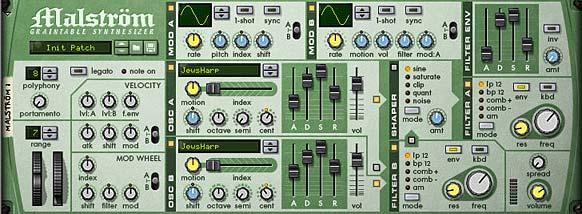
  3. Flip back around to the Front (Tab). In the Malstrom, turn on Oscillator 2, and set both Oscillators to “Sawtooth*4” and both Waveshapes in Mod A and Mod B to “Curve 2.” Set the ADSR envelopes of  both Oscillators to 40/127/127/75, respectively (This turns the sound into a much more progressive slow-moving Pad). Route Oscillator A to the Shaper and Oscillator B to the Filter B (Note: Do not turn on the Shaper). Set Filter A’s Frequency to somwhere around 116 or so. Set Filter B’s Frequency to somewhere around 106. This is so that we remove a bit of harshness in the final sound we’ll be building up. Set Oscillator A’s Cent value to “+7” and Oscillator B’s Cent value to “-7” which detunes the Oscillators from each other.

    The Malstrom settings
    The Malstrom settings
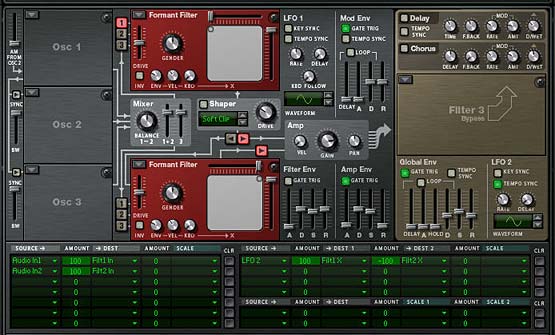
  4. Moving to the Thor, Turn Oscillator 1 Off, and uncheck the “1” button which routes Osc.1 to Filter 1. You don’t need Oscillators in Thor. We’re only using the Filters in Thor. Turn on the Formant Filter in both the first and second Filter Slots and set up Filter 1’s X/Y value to “0/127” and Filter 2’s X/Y value to “127/127.” Turn off the Filter Envelope’s “Gate Trig” button as well so that the Filters are not affected by the Filter Envelope. Then enable Filter 2 to be sent to the Amp section (the small arrow that leads from Filter 2 to Amp). Turn on the Tempo Sync for LFO2 and set the Rate to 6/4. Finally, set the Amp Envelope’s ADSR to the following values: 396 ms / 29.6 s / -0.0 dB / 6.98 s.
  5. Next, in Thor’s Modulation Bus Routing Section (MBRS), enter the following slots/lines:

    Slot 1 – Audio In1 : 100 > Filt1 In

    Slot 2 –  Audio In2 : 100 > Filt2 In

    Slot 8 – LFO2 : 100 > Filt1 X : -100 > Filt2 X

    The Thor Filter settings and Modulation Bus Routing Section (MBRS) settings.
    The Thor Filter settings and Modulation Bus Routing Section (MBRS) settings.

    The first 2 slots are telling Thor to take the audio input of the Left and Right Audio cables we set up previously, and sent them to Filter 1 and Filter 2 respectively. From that point onward, the signal travels through Thor as it normally would and then outputs to Channel 2 on the Line Mixer. The last line is what modulates the filter parameters in Thor. This basically creates a cross-over between filter 1 and filter 2 based on the default Sine wave in LFO2. Ok so far.

  6. Now with the Thor still selected, right-click and select “Duplicate Devices and Tracks.” In the duplicated Thor, set the LFO2 rate to 2/1 and change the Filter 1 X/Y value to “0/0” Then change the slot 8 line in the MBRS to the following:

    LFO2: 100 > Filt1 Y : -100 > Filt2 Y

  7. Flip the rack around and connect another split pair from the Audio Splitter to this new Thor’s Audio Input 1 & 2. Then Send the Left/Right Audio outputs from the new Thor into Channel 3 on the Mixer.
  8. Flip back around to the front of the rack and on the Line Mixer adjust the following:

    Channel 1 : Aux = 34; Level = 36; Pan = -14

    Channel 2: Aux = 50; Level = 92; Pan = 18

    Channel 3: Aux = 53; Level = 90; Pan = 22

  9. Finally, let’s take a look at the RV7000. Truth be told, you could enter whatever preset you like here which would work for a Pad sound. So enter your favorite RV7000 Patch. My settings were a low HF Damp, High EQ, with EQ turned on, and a lowering of the EQ curve on the low end with the gain set on the high EQ end to affect the midtones more than any other area. I also smoothed out the curve and made a few adjustments to the overall Reverb default “Hall” settings, as shown below.
    The RV7000 settings for the Hall Reverb
    The RV7000 settings for the Hall Reverb

    The settings for the Reverb's EQ.
    The settings for the Reverb's EQ.

Now give it a play and see how it sounds. By layering the filters and sending Left and Right to different filters that are modulated with a simple Sine wave, you can create some very complex tones that you couldn’t get using the Malstrom on its own.

Quickly Converting to a Whole New Sound

Now we can do a few interesting things with our setup. For example, duplicate the Combinator and change all four filters to “State Variable Filters.” Set the Resonance in the two filters in the first Thor to 54 and 82 respectively. In the second Thor, set both filters to “BP” mode and set the first filter’s Frequency to 3.28 kHz and Resonance to 38. Set the second filter’s Frequency to 158 kHz and Resonance to 50. Reduce the Attack and Release settings on the first Thor’s Amp Envelope a little bit. And Reduce them completely on the second Thor’s Amp Envelope. You can also use the Mod Envelope to affect the Resonance of the filters as I have done here:

Switching Filters and a few Parameters to get a completely different sound

Solo each Channel on the Mixer and see if the levels are ok. I found I had to insert a Maximizer after the second Thor just to boost things a bit. Trial and error is the key.

Finally, go into the Malstrom and change the two Oscillators to use the “JewsHarp” graintable in both. Reduce the Filter A & B Frequencies to your liking, and have a listen by playing a few notes. You end up with a very different sound altogether; like a slow meandering rumble. With just a few minor changes you get all sorts of different sounds.

The Malstrom Settings for this brand new sound. Use the JewsHarp Oscillators

Where do you go from here?

Anyplace you like is the short answer. But try out different filters and different Malstrom Oscillators. You could also insert a Scream device with some mild settings to completely alter the sound. Or try your hand modulating the filters in different unexpected ways using different LFO waves and rates. The sky is really the limit.

The only thing I might be wary of doing is creating delays on any of the parallel signals, as this can cause some phase shifting. But that might be something you are trying to achieve. It’s really up to you.

Let me know what you think of this tutorial and please add your comments if you come up with something far more interesting than these designs. I’d love to hear your own sound designs and creations. Until next time, good luck in all your endeavors.

New CD Release! 2011 Kicks off

2011 is here and it’s time to kick off the new year, get back to work with some crazy ass tutorials, make music, patches, refills and all other kinds of crazy things. To start the year off, I’ve released a new CD which you can check out at CD Baby.

New EP: Standing in a Hallway Staring at a Door2011 is here and it’s time to kick off the new year, get back to work with some crazy ass tutorials, make music, patches, refills and all other kinds of shenanigans. To start the year off, I’ve released a new CD which you can check out at CD Baby: Standing in a Hallway Staring at a Door.

This CD comes out of several more melancholy ambient tracks that I’ve been toying with all year and whittled down into a 37-minute EP carpet ride. It also was part of a challenge of mine to stick to the sounds that are found in my Generations refill. To that end, about 99% of the music on the CD is from that refill. A challenge to be sure; my fingers kept venturing into some of the other finer refills in my collection. But will power called me away and demanded I try creating something fully “mine” this time around. It was the first time I did and I’m pleased with the turnout.

I’ve also released a free download which is an alternate demo version of the last song on the CD (Locked), which you can find here in my trusty Soundcloud widget below. Feel free to have a listen, download, and share the tune. Just be sure to let them know where they can find the full CD if you do. Your help spreading the word is always greatly appreciated.

Locked (Demo) by Phi Sequence

Enough about that blatant self-promotion stuff. Now what tutorials do you want to see in the coming year? What types of sounds would you like to have in a refill? What general thoughts do you have about Reason and Record. Share your tips and tricks and fantastic creative voyages you’ve had with the software. I’m all ears.