Bernard Childcare Trust

It’s wonderful to be a part of something that truly makes a difference in our little music community, and I was lucky enough to contribute to a ReFill that helps out a true legend in the Reason world, James Bernard. The Bernard Childcare Trust is a ReFill where the proceeds go directly to helping out the 4 Bernard children. The family suffered a tragic loss in July 2011, when Nicole Bernard, wife to James and mother to the children, passed away. Please help out by purchasing this ReFill.

It’s wonderful to be a part of something that truly makes a difference in our little music community, and I was lucky enough to contribute to a ReFill that helps out a true legend in the Reason world, James Bernard.

A ReFill with a purpose!Those of you who know the story already realize that he recently had a tragedy in his life and the lives of his four children. His wife passed away in 2011. So a group of us got together and produced a ReFill for Reason labeled the Bernard Childcare Trust. Ben from 3rdFloorSound headed the project and a group of very respected and talented sound designers jumped in to contribute their sound and FX patches.

All proceeds from the sale of this ReFill will go towards a fund for the Bernard children, and I can’t think of any better cause than this. So if you want to contribute and add a few new and interesting patches to your library, I would encourage you to take a look at the page, and purchase the ReFill. It’s not going to break your bank, but it will most definitely make a difference.


Now for the DVD extras:

First, here’s the demo song I put together for the ReFill: Bernard-Childcare-Trust-Demo. You’ll need to have the ReFill on your computer in order to use the file, but if you do, you have access to the Full Reason song file (.reason). Feel free to remix it or play around with it. And let me know if you create something interesting from it. Everything except the drums were from the Bernard Childcare Trust ReFill. Cheers!

You can listen, comment, and download the demo song (.wav file format) from SoundCloud here:

JBCCT by Phi Sequence

Also, here are two videos showcasing a demo I put together for the sounds you’ll find under my section of the ReFill (Phi Sequence folder).

And here’s a brief rundown of what you will find in my section of the Refill:

Combinators:

The following 3 Pads were in part created while I was watching the service for Nicole Bernard streamed over the internet. As you can imagine, it was a very moving experience. So the sounds are deep and very rich. I hope that came across in these patches.

  • A Homage to Hope & Expectation
  • A Homage to Peace
  • A Homage to Rest

The following were two ideas I was developing for the FSB6 ReFill. One is a very common Reese Bass idea I had after watching a few videos on creating Reese Basses on the internet. The second was a typical glitch-induced mayhem patch (those who know me, know I love chaotic and mangled sounds – I think this one falls into that category).

  • Reese Bass (Run)
  • Robot 303

Thors:

The following patches are two other Pad ideas I had, along the same lines as the 3 Combinator pads.

  • Oblong Starstreak
  • There IS Celebration Here

The following patches are some Synth ideas. Some Leads which were developed specifically for this ReFill. Dark Blue Smear is a cross between an organ and an Oboe sound. Blue Yearnings is a wobbly lead. Buzzer Lead is exactly that. Sounds like it buzzes at a very fast rate. Synthetic Shine is a higher pitched ethereal synth sound. And Trance Symphony is more of a Trance lead line.

  • Dark Blue Smear
  • Blue Yearnings
  • Buzzer Lead
  • Synthetic Shine
  • Trance Symphony

The following two were underdeveloped ideas for the FSB 6 project. From Cowbell to Champagne Glass is a drum / bell sound that hopefully can recreate something close to both sounds, and a few things in between. Use the Rotaries, buttons, and Mod Wheel to change the shape of the sound, and add it into your projects as a synth triggered by a Redrum or Kong (to add inside your drum kits, if you like). Make Em Dance James is a bouncy Synth patch that I put together which uses the Step Sequencer in Thor. I figured that there were enough rich deep sombre sounds in this ReFill, that I had to put something in that gives an upbeat emotion. There’s only so much Beethoven one can listen to after all (not that I’m comparing my abilities to that of Beethoven whatsoever). I just felt that there should be a few patches in here which are more uplifting. Hopefully this one fits that category.

  • From Cowbell to Champagne Glass
  • Make Em Dance James

This last Thor patch is just a fun little texture where I got Thor to mouth the words “Yadda Yadda Yadda” — made me smile, so I included it here.

  • Yadda Yadda Yadda

Malstroms:

The Frog Bass is a throaty Bass-like sound, which could also be used as a Texture. Muck Rain is one of my favorite Textures, simply because it sounds like you’re in the middle of a swamp. And Tin Can Whistle is a very simple sound that can be used as a one-shot triggered for some added percussive sound. It’s kind of like a Digeridoo meets a downward ramping bomb being dropped. Hard to explain properly, but give it a whirl and see what you think.

  • Frog Bass
  • Muck Rain Texture
  • Tin Can Whistle

These two are just too hard for me to categorize. They’re more Textures than Synths. Space Murk is a fun one to play with. It reminded me of a space symphony sound.

  • Rough Tension
  • Space Murk

Subtractors:

These two Chip Tune patches were derivatives of the Chip Tune Emulators I put together for the FSB 6 ReFill

  • ChippyTune Fun 1
  • ChippyTune Fun 2

The FM Enveloper patch is a Subtractor Arp that is probably one of my favorites in the ReFill. You can hear it used in the Demo song I put together for this ReFill.

  • FM Envelopers

The First Flight patch is a cross between a Synth and a Bass. It uses some noise to create what I thought sounded like an engine in flight. And finally, Revy Bass is a really nice sounding Bass that was put together with a lot of love and care. You can hear this bass in theDemo song I put together for this ReFill

  • Revy Bass
  • First Flight

For more details, and to purchase the ReFill, go here: http://www.3rdfloorsound.com/bernard-childcare-trust.html

Thanks go out to all those who purchase this ReFill, and to all my friends and fellow sound construction architects. This is what makes it such a blessing to be part of the Reason & Music communities. I can’t think of another place I’d rather hang my hat.

All my best,

Rob.

EditEd4TV’s 88MPH ReFill

Anyone using Reason should already be sufficiently versed in the work that Ed Bauman has done. If not, then this is the perfect time to get acquainted. Simply put, he’s one of the gurus. And he has recently released a ReFill for version 4 and up, titled “88MPH Vol. 1” (a new volume 2 will be available late 2011 and volume 3 available early 2012). This ReFill packs in 51 Combinators of 80’s sounds; sounds which he used to recreate with utter realism some of the best hits of the 80’s. From Prince’s “1999” to Blondie’s “Heart of Glass,” he is the man who can’t get his perfect recreations (“Re-Covers,” to use a term he coined) posted on YouTube because the video service can’t recognize his tunes from the original. That’s just how good he is!

Ed “EditEd4TV” Bauman’s 88MPH Vol.1 ReFill
Available now at: http://baumanproductions.com/88mph.html


Anyone using Reason should already be sufficiently versed in the work that Ed Bauman has done. If not, then this is the perfect time to get acquainted. Simply put, he’s one of the gurus. And he has recently released a ReFill for version 4 and up, titled 88MPH Vol. 1 (a new volume 2 will be available late 2011 and volume 3 available early 2012). This ReFill packs in 51 Combinators of 80’s sounds; sounds which he used to recreate with utter realism some of the best hits of the 80’s. From Prince’s “1999” to Blondie’s “Heart of Glass,” he is the man who gets grief from YouTube because his perfect recreations (“Re-Covers,” to use a term he coined) fool the video service into thinking they are the original. That’s just how good he is!

So here, I’m going to take a quick look at his ReFill, and also post a demo video I created using the ReFill. I would highly recommend if you are into the sounds coming out of the 80’s or if you want to learn a little more about how to program those sounds, that you pick up this ReFill. It won’t disappoint you.

Ed was also gracious enough to allow me to provide a free Combinator from the ReFill. Since Blondie’s Heart of Glass has always been a great disco classic near and dear to my heart, I thought I would provide one of the sounds taken from that song. You can download the Combinator patch file here: E4TV_Bland E Herd a Class Pulsing Synth. Thank you Ed!

Ed's 88MPH Vol 1 Free Combinator Synth Patch
Ed’s 88MPH Vol 1 Free Combinator Synth Patch

First, here’s what Ed posted about his ReFill:

These are all Combinators with all 4 Combinator knobs and buttons mapped to various parameters. Usually Combinator knob 4 is mapped to volume for convenient live use. The remaining knobs and buttons control anything from filter frequency to reverb amount, reverb time, chorus speed, octave settings, and more. Pitch wheel and mod wheel are mapped as well. About 90% of the ReFill is custom Thor and Subtractor patches, with the remaining 10% made up of NN-XT patches which rely on the Orkester and Factory Soundbank for samples.

Each and every patch has enormous potential, from the default load-in setting to drastic changes when you alter the programmed parameters… try low octave power drones, and for patches with delay try playing staccato notes in tempo, move the pitch wheel and mod wheel, etc. When you load in a new patch, about 80% of the time all the knobs are at either 0%, 50%, or 100%. At first load-in you’ll find the patch to be exactly as I used it in my ReCover, so you can simply deviate from there.

This ReFill is a collection of 51 Combinator patches only; sequencer content is NOT provided. Requires Reason version 4.0 or higher due to extensive use of Combinator and Thor devices. There is not a VSTi version available and it will not natively work with any DAW (though you can of course use ReWire with your DAW of choice in conjunction with Reason/Record): this is a Reason/Record product only.

So the basic idea is that Ed provides you with all the sounds from the original songs, but not the sequencer information. Which means that we can bring the flavor of the 80’s into today’s music, and create our own tracks with them. I did that here:

Here’s a video that Ed put together to promote the ReFill:

And here’s the little demo I put together to showcase a few sounds from Ed’s Refill. Remember that this is just a taste of his refill. Ed is a meticulous programmer, and each Combinator is worth its weight in gold if you ask me. So please support his work:

I hope this gives you a good idea of what’s included in the ReFill and what can be done with these sounds. And might I suggest also having a look at his “Reasonable Help 2010” ReFill, in which you get 50 patches that help teach you how to design sounds and develop better patches.  It’s a great tool for the medium or advanced level Reason user. I wrote a review of that ReFill back in January 2010.


A huge thanks to Ed for putting this package together. You truly are an inspiration to all of us Reason users. Please keep doing what you’re doing my friend. You can purchase Ed’s 88MPH Vol.1 ReFill here:  http://baumanproductions.com/88mph.html

The Theory Refill

This Contribution is one I’m thrilled to showcase here on my blog. 3rdFloorSound’s The Theory is a terrific set of Music Theory learning tools in a huge refill. So this is not a refill with sound patches or samples. Rather, this is a refill which gives you a whole music theory master class in a download, and then some. Here, I’ll pick it apart and show you what you can do with the files, how to use them, and sing nothing but praises for it, because like many people who use Reason, I can definitely use all the help I can get when it comes to music theory.

This Contribution is one I’m thrilled to showcase here on my blog. 3rdFloorSound’s The Theory is a terrific set of Music Theory learning tools in a huge refill. So this is not a refill with sound patches or samples. Rather, this is a refill which gives you a whole music theory master class in a download, and then some. Here, I’ll pick it apart and show you what you can do with the files, how to use them, and sing nothing but praises for it, because like many people who use Reason, I can definitely use all the help I can get when it comes to music theory.

The idea behind the Refill is simple: provide those without a lot of music theory knowledge under their belts a chance to take a look at all the possible scales and chords that are available. The Scales and Chords are available in several “Chord” and “Scale” .rns files located in the Refill. So you will need to go to File > Open, as opposed to trying to open the refill files from any sound device. As previously stated, there are no device patches in here. Simply song (.rns) files. This makes life a lot easier, because you can open the files directly from your “Explore” or browser window, if you wish.

The refill costs $34.95 and for what you get, it’s a bargain. Though this refill is targeted for those without a music theory background, I think even seasoned professional musicians may find some new scales and chords in this refill to inspire them. At the very least, it’s a great hands-on musical index. You can download the example files here: http://wordpress.org/extend/plugins/wordbooker/

Here’s a few short videos put together by 3rdFloorSound to showcase the refill:

And here is what 3rdFloorSound has to say about the refill:

  • The Theory is not your average instrument refill. It’s an idea refill, a scale and chord resource, a midi score checker, and a teaching tool for Reason 5 and Record 1.5
  • 3 scale files that include every possible 5, 6, and 7 note scale organized by structure, mode, and transposed in modes. 1 file containing 30 full scale maps transposed for each key.
  • 152 Reason and Record song files, 76 for each program.
  • 1 Music Theory overview – a song file that works as a course covering everything from sight reading to time signatures, the circle of fifths, chord construction and more.
  • 17 Chord files containing 82 chords, each in individual clips organized four different ways: by quality, type, interval structure, and type versus structure.
  • 12 Scale files containing 223 scales in individual clips, and 30 full scale maps that contain the scales plotted across the entire keyboard.
    Home Contact
  • 12 “chords on scales” files that contain all the chords transposed and plotted across 30 scales they fit into.
  • 30 more Chords On Scales files, one for each scale, that has the scales and chords transposed for each key.
  • 2 pdf files: a companion to the music theory overview, and a chord & scale index listing the spelling for every chord and a cross reference of every scale.

The Basics of Music Theory

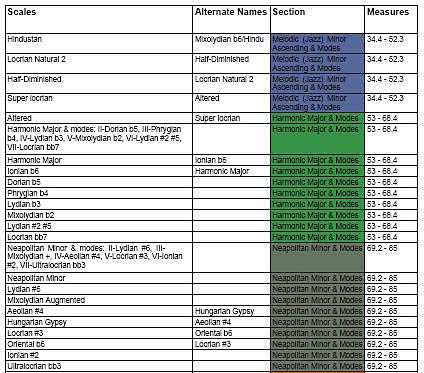
To get things started, there’s 2 PDF files that ship with the Refill: one PDF file provides a color-coordinated chord and scale index, outlining all the possible chord and scale names. The chords and scales are also listed by section and measure, so you can quickly go to the proper measure within the .rns document and locate chords and scales with ease. If you’re looking for a chord or scale by name (Phrygian, for example) or category (Harmonic Major, for example), this list works well to provide bread crumbs in your journey.

An excerpt from the scale index PDF.

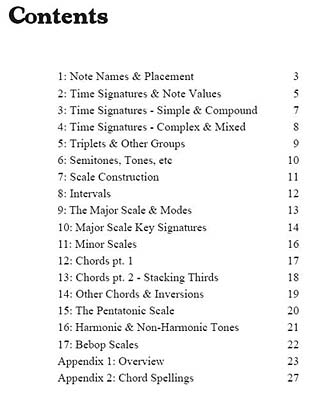
The second PDF file is a nice 28-page introduction to Chords, Scales, and Notation. It’s not going to turn you into a grand wizard of musical theory, but it will point out the basics about how tempos and time signatures work, the circle of fifths for Chord progressions, and how to notate your musical ideas. It’s very basic and simple terms, which is really nice for the absolute beginner to get their feet wet.

the Table of Contents for the Music Theory primer PDF

What’s even nicer is the fact that this PDF corresponds with a special .rns file in the root folder of the Refill: “Music Theory.rns” Let me just say that I think 3rdFloorSound is even crazier than I am when it comes to creating humungous project files. This one single .rns file is a complete recap of the Music Theory PDF file, and uses a very intricate and detailed system of blocks, clips, note lanes, and actual notes to create diagrams. Just check out his explanation of the circle of fifths or how the clefs relate to the keyboard. It’s brilliant just for the sheer amount of work that went into it. It will have your jaw dropping on the floor, I promise.

I will provide a slight bit of guidance however, and that is you may need to expand or contract the main sequencer view area to make the diagrams and explanations show up clearly. Since notes are used to create the diagrams, they can get squished if the view area is too small, or expand too much if the area is too big. But this is a minor issue, and one that does little to detract from the usefulness of the information. Personally, I prefer reading the information directly in the PDF. But I would recommend that everyone just open up this file and take a quick look to see a marvelous and ingenious use of the Main Sequencer as a learning tool. One of the most creative uses of the Main Sequencer I’ve ever seen. And that’s saying a lot!

And Now for the Really Good Stuff

Chords and Scales. That’s it folks. That’s all you’re going to find here. But wait. This is really all you ever need in music correct? I mean sure there’s progressions, timings, composition, and all the rest. However, when it comes to the building blocks of your songs, it all comes down to Chords and Scales. And all of them are here. I mean ALL OF THEM! Every Scale you never thought existed, and every chord in every one of those scales you never thought existed. I lost track after the 10th page of listings in the PDF Chord & Scale list. I thought 3rdFloor was going to run out of colours to connect the dots between the list and the .rns files to be honest. But just for the heck of it, I counted exactly how many scales were listed: 364 in total. And that’s not even getting into the chords.

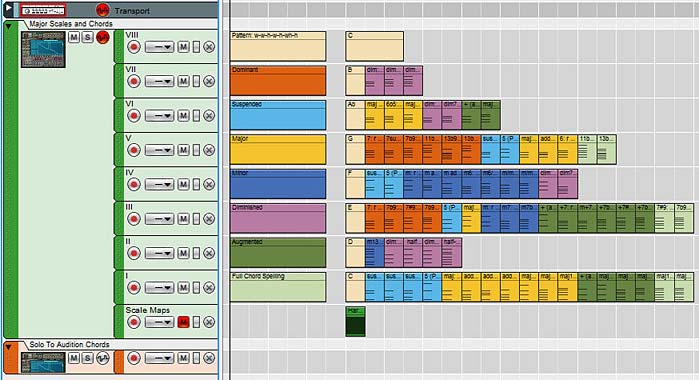
A screenshot showing all the 7-note scales by "Interval," "In Modes," and "In Modes - Transposed"

And of course you are given all possible Chords for each of those scales. So coming up with your own chord progressions is as easy as copy, paste, tweak, done! The beauty of all of the chords captured in a Reason format is that you can solo the chords and listen to them to instantly find new and interesting progressions. For those inept at theory, such as myself, this is a great hands-on feature.

A screenshot capturing a mere fragment of what is available for chords.

Then there are the Scale Maps. These maps can be used to overlay on top of your note lanes so you can immediately see any notes that don’t fit the scale in which you are working. The idea is simple. Copy the scale map clip from the .rns file into your own .rns or .record document and place it in advance (to the left) of your own note clip on the same note lane. Then go into the scale map clip by double clicking it, and select the entire set of notes in the clip (Ctrl+A). Finally, extend the notes, by dragging them over your own clip. This creates an overlay of the scale on top of your notes. You can then go into your note clip and delete any notes that are outside the scale map. If you’ve ever worked in Photoshop before, this is the same concept as creating an overlay or “image mask” on top of your layer. Simply delete everything that falls outside this masked area, or move the notes that are outside the mask to a note within the scale, and you’re halfway to correcting your song.

Of course, you’ll still have to ensure the composition sounds the way you want, and there’s still the human element of ensuring the notes make sense when played together. But this process goes a long way to helping your melody fit together coherently.

Here’s a short video I put together to showcase the refill:

To Summarize

This refill is massive in Theory, providing all the scales and chords you could ever want, and goes above and beyond to try to make things easy to find, and easy to use with scale maps, great color-coding, and nicely laid out files. It’s clear a lot of tender loving care went into this refill, and it’s well worth the bargain of a price. On the flip side, if you already have your theory well under your belt, or already own some chord and scale charts that work well for you, you may want to invest your money elsewhere. But even then, I think you’d be missing out on some great functionality. There’s no denying that having everything inside Reason files makes working with chords and scales a lot easier.

In the future, I’m looking forward to seeing more from 3rdFloorSound. Two great ideas that popped to mind as I was using this refill were: 1. Chord Progressions, and 2. Song Structure Templates. I think adding in groupings of common or even uncommon chord progressions could really enhance the refill, and adding some song structure templates, complete with lanes (or blocks) for bass, drums, guitar, pads, pianos, etc. would be a nice addition as well. Or both concepts could become their own new refill. And if anyone has the ability and determination to do it right, I think 3rdFloorSound is the one for the job.

I usually can’t find too many places to put my money, but this Theory refill is one that will reward you richly for such a small investment. I’d be crazy not to recommend it to every musical-minded person I know. Great job 3rdFloor!


3rdFloorSound is an upstate New York musician who uses Reason and Record extensively. You can reach him at www.3rdfloorsound.com or occasionally on twitter: @3rdfloorsound. To purchase The Theory refill direct, go to http://www.3rdfloorsound.com/theory.html

Rebirth PCF Effect Combi

This beautiful little patch was contributed by Mick Comito, and it recreates the ReBirth Pattern-Controlled-Filter effect, but in the form of a Combinator that can be used in Reason and Record. I am thrilled that Mick came up with this idea and put this little gem together. If you get a chance, have a look at it and try it out. It’s really something interesting that can be used as an insert effect on any audio you throw at it.

The ReBirth Museum: Official homepage for Propellerhead ReBirth - currently available for the Ipad and Ipod Touch.

This beautiful little patch was contributed by Mick Comito, and it recreates the Rebirth Pattern-Controlled-Filter effect, but in the form of a Combinator that can be used in Reason and Record. I am thrilled that Mick came up with this idea and put this little gem together. If you get a chance, have a look at it and try it out. It’s really something interesting that can be used as an insert effect on any audio you throw at it.

Note, the image at right is a link to the homepage for the official site of the ReBirth museum, however, it has since seen a resurgence and can be purchased for the Ipad and Ipod Touch. If you own one of those devices, you may want to check that out here: http://rebirthapp.com/

Now onward to Mick’s great little patch:

Mick Comito's ReBirth PCF Effect Combinator

The file can be found here: ReBirth PCF (Run)~mc. There are 2 files: the ReBirth PCF Combinator and an .rns test file. I did note that when running the test file, there was a little bit of clipping here and there, depending on your settings. So you may want to be careful when using this patch. Simply reducing the level on the Mixer’s channel 2 or inserting an M Class Maximizer (to limit the sound) should take care of it, and is a very easy fix. But it’s still an amazing patch and very worthwhile to try out. I can see a lot of useful applications for it. So thanks Mick!

From Mick:

After you posted the blog last week I got nostalgic thinking about the guy who turned me onto ReBirth 8 or 9 years ago and really started me on this path. One of the coolest things about ReBirth was the PCF (Pattern Controlled Filter) effect. I thought that would be something cool to try and re-create. So I downloaded Rebirth and the manual and started playing with it again. It was a cool effect… 54 Patterns!!!! And the cool thing was that they were all illustrated in the manual as well as how it worked. I didn’t mention it to you in my previous email because I wanted to see if I could do it, and I didn’t want to hear “it’s been done a million times… just go to blah blah blah…!)

So last night I sat down and tried to recreate it, based on the knowledge I’ve gained following you and I have to say Hyd as well. At it’s core is a matrix (actually 2) for the patterns and a Thor for its filter, then combined. Getting them cabled and setting up the Thor matrix took a few tries, but I finally got it. Worked in some effects and even made my own backdrop for the combi!

Here’s a video that shows what the PCF Combinator can do:

And here is a rundown of the Rotaries and Buttons in the Combinator:

  • Rotary 1: Scrolls through all the patterns on both Matrixes. So you have 54 patterns from which to select (32 on Matrix A and 22 on Matrix B). Mick also put the matrixes at the top of the combi and compressed all the other inserts. Now you can see what the patterns look like and their note length. Most are 1/16 notes then some 1/32 note and 1/8 note patterns. It’s also easy to tell which one is selected because the “follower” only follows the selected matrix.
  • Rotary2: Controls the filter frequency.
  • Rotary 3: Controls the filter Resonance, but in keeping true to ReBirth, Resonance is labeled “Q.”
  • Rotary 4: Controls the Dry/Wet of the Thor’s delay.
  • Button 1: Selects between the two Matrixes.
  • Button 2: Turns on the Scream. This is a send effect in the mixer. Side note… The Scream is a bit much at times and sounded good just punching it in and out. I didn’t like the way it ended abruptly though, so I added a delay. The problem was when the Scream was in bypass, the signal was still getting through to the delay, so I needed to re-program the Scream (Button2) to go from On to “Off” instead of bypass. this allowed the delay to leave a nice trail without further affecting the sound.
  • Button 3: Turns on the Reverb. This is a send effect in the mixer.
  • Button4: Turns the delay on and off.
  • Mod Wheel: Rebirth had a fader for “amount” which is mapped to the Mod Wheel. This splits the dry and wet signal into a mixer so that the wet/dry amount can be controlled via the Mod Wheel. When the Mod Wheel is at zero (fully down), the PCF is fully wet. When the Mod Wheel is at 127 (pushed to the top), the PCF is fully dry.
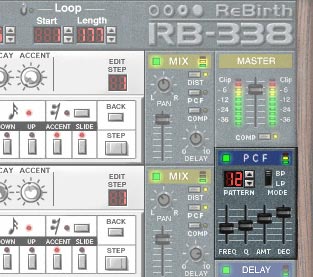
The PCF filter located on the ReBirth software screen.

Mick and I would love to hear any comments you may have.


Mick Comito is an aspiring musician, whose music can be found on Soundcloud under the pseudonym SoulReason. He’s a regular contributor on TSOR (The Sound of Reason).  He’s also a really great guy who is more than willing to share his creative ideas with us, and for that I’m very thankful.

Reason Patch A Day Refill

A review of Robb Neumann’s “Reason Patch A Day” Refill, with approximately 500 Patches for Propellerhead Reason. This is one refill you don’t want to miss. Basses, Pads, Effects, Combinators, Synths. It’s all in there. Take a listen for yourself.

If you frequent the various Propellerhead forums and sites, you’ve probably come across Robb Neumann’s “Reason Patch A Day” website. The concept is simple. Robb provides a new patch each day which is produced by him or contributed by others, and he provides a short write-up explaining each one on his blog at http://www.reasonpatchaday.blogspot.com/

Recently, he decided to release the entire 1.5-year collection in a single Refill that anyone can download for a donation. Being a person who runs my own Reason website, I know what goes into maintaining this growing monstrosity. And I know that a few modest donations go a long way. And for 500 patches in a rock-solid refill, that’s well worth it. And that’s what you get.

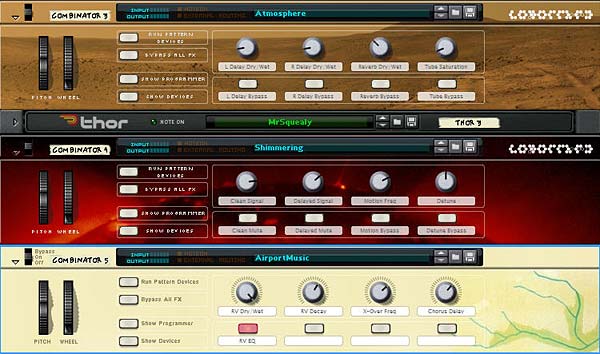
Some of the great Combinator patches from the refill
Some of the great Combinator patches from the refill. Notice the dedication to Brian Eno in the bottom Combi backdrop. Love it!

There’s Basses, Synths, Rhythm patches, and tons of Effects. If you’re looking for some great new sounds or looking to be inspired and see how one sound designer works his magic, then this is a great refill which you’ll want to have in your collection. Play the video review I put together below to hear some of the sounds and what you can accomplish.

Now keep in mind this only scratches the surface. I could go on and demonstrate many more of his patches, but I think this modest little intro showcases some of the magic you’ll find here.

I think in general the refill focuses on Basses, Synths, Pads and Effects. However, there are also some really nice percussion kits, and a lot of great Yamaha RX one-off samples that you can easily put inside an NN-XT kit.

The only nit-pick I would have is that some of the Combi patches that I opened up were templates where you had to add in your own Redrum kits. I would have liked to have been able to open up those Combis and start rocking out right away. But that’s such a minor nit-pick, it should in no way stop you from downloading this refill right away. You will not be disappointed.

To download the Refill, go to http://www.reasonpatchaday.blogspot.com/ and click the Donate button on the right side navigation bar. Once you enter a paypal donation, Robb will send you an email with a link to download the refill. Simple as that.

I think the cherry on the cake are the Combinator backdrops. There’s some really nice designs in there. I know that’s just a minor thing, but it adds that special touch that is usually lacking in a lot of refills. So this refill gets an extra gold star for that.

So thanks to Robb and thanks to all of you Reason/Record sound designers out there. You guys all give of yourselves so much and so freely that it makes me proud to be considered part of this small little niche community. Keep up the great work!

BV512 Spectrum Analyzer

This is what fills my heart with warm fuzzies. When those that are part of the Reason and Record community come together to Analyze and tackle some of the more difficult aspects of the software and fill in the gaps that may be left by incomplete specifications. Wendy Dunham and Giles Reaves have teamed up to provide the penultimate BV512 Vocoder Spectrum Analyzer for Reason and Record.

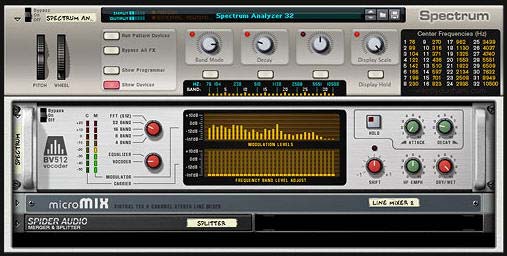
This is what fills my heart with warm fuzzies. When those that are part of the Reason and Record community come together to Analyze and tackle some of the more difficult aspects of the software and fill in the gaps that may be left by incomplete specifications. Ed did it previously with his Thor Sine Wave Shaper tutorial, using it to cross-fade between 4 different devices. And now Allen Day (“rogerraa”), Wendy of Wendy Dunham Music fame and Giles Reaves (Selig) from the Selig B3-Leslie refill fame have teamed up to provide the penultimate BV512  Spectrum Analyzer. Selig provided the charts, and Wendy provided the Combinator with a backdrop that cleverly shows the frequency bands.

Download the charts along with the Combinators here:  spectrum-analyzer-project-files. This zip file contains the two charts outlined below, and Wendy’s 2 Combinators: 1. A 16-band Spectrum Analyzer and 2. A 32-band Spectrum Analyzer. They both use the BV512 Vocoder/Equilizer in Reason. You can, however, use this in Reason or Reason+Record.

So how do you use this? Well, let’s let Wendy explain:

Note: This excerpt is taken from her site. There is also a video you can watch about how it works here: http://www.galxygirl.com/videos/music-making/spectrum-combinators.html. She has graciously allowed me to present it here on my blog (thanks Wendy, you are indeed amazing for sharing this with us 🙂 )


BV512 Spectrum Analyzer with Frequency Band labeled Backdrop

These are convenient Spectrum Analyzer Combinators to see your song’s frequency spectra. Each one has an accurate Scale with Band and Hz labels. I prefer the Spectrum Analyzer 32 band version, but in case you don’t want that much resolution, I also created a Spectrum Analyzer 16 band version.

  • Band Select: 4, 8, 16, 32, FFT (512)
  • Decay: Lower = faster display; higher = overall averaging.
  • Display Scale: Roll this back to see the peaks.
  • Display Hold: Take a snapshot in time.

Place before final output. It’s a great aid for balancing your mix!

You can leave this on without adversely affecting your output. The main signal passes straight through the combinator via an Audio Spider, so it’s monitoring the frequency safely.
Vocoder Band Frequencies

These reference charts for all band frequencies are printed on each combinator. The frequencies were measured accurately by Giles Reaves (“selig”) and Allen Day (“rogerraa”) on the Propellerhead User Forum.

Here’s another tip:

If you have an MClass EQ somewhere in your song, temporarily sweep one filter back & forth (with max Q, max Gain), and you should be able to see that peak on the analyzer and identify the frequency.

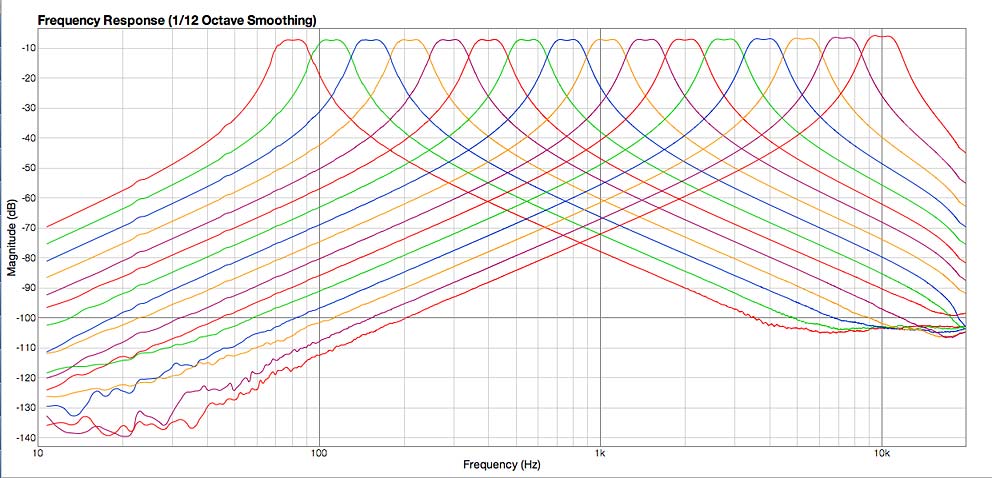
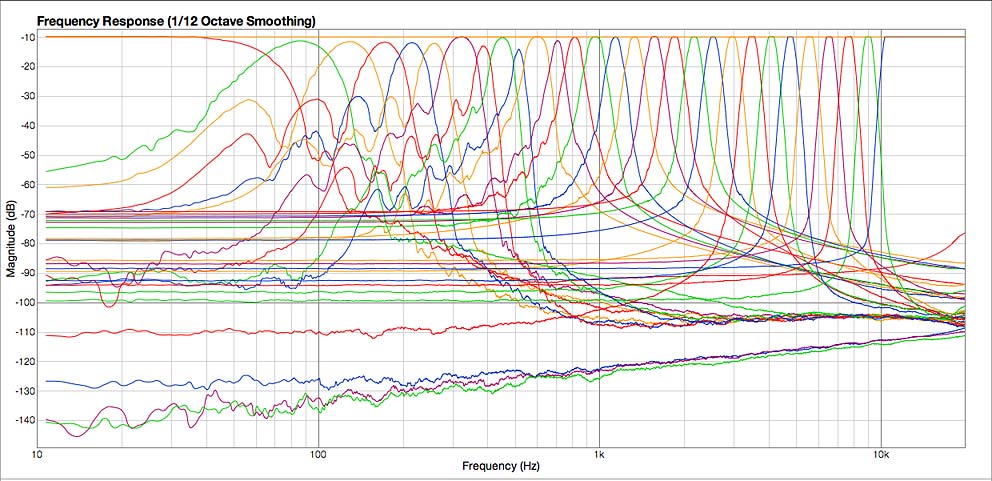
For those interested, Selig did a great job putting together the frequency charts for the 16- and 512 (FFT) -band modes of the Vocoder. Here are the screenshots:

BV512 Vocoder - 16-Band mode Frequency Chart
BV512 Vocoder – 16-Band mode Frequency Chart
BV512 Vocoder - 32-Band mode Frequency Chart
BV512 Vocoder – 512 (FFT) Band mode Frequency Chart

There you have it. Thanks so much to Wendy, Giles, and Allen for these great resources. Your important work does not go unnoticed.

DopeTank Free 2010 Refill

DopeTank Free 2010 Refill: A collection of 106 Thors and 15 Combinators made by Heikki Roots (aka Pirnikas or Deep’n’Dark). He was gracious enough to offer this out to the Reason community for free.

Download the Refill: DopeTank-Free-2010

A collection of 106 Thors and 15 Combinators made by Heikki Roots (aka Pirnikas or Deep’n’Dark). He was gracious enough to offer this out to the Reason community for free. Here’s what he has to say about his refill:

When making this refill I wanted to keep the sound phat, clean and musical. Another thing I wanted was making every sound different so there’s something for everyone.Every sound-designer has their own methods and their own taste of how it should sound. I like when there’s lot of edge but not too much. When playing the sound, it should make you wanna play your midi keyboard. Most of the time the modwheel has been assigned to some parameter, sometimes the other buttons & rotaries as well. When playing pads or other patches that you may play as chords, I’ve tried to keep the sound clean.

The Combinator patches:

There’s 15 combinators inside this refill. When layering sounds, you can make extremely rich and big sounds as you can add just as many layers as you want. Another thing are the effects which bring in lot of possibilities to shape the sounds.Sometimes you have an instrument that doesn’t sound that special, but when layering some sounds together, you can make some “killer” sounds. Some of these patches have tweaking possibilities, most don’t. These patches can be used for many genres, like hiphop, electronic but also for pop or film music etc. So get the refill and expand your rack as this refill is free.

The Thor patches:

The Thor patches have been categorized into different folders so it’s easy to find right sound every time. The categories are:

  • Bass
  • Fx
  • Keys
  • Leads
  • Mono synth
  • Modulated
  • Other
  • Pads
  • Poly synth
  • Sequenced
  • Voices

What I found great about these patches is the fact that the sound is indeed very clean and crisp. For the combinator patches, there’s a lot of interesting reverb going on in most cases, and the sound is very spacious. Also, what’s nice is that every mod wheel does affect a parameter, so you can vary the sound as you play. The only thing I would criticize is the fact that most of the other combinator parameters or Thor parameters don’t have any modulations assigned to them. I think this misses out on a great opportunity to enhance the patches even further. But putting that aside, the sounds in here are top notch!

Highlights for me were the Combinator and Thor Pads. I think this refill shows off a lot of reverb talent and that comes across best in those patches. I also thought the sequenced and voice Thor patches were really nice, and it’s too bad there weren’t more of these. Perhaps in some future patches or refills, since Heikki has promised more free patches to come in the Propellerhead User Forum.

Thanks for sharing Heikki!

Ed’s Thor Shaper Tutorial

I’m always amazed with EditEd4TV’s ability to analyze what should be a simple signal path. He literally blows my mind when it comes to this technical stuff. And I find myself reading it about 5 times before some part of it actually sinks in. And of course the real fun comes in figuring out just “what” musically you can do with this information. So not to disappoint, Ed is back with a great tutorial on the inner workings of Thor’s Shaper feature, and more specifically the “Sine” wave inside the shaper. If you feel brave enough, my young paduan learners, then venture forward where quite honestly no man has gone before. . .

I’m always amazed with EditEd4TV’s ability to analyze what should be a simple signal path. He literally blows my mind when it comes to this technical stuff. And I find myself reading it about 5 times before some part of it actually sinks in. And of course the real fun comes in figuring out just “what” musically you can do with this information. So not to disappoint, Ed is back with a great tutorial on the inner workings of Thor’s Shaper feature, and more specifically the “Sine” wave inside the shaper. If you feel brave enough, my young paduan learners, then venture forward where quite honestly no man has gone before. . .

Download the project files here: EditEd4TV_ThorShaperFiles. They contain an Excel spreadsheet with the settings for various sine wave values/positions, as well as Ed’s 4 source cross-fader which was designed using the Shaper’s Sine wave. Quite a brilliant design idea.


Thor’s Shaper can produce a number of interesting distortion effects when processing an audio signal from any of the three oscillator slots, but one of the more arcane features of the shaper is the processing of CV data. In this setup I’m routing the mod wheel data, 0-127, into Filter 1, which is in bypass mode (no filter), which is then routed into the Shaper, set in the sine wave preset. So that you don’t bypass the learning here, I’m not providing the patch, as it’s better to get your hands dirty and learn the hard way, so let’s make this specific patch before moving on:

Processing CV data through Thor’s Shaper

  1. First, create a Thor device and initialize the preset if necessary.
  2. Next, set filter slot 1 to bypass.
  3. Deactivate oscillator 1 routing to filter 1, and activate it for filter 2.
  4. Activate the routing button to send filter 2 to the amp (it’s directly below the Shaper’s Drive knob).
  5. At this point, if you set the Step Sequencer to Repeat mode, and press the Run button, you should hear a basic repeating pulse coming from oscillator 1. If you don’t hear this, go back and check your settings before moving forward.
  6. Next, in the Step Sequencer, move the Steps knob on the far right so that we have only 1 step. For this single step, set the gate length from 75% to 100%. At this point, if you press the Run button you should hear a single pulse that drops in volume. Change the oscillator type from sawtooth to a sine wave for a more pleasant tone, and raise the amp envelope sustain level from -21.8 dB (default) to full 0.0 dB. At this point you should hear a steady sine wave tone. Again, if you don’t hear this, go back and check your settings before moving forward.
  7. In the Modulation Bus Routing Section, make the following assignment:

    Source -> Amount -> Destination -> Amount -> Scale

    Mod Wheel -> 100 -> Oscillator 1 pitch

  8. At this stage, if you raise the mod wheel you should hear the pitch rise and fall as you move the mod wheel – this is direct control with essentially linear control/results. Change this amount value to 0 for the time being.
  9. Now activate the Shaper, change the mode to Sine, and in the Modulation Bus Routing Section, make the following assignments:

    Source -> Amount -> Destination -> Amount -> Scale

    Mod Wheel -> 100 -> Filter 1 Audio Input

    Shaper -> 100 -> Oscillator 1 pitch

  10. At this stage, if you raise the mod wheel you should hear the pitch first rise, but then suddenly begin to fall. This is the sine wave of the Shaper controlling oscillator pitch. At the default of 37, you’re hearing just a portion of what’s available in this shaper setting. For a nearly perfect full sine wave cycle, set the Shaper Drive value to 50. If you listen carefully to the results, you’ll hear that with the Mod Wheel at full 127, the pitch is slightly higher than with the Mod Wheel at 0. To verify that things are off a bit, create an Analog Oscillator in oscillator slot 2, set the type to sine wave, and engage the routing button to filter 2 for oscillator 2. With the Mod Wheel at 0, you’ll hear the two oscillators in perfect sync, but with the Mod Wheel at 127, they’re off a bit. To trim this, in the Modulation Bus Routing Section, modify the previous assignment to this:

    Source -> Amount -> Destination -> Amount -> Scale

    Mod Wheel -> 100 -> Filter 1 Audio Input -> 2 -> Rotary 2

  11. You should hear Oscillator 1 pitch drop a bit. Now turn up Rotary 2 and you’ll hear the pitch rise to meet up with Oscillator 2, which is unaffected by the Mod Wheel. A Rotary 2 setting of 62 is nearly perfect. Sweep the Mod Wheel from 0 to 127 and you should hear the full sine wave cycle, landing nearly perfectly with both oscillators showing the match.

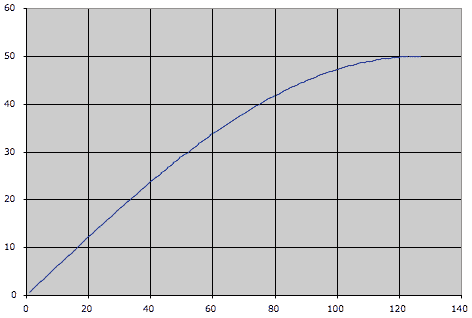
Through painstaking research, I went through and found the settings for various sine wave values/positions. You can view the chart in the Project Files download (above).

To plot out a sine wave in Excel, the magic number we’re working with is 20.21267. The A column serves as our Mod Wheel range. In the B column we find the result of a formula which works with the Mod Wheel values and multiples of the magic 20.21267 value.

When you open the spreadsheet you’re seeing the 1/4 cycle output in the chart:

the 1/4 cycle Sine wave output

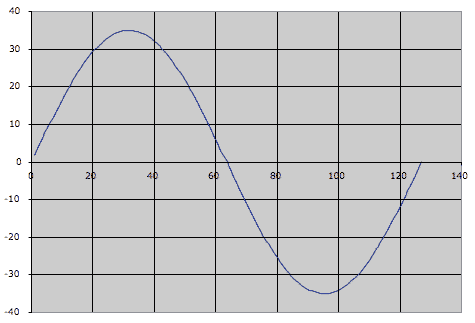
Copy the E5 to I5 range and paste into the E22 to I22 range and you’ll see the result in the chart:

a nearly perfect cycle of a sine wave

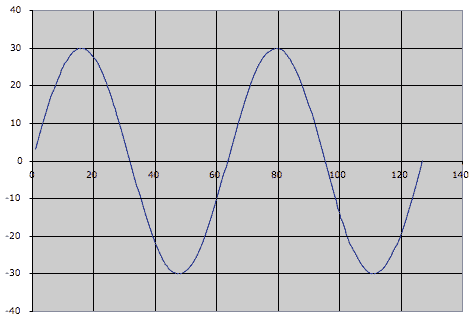
It’s a nearly perfect cycle of a sine wave. To chart out two full cycles, copy and paste E9 to I9:

Charting out 2 cycles of a Sine wave

One thing to keep in mind here is that the CV output limits change as you raise the Drive value. At a 1/4 sine wave setting (Drive value at 0 and a scale value of 34 with Rotary 2 at 0), the Shaper will output a CV value of +50 (it’s not entering the negative range of the bipolar output). At the 4 sine wave settings (Drive value at 91 and a scale value of 2 with Rotary 2 at 4) the Shaper will output a CV vale of +/- 29. The spreadsheet changes all of this for you, and adjusts the chart accordingly.

Viewing the CV value in Thor

  1. To view the CV value in Thor, let’s first make sure we’re seeing true +/-127 values from the Mod Wheel, so place this Thor inside a Combinator, and in Thor’s Modulation Bus Routing Section, make the following assignment:

    Source -> Amount -> Destination -> Amount -> Scale

    Mod Wheel -> 100 -> CV Out 1

  2. Now route CV 1 output on the back of Thor to the Combinator’s Rotary 1 input. In the Combinator’s Modulation Routing Section, make the following assignments:

    Source -> Target -> Min -> Max

    Rotary 1 -> Mod 12 Destination Amount -> -100 -> +100

    Rotary 1 -> Mod 13 Destination Amount -> -27 -> +27

  3. Change Combinator knob 1 from 63 to 64. This visualization isn’t perfect, but it’s fairly close. Raise the mod wheel and note the two amount values in Thor’s Modulation Bus Routing Section rising with the mod wheel. At full throw, they should add up to 127, and at 0 it’s approximately 0 (you may see negative values). Now modify the previous assignment to this:

    Source -> Amount -> Destination -> Amount -> Scale

    Shaper -> 100 -> CV Out 1

  4. Raise the Mod Wheel and you’ll find the values range from approximately +34 down to -36. This is basically a range of 70, so we can essentially call this +/- 35.

So… what is all this good for? What are the applications? I don’t know yet, but it does potentially open up a lot of possibilities for those folks out there with creative and curious minds. One design is a 4 source cross-fader, which is included in the Project files (download above). The Combinator is within a Reason file for maximum compatibility with everyone out there.

Inside this Combinator you’ll notice that the Shaper Driver values for “CV2” and “CV3” Thor units are set for 42, which to my ears extended the fade out time for the mixer faders to a better sounding value. The “CV2” and “CV3” Thor units are identical, except via the Combinator Modulation Routing section, CV3 Thor’s Mod Wheel values are inverted, so the full throw is 0, and the lowest position is 127. This is essentially allowing you to send that sine wave backwards (not upside down) via the Combinator knob. I know, that’s confusing a bit, but sit and stare at your screen for a few hours and it might make sense – it took a while to figure it out, and now it makes sense to me, but it wasn’t easy at first. These Thor units send bipolar CV data to raise and lower the mixer volume levels. When the values go into the negative, those CV values are of no use to the mixer, thus the channels remain at 0 volume. The other Thor, “CV1 and CV4” is sending out linear CV values as opposed to sine wave shaped values – these are being offset via a DC offset value from the two Step Sequencer CV values, one for each CV output. To add a bit of crossfade between 1&2 and between 3&4, adjust Rotary 1 on the “CV1 and CV4” Thor.

Well, that’s about it – hope this is mind-bending for you all.


Ed “EditEd4TV” Bauman

• NOW AVAILABLE ‘Reasonable Help 2010: http://baumanproductions.com/reasonablehelp.html
• Facebook: http://www.facebook.com/pages/EditEd4TV/46599212364
• Reason Files: http://www.baumanproductions.com/reason.html
• Tunes: http://www.soundclick.com/EditEd4TV

Ed’s Reasonable Help 2010

EditEd4TV’s Reasonable Help for 2010
Available now at: http://www.baumanproductions.com/reasonablehelp.html


It’s rare that I advocate a specific refill. I can actually count on my fingers how many refills I rely on in my own work, and would rather try and figure out the answer myself or else try building my own instruments and combinators. But when it comes to inspiration and I’m looking to expand my knowledge I can’t think of anyone better than Ed Bauman. In his latest refill offering “Reasonable Help 2010” he provides you with 50 amazing combinators which push the envelope on what Reason can do. And he sets off to prove that most anything you can think of in your head can be worked out in Reason routings and device Combinations.

Without a doubt this is one of the best refills I’ve seen, and it’s not because it’s packed to the brim with a ton of new sounds or new patches. If you’re looking for new sounds, there are other refills out there that can give you off-the-shelf sounds. This refill is aimed straight at the Sound designer who wants to learn how to route devices in reason. It’s also aimed at solving common problems that people face in Reason. How to create a noise gate? How do yo scrub your audio, how do you make reason strum a guitar? All of these questions and more are answered. Other common questions from the forum are answered too. How do you put your vocals through a vocoder to get that Telephone voice? Want an instant Steam Locomotive with Whistle and train speed included. It’s all in there.

In a nutshell, if you’re willing to sit down and look through the patches to see how they are routed, and read the accompanying documentation, you’re going to learn some new tricks and better your Reason skills. If you’re just starting out, you may not entirely be ready for this one. But if you have a decent grasp of how to route your devices together and want to take yourself to the next level, these 50 patches will open your eyes to some brand new ideas. The true benefit of Reasonable Help 2010 is in the educational value. What better way to expand your Reason knowledge than having a 50-session class provided by one of Reason’s top gurus: Ed. He’ll hold your hand the entire way, and speaking from personal experience, he’s always there to help if you get stuck. I highly recommend you purchase your copy now. At $50.00 it’s an awesome deal.

Ed was gracious enough to provide a free .rns file from Reasonable Help: EditEd4TV_GateModifier.

EditEd4TV's Reasonable Help Gate Modifier Combinator
EditEd4TV’s Gate Modifier Combinator

Ed also had some comments about this file, as well as some great insights into his work flow:

The reason I made this Gate Modifier patch was simple – the Slice Output of Dr. Rex is basically useless for triggering synth pads.  I wanted something that could easily serve as an “in-between” module to transform CV data into something more useful.  The concept is pretty simple: just take incoming slice data, which is basically just a small millisecond CV burst, and send that to Thor’s Step Sequencer CV Input Gate In Trigger.  That small gate burst is perfectly fine for triggering the Step Sequencer.  That trigger is used to trigger Thor’s Amp Envelope, which is held open depending upon the value of Combinator knob 1, which adjusts the Step Sequencer Gate Length value.  The Amp Envelope attack and release values are adjustable as well.  There’s also Gate Strength, which can be inverted so it sends negative CV values instead of positive values, which can be used as sort of a “ducking” feature.

So how do I go about this sort of thing?  Well, most of my patches always begin with a need, a want, a solution to a problem.  I always start with a Combinator with a Mixer inside.  I may ditch the Mixer later if it isn’t needed, but that’s the default.  At the heart of most of my problem solving solutions is Thor, since it offers so many incredible ways to take incoming audio or CV and manipulate it to death.  There’s almost always a way to solve a problem with Thor.
 
So sometimes I’ll just decide I’m going to tackle a problem, I’ll make the Combi and put the Mixer in there, along with one Thor, and I’ll just sit there and think, maybe for a few seconds, or maybe an hour or two… just thinking.  I’ll experiment along the way, maybe draw things out on paper so it makes sense visually instead of just mentally (sometimes if I’m away from home and I’m sitting somewhere on a video shoot I’ll start drawing out design concepts that just come to me, I’ll draw them out on paper, you can see 3 of them on the last few pages of the RH’10 PDF manual).
 
The worst is when inspiration hits when I’m driving, and all I can do is dictate the concept into my cell phone, which is somewhat difficult depending on the complexity of the design stuck in my head.  So, once I’ve come up with a solution, and I design it in a Combinator, I’ll sit and stare and think for maybe an hour or so, thinking… “If I’m the end user of this, what will I hate about it, what will I want, what would I change”, and I go about solving those problems.  Sometimes this can be really frustrating because I’ll come up with additions before I stumble upon some solutions, so I may end up programming knobs 3 and 4 to do something, then I discover it’s a much better solution if I have, say, the Mod Wheel do the same job as those two knobs, so I have to redesign my modulation routings and perhaps some CV cabling as well.
 
Eventually I land on the final design, and I’ll have some buttons or knobs left over empty, so I’ll try to come up with some fun stuff at that point.  That’s when I wish the Combi Pitch and Mod Wheels had labels as well, since they’re stuck being labeled via the Combi skin… Sometimes I use those two wheels for other things and I’m too busy/lazy to design a custom skin for those different purposes.  Also, I try to avoid tying up a knob with the “do not touch!” label, though sometimes it’s necessary.  And that’s when I wish the Combinator was 8×8 instead of 4×4, and I wish it had, say, 8 CV inputs and 8 CV outputs on the back as well, not necessarily tied to the knobs if you don’t want them to be.

And here is an explanation of the inner workings of the rns file, direct from Ed’s PDF documentation:

EditEd4TV_GateModifier

This Combinator allows you to modify/extend Dr. Rex gates into a more useful state.

Knob 1 “Gate Length”: This knob adjusts the gate length.

Knob 2 ” Gate Strength”: This knob adjusts the gate strength.

Knob 3 ” Gate Attack”: This knob adjusts the gate attack time.

Knob 4 ” Gate Release”: This knob adjusts the gate release time.

Button 1 “2 Ordered”: This button switches the gate mode from single to two varying triggers.

Button 2 “16 Random”: This button switches the gate mode from single to 16 random triggers.

Button 3 “n/a”: This parameter is unassigned.

Button 4 “n/a”: This parameter is unassigned.

Pitch Wheel: This wheel is unassigned.

Mod Wheel: This wheel is unassigned.

Details: This Combinator is particularly useful when used with a Dr. Rex loop player. On the rear panel of Dr. Rex you’ll find a Slice Gate Output. Note that this CV signal is routed to the Spider CV Slice Splitter – this is purely for demonstration purposes. Note that the first split output is routed directly to Thor 1 Pad’s Filter 1 Frequency Modulation Input, whereas the second split output is routed through the GateModifier, then into Thor 2 Pad’s Filter 1 Frequency Modulation Input. Play back the demonstration sequencer and solo Mixer channel 1. This is the drumbeat that we’re using to send gate signals to the two Thor units. Return the Mixer back to normal and now solo Mixer channel 2. This is Thor Pad 1. Notice very short and barely useful clicks in the audio signal, which is a result of the very short slice gates affecting Thor’s filter. Return the Mixer back to normal and now solo Mixer channel 3. This is Thor Pad 2. Notice the much more active and useful affects on the audio signal, which is a result of the GateModifier creating better gate signals.

Inside the GateModifier you’ll find a single Thor unit. CV control needs to come directly into this Thor, into the Step Sequencer CV Input Gate In (Trig) jack. Each incoming slice gate will trigger a step in the Step Sequencer. This first step is set for a gate of 0%, but Combinator knob 1 (Thor Rotary 1) is used to adjust this gate length up to 100%, thereby creating much more useful gate lengths. This new gate signal triggers Thor’s Amplitude Envelope, which is then routed to both CV 1 and CV 2 outputs, where CV 2 is a polar opposite of CV 1. Though not used in this demonstration, know that CV 2 output is ready for use if needed as an inverted output. Combinator knob 2 is used to trim the strength of both of these outputs. Note that Combinator knob 2 is bipolar, with no affect on strength when centered. Right of center results in positive results (with negative results from CV 2 output) and left of center results in negative results (with positive results from the CV 2 output).

Combinator button 1 is used to change the number of steps of the Step Sequencer from 1 to 2, in a back and forth pattern. Step 2 contains modified parameters that create a different result than step 1, thereby making a noticeable difference in how the gated signal controls Thor. Combinator button 2 is used to change the number of steps of the Step Sequencer from 1 to 16, in a random pattern, with all 16 steps set for variable settings that result in an unpredictable, yet still slice accurate, gate signal.

Combinator knobs 3 and 4 adjust the Amplitude Envelope attack and release times, respectively.

In our example we’ve sent the gated signal to Thor’s Filter 1 Frequency Modulation Input CV jack, but you can of course route this signal anywhere you like. You’ll find this new signal works much better than the standard slice output of Dr. Rex. This GateModifier is also useful to modify the gate signals coming out of a ReDrum, where the ReDrum channel is set for gate mode 0 (sawtooth wave). Though you can get workable results by switching the ReDrum gate mode to 1 (square wave), this potentially affects the ReDrum channels audio waveform; in the case of, say, a crash cymbal, the affect of switching the gate mode to mode 1 are more often than not unacceptable (muted crashes). The alternative is to sacrifice a ReDrum channel to use purely as a gate signal in mode 1, which may also be unacceptable. Your best option may be to use the GateModifier Combinator, allowing you to select any gate output for use.

The Dr. Rex, Spider CV, Thor units, and sequence in this file are provided simply to test the Combinator’s features.


A huge thanks to Ed for putting this package together. You truly are an inspiration to all of us Reason users. Please keep doing what you’re doing and I look forward to your future products as well. You can purchase Ed’s Reasonable Help 2010 here:  http://www.baumanproductions.com/reasonablehelp.html

Panning to Punch out your Mix

Kevin Parks is a former architectural designer, artist, and boatbuilder with a life-long love of music. Learn how he uses Panning in Record to punch up his mixes, giving them enough sonic space to have a fighting chance.

Your mastering will go a lot better when your mix is fine tuned.

These are some procedures that have evolved for me through time, advice, and experience. Everyone’s work flow is different, but we are all trying to solve the same sorts of problems, so I hope what follows will add something to your bag of tricks.

Before adding a lot of FX to try to punch out a mix, there are some things I like to do to give my mixes enough sonic space to have a fighting chance.

Working with Audio

First of all, since Record gives us audio capability now, let’s start with audio.

For all audio recording, I want to get the cleanest signal possible going into my computer.  Electronic noise takes up space better used for actual audio content.

I spent weeks routing and re-routing cables, getting rid of bad connections, separating all my power cords from my audio cables, and gain-staging to get the cleanest signal I could going into my computer.

While my input signal is *much* improved, it isn’t perfect, and electronic noise is cumulative. So if you mix a lot of tracks, each with a little noise, it adds up. If you don’t have noise reduction software, what can you do?

One thing you can do about that in Record is to use the razor tool and cut out the silent stretches in each audio track.  That will eliminate your hardware’s noise profile, at least from those stretches.  Nothing worse than teaching people’s ears how to tune into the static, just as they are ready for the music to start. This can make a really surprising difference. Noise can hide rather nicely within the audio content when the listener isn’t being trained how to hear it.

So now that we have gotten off to a good start by getting rid of obvious  problems with the audio tracks. Now what?

Next step , before adding a lot of FX to the mix, is to make sure to give all your tracks a place to be in the mix,  their own sonic space. No sense to start cutting freqs with EQ to solve problems that will go away with proper panning.  So start out with panning before using EQ.

To pan your tracks well, the first thing to consider is what goes center stage?

Be careful not to stack too many things in the center. 

Keep in mind that bass  frequencies are non directional to a great extent, so try to avoid panning low freqs very far if at all. The farther you pan a low frequency track the muddier your mix will get. (I have sometimes panned a bass and a kick a little bit, say 10-15%, and then gone back later to help separate them with some judicious EQ work.)

Separate freq ranges work OK together in the center, but if the freqs are too close to each other it will get “crowded” very quickly.  Think in terms of low, medium and high frequencies, and choose what  tracks you will stack in the center. Then  preview just  those tracks in your center channel.  You can try out different instruments until your center shines.

Next idea to remember:  The higher the frequency, the easier it is for it to sit farther from center. Since I use a lot of guitar tracks, I often balance the rhythm and lead guitars by placing them approximately the same distance from center, say 30-50%.

I like to continue to keep balance in my mix by pairing up higher freq tracks and placing them likewise the same distance apart. Higher freq tracks I place farther out than the guitar tracks. More often than not, it is better not to go all the way to 100% .  

Placing higher freqs farther apart is a good rule of thumb to start off with. I  get a sense of how many pairs I have and then divide up the space between pairs accordingly. Then preview different ideas; it’s fun, it’s free, and it’s going to improve your mix.

On the psycho-acoustic side, keep in mind that people tend to rely more on their right ear for things that they pay more attention to, so I like to place the lead somewhat, but not extremely, to the right. It helps hold peoples attention.

So remember,  you will need to do less fiddling with EQ when the tracks each have their own place in the sound field. Panning is powerful stuff.

Now, just to touch on EQ and Reverb:

OK, at this point,  panning has just given you the ability to place your tracks/instruments in different locations from left to right across the sound field. Then if there is a conflict, if  there is an instrument or track that is masking another one, then use EQ to tweak that  problem specifically.  Using a bass track and a kick drum as an example, solo those two tracks and tweak the EQ gently on each  until you can hear them both clearly. (Research this aspect if necessary.) 

Apply reverb last: Now I evaluate where I need/want reverb. Reverb will push a track farther back in the mix.  Sometimes you might need some reverb on a guitar track to help it cut through the mix. I often like to give my guitar tracks an ethereal feel with reverb. Avoid using reverb on low freqs; it makes muddy, harmonics. Reverb is much more pleasant and clean when used on higher freqs.

Once in a while I find that a *little* reverb applied globally to the finished song, can help integrate the tracks. Be careful though. If you are having to do very much of that, chances are that there is a track that needs more attention.

That’s all for now.  Knock ’em out, baby!


Kevin Parks is a former architectural designer, artist, and boatbuilder with a life-long love of music.  Translating uncharted realms of emotion using rhythm, space, and harmony..weaving real world instruments and software synths into experiential ambient synthesis. You can visit his website at http://www.soundclick.com/ambientsynthesis where he showcases several of his musical works.