After working with the Thor step sequencer, and in honor of Music Making Month at Propellerhead Software, I posted a challenge on TSOR (The Sound of Reason): Create an entire song without the main sequencer in Reason. So here is my attempt at a song without a Sequencer. And I’m here to say, it can definitely be done! The following were the basic rules:
- You can’t use the main sequencer. This means you can’t have any note, audio, pattern or automation lanes or clips. Kindly step away from the Main Sequencer!
- The song has to be a decent length: about 3-5 minutes.
- You can use the L / R and End markers in the sequencer (to indicate the end of the song, or to loop the song over again so we at least know the song’s end location).
- It can’t be a “live jam” and it can’t consist of the same one note sound over 4 minutes in length (yes, I get the joke Mr. Marcel Duchamp — Har dee har har). In the spirit of a challenge, this is put out there to challenge you as a musician who loves making songs in Reason. So give it a good shot.
What you end up with is a song that is pretty much controlled via CV and the device sequencers (Thor, Redrum, and the Matrix). After a few days, here’s what I came up with:
Song without a Sequence by Phi Sequence
I thought this was an interesting challenge, given it’s not easy to throw the Main Sequencer aside. For one thing, how do you mute or fade in / out? For another, how do you automate your sends? All very interesting challenges and all will require those that participate to flex their CV muscles. And I strongly encourage you to do so, because the more you learn about CV and the back of the Reason rack, the more you will understand inner connections, and the easier it will be to take what’s in your head and spit it out in Reason.
So enough preaching. Here, I’m going to explore a few tricks to overcome the lack of the Main Sequencer in our song challenge.
You can download the project files here: Song-without-a-Sequencer. This is a zip file that contains a reworked copy of the 128-step forward sequencer Combinator that is used extensively below (works with Reason 4 & 5, and Record 1.5), as well as a finished song file I created without the use of the Main Sequencer or any automation, notes, or pattern lanes / clips (the Song file works with “Record 1.5 + Reason 5”). Note: please respect that the included song file, like everything else on this site, is under the Creative Commons 3.0 licensing, meaning you can mix, remix, share, and play around with the song to your heart’s content, but you will need to provide the source info and a link back to my site here in any productions you do with this file. Share and share alike ok? And you can’t make any money off the file. But if you remix or play with the file, send them back to me privately and I’d be happy to showcase them here in a new posting (send to my email in the top menu), I’d love to see what you come up with. Don’t be shy! 😉
To start tackling this pickle, I first thought about how the song would be sequenced? Since I can’t use any note lanes, the notes would have to be placed inside one of two possible devices: The Thor Step Sequencer or the Matrix. You can also use the RPG-8 to help play your notes and the Redrum could be used as a sample player/sequencer. But I thought I would stick to the Thor and Matrix for most of my song. As I have already explored creating a song entirely using Matrix sequences on my blog, I thought it would be a better challenge to use Thor as my main sequencer. Note: it also helped that I just came off a Thor Step Sequencer bender in the last 2 tutorials I wrote. So it was fresh on my mind.
With that accomplished, I had to set out using Thor as the sequencer for the song. The next step is to figure out the length of your song. If my song is 120 beats per minute, and I use 4/4 time, each bar is 2 seconds long, or 30 bars per minute. If I set up Thor’s step sequencer rate to be 4/4, that means each step is one full bar long (2 seconds). Using this rate/resolution, I can calculate that I will need 8 Thors to sequence a song 4 minutes long (4 minutes = 120 bars or 120 steps in Thor. Thor can produce 16 steps, so 120 / 16 = 7.5 Thors). I promise that will be the only math you’ll need to do in this tutorial. 😉
So the way I started was to create a Combinator with 9 Thors all strung together. See the Generative Ideas tutorial for a complete explanation, or you can download the Project Files at the top of this tutorial. We’re using the forward running Thor 128-step sequencer as a starting point. This is a Combinator that you can modify for use as a forward running sequencer to control various sounds and their levels. You can set all the rates on these Thors to 4/4 and you’ll have yourself a 4-minute sequencer. Now comes the modifications:
Since we can’t use the Main Sequencer at all, we need a way to a) Trigger the Step sequencer via CV, and b) modify the sound source levels via CV. Here’s how you do that:
Triggering the Step Sequencer via CV
The biggest problem you will encounter when doing things this way is how to trigger the step sequencer to start, and ensure it is only triggered once, and never again. The solution I came up with is to use 2 Matrix Curves inside the step sequencer Combinator.
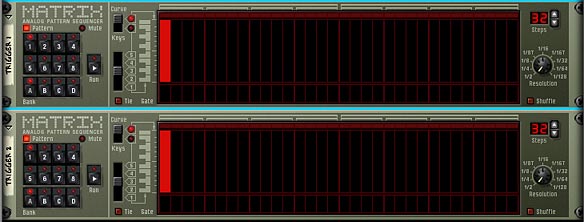
- Hold your Shift key down and create a Matrix under the set of sequenced Thors (we’ll call this “Trigger 1”). Switch to “Curve” mode, and on pattern A1, set it to 32 steps with a resolution of 1/2 (though I don’t think the step length or amount of steps really matters, as long the step length is above 2 steps, but as these settings worked for me, I’m not going to deviate from them). On step 1, set the curve to it’s full height (MIDI 127).
- Select this Matrix, right-click and select “Duplicate Devices and Tracks” to create a copy of the first Matrix (we’ll call this “Trigger 2”).

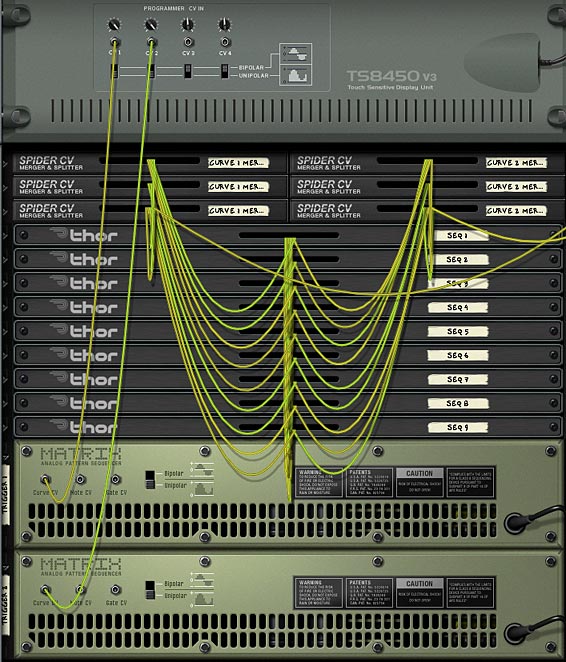
The 2 Matrix Triggers (Trigger 1 and Trigger 2) with the exact same Curve settings. - Now flip to the back of the rack and send the Curve CV from Matrix 1 into CV input 1 on the Combinator. Send the Curve CV from Matrix 2 (Trigger 2) into CV input 2 on the Combinator. Set the Trim knobs on both CV inputs to full 127, and switch to “Unipolar”
Note: If you have Reason 4, you can still do this trick, just send the Curve CVs from both Matrixes into Rotary 1 and Rotary 2 CV inputs, set their trim knobs to full, and on the front of the Combinator, turn Rotary 1 and 2 down to 0 (zero; fully left).

The two Matrix Triggers' Curve CV cables being sent to CV 1 & CV 2 inputs on the Combinator, respectively. - Flip to the front of the rack and in the Combinator’s Programmer, select the first Thor device in your sequence. Enter the following into the Modulation Routing:
CV in 1 > Button 1 : 0 / 1 (For those using Reason 4, change “CV in 1” to “Rotary 1”)

The first Thor Step Sequencer Triggered to start by the Curve of the Trigger 1 Matrix. - Select the Matrix 1 (Trigger 1) device and enter the following into the Modulation Routing:
CV in 2 > Pattern Select : -1 / 0 (For those using Reason 4, change “CV in 2” to “Rotary 2”)

The Trigger 1 Matrix's Pattern switched by the Trigger 2 Matrix.
Now what happens is as soon as you hit the Play button on the Transport, the second matrix triggers the pattern of the first Matrix, which kicks off the first Thor step sequencer (provided Button 1 on this Thor is set to trigger the start of the Sequencer — turning it on, which should already be set up if you downloaded the 128-step sequencer). The great thing about this setup is that it’s a “one-time” trigger setup. Every time the Matrixes come around to trigger again, Matrix 1 will be one step ahead of Matrix 2, and so the first Thor will never be triggered twice. If it were triggered twice, you’d end up with all kinds of problems with multiple CV values output and summed together. Trust me, it’s not what you want to hear coming out of your sequencer.
Ask me why the steps of both Matrixes go out of sync or lag 1 step behind each other and I couldn’t tell you. I’m just happy that they do in this instance. I’m sure somewhere down the road I’ll be doing something totally different with the Matrix and need them in sync, and get all upset because they aren’t. But not here. Here I’m happy happy happy.
Modify your Sound Source Levels via CV
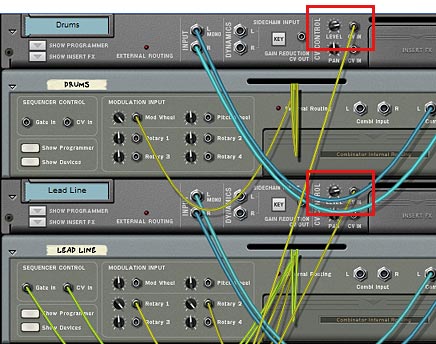
Now that we have the sequencer setup properly, it’s time to add in our sounds. If you look at the song I uploaded, you’ll see that I am using Curve 1 and Curve 2 of all the “Level” Combinators to output 2 level values from each “Level” Combinator. The final output of both curves are sent to the CV input on the Mix channels of the sound devices. This way, you can use the Thor Step Sequencer as a “Level” sequencer for each sound device.


If you need more level controls, just duplicate the 128-step sequencer Combinator and send the Merged Curve outputs to the devices you wish. Just make sure to keep all the Step Sequencer rates the same in all Thors so that you don’t go out of sync. Not that you can’t change the rates, but things will be much easier if all the Thors in each of the Combinators move at the same time through their steps.
Using this method, you can now fade in your song and fade out your song by adjusting the steps’ curve values in the first Thor sequencer (fading in) and adjusting the steps’ curve values in the last Thor (fading out). You can also control what is heard at any point in time along the song. For instance, I added a Trance Lead “Fill” in the middle of the song by adjusting the steps of the curve that controls the Fill’s Mix Channel Level CV. If you open up this Combinator, you’ll see that all the curve CV values of all the Thor steps are 0 (zero), except for Thor 4, 5 and 6. The curves in these Thors are raised up to around 64 gradually (fading in), and then lowered back down to 0 (zero) gradually (fading out). This has the effect of bringing the fill into the soundscape in the middle of the song. At the same time, most of the other devices except the Basses are lowered during the fill. If you wanted to mute any part along the way, just make sure that the curve value is set to zero. To have it sound, bring it upward to the level you desire (any non-zero level).
Alternately, if you want to mute the sound for a given device, you can just turn off the step where you want to mute the sound (the small red square beneath the steps). However, if you mute this way, it will mute both curves, so if you are controlling 2 devices with the 2 different curves of the same Thors, you’ll end up muting both devices. To get around this, have only one curve from Thor controlling one device (put another way, use only one 128-step sequencer Combinator to control one sound device).
So that shows you how to Trigger your song, change the sound device levels over time, and mute the sounds in your song.
Adding Send Effects
Another thing I wanted to try and accomplish is adding a send effect into the Record Main Mixer and control when and where this effect gets added. If you look at my song, you’ll see a Delay device connected to “Send 2” of the Master Section. This is a nice send effect to use because it already comes equipped with a “Dry/Wet” control on Rotary 4. The crux of the biscuit is this: You need to set up a similar Dry/Wet control for any send that you want to control during the duration of your song. This way, you can use another Curve from a 128-step sequencer Combinator into the Rotary 4 CV input on the back of the Combinator, and turn the CV Trim Knob all the way up to 127. Then flip the rack around and reduce Rotary 4 to 0 (zero; all the way left).

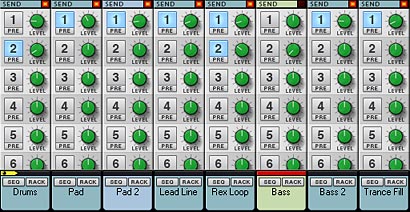
Next, you need to turn on the Send effect for the devices that will use it (you’ll see in my song that the drum and Rex Loops take advantage of this delay send effect). Now, in much the same way as the sound devices are being controlled by the other step sequencer Combinators, the level of the “wet signal” of the delay is being controlled by yet another merged Curve value from another Sequencer Combinator. It’s as easy as saying “right-click Duplicate Device and Tracks” — of course you’ll have to go into each Curve and tweak the levels of the Curve’s step values in all the Thors, but I think by now you get the gist of it.

Now just for the fun of it go into the Main sequencer, and delete all the tracks (Don’t delete the devices, just the tracks). Set the End marker to somewhere after 4 minutes and press Play on the Transport. Your song will play through from start to finish. You’ve now created an entire track without the Main Sequencer. I knew you could do it!

Where do you go from here?
This tutorial touches on a few ways you can control your song via CV. It’s by no means the only way it can be done. Not by a long shot.
Another way you could control devices without the main sequencer is to send them through a 14:2 Mixer. If you place the mixer inside a Combinator, you can check the box in the Combinator programmer, to have the Mixer receive notes. Then you can send CV into the Combinator’s Gate/CV input and play the appropriate keys to Mute or Solo your tracks connected to the Mixer. You could also send the Curves from the 128-step sequencer into the Mixer’s Level CV input, much as I have done in my song. This would control your fade-ins and fade-outs.
You could also use a Matrix device inside a Combinator and string together patterns going from A1 – D8. Then map the “Pattern Select” to a Rotary and use a very long slow LFO to move the Rotary over time. The matrix can then control any number of other devices with the Note/Gate CV source, and then you can use the Curve CV to adjust levels of the device, in much the same way I have done here. The only downside to the Matrix is that you don’t have any read-out of the CV levels, as you do in Thor, and so this can be a little daunting.
I hope this creative exercise inspires you to try it out yourself. Or at least shows you a few new hints and tricks when working with the Thor Step Sequencer and CV. Now back to making more music. It is music making month after all. 😉
