66 – The ECHO Echo echo. . .

Today let’s take a nice little look into the world of The Echo. New to Reason 6, this is one of 3 new effects which were much anticipated by the User Community (Do we all remember posts with subject lines reading “We need better effects in Reason”? I do).

Today let’s take a nice little look into the world of The Echo. New to Reason 6, this is one of 3 new effects which were much anticipated by the User Community (Do we all remember posts with subject lines reading “We need better effects in Reason”? I do).

You can download the project files here: Echo-Techniques. There are some Combinators and a .reason file showcasing the examples found below. In the .reason file, I’ve used mutes to silence all the tracks. To listen to a track, unmute it. I hope you find some of these tricks useful.

Also don’t forget that my latest Refill, Pureffects, is available with 1,250 effect patches designed specifically with Reason 6 in mind. There’s 200 Echo patches alone, and about 30 or so Echo Combinators with all kinds of interesting routing ideas. For example, ever thought about setting up Kong to “Play” the various “Delay Times” via your pads? Since there are 16 “synched” times in The Echo delay, they are perfect for mapping to the Kong pads. Yup. It’s in there. Read More about the ReFill.

Overview of The Echo

The Echo brings some nice new features into Reason. It’s an Echo / Delay device that can also phlange things around, and purports a new Algorithm to the Echo that you won’t find inside the RV7000. As with all Reason devices, it doesn’t replace anything, but instead adds something new into Reason. So it’s not meant to be a replacement for the DDL-1 or the RV7000 Echo algorithm. They all have their place inside Reason.

One of the nice things I like about the Echo is the “Keep Pitch” button. Essentially, this will keep the pitch as you adjust the Delay Time, so that you don’t get those insane squelches that you get if you were to change the Delay Time in Thor or the DDL-1 devices. This is unique to The Echo.

Another unique offering is the way in which you can control The Echo. There are 3 ways to control it:

  1. Normal: Allows you to use The Echo as an insert or send device in any situation. The Dry / Wet knob determines the amount of Echo produced. This mode is probably the one you will be most familiar with, as it’s the way most effects are set up in Reason.
  2. Triggered: Allows you to Trigger The Echo via the Trigger button or by sending CV to the back of The Echo device. The only thing to remember with this mode is that Any Audio being processed through The Echo will not sound unless the Triggering is enabled. Something that can be a little confusing at first. Honestly, I would have preferred if the Audio was sent through the device dry when not triggered, so that you could still hear the unprocessed audio, and then triggering allowed you to hear The audio processed through The Echo, but I’ll show you a way around that later.
  3. Roll: This is a really nice option when you want to play a stuttering effect on the Audio. The Roll Feature will boost both the Feedback and “Wet” signal as the Roll lever is moved to the right. When this lever is all the way right, both Feedback and the Wet signal = 100%. Fully left, and both Feedback and the Wet signal are 0%. This makes it very useful as a “Freeze” or “Beat Repeat” function.

And of course you have the Color, Modulation, Ping-Pong mode, Offsets for Delay and Feedback, and Ducking. I’m not going to go into all of these features because the manual does a pretty good job of explaining them. Instead, I’m going to show you a few practical ways you can use them in your compositions.

Trick #1: Echoing Slices in a Loop via Parallel Processing

This idea uses 2 instances of the same loop to parallel process the drum beats. One will be the original unprocessed Loop, and the other will have a few slices of the same Loop run through The Echo. It’s a very simple process, but it can be a lot of fun when you’re spicing up your loops.

Start by creating a 6:2 Mixer inside a Combinator. Then create a Dr. OctoRex Loop player and initialize the device. Open up the lower section of the Dr. OctoRex and load up one of your favorite loops into slot 1. Now Duplicate the Dr. OctoRex Loop player. Flip around to the back panel (Tab), and connect the second Dr. OctoRex to Channel 2 (the first Dr. OctoRex should be connected to Channel 1). Flip back to the front, and select the Second Dr. OctoRex. Right-click and select Effects > The Echo. This will automatically connect The Echo as an insert device between the second Dr. OctoRex and the 6:2 Mixer. Perfect.

Now for the important part. Flip to the back of the Rack, and move the output of the second Dr. OctoRex from the Left / Right output to the 1/2 output instead.
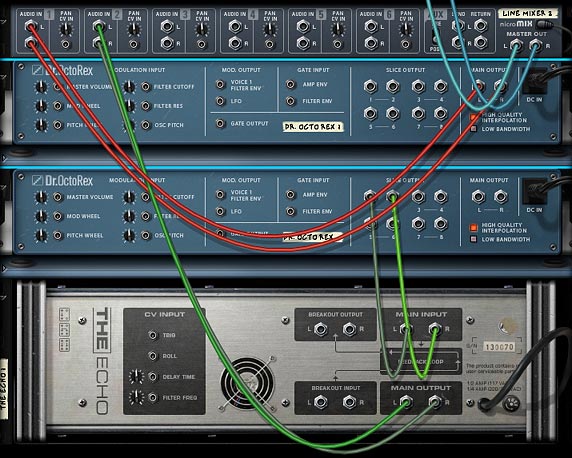
Parallel Processing specific Slices in a Dr. OctoRex with The Echo
Parallel Processing specific Slices in a Dr. OctoRex with The Echo (back of the Rack)

And now comes the fun part. Set both Dr. OctoRex devices to “Select Slice By Midi.” This allows you to see the slice focus as the loops are running. On the first Dr. OctoRex, select the “Slice Edit Mode” button and select the word “Level” in the Loop display area (not the “Level” knob). In the second Dr. OctoRex, select the “Slice Edit Mode” button and select the word “Out” in the Loop display area (not the “Out” knob).

Find a few key slices as the loop is played (Bass Drum is a pretty good choice in most cases), and in the second Dr. OctoRex, pencil in a quarter of the way up over these key slices. You should be hearing The Echo affecting those slices. In essence, the slices you select to be output from 1/2 (a quarter of the way up in the display) will be processed through The Echo. The reason it’s a parallel process is that the original loop is still playing simultaneously. If you don’t want the slices processed in a parallel way, go to the first Dr. OctoRex and reduce the level completely on the same slices you just sent to the Echo. You can introduce a little of the original signal back in by raising this level for the first Dr. OctoRex loop slices, or you can reduce/raise the levels in different ways to add a little variation and groove. It’s a very versatile method.

If you really want to start tweaking things, try transposing the second Dr. OctoRex loop by a few semitones or a whole Octave. If it sounds good, go with it. And when you’re done, save your creation in a Combinator.
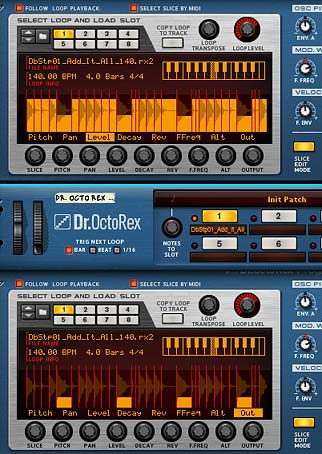
Parallel Processing Specific Slices in a Dr. OctoRex Loop with The Echo
Parallel Processing Specific Slices in a Dr. OctoRex Loop with The Echo (Slice Edit Mode)

Trick #2: Using a Matrix to Trigger Echoes

This idea is very basic but shows you how to use the Trigger Mode of The Echo. The idea is to use a Spider Audio to split the signal of a Dr. OctoRex Loop, and have one split going into a Mixer Channel, and another Split processed by The Echo and then sent to another Mixer Channel. Then take a Matrix Pattern Sequencer, and send the Curve CV from the Matrix into The Echo’s Trigger CV input on the back of the device. On the front panel, Set The Echo to “Triggered” mode, and set the Matrix to “Curve” mode. Start the Main Sequencer by pressing the “Play” button,  and start drawing in some steps in the Matrix curve. The steps should be draw in at full level, and you don’t need a lot of them. Start by drawing in one or two on a few key beats. You’ll start to hear how The Echo is affecting the loop, so draw in your steps by letting your ears decide where they should go.

Here’s a video that showcases how to set up the above 2 tricks. Don’t worry, it’s really not as hard as it sounds. Once you understand the concepts, you can really have some fun with these methods.

Trick #3: The Echo’s Feedback Loop

Using the built-in Feedback loop of The Echo is something that hasn’t been talked about very much since Reason 6 was released a few days ago, but I’ll bet this will be one area that will get a lot of attention in the coming weeks and months. If not, then it should. The Feedback Loop is one helluva tremendous feature. And it’s really simple to implement with a lot of possibility. The only thing I would advise when you start fiddling with the Feedback loop is to reduce the Feedback of the Echo down to zero before you start connecting devices to it. Also make sure there is no feedback offset either. Keep that knob centered at zero (0). Otherwise you can really destroy your ears if Feedback is set very high and you accidentally connect a Scream to it, for instance.

No doubt someone will eventually do this. And for that poor soul I guarantee it will end up being the last time they do it.

So now that you know the rules of the road, here’s how you set it up:

Load up a sound device, like your favorite Thor, Malstrom, Subtractor, or any Audio Track if you prefer.

Create an Echo device underneath the sound source device (or you can place it inside the Audio/Mix Channel’s “Insert Effects” section). Turn the Feedback knob down to zero. I also turn the Delay Time down to zero as well, but this isn’t necessary.

Hold your Shift Key down and under The Echo device insert your favorite Effect device from the “Effects” subfolder (to make it interesting, select a Pulveriser).

Flip to the back of the rack and connect the Pulveriser’s audio outputs to The Echo Feedback Loop audio inputs (Breakout Input). Then connect The Echo Feedback Loop audio outputs (Breakout Output) to the Pulveriser’s audio inputs.

The basic setup is complete. Now you can flip to the front of the rack and slowly raise The Echo’s feedback knob. I would probably set the knob to somewhere around 20. Then start to play with the parameters on the Pulveriser. Don’t go crazy. Just slowly introduce a few things such as some dirt, filtering and dry/wet blend. If you don’t hear anything too exciting, keep experimenting by turning up the feedback a little more, then increase the dirt and perhaps the squash settings. Try out the various filters.

You’ll start to hear how it all affects the feedback inside The Echo. And believe me, there are hours of fun found just in creating weird feedback loops. I created a lot of different feedback loops inside my Pureffects refill for Reason 6. I even fed a second Echo device through the feedback loop in one patch, and an RV7000 in another patch. Though when you feed delay effects through the Feedback Loop, you really need to mind your manners. As you can imagine, piling delays upon delays can be a recipe for disaster. Though with the right settings, you can produce some phenomenal results. It goes without saying, but I’ll say it again and again: Experiment! Experiment! Experiment!

Here’s the Video for setting up a Feedback Loop in The Echo:

Trick #4: The Zipper Effect

Here’s a little trick to create an off-the-wall sound with The LFO feature of The Echo. I personally like it for a very rapid delay which sounds somewhat like a zipper. So I’m calling it the zipper effect. It’s also very simple to set up.

The "Zipper" effect in The Echo

Here’s a short video on how this is set up:

Trick #5: Automating the Roll feature in The Echo with an LFO

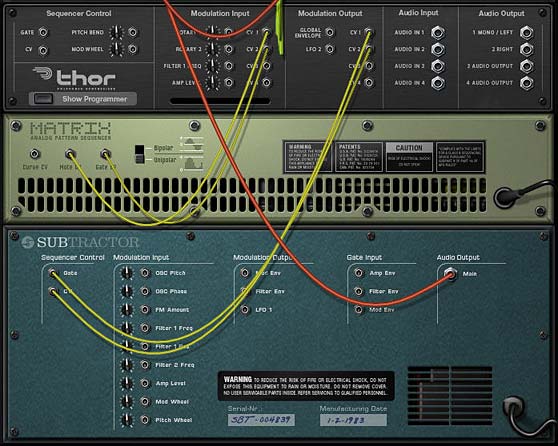
This is another one of those simple ideas that can produce some nice results. Try automating the Roll in The Echo with an LFO. Any LFO will do. You can even use the Pulveriser’s Tremor feature (essentially an LFO) to control your Rolls.
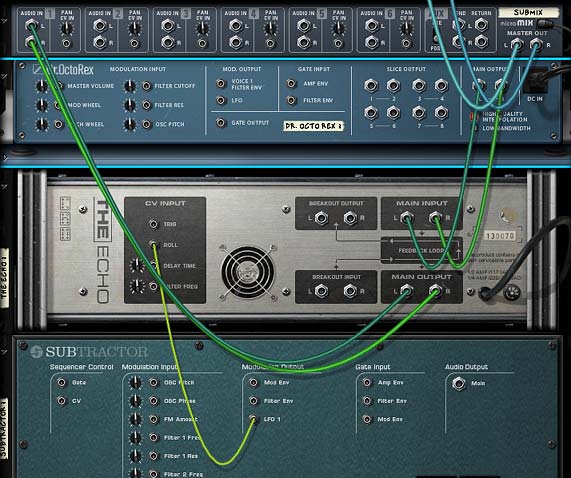
A Subtractor LFO connected to The Echo's Roll CV Input

Here’s a short video on how this is set up:

Bonus Trick #6: Processing a Kong Snare Drum through The Echo

Much like Trick #1, where the Slices are independently sent out to The Echo, you can also set up a Kong Drum Kit, and send specific drums out to The Echo for processing. This video shows how you can set up a Snare Drum to be processed by a Pulveriser and an Echo, while all the other drums are sent out Dry. Once you understand these concepts, there’s no end to how you can process things with The Echo, as well as other effects devices in Reason. Have fun with it!


And here’s a really nice tutorial that Selig put together on parallel processing and sidechaining with The Echo, which I just found the other day. Really nice method to parallel process using nothing more than a single Echo. Sweet.


I hope that opens up some new ideas for those of you using The Echo. Any other ideas, please share them here. Until next time, have a blast with your new Reason 6 upgrade.

 

62 – Song without a Sequencer

After working with the Thor step sequencer, and in honor of Music Making Month at Propellerhead Software, I posted a challenge on TSOR (The Sound of Reason): Create an entire song without the main sequencer in Reason. So here is my attempt at a song without a Sequencer. And I’m here to say, it can definitely be done!

After working with the Thor step sequencer, and in honor of Music Making Month at Propellerhead Software, I posted a challenge on TSOR (The Sound of Reason): Create an entire song without the main sequencer in Reason. So here is my attempt at a song without a Sequencer. And I’m here to say, it can definitely be done! The following were the basic rules:

  1. You can’t use the main sequencer. This means you can’t have any note, audio, pattern or automation lanes or clips. Kindly step away from the Main Sequencer!
  2. The song has to be a decent length: about 3-5 minutes.
  3. You can use the L / R and End markers in the sequencer (to indicate the end of the song, or to loop the song over again so we at least know the song’s end location).
  4. It can’t be a “live jam” and it can’t consist of the same one note sound over 4 minutes in length (yes, I get the joke Mr. Marcel Duchamp — Har dee har har). In the spirit of a challenge, this is put out there to challenge you as a musician who loves making songs in Reason. So give it a good shot.

What you end up with is a song that is pretty much controlled via CV and the device sequencers (Thor, Redrum, and the Matrix). After a few days, here’s what I came up with:

Song without a Sequence by Phi Sequence

I thought this was an interesting challenge, given it’s not easy to throw the Main Sequencer aside. For one thing, how do you mute or fade in / out? For another, how do you automate your sends? All very interesting challenges and all will require those that participate to flex their CV muscles. And I strongly encourage you to do so, because the more you learn about CV and the back of the Reason rack, the more you will understand inner connections, and the easier it will be to take what’s in your head and spit it out in Reason.

So enough preaching. Here, I’m going to explore a few tricks to overcome the lack of the Main Sequencer in our song challenge.

You can download the project files here: Song-without-a-Sequencer. This is a zip file that contains a reworked copy of the 128-step forward sequencer Combinator that is used extensively below (works with Reason 4 & 5, and Record 1.5), as well as a finished song file I created without the use of the Main Sequencer or any automation, notes, or pattern lanes / clips (the Song file works with “Record 1.5 + Reason 5”). Note: please respect that the included song file, like everything else on this site, is under the Creative Commons 3.0 licensing, meaning you can mix, remix, share, and play around with the song to your heart’s content, but you will need to provide the source info and a link back to my site here in any productions you do with this file. Share and share alike ok? And you can’t make any money off the file. But if you remix or play with the file, send them back to me privately and I’d be happy to showcase them here in a new posting (send to my email in the top menu), I’d love to see what you come up with. Don’t be shy! 😉

To start tackling this pickle, I first thought about how the song would be sequenced? Since I can’t use any note lanes, the notes would have to be placed inside one of two possible devices: The Thor Step Sequencer or the Matrix. You can also use the RPG-8 to help play your notes and the Redrum could be used as a sample player/sequencer. But I thought I would stick to the Thor and Matrix for most of my song. As I have already explored creating a song entirely using Matrix sequences on my blog, I thought it would be a better challenge to use Thor as my main sequencer. Note: it also helped that I just came off a Thor Step Sequencer bender in the last 2 tutorials I wrote. So it was fresh on my mind.

With that accomplished, I had to set out using Thor as the sequencer for the song. The next step is to figure out the length of your song. If my song is 120 beats per minute, and I use 4/4 time, each bar is 2 seconds long, or 30 bars per minute. If I set up Thor’s step sequencer rate to be 4/4, that means each step is one full bar long (2 seconds). Using this rate/resolution, I can calculate that I will need 8 Thors to sequence a song 4 minutes long (4 minutes = 120 bars or 120 steps in Thor. Thor can produce 16 steps, so 120 / 16 = 7.5 Thors). I promise that will be the only math you’ll need to do in this tutorial. 😉

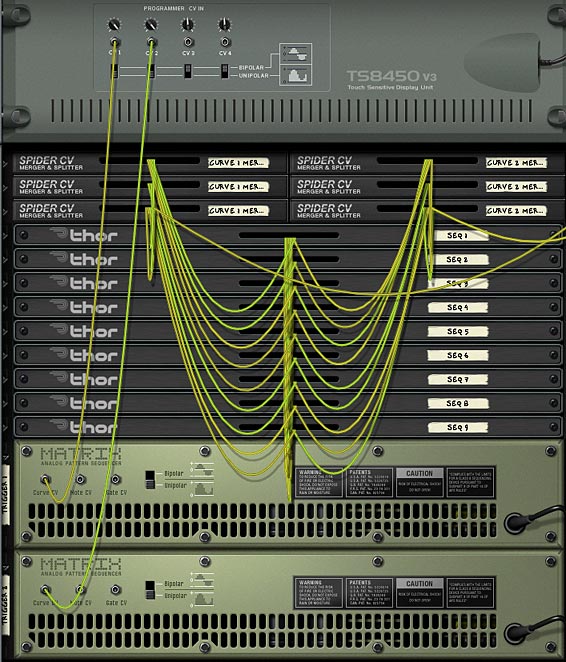
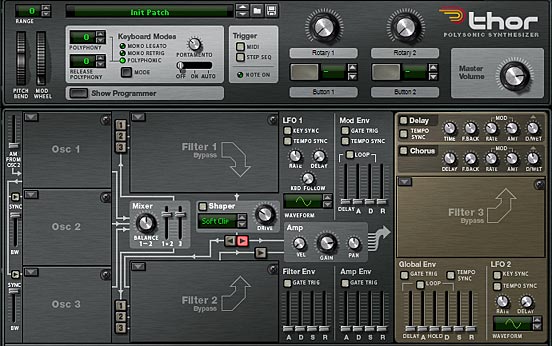
So the way I started was to create a Combinator with 9 Thors all strung together. See the Generative Ideas tutorial for a complete explanation, or you can download the Project Files at the top of this tutorial. We’re using the forward running Thor 128-step sequencer as a starting point. This is a Combinator that you can modify for use as a forward running sequencer to control various sounds and their levels. You can set all the rates on these Thors to 4/4 and you’ll have yourself a 4-minute sequencer. Now comes the modifications:

Since we can’t use the Main Sequencer at all, we need a way to a) Trigger the Step sequencer via CV, and b) modify the sound source levels via CV. Here’s how you do that:

Triggering the Step Sequencer via CV

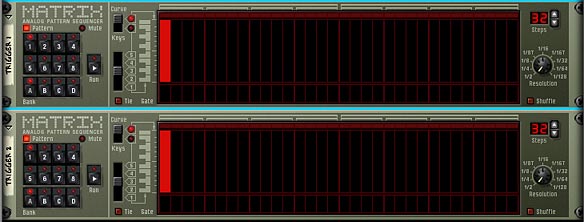
The biggest problem you will encounter when doing things this way is how to trigger the step sequencer to start, and ensure it is only triggered once, and never again. The solution I came up with is to use 2 Matrix Curves inside the step sequencer Combinator.

  1. Hold your Shift key down and create a Matrix under the set of sequenced Thors (we’ll call this “Trigger 1”). Switch to “Curve” mode, and on pattern A1, set it to 32 steps with a resolution of 1/2 (though I don’t think the step length or amount of steps really matters, as long the step length is above 2 steps, but as these settings worked for me, I’m not going to deviate from them). On step 1, set the curve to it’s full height (MIDI 127).
  2. Select this Matrix, right-click and select “Duplicate Devices and Tracks” to create a copy of the first Matrix (we’ll call this “Trigger 2”).

    The 2 Matrix Triggers (Trigger 1 and Trigger 2) with the exact same settings.
    The 2 Matrix Triggers (Trigger 1 and Trigger 2) with the exact same Curve settings.
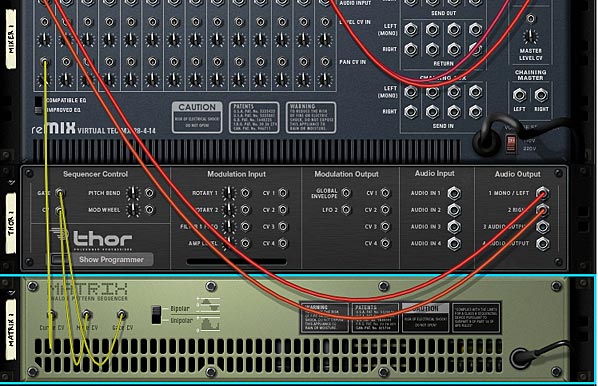
  3. Now flip to the back of the rack and send the Curve CV from Matrix 1 into CV input 1 on the Combinator. Send the Curve CV from Matrix 2 (Trigger 2) into CV input 2 on the Combinator. Set the Trim knobs on both CV inputs to full 127, and switch to “Unipolar”

    Note: If you have Reason 4, you can still do this trick, just send the Curve CVs from both Matrixes into Rotary 1 and Rotary 2 CV inputs, set their trim knobs to full, and on the front of the Combinator, turn Rotary 1 and 2 down to 0 (zero; fully left).

    The two Matrix Triggers' Curve CV cables being sent to CV 1 & CV 2 inputs on the Combinator, respectively.
    The two Matrix Triggers' Curve CV cables being sent to CV 1 & CV 2 inputs on the Combinator, respectively.
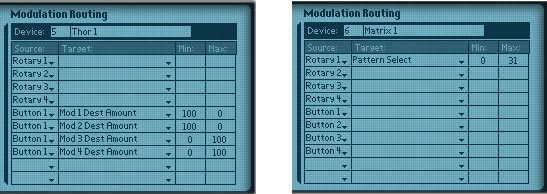
  4. Flip to the front of the rack and in the Combinator’s Programmer, select the first Thor device in your sequence. Enter the following into the Modulation Routing:

    CV in 1 > Button 1 : 0 / 1 (For those using Reason 4, change “CV in 1” to “Rotary 1”)

    The first Thor Step Sequencer Triggered to start by the Curve of the Trigger 1 Matrix.
    The first Thor Step Sequencer Triggered to start by the Curve of the Trigger 1 Matrix.
  5. Select the Matrix 1 (Trigger 1) device and enter the following into the Modulation Routing:

    CV in 2 > Pattern Select : -1 / 0 (For those using Reason 4, change “CV in 2” to “Rotary 2”)

    The Trigger 1 Matrix's Pattern switched by the Trigger 2 Matrix.
    The Trigger 1 Matrix's Pattern switched by the Trigger 2 Matrix.

Now what happens is as soon as you hit the Play button on the Transport, the second matrix triggers the pattern of the first Matrix, which kicks off the first Thor step sequencer (provided Button 1 on this Thor is set to trigger the start of the Sequencer — turning it on, which should already be set up if you downloaded the 128-step sequencer). The great thing about this setup is that it’s a “one-time” trigger setup. Every time the Matrixes come around to trigger again, Matrix 1 will be one step ahead of Matrix 2, and so the first Thor will never be triggered twice. If it were triggered twice, you’d end up with all kinds of problems with multiple CV values output and summed together. Trust me, it’s not what you want to hear coming out of your sequencer.

Ask me why the steps of both Matrixes go out of sync or lag 1 step behind each other and I couldn’t tell you. I’m just happy that they do in this instance. I’m sure somewhere down the road I’ll be doing something totally different with the Matrix and need them in sync, and get all upset because they aren’t. But not here. Here I’m happy happy happy.

Modify your Sound Source Levels via CV

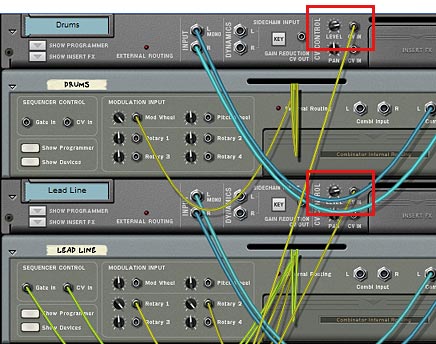
Now that we have the sequencer setup properly, it’s time to add in our sounds. If you look at the song I uploaded, you’ll see that I am using Curve 1 and Curve 2 of all the “Level” Combinators to output 2 level values from each “Level” Combinator. The final output of both curves are sent to the CV input on the Mix channels of the sound devices. This way, you can use the Thor Step Sequencer as a “Level” sequencer for each sound device.

The 2 Curve Outputs: The final Merged Output is sent to the splitter side of the Spider, and then one of the splits is sent to control the level of the sound device.
The 2 Curve inputs: The CV controls the level of the sound device. Input is on the Mix Channel, and the Trim Pot is set to 100.

If you need more level controls, just duplicate the 128-step sequencer Combinator and send the Merged Curve outputs to the devices you wish. Just make sure to keep all the Step Sequencer rates the same in all Thors so that you don’t go out of sync. Not that you can’t change the rates, but things will be much easier if all the Thors in each of the Combinators move at the same time through their steps.

Using this method, you can now fade in your song and fade out your song by adjusting the steps’ curve values in the first Thor sequencer (fading in) and adjusting the steps’ curve values in the last Thor (fading out). You can also control what is heard at any point in time along the song. For instance, I added a Trance Lead “Fill” in the middle of the song by adjusting the steps of the curve that controls the Fill’s Mix Channel Level CV. If you open up this Combinator, you’ll see that all the curve CV values of all the Thor steps are 0 (zero), except for Thor 4, 5 and 6. The curves in these Thors are raised up to around 64 gradually (fading in), and then lowered back down to 0 (zero) gradually (fading out). This has the effect of bringing the fill into the soundscape in the middle of the song. At the same time, most of the other devices except the Basses are lowered during the fill. If you wanted to mute any part along the way, just make sure that the curve value is set to zero. To have it sound, bring it upward to the level you desire (any non-zero level).

Alternately, if you want to mute the sound for a given device, you can just turn off the step where you want to mute the sound (the small red square beneath the steps). However, if you mute this way, it will mute both curves, so if you are controlling 2 devices with the 2 different curves of the same Thors, you’ll end up muting both devices. To get around this, have only one curve from Thor controlling one device (put another way, use only one 128-step sequencer Combinator to control one sound device).

So that shows you how to Trigger your song, change the sound device levels over time, and mute the sounds in your song.

Adding Send Effects

Another thing I wanted to try and accomplish is adding a send effect into the Record Main Mixer and control when and where this effect gets added. If you look at my song, you’ll see a Delay device connected to “Send 2” of the Master Section. This is a nice send effect to use because it already comes equipped with a “Dry/Wet” control on Rotary 4. The crux of the biscuit is this: You need to set up a similar Dry/Wet control for any send that you want to control during the duration of your song. This way, you can use another Curve from a 128-step sequencer Combinator into the Rotary 4 CV input on the back of the Combinator, and turn the CV Trim Knob all the way up to 127. Then flip the rack around and reduce Rotary 4 to 0 (zero; all the way left).

Rotary four (dry/wet knob) is reduced to 0 (zero) shown on the left, and a "128-step sequencer curve" is sent into the Rotary 4 input on the back (with the trim knob set to 127), shown at right.

Next, you need to turn on the Send effect for the devices that will use it (you’ll see in my song that the drum and  Rex Loops take advantage of this delay send effect). Now, in much the same way as the sound devices are being controlled by the other step sequencer Combinators, the level of the “wet signal” of the delay is being controlled by yet another merged Curve value from another Sequencer Combinator. It’s as easy as saying “right-click Duplicate Device and Tracks” — of course you’ll have to go into each Curve and tweak the levels of the Curve’s step values in all the Thors, but I think by now you get the gist of it.

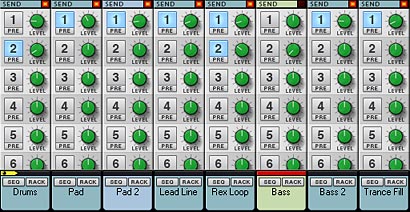
The Send settings for my song. The delay is set to Send number 2.

Now just for the fun of it go into the Main sequencer, and delete all the tracks (Don’t delete the devices, just the tracks). Set the End marker to somewhere after 4 minutes and press Play on the Transport. Your song will play through from start to finish. You’ve now created an entire track without the Main Sequencer. I knew you could do it!

Bye Bye Main Sequencer. Asta la vista. Adios. Arivaderce!

Where do you go from here?

This tutorial touches on a few ways you can control your song via CV. It’s by no means the only way it can be done. Not by a long shot.

Another way you could control devices without the main sequencer is to send them through a 14:2 Mixer. If you place the mixer inside a Combinator, you can check the box in the Combinator programmer, to have the Mixer receive notes. Then you can send CV into the Combinator’s Gate/CV input and play the appropriate keys to Mute or Solo your tracks connected to the Mixer. You could also send the Curves from the 128-step sequencer into the Mixer’s Level CV input, much as I have done in my song. This would control your fade-ins and fade-outs.

You could also use a Matrix device inside a Combinator and string together patterns going from A1 – D8. Then map the “Pattern Select” to a Rotary and use a very long slow LFO to move the Rotary over time. The matrix can then control any number of other devices with the Note/Gate CV source, and then you can use the Curve CV to adjust levels of the device, in much the same way I have done here. The only downside to the Matrix is that you don’t have any read-out of the CV levels, as you do in Thor, and so this can be a little daunting.

I hope this creative exercise inspires you to try it out yourself. Or at least shows you a few new hints and tricks when working with the Thor Step Sequencer and CV. Now back to making more music. It is music making month after all. 😉

Rebirth PCF Effect Combi

This beautiful little patch was contributed by Mick Comito, and it recreates the ReBirth Pattern-Controlled-Filter effect, but in the form of a Combinator that can be used in Reason and Record. I am thrilled that Mick came up with this idea and put this little gem together. If you get a chance, have a look at it and try it out. It’s really something interesting that can be used as an insert effect on any audio you throw at it.

The ReBirth Museum: Official homepage for Propellerhead ReBirth - currently available for the Ipad and Ipod Touch.

This beautiful little patch was contributed by Mick Comito, and it recreates the Rebirth Pattern-Controlled-Filter effect, but in the form of a Combinator that can be used in Reason and Record. I am thrilled that Mick came up with this idea and put this little gem together. If you get a chance, have a look at it and try it out. It’s really something interesting that can be used as an insert effect on any audio you throw at it.

Note, the image at right is a link to the homepage for the official site of the ReBirth museum, however, it has since seen a resurgence and can be purchased for the Ipad and Ipod Touch. If you own one of those devices, you may want to check that out here: http://rebirthapp.com/

Now onward to Mick’s great little patch:

Mick Comito's ReBirth PCF Effect Combinator

The file can be found here: ReBirth PCF (Run)~mc. There are 2 files: the ReBirth PCF Combinator and an .rns test file. I did note that when running the test file, there was a little bit of clipping here and there, depending on your settings. So you may want to be careful when using this patch. Simply reducing the level on the Mixer’s channel 2 or inserting an M Class Maximizer (to limit the sound) should take care of it, and is a very easy fix. But it’s still an amazing patch and very worthwhile to try out. I can see a lot of useful applications for it. So thanks Mick!

From Mick:

After you posted the blog last week I got nostalgic thinking about the guy who turned me onto ReBirth 8 or 9 years ago and really started me on this path. One of the coolest things about ReBirth was the PCF (Pattern Controlled Filter) effect. I thought that would be something cool to try and re-create. So I downloaded Rebirth and the manual and started playing with it again. It was a cool effect… 54 Patterns!!!! And the cool thing was that they were all illustrated in the manual as well as how it worked. I didn’t mention it to you in my previous email because I wanted to see if I could do it, and I didn’t want to hear “it’s been done a million times… just go to blah blah blah…!)

So last night I sat down and tried to recreate it, based on the knowledge I’ve gained following you and I have to say Hyd as well. At it’s core is a matrix (actually 2) for the patterns and a Thor for its filter, then combined. Getting them cabled and setting up the Thor matrix took a few tries, but I finally got it. Worked in some effects and even made my own backdrop for the combi!

Here’s a video that shows what the PCF Combinator can do:

And here is a rundown of the Rotaries and Buttons in the Combinator:

  • Rotary 1: Scrolls through all the patterns on both Matrixes. So you have 54 patterns from which to select (32 on Matrix A and 22 on Matrix B). Mick also put the matrixes at the top of the combi and compressed all the other inserts. Now you can see what the patterns look like and their note length. Most are 1/16 notes then some 1/32 note and 1/8 note patterns. It’s also easy to tell which one is selected because the “follower” only follows the selected matrix.
  • Rotary2: Controls the filter frequency.
  • Rotary 3: Controls the filter Resonance, but in keeping true to ReBirth, Resonance is labeled “Q.”
  • Rotary 4: Controls the Dry/Wet of the Thor’s delay.
  • Button 1: Selects between the two Matrixes.
  • Button 2: Turns on the Scream. This is a send effect in the mixer. Side note… The Scream is a bit much at times and sounded good just punching it in and out. I didn’t like the way it ended abruptly though, so I added a delay. The problem was when the Scream was in bypass, the signal was still getting through to the delay, so I needed to re-program the Scream (Button2) to go from On to “Off” instead of bypass. this allowed the delay to leave a nice trail without further affecting the sound.
  • Button 3: Turns on the Reverb. This is a send effect in the mixer.
  • Button4: Turns the delay on and off.
  • Mod Wheel: Rebirth had a fader for “amount” which is mapped to the Mod Wheel. This splits the dry and wet signal into a mixer so that the wet/dry amount can be controlled via the Mod Wheel. When the Mod Wheel is at zero (fully down), the PCF is fully wet. When the Mod Wheel is at 127 (pushed to the top), the PCF is fully dry.
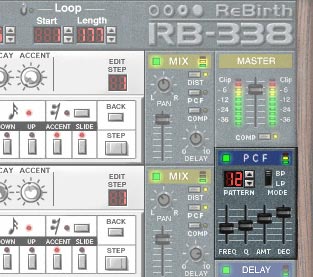
The PCF filter located on the ReBirth software screen.

Mick and I would love to hear any comments you may have.


Mick Comito is an aspiring musician, whose music can be found on Soundcloud under the pseudonym SoulReason. He’s a regular contributor on TSOR (The Sound of Reason).  He’s also a really great guy who is more than willing to share his creative ideas with us, and for that I’m very thankful.

53 – Key Trig Patterns (Part 1)

I’m sure most of us have used the Matrix or Thor Step Sequencer to some extent. But how often have we thought about using our keyboard to trigger those patterns? I know I’ve never given it much serious thought, since I usually sequence all the parts into the main sequencer. But this time I’m going to explore the possibility of triggering patterns from our Keyboard. This has a lot of “live play” applications.

By now, most of us know how to use Pattern sequencers to play parts in their tracks. I’m sure most of us have used the Matrix or Thor Step Sequencer to some extent or degree. But how often have we thought about using our keyboard to trigger those patterns? I know I’ve never given it much serious thought, and it’s probably due to the fact that I don’t play “live.” I usually sequence all the parts into the main sequencer. So this time, we’re going to explore the possibility of triggering patterns from our Keyboard.

The project files can be downloaded here: key-trig-pattern-methods. This file contains some combinators and an .rns file with all the combinators inside. These Combinators outline some of the methods presented in the tutorial below. Try them out and see what you can do with these ideas.

Furthermore, we’ll see just how far we can take this idea. The whole thing will be contained inside a Combinator (or a Kong device, if you wish), and the notes on the keyboard will trigger different patterns playing different instruments. It’s like having full control of the band at your fingertips on your piano or controller keyboard.

Sound interesting to you? Yeah, it was interesting to me too.

Before I jump into the various methods of Key Triggering, I want to give a huge shout out to Peff for providing help on figuring out the “Latching” method below. Without his help, I would have spent several more hours tearing out my hair. So thanks Kurt! I really appreciate all the help you provide, not just to me, but to the whole community.

Triggering Matrix Patterns

Let me start off by saying this is a huge PITA where the Matrix is concerned. The main problem lies in the delay of Pattern triggering from the moment when you press the trigger key to the moment the pattern starts (variable, depending on when the key was hit during playback). Yes I know, you can plop your patterns down on the Matrix pattern lanes, but that’s defeating the whole purpose of this tutorial, which is all about triggering patterns via different keys on your keyboard. But for the sake of argument (and to be complete), I’ll show you first how to set it up this way using a Matrix, but I’m not going to spend a lot of time on this one. Maybe this is beneficial on some planet where delay is a “cool” and “hip” concept. Here’s a video where I outline 2 methods to key trigger a Matrix Pattern. The first method is not described in detail here because it introduces the dreaded delay. But the second method (outlined in detail below) can be useful in a somewhat chaotic and free-running way.

Note: Ed Bauman highlights a method you can use to Trigger Matrix Patterns “almost” instantaneously here: “When Reason’s Time Signature is set to 4/4, patterns will switch on every measure, a full 16 x 16th notes, but if you set the Time Signature to 1/16, patterns will switch on every 16th note, so it’s basically immediate. Of course, if you’re playing back a sequence, doing this completely screws up the measures in a song and makes the whole song gigantic as far as measure count goes, but it definitely works for the Matrix and ReDrum. It used to apply to Dr. Rex as well but with Dr. Octo Rex we now have the Trig Next Loop region which essentially does the same thing if you’re switching around rex files within one Dr. Octo Rex.”

  1. First, Create a Combinator. Then create a 14:2 Mixer, and a sound source (in this case a Subtractor). Load up a Subtractor patch or else create your own synth sound in the Subtractor. Then create a Matrix underneath. It should automatically connect the Note / Gate CV for you. Enter a pattern into the Matrix (or press Ctrl+R to quickly enter a random pattern).
  2. In between the Subtractor and the Matrix, we’re going to create a Thor and completely initialize the patch (this means removing any Oscillators and Filters, and dropping all the values down to zero.
  3. The Thor is simply used as the gate trigger. So flip around to the back of the rack and connect the Note / Gate CV from the Matrix into the Thor CV1 & 2 inputs. Also connect the CV 1 & 2 outputs from Thor back into the Note / Gate CV inputs on the Subtractor.
The back of the rack showing the CV passing from the Matrix through the Thor and into the Subtractor.
  1. Flip around to the front again, and in the Thor Modulation Bus Routing Section (MBRS), enter the following:
      CV In1 : 100 > CV Out1 : 100 > Midi Gate (under Midi Key > Gate)
    CV In2 : 100 > CV Out2 : 100 > Midi Gate (under Midi Key > Gate)
  • Open up the Programmer Modulation Routing on the Combinator and for the Subtractor device uncheck the “Receive Notes” checkbox. Then select the Thor device and enter the following for the Key Range: Lo: C-2 / Hi: C-2. This way, when you press C-2 on your keyboard controller, it will open the gate and play the pattern on the Matrix.
  • Now press Run so the Matrix pattern is running. You won’t hear anything yet. In order to hear the pattern (turning it on or off) you need to press the C-2 key. This allows you to hear the pattern. The crappy part is that there’s no telling when the pattern will be picked up when you press the key. Put another way, the pattern is continually running, but only sounds when you press and hold the key down. Not the most elegant solution.
  • To add multiple instruments or parts, select the Subtractor, Thor, and the Matrix (holding down your “Shift” key to multiple-select the devices), right-click and select “duplicate devices and tracks.” Enter your new pattern in the Matrix. Then flip to the back of the rack and route the audio out of the Subtractor to a new channel. Finally, go into the Combinator programmer, and adjust the Thor device so that only one key on your keyboard controller is used to trigger the Thor (C#-2, for example).
  • Repeat the above process for as many sounds as you need (up to the total amount of keys that your keyboard will allow: 88 for a full size piano or synth controller keyboard, or 128 for the full midi range which a Reason or Record Combinator allows — from C-2 to G8). This is more than enough of a range to create a complete set of instruments and sounds for most any standard songs or performances.
  • Using Thor’s Step Sequencer for Precise Pattern Key Triggering

    Now that you have an understanding of how the Matrix is key triggered, I’ll move on to a more robust way of accessing patterns via the keyboard. This method replaces the Matrix in favor of the Thor Step Sequencer. Since the Thor Step Sequencer can be programmed to start and stop precisely where you want it, using it is the best option when you want precise control over your sounds. It’s just too bad that it’s more of a pain to enter and edit notes into it. The Matrix, to my eyes, provide a simple visual way to add patterns. The Thor Step Sequencer is more tedious by changing rotary knobs all the time.

    The Momentary Key Method

    The first method is the easiest and allows you to create a “momentary” trigger via your midi keys. This means that when you press a key, the Step Sequencer plays the pattern. When you release the key, the pattern stops.

    1. To set this up, first create a Combinator, and then in order a 6:2 Mixer, a sound device (here, a Subtractor), and holding the “Shift” key, a Thor device. While you’re at the front of the rack, add a sound into the Subtractor that you’d like to hear. Any sound will do.
    2. Completely Initialize the Thor device. This means removing the Oscillators, Filters, bringing all values to zero as well.
    3. In the Thor MBRS, enter the following:
        Button 1 : 100 > S.Trig (found under Step Sequencer > Trig)
    4. Directly to the rght of Button 1 on the Thor, use the upward spin control arrow to set this to C-2. This means that the Thor Step Sequencer is triggered when the C-2 key is pressed. In the Step Sequencer, set the Run Mode to “Repeat” and enter a pattern into the Step Sequencer (note that to gain access to the full note range, you’ll need to switch the Octave setting to “Full”).

    Note that an alternate way to trigger the Step Sequencer is outlined in the Video. Though this is a more labor intensive way to trigger things. If you want to use this method, switch the “Button 1” source in the MBRS to “MIDI Gate (found under MIDI Key > Gate)” and then open the Combinator Programmer and adjust the Key Range of the Thor device to Lo: C-2 / Hi: C-2 (so one key is selected). This achieves the same outcome.

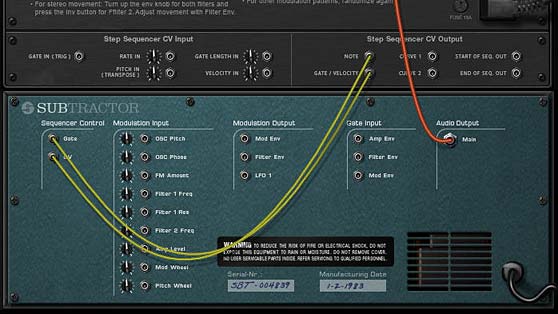
    1. Flip the rack around and in the “Step Sequencer CV Output,” send the Note and Gate/Velocity CV outputs into the Gate / CV inputs on the Subtractor.
    The back of the rack showing the Thor routing from the Step Sequencer into the Subtractor.
    The back of the rack showing the Thor routing from the Step Sequencer into the Subtractor.
    1. Lastly, go into the Combinator Programmer, and deselect the “Receive Notes” checkbox for the Subtractor (so that the Subtractor only receives notes from the Thor Step Sequencer).

    Now, when you play the C-2 key, the Thor Step Sequencer will start and play for as long as the key is held down. Cool right? If you want to create more instruments along other keys, create the new sound device (or even another Combinator), duplicate the Thor, connect the new Thor CV outputs to the new device, and move the button spin control to the new key setting. Done.

    The Latched Key Method

    No, this is not the latched key kid hanging outside his parents’ house with the key around his neck. This is the second method to trigger patterns via MIDI keys. It is is a little more complex because you need two Thors to produce it. This method is a “latch” or “hold” style of triggering. Another way to look at it is a toggled pattern on / pattern off method. In this procedure, you press a key and the pattern starts. The pattern then plays through even when you release the key. You then press the same key again, and the pattern stops. In this way, the pattern is “latched” by the key.

    1. Building on the first method, we need to change a few things. First, reset the Combinator by removing the key assignment (using the spin control to the right of the button — which should be set to “-“). We also need to remove the “Button 1” line in the MBRS (not necessary, but for cleanliness’ sake). Label this Thor “Pattern.”
    2. Create a new Thor and completely initialize it as we did previously. Label it “Trigger.” In the Step Sequencer, set the Run Mode to “Step,” change the Edit knob to “Curve 1” and create a 2-step pattern, with Step 1 set to zero (0) and Step 2 set to 100. Then enter the following line in the MBRS:
        MIDI Gate : 100 > S. Trig
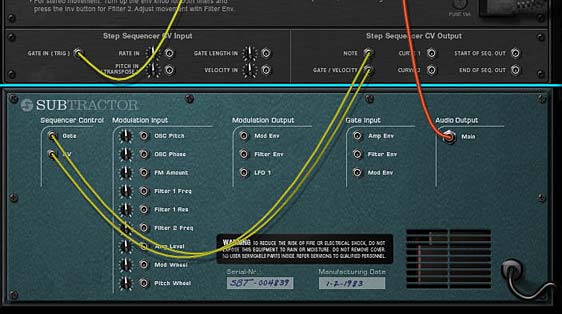
    3. Flip the rack around and send the “Curve 1” CV output from the “Trigger” Thor into the “Gate In (Trig)” CV input on the “Pattern” Thor.
    The back of the Reason rack with the CV routings for the latched setup. One Thor triggers the other Thor's Step Sequencer to start
    The back of the Reason rack with the CV routings for the latched setup. One Thor triggers the other Thor's Step Sequencer to start
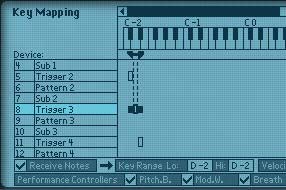
    1. Flip the rack back to the front and in the Combinator Programmer, ensure both the Subtractor and “Pattern” Thor is not receiving notes (uncheck the “Receive Notes” checkbox), and ensure the “Trigger” Thor is receiving notes (the “Receive Notes” checkbox has a check in it). Also set the Key Range value for the “Trigger” Thor to Lo: C-2 / Hi: C-2.
    The Combinator Programmer Modulation Routing
    The Combinator Programmer Modulation Routing

    Now press the C-2 key on your keyboard. The Step Sequencer starts and plays through even when you release the key. Press the key again, and the Step Sequencer stops. If you wish to add more devices to different keys that are “latch” triggered, create the new sound device (or even another Combinator), duplicate the 2 Thors, connect the new Thor CV outputs from the “Pattern” Thor to the new device, and adjust the Key Range to a new key for the “Trigger” Thor within the Combinator Programmer. Then you can set up your pattern in the “Pattern” Thor Step Sequencer, and you’re all set. Simple right?

    Where do you go from here?

    Here’s a few suggestions, which we will explore in the next part in our “Key Triggering Patterns” tutorial series:

    • Now that we have the hang of the way in which we can trigger the Thor Step Sequencer via your keyboard controller, you can duplicate the same sound source as many times as you like to create new patterns for the same sound source. Yes, you can merge the CV to control the same sound source (instead of duplicating the sound source), but it’s often quicker just to copy the whole thing and change your pattern.
    • You can create many different sound source instruments (any synths, samplers, Rex or Drum modules) that are controlled by different Thor Step Sequencers and map them to your keyboard to create complex multi-instrument Combinators. Using this method, you could even create an entire song within a single Combinator, and play the parts of the song by playing notes on your keyboard. In this way, you can bring the sounds in and out based on how you play the keyboard, or program the notes directly into the main Reason sequencer.
    • Instead of setting this all up in a Combinator, try setting it up on a Kong device, and using the Pads to trigger the patterns instead of the Combinator.
    • Feeling ambitious? Try combining the two methods: “Momentary” and “Latched,” then designating a key on your keyboard, a button on the Combinator, or a Pad on Kong to switch between the two methods.

    These ideas are great for setting up “Live Play” templates in Reason Combinators. It takes a lot of preparation to set up a complete song in this manner, but once it’s set up, it will make you look like a magician as you play complete part sequences with the press of a key.


    What do you think of these ideas? Have any others that you’d like to share here? Post a comment and let me know what you’re thinking. As always, thanks for watching, listening, and reading.

    51 – Matrix Track Building (Part 4)

    Just when you thought it was over. . . You were wrong! I’ve decided to extend this series of tutorials to explore a few things that I didn’t get to within the track I built. I could probably go on for 10 more parts to go over all the possible things you could do with the Matrix. But I wanted to focus on a few areas and explore them in a little more depth. So here’s a few things beyond the track, which you can do with the Matrix Step Sequencer.

    Just when you thought it was over. . . You were wrong! I’ve decided to extend this series of tutorials to explore a few things that I didn’t get to within the track I built. I could probably go on for 10 more parts to go over all the possible things you could do with the Matrix. But I wanted to focus on a few areas and explore them in a little more depth. So here’s a few things beyond the track, which you can do with the Matrix Step Sequencer.

    Download the new project files here: Matrix-Track-Building2(NoCheat). This zip file contains a new version of the main song .rns file, as well as the two new Combinators for the Bass and Pad tracks. They both contain new Matrix devices that can be used in place of the Mod Wheel Automation clips found in the song. Read on to see what was done to update them. Note: please respect that these project files, like everything else on this site, is under the Creative Commons 3.0 licensing, meaning you can mix, remix, share, and play around with the song to your heart’s content, but you will need to provide the source info and a link back to my site here in any productions you do with this file. Share and share alike ok? And you can’t make any money off the file. It’s not going to win any awards anyway. But if you remix or play with the file, send them back to me privately and I’d be happy to showcase them here in a new posting (send to my email in the top menu), I’d love to see what you come up with. Don’t be shy! 😉

    Chaining Patterns together to create a Pendulum Direction

    As I mentioned in Part 1 of this series, you can chain two patterns together to create a Pendulum direction for any pattern. To do this, simply have one pattern going one direction, and another pattern going the opposite direction. Then you can place the patterns back to back endlessly in the main sequencer on the pattern track. The pattern clips would alternate and sound exactly as if you used the Pendulum direction setting on the Thor Step Sequencer. Here’s a short video to show how that’s done.

    Automating the Resolution Knob

    Spend more than a few minutes with the Matrix, and you’ll realize that you can’t automate the Resolution knob in a Matrix. So how do you keep the pattern the same, but change the resolution of the pattern? I came across this problem when I was first starting out with Reason. And it’s no problem. The solution is to create copies of the pattern (A1, A2, A3, A4, etc.) and then change the resolution for each pattern. If you want a pattern that can travel across all resolutions in the Matrix, you’ll have to create 9 copies of the same pattern, and then change each pattern’s resolution setting from 1/2 to 1/128.

    Note: You can even put the Matrix inside a Combinator and assign a Combinator Rotary to switch between the different patterns (A1 to B1). In this way, the Combinator Rotary acts as a Resolution knob, and it IS automatable. Only downside is that your pattern must complete the full pattern cycle before it switches to the next pattern/resolution in this scenario (because the Matrix is “locked” to the main tempo).

    Finishing up the song. . . No Cheating this time!

    Now let’s delve back into the Track I completed and update those last two automations that were put on the Mod Wheel automation lanes, and change them to be controlled by the Matrix. Once this is done I can clear my conscience and bring this series to a close.

    Note: For a full explanation of how this is accomplished, refer back to “Part 2” of this series, where I go into great lengths on the subject of using the Matrix to create a long complex pattern (or rather, a compound pattern). If you’ve been reading this tutorial through chronologically, the hope is that you’ve given this a try yourself and come up with something similar to the solution I came up with here.

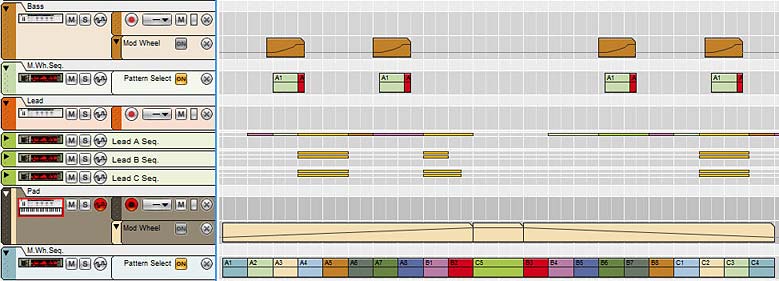
    If you look at the image below, you’ll see how I changed the automation in the main sequencer for the Bass and Pad track. For both those tracks I turned the automation lanes off (to keep them here to show you the relationship — they are just above the new Matrix Pattern Lanes), and added a new Matrix to control the Mod Wheel of each of those Combinators (labeled “M.Wh.Seq.”). This essentially does the same thing as the automation. If you open the Project files at the top of this posting, you’ll be able to open up the .RNS, solo each track and then play the song at the automation points to listen to how the Matrix is working. You can also open up the rack and see the Matrix cycle through the patterns. If you want to switch back to compare, just turn the Matrix pattern lane off, and turn on the automation lane again.

    The main sequencer showing how the Matrix patterns can be used in place of the Mod Wheel Automation clips
    The main sequencer showing how the Matrix patterns can be used in place of the Mod Wheel Automation clips

    And that about does it for the Matrix. I’m sure there are many other ways to use the device, but my hope is that this shows how you can get the Matrix to play most anything the Reason devices can dish out. I hope this also shows you some new creative ways that you might not have known about before. If you have any other uses for the Matrix, please feel free to share them here. It’s been an interesting creative journey for me, and I hope for you as well.

    As always, thanks to those who watch, read, and listen in.

    50 – Matrix Track Building (Part 3)

    In this tutorial, I’m going to finish up our Matrix song, and then explore the differences between the Matrix and the Thor Step Sequencer in a little more detail. It’s important to note the differences between the two and how one is not necessarily better than the other. Although I would argue that Thor’s step sequencer is much more advanced from a programming standpoint. I think the Matrix still has a lot to offer and still provides a lot of possible uses. So don’t shelve it just yet.

    In this tutorial, I’m going to finish up our Matrix song, and then explore the differences between the Matrix and the Thor Step Sequencer in a little more detail. It’s important to note the differences between the two and how one is not necessarily better than the other. Although I would argue that Thor’s step sequencer is much more advanced from a programming standpoint. I think the Matrix still has a lot to offer and still provides a lot of possible uses. So don’t shelve it just yet.

    Creating a Bell Fill

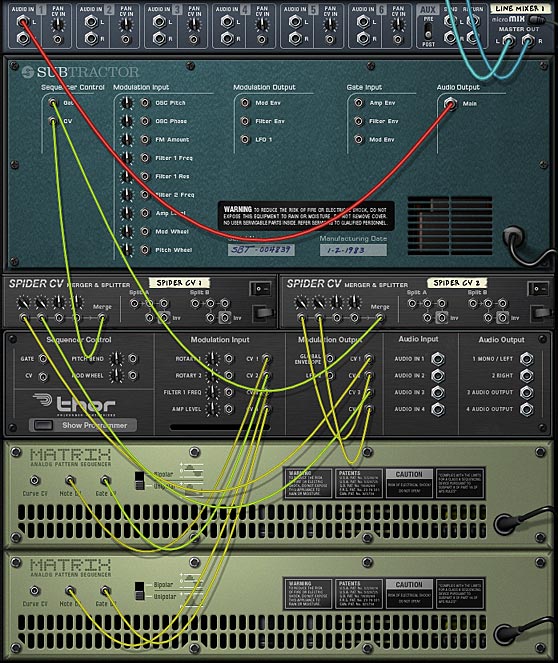
    This time we’ll use the Matrix in a new way, as an Arpeggiator. I know if you have Reason 4 and up, you have the great RPG-8 (which I’ve explored in a different series of tutorials). This time, however, we’ll use the Matrix to arpeggiate your sounds. In this specific case, the Bell Fill track is used to add some arpeggiated notes into the song. Creating an Arpeggio with a Matrix is really easy. Think of it this way: You need one Matrix to play the notes/gate and another Matrix to apply the Arpeggiator. In the second Matrix, the Note CV is sent to the Osc. Pitch CV input (Osc. Pitch is a CV input on all Reason Synths and Samplers).

    In this case, a Thor is used to create a Bell sound using 2 FM Pair Oscillators, and then one Matrix is sent to the Note/Gate CV input on the Thor (this plays the Thor in a normal way), and another Matrix Note CV output is sent into the CV1 input. On the Modulation Bus Routing Section (MBRS), the CV1 input is sent to the 2 Oscillator Pitches. Any notes you input on this second Matrix device will adjust the Pitch as the Thor is played; i.e.: it arpeggiates the Notes being played. This gives you a great degree of control over your Bell sound.

    Song Cleanup

    Finally, we’ll do a little bit of cleanup to the song overall. First, we’ll add a Reverb as a send to all the tracks and “glue” the whole song together. Second, we’ll add a Mastering Suite underneath the Hardware Interface to master the entire track. Note that this is just a starting point. You can tweak all the mastering device parameters to fit the song as you see fit. But it’s a good starting point to try out some of the Mastering Suites that are included with Reason and Record. For that matter, you can bring everything into Record and use the SSL to master your track. So many options.

    Probably more important is the fact that if you have Reason 5 (not sure about Reason 4), you can select all the Matrix Sequencer tracks (using Ctrl+Right-clicking on the tracks at the left section of the sequencer) and select “Convert Pattern Automation to Notes.” This is a very handy way to convert all the pattern automation you’ve spent so much time getting “just right” into note clips on note lanes. Once this is done, you’ll have to move all the note clips to their respective Combinator tracks. The Pattern lanes are automatically muted for you though, because the expectation is that you won’t want to have them playing or “doubling” up, after you move the note clips to the Combinator lanes.

    This little trick provides you with the ability to then go in and adjust individual notes or entire note clips using the “Sequencer Tools” (F8). You can quantize, Transpose, adjust velocity, randomize notes, Scale Tempo, etc.

    So there in a nutshell is how you can use the Matrix to build a track in Reason. Now I think I’ll try building one with nothing but Subtractors. That should be an interesting task. As always, let me know what you think, or if you have any suggestions on ways in which you can use the Matrix within Reason and Record.

    If you want to download the final song file, along with all the separate Combinators, you can find them here: Matrix-Track-Building. The file includes a final .rns file as well as the separate Combinators. The reason the Combinators are provided is because I’m running reason version 5. But for this project, I stuck only to devices you would find in both version 4.0 and 5.0. So if you can’t open the .rns file, then you have the Combinators and can reconstruct things yourself if you like. It’s more fun that way anyhow. Note: please respect that these project files, like everything else on this site, is under the Creative Commons 3.0 licensing, meaning you can mix, remix, share, and play around with the song to your heart’s content, but you will need to provide the source info and a link back to my site here in any productions you do with this file. Share and share alike ok? And you can’t make any money off the file. It’s not going to win any awards anyway. But if you remix or play with the file, send them back to me privately and I’d be happy to showcase them here in a new posting (send to my email in the top menu), I’d love to see what you come up with. Don’t be shy! 😉

    Where do you go from here?

    Well you have the file, so feel free to remix and play with it and send it back my way. I’d love to take a listen. As I put together this posting, I also thought a little more about the comparison between the Matrix step sequencer and the Thor step sequencer, so I’ll leave off with a look at both in a side-by-side comparison. Just to give everyone a little more food for thought about both, and when one would be better suited over the other. In asking some people on “The Sound of Reason” website which was more advantageous than the other, I got some mixed responses. Most found the Matrix to be easier to use live, but they also found the Thor sequencer to be advanced on a number of fronts. I’ll let you decide. For now, the jury seems to say that both are still very much necessary, and they are more like sisters than a parent-child relationship.

    So let’s take a rundown of the Pros and Cons of each by providing a side-to-side comparison:

    Matrix Thor Notes
    Pattern Enable Yes Yes You can use the “Step Seq.” button on the Thor Controller (top panel) to enable or disable the Step Sequencer.
    Pattern Reset No Yes (non-automatable button).
    Number of Patterns 8 Patterns x 4 banks = 32 1 Obviously, the Matrix can produce more pattern variations than Thor. You will need to create a new instance of Thor for each pattern you want to input.
    Pattern Randomization 2 Options (via right-click context menu):
    Randomize
    Alter Pattern
    1 Option (via right-click context menu):
    Randomize
    Dear Props: Please add Alter Pattern to Thor. Pretty please with a cherry on top.
    Convert Patterns to Notes Yes (via right-click context menu). No This is the biggest beef users have with Thor. You can’t send the Thor sequencer data to the Main Reason/Record sequencer, either as patterns or as notes.  Nuff said.
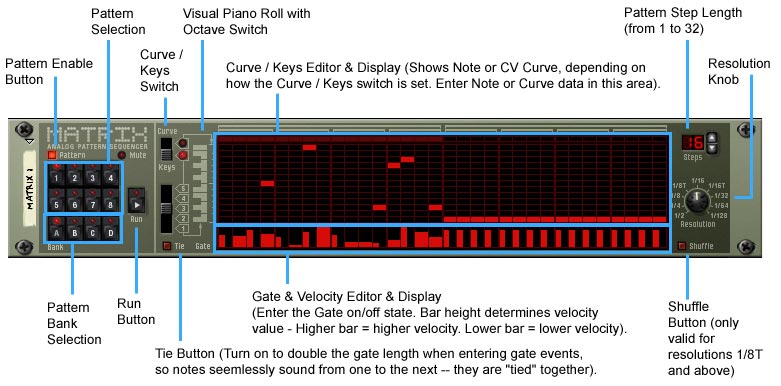
    Number of Steps 1 – 32 (selectable via digital input and up/down arrows). Non-automatable. 1- 16 (selectable via lighted square step buttons) or Step Count knob.

    Note that the Step Count knob is automatable, while the step buttons are not.

    Thor’ step count knob is automatable, which means you can automate the number of steps, but since you can’t automate the step buttons, you can’t automate turning steps on or off.
    Pattern Input Type Note/ Bar visual display (non-automatable) 16 Rotary inputs (non-automatable)
    Resolution Input Type Rotary (labeled dial) Rotary (digital dial)
    Step Directions 1 direction:
    Forward
    5 directions:
    Forward
    Reverse
    Pendulum 1
    Pendulum 2
    Random
    Run Button Yes (non-automatable) Yes (non-automatable) It’s a little unfair to say that the Thor Run button is not automatable. As with most things in Reason/Record, there are workarounds. And you can get it to run using the Modulation Bus Routing Section (MBRS) or CV to trigger the sequencer.

    As far as I can tell though, there’s no way to automate the Matrix Run button.

    Run Modes No 4 modes:
    Off
    Step
    One-Shot
    Repeat
    Mute Light Yes Yes
    Sync Capability Yes Yes
    Synced Rate / Resolution 9 Positions (non-automatable):
    1/2
    1/4
    1/8
    1/8T (Triplet)
    1/16
    1/16T (Triplet)
    1/32
    1/64
    1/128
    21 Positions:
    16/4
    12/4
    8/4
    7/4
    6/4
    5/4
    4/4
    3/4
    2/4
    3/8
    1/2T (Triplet)
    1/4
    3/16
    1/4T (Triplet)
    1/8
    1/16D (Dotted)
    1/8T (Triplet)
    1/16
    1/16T (Triplet)
    1/32
    1/64
    Synced Rates/Resolutions which are shared between the two are in Bold.

    While the Matrix has less positions, it has two positions Thor does not: 1/128 and 1/2. Though I would venture that using 8/4 and 2/4 is the same as using 1/2.

    Non-Sync Capability No (always synced) Yes
    Non-Synced Range N/A .10 Hz – 250 Hz.
    Editability
    Notes Yes (5-Octave Range from C1 to C6) Yes (Full Range from C-2 to G8) Note that for Thor, there are 3 global Note modes: “2,” “4,” and “Full” octave ranges.

    Note also that for Thor, the Octave switch is not automatable

    Velocity Yes (Range is 0 – 127) Yes (Range is 0 – 127) Note: in Thor you can see a digital readout of the Velocity value. In the Matrix you do not see the precise value. It’s a bit of a guess to get the Velocity exact. Though workarounds exist to see the numerical CV value (see Part 1 of this series of Matrix tutorials).
    Gate Length 3 states:
    Off (0)
    Half (50%)
    Tied (100%)
    100 States (Full Range of 0% – 100%)
    Step Duration Static Varied (17 Positions):
    1/4
    1/3
    3/8
    1/2
    5/8
    2/3
    3/4
    7/8
    1
    5/4
    4/3
    6/4
    7/4
    8/4
    9/4
    3
    4
    This parameter is different than the gate length. Whereas Gate Length determines how long the gate stays open, Step Duration signifies how long the note plays.

    Put another way, this allows you to create a self-contained tempo inside Thor’s Step Sequencer. Something you can’t do with the Matrix because all steps are a static value. There is no ability to change step duration for each note played.

    If you use Step Duration in Thor, generally, you’re going to want your entire pattern to equal the same value as the overall tempo. This means if you change One step duration downward, you want to change another one upward to compensate.

    If you don’t compensate, you’ll end up with a pattern that’s out of sync (which of course may be what you want, but probably not).

    Try it out to get a feel for how it operates. If you go too far, there’s always the “Reset” button.

    Curve 1 Yes. 2 “modes”:
    Unipolar (Range: 0 – 127)
    Bipolar (Range: -64 to +64)
    Yes. 1 “mode”:
    Unipolar (Range: 0 – 127)
    Curve 2 No Yes. 1 “mode”:
    Unipolar (Range: 0 – 127)
    Shuffle Yes (valid for Resolution values 1/8T and above).

    This is non-automatable, but is set on a per-pattern basis.

    No Though Thor does not have a Shuffle feature, you are usually better off using the ReGroove functionality for Both Thor and the Matrix.

    In Thor, you can use the Step Duration to shuffle as well.

    Editing Input / Edit Knob Note / Step / Gate / Velocity are drawn in by hand. Rotaries are available for each step, and are turned for one value at a time (determined by the Edit knob).

    Note that the edit knob as well as the steps and Rotaries are all non-automatable.

    This makes for easier “Live” editing input for the Matrix. Thor can be a little difficult and unwieldy to enter. It takes more time and precision to lay down a pattern.
    CV Capability (all of which are non-automatable)
    CV Outputs 3 Outputs:
    Curve CV
    Note CV
    Gate CV
    6 Outputs:
    Note
    Gate / Velocity
    Curve 1
    Curve 2
    Start of Seq. Out
    End of Seq. Out
    This is where Thor really shines, because there is an extra Curve CV, and extra CV outputs that can get sent to other locations when the Sequencer starts and/or stops.
    CV Inputs None 5 Inputs:
    Gate In (Trig)
    Rate In
    Pitch In
    Gate Length In
    Velocity In
    Again, Thor has some nice input capability where CV can be used to send values into the Sequencer to Trigger all kinds of Parameters.

    For example, you can have the sequencer run (and play a short sequenced thor melody, for example) based on a Kick by sending the CV from the Kick drum into the Gate In (Trig) CV input.

    *Note: Unless otherwise specified, all above parameters are automatable in the sequencer.

    In leaving, I’ll say this: They both have their respective places. And what you want to do in your tracks is going to determine which step sequencer you use. One question that I can’t seem to shake is why on earth the Props didn’t provide the ability for the Thor step sequencer to create 64 patterns in a single device, and provide the same kind of editing interface that the Matrix has? If these two things were implemented, the Thor step sequencer would go light years beyond the Matrix and would probably negate the need to keep using the Matrix altogether. These two feature implementations would solve the two biggest issues: multiple patterns per device, and an editing environment that is easy to manipulate in a “live” environment. So if the props are listening, take note: This would help the users out immensely!

    Your thoughts?

    And after writing this, Sterioevo was kind enough to provide this cool little patch which shows how you can chain several Thor sequencers together to create a giant 256-Step-Transposable-Sequencer. No this is not a tutorial on Thor necessarily, but it shows that with some creative CV routing, you can get an amazing thing going on. Very cool stuff!

    49 – Matrix Track Building (Part 2)

    Now we get to some fun stuff: How to use the Matrix in a few different and interesting practical ways. To that end, I decided to build an entire track using nothing but sound devices that are controlled by Matrixes (Matrices?). This way, we can explore some of the practical uses of the Matrix along the way.

    Now we get to some fun stuff: How to use the Matrix in a few different and interesting practical ways. To that end, I decided to build an entire track using nothing but sound devices that are controlled by Matrixes (Matrices?). This way, we can explore some of the common and uncommon uses of the Matrix along the way.

    Creatively, it can also be a test of limitations to try creating tracks entirely with certain devices in Reason. It helps to set some boundaries and you might want to try creating an entire track using nothing but Thors, or nothing but one set of 10 samples or something along those lines. It forces your mind to think in new and innovative ways. And that, after all, is the point of this Blog.

    Kick Drum and Roll Creation

    In this video, I’ll show you how to create a kick drum and roll using a Subtractor. The Matrix is used to gate the drums and 2 patterns are created: One for the main drum part, and the other for the Roll. Once this is done, you can program the patterns in the sequencer and put the roll anywhere you want.

    Snare and Hi Hat Creation

    In this video, I’m going to do the same thing with the Matrix. Once again, we use some Subtractors for the sound sources, and the Matrixes are used to gate the drums.

    Entering a Bass Line and Variations

    Next, we’ll use a Malstrom and Matrix to create a simple Bass line. We’ll also use the “Copy/Paste Pattern,” and “Alter Pattern” functions on the Matrix to create some variations of the main bassline. Note that the “Alter Pattern” feature of the Matrix (accessed from the right-click context menu when you hover your mouse over the Matrix device) is unique to the Matrix. Even Thor doesn’t have this feature. The difference between Alter Pattern and Randomize are as follows:

    Randomize: Randomizes the Note values anywhere from C1 to C6 in the Matrix. Also Randomizes the Gate & Velocity events (on / half / tied is also randomized), and the Curve. In other words, all three Matrix outputs are randomized.

    Alter Pattern: Randomizes the notes, Gate / Velocity, and Curve events along the left and right axis. No new notes are introduced, no new velocity and gate values, and no new Curve values. Put simply, it reorders what already exists on-screen. And is one of the best features of the Matrix in my honest opinion.

    Ok, I’ll admit, I cheated a little on this one. I automated the Mod Wheel directly in the sequencer. I could have just as easily created a curve ramped upward in a new Matrix and sent the Curve CV output from the Matrix into the Malstrom’s Mod Wheel CV input. Then drawn the pattern into the sequencer at the position where the Combinator Mod Wheel automation is located. Oops. But this gives you a great opportunity to practice some of the concepts I’ve presented here. Why not try reproducing this automation lane with a new Matrix yourself? Yeah, let’s go with that. 😉

    Creating the Lead

    In this video, I’ll show how you can create a Lead with Thor. Then we’ll use the Matrix to create a few patterns as we did for the Bassline. One of the things I hope you take away from this video is the idea that you can use the Matrix to adjust parameters that don’t have CV input jacks on the back of them. I know this sounds counter-intuitive, but it’s not a hard setup at all.

    For example, here we have the BW parameter on Thor that can’t be adjusted via CV input, and since it can’t be adjusted on the Thor Modulation Bus Routing System (MBRS), you can’t send the curve CV of the matrix into Thor to adjust it that way. The solution is to send the Curve CV from the Matrix into a Combinator Rotary (or CV input in Version 5.0), and then set this parameter in the Combinator’s Modulation Programmer, so that Rotary 1 on the Combinator adjusts the BW in Thor. This way, the Combinator Rotary acts as a CV pass-through between the Matrix CV source and the Target parameter. This means that you can automate almost any parameter in Reason using the Matrix as a source. Such a simple idea with profound and powerful consequences.

    In this second Lead-creation video (below), I’m going to introduce the idea of creating Chords using the Matrix. Since the matrix is a monophonic device, you cannot play more than one voice (or note) at a time. So Chords are out. However, once the lead is created, you can duplicate both the sound source and Matrix a few times to gain access to multiple voices. For example, create three instances of the Sound Source/Matrix duo, and then on step 1 for the first Matrix, place a “C” note. On step one of Matrix 2, place an “E” note. Finally, on step 1 of Matrix number 3 place a “G” note. If you have a pattern that is one step long, you will hear a C-major chord when all three are played simultaneously (when all three Matrixes are “run” at the same time).

    So this video shows you how to create polyphony, and automate a polyphonic lead line in the sequencer.

    Adding Pads

    Now comes the part where we add our pad sound. This is a basic Thor device using some Wavetable Ocsillators and a Multi-Oscillator. Two Matrixes are used; one to control the note/gate of the pad, and the other used to adjust the Filter 1 Frequency.

    Once again, I cheated on the Matrix in favor of a Mod Wheel automation lane. The poor girl is never going to forgive me.

    Looks like another opportunity to try switching automation lanes into pattern lanes using a Matrix. For this one, it will be a little trickier. Since the Matrix pattern can only go 32 steps long, at the highest resolution(1/128) a single pattern can last 1/4 bar, while at the lowest resolution (1/2) a single pattern can last 16 bars. Put another way, if you want the smoothest possible curve, you will need to use 1/128 resolution. If you want the choppiest curve, you can use the lowest resolution (1/2).

    Why does resolution matter? Because it’s important to understand that the Matrix is a “Step” sequencer, and not a a smooth curve (like a vector curve, for example). Put another way, think of the steps in the step sequencer as a square wave and a vector curve as a sine wave. As the amount of steps increases and the amount of time to play those steps decreases, the Resolution becomes finer (the Square Wave moves closer to morphing into a Sine wave). As the amount of steps decreases and the time it takes to play those steps increases, the Resolution becomes coarser (the Sine wave moves closer to morphing into a Square Wave). The finer your resolution, the less you will hear the change from one step event to another. The coarser your resolution, the more you will be apt to hear the switch from one step to another. This is a key concept to keep in mind when working with the Matrix. If the resolution is too course, you’re going to hear the switches between steps — which may be what you’re after. For this specific case, we want to create a very smooth curve. That’s going to mean a lot of Patterns and some work to create smooth, even curves. Truth be told, in the Matrix, there’s no such thing as a pure vector wave or sine wave. It’s just that there is a point at which the resolution becomes so fine that the ear does not hear the switch from one step to another (similar to how resolution works with sight. look at a newspaper photograph up close or through a magnifying glass and you see all the dots — course resolution. Look at the newspaper from farther away and your mind can no longer discern the dot pattern — fine resolution).

    So how do you recreate the 20-bar ramp upward that I used for the Pad’s Mod Wheel automation?

    The solution is to determine the resolution you want, then chain your patterns together using multiple curves. Let’s go somewhere in the middle. Using 1/16th resolution, we will need 10 patterns to create a 20 bar curve (all patterns using 32 steps). So you will need to utilize patterns A1 to B2 to create a continuous ramp upward. Still with me? Good. Now the most difficult part comes. Since the Matrix does not provide a proper way to set each step (you have to do this visually), you’ll have to figure out approximately where the curve starts and stops between patterns. For this, you can use the Visualizing CV trick I showed in the video in Part 1 of this series. Or you can eyeball it using the hash marks along the left edge of the curve input area. You know that the curve ending A5 and starting on A6 will need to be at the 50% mark of the Unipolar Curve height. So work backwards from there ramping downward all the way to zero at the start of pattern A1 (use the Shift key to create an even line of step events in each pattern). Then work upward from the start of A6 to the end of B2 (again holding down shift to create an even line of step events). Once that’s done, create a series of 10 patterns on the sequencer, each 2 bars long, and chain them together from A1 at the start to B2 at the end.

    Now repeat this process using another 10 patterns and create a downward ramp 20 bars long (from B3-C4). To create the middle clip that is at level 127 is easy. Create a pattern (on C5, for example) which is one step long. On this first step of C5, raise the curve value up to the top in the Matrix editor. Then place that pattern on the sequencer for the duration of the middle clip (4 bars long in this song).

    Phew! Now you see why I cheated. This is no small task. It’s fiddly, and it takes some effort. So why would you do it this way? Well, it shows you the concept of chaining patterns together, which can come in very handy to create curves or note sequences over long passages in your song. Also, it’s a great way to learn how the Matrix operates, which is, after all, the reason for this tutorial series. But more on this whole pattern chaining issue later on.


    Thus ends the second part of our track creation using Matrixes. In the next part of this series, I’m going to show you how to use the Matrix as an arpeggiator, finish and clean up the track, convert all the patterns to notes, and more. Until next time, hope you have some fun in Reason and Record, and post a comment to let me know how you’re making out with the software and how I’m doing teaching it to you. Thanks for reading!

    48 – Matrix Track Building (Part 1)

    In this tutorial, I’m going to work with the Matrix and build a track by step sequencing. Egads! I hear the purists gasp, as they turn away in disgust. But rest assured, I’m merely presenting this as a creative idea to force you to think about alternative ways to build your songs. Take from that what you will. In the end, I hope this shows you how the Matrix, and step sequencing in general, can be a powerful ally when you compose your tracks.

    In this tutorial, I’m going to work with the Matrix and show how you can build a track by sequencing, rather than by plugging notes into the standard Reason sequencer. Egads! I’m not saying this is the best and only approach. Indeed, a lot of people (purists mostly) would probably turn away in disgust at a tutorial like this. I’m merely presenting it as one way you can use to build your songs. Take from that what you will. In the end, I hope this shows you how the Matrix can be a powerful ally when you compose your track, whether or not you go to the extreme of building an entire track using step sequencing or not.

    In this first part of the series, I’m going to familiarize you with the Matrix device, and show you how it works. I’m also going to show you a few ways you can use it, as there are an infinite array of ways in which it can be applied. So let’s start out with the Basics, and then we can move on to Part 2, where we get a little more complex.

    Matrix Basics

    First, a bit about the Matrix. The Matrix is a monophonic step sequencer that is used to generate CV signals to control other devices. It makes no sound on its own. Rather, it must be used in conjunction with other devices for you to achieve anything with it.

    Here’s a short video that goes over the various parameters of the Matrix:

    The Matrix controls other devices via the 3 CV outputs on the back. Here’s a rundown of the purpose of each of the CV outputs:

    1. To send a gate on/off signal to tell other devices when to start and stop (or to turn a parameter on another device on or off).
    2. To send a note output in a 5-octave range a from C1 to C6 (take note that this is not the full range of all octaves on the keyboard, but rather a subset — for this reason, certain notes and triggers are outside the reach of the Matrix – for example triggering a rex loop to start and stop).
    3. And finally, there is a curve CV which is a straight CV value that can be used for a variety of purposes (much like the Curve 1 or 2 value in a Thor Step Sequencer). The Curve CV is great for drawing in your own curves to be applied anywhere you like.

    There is a special switch on the back of the Matrix device called “Bipolar / Unipolar.” Put simply, there are 2 possible CV algorithms that can be used: One is “Bipolar” which sets the CV from -64 to +64 and the second is “Unipolar” which sets the CV from 0 to 127.  To understand how this works, think of the difference between volume and Panning in the midi world. Volume is Unipolar: It can go from zero (0) volume to full volume (127). This is the way the fader operates on the 14:2 and 6:2 Mixers in Reason. Panning, on the other hand, is bipolar because it can go from fully left (-64) to fully right (+64). In this instance, zero would be the middle of the stereo field. This switch allows you to set how you want your source curve to act on the destination of the CV signal. And you can visually see how it is displayed on-screen in the “Curve / Keys Display area.

    The Unipolar setting on the back of the Matrix produces a Unipolar Curve on the front panel display (CV value 0 - 127)
    The Unipolar setting on the back of the Matrix produces a Unipolar Curve on the front panel display (CV value 0 – 127)
    The Bipolar setting on the back of the Matrix produces a Bipolar Curve on the front panel display (CV value -64 to +64)
    The same curve but shown in Bipolar mode (CV value -64 to +64). The line across the middle of the display is where the value is zero. Anything below this line is negative, and anything above this line is positive.

    The Front Panel

    From the front of the panel, you fill in your pattern information. Here’s a rundown of the front panel of the Matrix:

    The Front of the Matrix Device with all parameters outlined.

    Pattern Bank: Here you can select from 8 different patterns and 4 different banks (for a total of 32 patterns within a single Matrix). To work on entering a pattern, select an appropriate pattern in a specific bank (usually starting with A1), and then enter curve, note, and velocity (gate) information for the steps in that pattern (or any combination).

    Curve / Keys Switch: This switches the display mode from Key display to Curve display. By default, the matrix is set to show Keys in the display (in a 5-octave range). When you switch to Curve display, the Curve can be visually drawn into the display.

    Note: holding down the shift key and drawing across the Note or Curve steps creates an even line of note or curve events from the first click to when you let the mouse go. Also, the gate does not play a factor when working with Curves. Gates are a separate CV source from Curves. The curve simply provides a value from 0 – 127 that is represented visually by the bars in the Curve Display.

    Curve / Keys Display: This area provides a visual display of the note events in the C1 – C6 range. When the Matrix is run using the Run button, the step sequencer starts and travels from left to right for the number of steps entered, then starts over from the left again and runs through the pattern again. It is forward-moving from left to right and repeating. This is the only direction of movement for the Matrix. In contrast, you can move the Thor Step Sequencer in a few different directions (Forward, Reverse, Random, Pendulum).

    Enter note events using your mouse to click on the note value you want. The screen displays 13 notes (1 octave+1) at any given time. Use the “Octave Switch” to the left of the note area to move down or up to the next or previous octave.

    Gate Velocity Display: This area runs along the bottom of the Matrix and provides Gate Velocity information. Use your mouse to determine the velocity level of the notes being played by lowering or raising this small bar. You can turn off a note (making it silent) by pulling the Velocity bar all the way down so it is no longer visible. In this case, no matter what note is entered in the Note Display for this event, the note acts as a “rest” for the duration of this gate event.

    By default, the note duration is only half the length of the gate. You can enable the “Tie” button, and this allows you to enter full gate duration, so the notes seamlessly sound from one note to the next (or from one gate event to the next).

    Note: You can also use Shift when entering Gate/Velocity events. By default, holding Shift down as you draw the events allows you to enter “Tied” gate events. If you have the “Tie” button on, holding Shift down enters non-tied gate events.

    Think of it this way: There are 3 settings for a gate event in the Matrix

    1. None: In this case, there is no sound for the note on this step. In other words, the step is a full length of silence (when the Velocity bar is pulled all the way down). The event still occurs for a whole step of silence. This would be like looking at the “Gate” setting in Thor’s Step Sequencer, and having the Step Knob set to 0% (no gate).
    2. Half Step: the Velocity bar is visible and set to a value of some sort. This is the default setting where the velocity bar occupies half the length of the note (from left to right). This would be like looking at the “Gate” setting in Thor’s Step Sequencer, and having the Step Knob set to 50% (half).
    3. Whole Step: The Velocity bar is visible and set to a value of some sort. However, the “Tie” button is enable when you set it (click on the gate event). In this case, the gate is set to be the full length of the note (and glides into the next note/gate event). This would be like looking at the “Gate” setting in Thor’s Step Sequencer, and having the Step Knob set to 100% (full).

    As you can start to see, there are some limitations to the Matrix. You cannot create step gate lengths other than these three states (though you can creatively workaround the situation — See Sterioevo’s comment below this post). You cannot change the play direction of the Matrix as you can in Thor (though a workaround is to create two patterns and chain them — for example, create one pattern with notes going forward, and another pattern with the notes going in reverse, and then put their clips on the sequencer back to back for a “Pendulum” direction. You also cannot see the CV’s numerical value for all three sources (Note / Gate / Curve). They appear visually on-screen as bars and note blips. Whereas, you can see the CV values clearly in Thor.

    As a sidenote, if you ever want to see CV values for any parameter in Reason, send the CV value to a Combinator Rotary, and include a Thor device in the Combinator. Then on the Combinator Programmer, assign the Combinator’s Rotary 1 to Thor’s Rotary 1 with a min/max value of 0 / 100. Then you can hover your mouse cursor over Thor’s Rotary and see the readout of the value in the Tooltip. And if you want something a little more advanced, you should check out Meowsqueek’s CV Monitor Tool at his Off-White Noise site. But for something very basic, here’s a video for how to set up the Thor Rotary as a Monitor tool:

    Steps: For each pattern, you can select the number of steps from 1 to 32. To create 4 1/4 note beats per bar, enter 4 in the number of steps, and dial in 1/4 for the Resolution (see “Resolution Knob” below).

    Resolution Knob: While the Matrix adheres to the Global tempo value that you set, the Resolution knob allows you to force the Matrix to play at different tempos or speeds. For example, in 4/4 time, if you create a pattern with 4 steps, and want 1/2 notes, dial in 1/2 for the resolution. You’ll end up with 2 1/2 notes in your sequencer. In other words, the lower the resolution value, the slower the step sequencer runs (or the less notes that are entered per bar). The higher the resolution value, the faster the step sequencer runs (or the more notes that are entered per bar). There are 9 possible Resolution values from 1/2 to 1/128 (two of which, 1/8t and 1/16t, are triplet values).

    Shuffle Button: Provides a swing feel to your notes. As the user manual puts it: “It delays all 1/16th notes that fall between the 1/8th notes.” This means, as far as I can see, the Matrix Shuffle setting only affects your output if you have the Resolution knob set to 1/8t or higher. Any setting below that will not change the “groove” of the Matrix pattern. In addition, the shuffle amount is set by the ReGroove “Global Shuffle” setting in the ReGroove Mixer. The “Shuffle can be set independently for each pattern.

    Note that this “shuffle” feature is like a poor man’s single-setting ReGroove. All I can say is that it’s great for a quick shuffle feel, but you’re usually better off using the ReGroove in most cases. But since this is all about the Matrix, we need to explore all of its settings.

    Matrix Quick-Start 1: Matrix as Sound Previewer

    Long before we had the computer keyboard controller (F4 in Reason 5), in the days of old, the best way to preview a song was to use a Matrix. This probably goes without saying but create a sound device in Reason (synth or sampler), and then create a Matrix directly underneath. The Note / Gate CV outputs from the Matrix are connected to the device automatically. Now, with the Matrix still selected, press Ctrl+R to enter a random pattern into the Matrix on pattern A1. Then click the “Run” button on the Matrix (or the “Run” button on the main transport). Bingo! Instant sound previewer. This is great for situations when you want to listen to how a synth sounds as you’re making parameter changes to the synth. And it’s the most basic use of the Matrix.

    Matrix Quick-Start 2: Matrix for Parameter Adjustment

    Next up is still a very basic concept, but it’s worth exploring. Keep the setup you just created in the “Matrix as a Sound Previewer” section. Now flip to the back of the rack and connect the Curve CV from the Matrix to the Pan CV input on the channel of the mixer where the sound device is located. Turn the trim knob way up. Now set the Bipolar/Unipolar switch to “Bipolar.” Flip back to the front of the rack and press Run again. Voila! Not only is the matrix playing the sound device, it’s also changing the Panning for the device based on the Curve in the Curve display.

    The Back of the Matrix with proper Note/Gate CV controlling Thor. And the curve controlling the Pan on the Mixer.
    The Back of the Matrix with proper Note/Gate CV controlling Thor. And the curve controlling the Pan on the Mixer.

    In Summary

    As you start to work with the Matrix, you begin to realize how it is a poor cousin to Thor’s Step Sequencer, and you’d be very right. The Matrix has been around since the birth of Reason back in Version 1, and Thor, who came around in version 4, has opened us all up to an entirely revamped “Matrix” in its Step Sequencer. In this respect, Thor is more than just a synth. It’s an enhanced Matrix as well (on steroids, no less). For example, in Thor you have multiple directions your Pattern can take, you have a full 0 – 100% range for the gate length (the Matrix has 3 static states). And you have 2 available curves (the Matrix has one). Still, the Matrix does have at least one advantage over Thor: It can produce 64 patterns in a single device; whereas Thor can only produce one. So it might not come down to a question of who is bigger and badder (though I would still argue Thor wins out every time), it might also be about which device is right for the job.

    So why on earth would you still use the Matrix? Because sometimes you don’t need all the power of Thor. Because you might want to create a lot of pattern variations with minimal fuss. Because sometimes it’s healthy to work within a device with set limitations. And most of all, because knowing one will help you learn about using the other. The Matrix is a great place to start. And it’s a wonderful stepping stone to understanding the Thor Sequencer. If Thor seems too intimidating, start with the Matrix and learn it inside out, You’ll be more than halfway to understanding what goes into Thor’s own Step Sequencer. It’s like learning the Subtractor synth before you jump into the Thor synth. And it can be a great creative way to learn how to use it in depth.

    Please feel free to provide any comments or insights you might have about the Matrix, Thor, or anything else Reason-related. Stay with me until the next part in this series where I take you further down the Matrix rabbit hole.

    33 – One Rotary, 64 Patterns

    This is a problem that plagued me for a long time but with Thor, I found a very easy workaround. The idea is simple. I wanted to gain access to more than 32 patterns with a single Rotary on a Combinator. For the longest time I couldn’t figure out how to do it. Then it hit me like a ton of bricks and I had one of those “of course!” moments. I mean come on. Doesn’t everyone feel limited with only 32 patterns accessible from a Combinator rotary? How about 64 patterns?

    Let’s take a breather from all the Reason 5 action. Since many people are still on Reason 4, let’s do something that everyone in 4 & 5 can do together. This is a problem that plagued me for a long time but with Thor, I found a very easy workaround. The idea is simple. I wanted to gain access to more than 32 patterns with a single Rotary on a Combinator. For the longest time I couldn’t figure out how to do it. Then it hit me like a ton of bricks and I had one of those “of course!” moments. I mean come on. Doesn’t everyone feel limited with only 32 patterns accessible from a Combinator rotary? How about if I showed you how to double the amount of patterns you could access. Would that be worth 10 minutes of your time?

    Here is the project file for this tutorial: 64-patterns. It contains an .rns file (it was created in Reason 5, so I’m not sure if those with Reason 4 can open it or not. If not, let me know and I can create the same file in R4 for you). In the rns file there are two Combinator ideas. One that contains 64-pattern switching, and the other contains 128-pattern switching. Note that I have not populated all the matrixes with fully loaded patterns. Instead there is a single pattern on A1 for all the Matrixes. This way I was able to test switching from one matrix to another. It’s up to you to load the Matrixes with your own patterns, random or otherwise. Both Combinators are connected to the same mixer, so you will need to mute one channel to hear the outcome of the other and vice-versa. Have fun with these!

    So let’s get down to business. . .

    So why would you ever want to do this. Well, it gets me closer to what I would like to see out of Reason: a way to create truly generative music, where you can press a button and set sail a sea of sound that is ever-changing. Great if you want to have some Pad or Ambient sounds drift on in the background, ever changing and always new and interesting. You could also incorporate this into your glitch effects as a controlling device to provide an endless range of chaotic buzzes, blips and shazams. How you use it is really up to your own creativity. But at least with 64 (and even 128) different patterns, you can create a pretty long string of variety that, if played through from start to finish, no human could discern the repetition (think of it this way: at 120 BPM, a normal 4/4 bar with 64 patterns shifting at every 4 bars would last 8.5 minutes before any repetition occurs. In the case of 128 patterns, you could end up with an ever-changing pattern lasting 17 minutes long without any repetition.

    Yes, it’s a little spastic and insane, but it can definitely prove interesting, even as nothing more than a creative experiment. So let’s take a look at how you can create 64 patterns on one Combinator rotary knob.

    1. First, create a Combinator and inside create a 6:2 line mixer. Then, holding the Shift key down to force Reason not to autoroute the devices, create a sound source (let’s take a Subtractor so that we can differentiate from the Thor device which we’ll use as a CV switcher). Also create 2 Spider CV Mergers/Splitters, a Thor, and one Matrix pattern sequencer.
    2. Load up the Matrix sequencer with 32 patterns, then duplicate the matrix so that you have another copy with the same 32 patterns. At this point, change the patterns on the second matrix so that you have a new set of 32 unique patterns in the second matrix.

      You may want to temporarily tie the matrix to a sound source device so that you can audition the patterns and how they sound. You may alternately want random patterns, in which case you can select the Matrix device and press Ctrl+R in order to randomize a pattern into a pattern bank. Go to the next pattern (A2) and do the same. And so on, until you have all 32 pattern banks filled.

    3. Next, flip the rack around and start making connections. Send the Audio output of the Subtractor to the Audio Input of channel 1 on the Line Mixer. Send the Note CV output of Matrix 1 to the CV 1 input on the Thor. Send the Gate ouput of Matrix 1 to the CV 2 input on Thor. Then send the Note CV output of Matrix 2 to the CV 3 input on the Thor. Send the Gate ouput of Matrix 2 to the CV 4 input on Thor.
    4. Send CV 1 & CV3 outputs from Thor into the Merge input 1 & 2 on the first Spider. Then CV 2 & CV4 outputs from Thor into the Merge input 1 & 2 on the second Spider.
    5. Send the merge output from Spider 1 to the CV input on the Subtractor, and merge output from Spider 2 to the Gate input on the Subtractor. Also, turn the trim knobs on all the CV merge inputs that are occupied fully right (set to 127). If you don’t do this, you won’t get what you expect when you start playing the patterns.

      The CV and audio routings on the back of the rack
      The CV and audio routings on the back of the rack
    6. Now that everything is routed, we need to tell Thor what do do with all that CV stuff. So flip the rack around to the front again, and click the “Show Programmer button on Thor.

      Note: Since the Thor device is only used for CV purposes, you can remove all of Thor’s audio settings (bypass the Oscillator and Filter, turn off all the envelopes, etc.). Alternately, you can open up the Combinator Programming panel and deselect the “Receive Notes” checkbox for the Thor device. Either way will work.

      A completely initialized Thor device
      A completely initialized Thor device
    7. Once the Thor programmer is open, enter the following in the Modulation Bus Routing System (MBRS):

      CV In1: 0 > CV Out1

      CV In2: 0 > CV Out2

      CV In3: 0 > CV Out3

      CV In4: 0 > CV Out4

      The Modulation Bus Routing Section (MBRS) in the Thor device
      The Modulation Bus Routing Section (MBRS) in the Thor device
    8. Now let’s do a little programming in the Combinator. Open up the Programmer panel for the Combinator. Select the Thor device and enter the following:

      Button 1 > Mod 1 Dest Amount: 100 / 0

      Button 1 > Mod 2 Dest Amount: 100 / 0

      Button 1 > Mod 3 Dest Amount: 0 / 100

      Button 1 > Mod 4 Dest Amount: 0 / 100

      Then select each matrix and tie them both to Rotary 1 as follows:

      Rotary 1> Pattern Select: 0 / 31

      The Modulation Bus of the Combinator: Thor settings on the left and the Matrix settings on the right.
      The Modulation Bus of the Combinator: Thor settings on the left and the Matrix settings on the right.

    Press button 1 twice to initialize it (turn it on and off). Also turn Rotary 1 in order to initialize it. Now when you play the sound source, moving Rotary 1 around will select pattern 1 – 32 on Matrix 1. When you press Button 1, the Rotary switches to Matrix 2 and you’ll be hearing pattern 1-32 on Matrix 2. This switch is instantaneous simply because both Matrix patterns are running at the same time. Thor and the Spiders are used to switch from one matrix to the other on-the-fly. It’s really that simple.

    And now let’s go for broke!

    Awesome. We have 64 patterns. Let’s go for broke. Let’s create 128 patterns! Because you can never have enough patterns. In this case, you essentially have to duplicate what you did for the previous section, and create a second set of 64 patterns on Rotary 2 / Button 2 in your Combinator. Once you’ve created those, and routed them up and programmed them (Tip: duplicate all your devices, that way you don’t have to reprogram the Thor again, and instead just need to set up the routings).

    Once that’s done, you’ll need to create yet one more Thor and 2 Spider Mergers/Splitters. This time, you’re going to take the merged output from the two spiders hooked up to Thor #1 and the merged output from the two spiders hooked up to Thor #2, and send them through the third Thor. The CV outs from Thor will then go into the 2 Spider Mergers/Splitters you just set up (on the merged side), and then the merged output from both will go into the CV / Gate inputs on the sound source device (in this case, the Subtractor).

    Now the only thing left to do is to program the Combinator. Open up the Programmer, select Thor #3, and again enter the following:

    Button 3 > Mod 1 Dest Amount: 100 / 0

    Button 3 > Mod 2 Dest Amount: 100 / 0

    Button 3 > Mod 3 Dest Amount: 0 / 100

    Button 3 > Mod 4 Dest Amount: 0 / 100

    Matrix 1 & 2 will need to have their “Pattern Select” both tied to Rotary 1, while Matrixes 3 & 4 will need to have their “Pattern Select” both tied to Rotary 2.

    This way, Rotary 1 controls which pattern is selected on Matrix 1 & 2 (64 patterns in total), and Rotary 2 controls which pattern is selected on Matrix 3 & 4 (64 additional patterns). Button 3 acts as a toggle switch between the two sets of Matrixes (Matrixes 1 & 2 on Rotary 1, and Matrixes 3 & 4 on Rotary 2). Phew. That’s it. You’re all set to play with the Rotaries/Buttons to switch between 128 unique patterns programmed into 4 Matrixes. If that’s not enough patterns, then even Reason can’t help you out.

    I know this might get a little confusing for some of you. It was confusing to set up the first few times. But if you run into trouble, just download the project files up at the beginning of this tutorial. There’s a fully-functional 128-pattern switcher Combinator in there. Good luck!


    So as far as practical applications, if you really need 64 or 128 unique patterns affecting the same sound source, you can do it all within a Combinator. With a little routing ingenuity you could probably access the Redrum patterns in much the same way and extend your creativity further. How’s that for an idea? Do you have any comments or questions? please jump in and post them here. Until next time, happy reasoning!

    21 – Massive Combi Drum Kit

    Turn a Combinator into a 61-synth drum kit that spans the range of the Matrix pattern sequencer so you can use the Matrix to trigger your drum hits. Yes it’s massive. Yes it’s crazy. And yes, you should try it out! Why? Because apart from being time consuming, it’s dead easy to accomplish. And it doesn’t have to break the CPU bank.

    This project was a real blast to put together. Essentially it involves turning a Combinator into a 61-synth drum kit that spans the range of the Matrix pattern sequencer so you can use the Matrix to trigger your drum hits. Yes it’s massive. Yes it’s crazy. And yes, you should try it out! Why? Because apart from being time consuming, it’s dead easy to accomplish. And it doesn’t have to break the CPU bank.

    Download the project file here: minimal-super-kit. This zip file contains my Minimal Super Drum Kit Combinator with 61 synth sounds that can be played by the Matrix. I’ve added 32 random patterns in the Matrix which is assigned to a Rotary knob so you can dial in a pattern you like. Also, you can turn the matrix off using button 1, so that you can play the drum kit with your keyboard controller if you wish. This is a great flexible way to show off your drum kit creation chops. So enjoy! And when you’ve had it with my own drum sounds, try your hand at creating your own. Read on to find out how.

    There’s also a few extra devices in the Combinator, and assignments on the other Rotaries / Buttons which affect the drums globally. Feel free to explore their routings as well if you’re interested. The focus here, however, is turning your Combinator into a massive drum kit which can be sequenced using the Matrix.

    Back to Basics: Setting things up

    1. Open up a new document with a 14:2 Mixer and then create a new Combinator. Inside the combinator, create five 14:2 mixers all in succession so that they are all chained one after the other.

      The five 14:2 Mixers are chained together.
      The five 14:2 Mixers are chained together.
    2. Create 61 Synths. Yes, that’s right. 61 Synths. These can be any combination of Thors, Malstroms, or Subtractors. one trick before you go nuts copying and pasting is to create one instance of Thor, one Subtractor, and one Malstrom, and then initialize all 3. This way, only one oscillator or graintable is used and it will be light on the CPU. Once you’ve done that, copy and paste so you have 61 different synths and connect them each to their own mixer channel.

      Each of the synths are connected to their own Mixer channel.
      Each of the synths are connected to their own Mixer channel.
    3. Now this is the trickiest part of the whole tutorial. Click the “Show programmer” button on the front of the Combinator, and select the first synth in the list at the top. Notice in the Key Mapping area on the left part of the Combinator screen, the key range for this synth spans the entire keyboard range. If you look at the bottom of the Key Mapping area, the value under Key Range is C-2 (Lo) to G8 (Hi). We’re going to change these values so that both read C1. The easiest way to do this is to click and drag upward over the “Key Range Lo” field until it reads “C1.” Once you’ve done that, you can click and drag down all the way on the “Key Range Hi” field. This means that the synth will only be triggered by pressing C1 on your keyboard controller.
    4. The first Synth selected in Key Mapping. See that the range listed is C1 (Lo) to C1 (Hi)
      The first Synth selected in Key Mapping. See that the range listed is C1 (Lo) to C1 (Hi)
    5. Sweet! Now do this for each subsequent synth, but incrementing each one by one note value upward on the scale. So, for example, the next synth is only triggered by C#1 and the one following that by D1, and so on up the scale until you have the last synth in place at C6. Ta da! Now each synth can only be triggered and played from it’s corresponding note on the keyboard controller. And taken as a whole, the entire kit ranges the same 5-octave span of the Matrix (from C1 to C6).
    6. The last Synth selected in Key Mapping. See that the range listed is C6 (Lo) to C6 (Hi).
      The last Synth selected in Key Mapping. See that the range listed is C6 (Lo) to C6 (Hi).
    7. Now comes the really fun (but tedious) part. Go through each synth one at a time and sculpt your drum sounds. Go wild. Enter some amazing Kicks, Snares, Toms, Hi Hats, Rim shots, glitch mayhem, or whatever sounds you really enjoy listening to through Reason. Don’t be shy. Jump in and have some fun. And if you’re really hard pressed for some ideas, sift through the Factory Soundbank (FSB) for some inspiration. There are plenty of synth ideas in there.
    8. Note: audition your sounds using your keyboard controller. This way you can hear each note triggering each synth. If you forget your place on the keyboard, minimize your entire stack of synths by holding down Alt as you press on the minimize arrow of one of the devices. This will automatically minimize all devices within the Combinator. Now press a key on your controller and look for the “Note On” light as you press. This “Note On” light will show you which synth is triggered by the note you are playing. Since each synth is tied to an individual note on the keyboard, only a single “Note On” light will flash when you press a single key. Trust me, this is a great time saver when working with so many devices.

    9. Add a Matrix under everything, flip the rack around, and tie the “Note/Gate CV out” cables from the back of thedevice into the Sequencer Control “Note/Gate CV in” on the Combinator. Flip back around to the front again and start dialing in some Note/Gate patterns into the Matrix pattern banks. Or use the right-click context menu to select some random patterns for the various Matrix pattern banks.

      Connecting CV cables from the Matrix to the Combinator's Sequencer  Control section.
      Connecting CV cables from the Matrix to the Combi's Sequencer Control section.
    10. Finally, go back to the Combinator’s Modulation Routing section and with the Matrix device selected, enter the following settings:

    Rotary 1 > Pattern Select: 0 / 31 (assuming you’ve entered patterns in all 32 pattern banks of the Matrix)

    Button 1 > Pattern Enable: 0 / 1

    Entering the Matrix Sequencer Parameters in the Combi's Modulation Routing Section.
    Entering the Matrix Sequencer Parameters in the Combi's Modulation Routing Section.

    Keeping Button 1 off means that you can play the Combinator in a “live” situation, accessing the drums to be played in real time and ignoring the Matrix. Turning on Button 1 automates the drums and plays the drums according to what is programmed in the Matrix. Spinning the Rotary 1 knob will select from the 32 Matrix pattern banks. You can also automate pattern changes for the Matrix in the Sequencer if you create a sequencer track for the Matrix.

    I hope you’ve enjoyed this little exploration of what can be done with a bunch of synths and a Matrix inside a Combinator. You can create some gigantic kits using this technique. And it can be an alternative to using the NN-XT for a sample-based drum kit.

    As with any method, there are pros and cons to this approach. I like it because it can be much easier to tweak the sounds later if you want to adjust any of the synth parameters for your various hits. Personally, I feel this can give you more flexibility than storing your kit in an NN-XT. That being said, the downside is that it’s not quite as compact, takes some time to load up in your song, and it’s not sample-based so it’s not as “organic” as samples in an NN-XT can be. Both approaches, however, are valid. It all depends what you’re after.

    If you have any other ideas or unique ways in which you’ve created your own kits please share them with us. I’d love to know some new techniques that I may not have thought about before.

    Until next time, I hope this inspires you to build some kick-ass drum kits. Good luck!