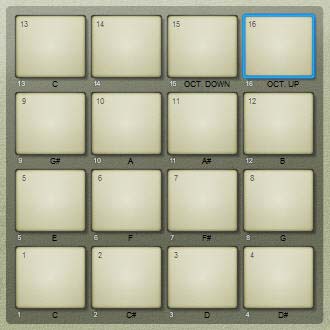
Once again we have a new use for Kong. This time, we’ll turn Kong into a Piano Roll. On my Maschine, I can turn the entire device into a Keyboard by going into a special “Pad Mode – Keyboard (Button 1).” So I got to thinking if this was a possible setup for Kong in Reason. Sure enough, there’s an interesting way to work this out. Since most of the time, you’ll probably want to work on a Sampler device for this kind of feature, we’ll set it up within an NN-XT (or at least a group of NN-XTs). This way, you can insert the sample kit of choice, or your own samples directly into the device.
You can download my sample .RNS patch which includes the Combinator setup here: kong-keyboard-mode. This is a zip file which contains both the .RNS and Combinator file we’ll be discussing below.
Note: A huge debt of gratitude goes out to Ed Bauman (EditEd4TV) for his help getting the CV on the Octave Up/Down pads working correctly. Without his help, you’d be cycling through all the octaves and looping around them using a single pad. Not the most intuitive design. Thanks a million for this Ed. I owe you big time! You can visit him at Bauman Productions or his Reason forum.
Setting up the Kong Keyboard
And now let’s get started creating a multi-purpose Kong Keyboard (aka: the Kong Piano Roll).
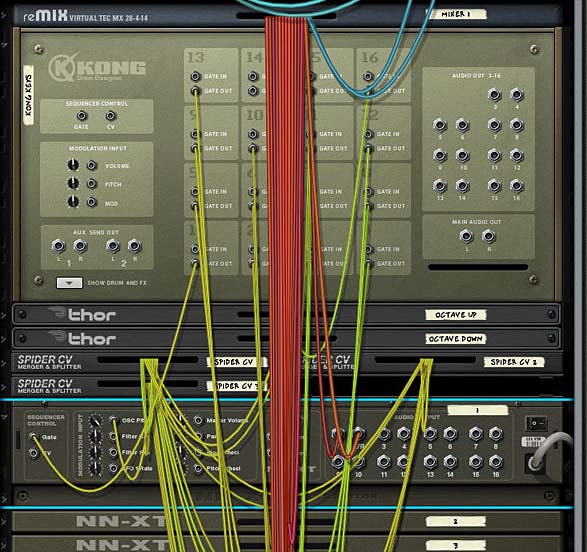
To start, create a Combinator and inside the Combinator create a 14:2 Mixer and holding shift down, create a Kong device. This is going to be the main device from which everything else is triggered. Underneath that (and still holding shift down) create two empty Thor devices, and three CV Spider/Mergers. Then without holding Shift down, create an NN-XT, which will auto-route to the first channel on the Mixer.
Inside the NN-XT, load your favorite patch or a group of samples that span the full range of the keyboard. For this example, I used a Wurlitzer Piano. You could even load up your favorite sound effects kit, and use the Kong pads to trigger each of the sounds associated to each of the keys. This is a very versatile little patch.
With the sounds loaded, select them all in the “Sample Zone” window. Then be sure that the Pitch Semitone is set to zero (0). Also flip to the back of the NN-XT and Route the Gate CV output from Kong’s Pad 1 to the Gate input on the NN-XT. Also set the Osc. Pitch CV input trim knob on the NN-XT to 127.
Duplicate the NN-XT 12 more times, for a total of 13 NN-XT devices. Open each of these sampler devices fully so that you can see the sample editors. Select all the samples contained in the device so they are all highlighted, and then move the Pitch Semitone knob incrementally by 1. Do this for each NN-XT device, moving the semitone pitch upward incrementally by a value of 1. Note that the first NN-XT’s semitone should be set to zero (center). Then NN-XT 2 should be set to “Semitone = 1,” NN-XT 3 to “Semitone = 2” and so on down the line until NN-XT 13 is set to “Semitone = 12.” This gives you a full Octave range of 12 notes +1 (C to C).
Next, flip the rack around and route the Audio Outputs 1 & 2 (Left & Right) for each NN-XT to separate channels in the main mixer. Also route the Gate outputs for each subsequent Kong Pad into the Gate inputs of each corresponding NN-XT.
Now it’s time to set up the “Octave Up” and “Octave Down” pads in our Kong device. Octave Up is going to be placed on Pad 15. So we’ll start there. Rename the first Thor in the Combinator “Octave Up.” Send the Gate CV output from Kong’s pad 15 into this Thor’s “Gate In (Trig)” CV input (located at the back of Thor’s Step Sequencer area). Also send the CV1 output from Thor to the Merge input 1 on the first Spider Merger/Splitter, and set the Trim knob to 84 (this is the “magic” CV number to get the octave switching correctly). Flip around to the front of Thor, and in the Step Sequencer set Run Mode to “Step” and Direction to “Forward.” Also set the number of steps to 1 only and with the Edit knob set to “note” adjust the Step 1 knob to C2 (which is set fully left). enter the following in the Master Bus Routing Section (MBRS):
Seq.Note : 100 > S. Transp
Seq.Note : 100 > CV Out1
This is used to transpose the value of Thor, and thereby all the NN-XT devices upward by one octave. The only thing left to do is to ensure the CV Out1 gets sent to all the NN-XT devices (into the “Osc Pitch” CV input on each device). This is what the spider mergers/splitters are for. So flip around to the back of the rack, and send the Merged output from Spider 1 into the Split input of spider 1 (A), then daisy chain this input to the B side of the same Spider, and then over to the A side input on the second Spider, and so on and so forth to each A/B splits on all 3 spiders. This gives you 13 free splits to send to the “Osc Pitch” CV inputs on each of the NN-XT devices. Thus ends the setup for the Octave Up pad.
And now for the Octave Down pad. Same idea but in reverse. Here’s what you do: Octave Down is going to be placed on Pad 16. Rename the second Thor in the Combinator “Octave Down.” Send the Gate CV output from Kong’s pad 16 into this Thor’s “Gate In (Trig)” CV input (located at the back of Thor’s Step Sequencer area). Also send the CV1 output from Thor to the CV Merge input 2 on the first Spider Merger/Splitter, and set the Trim knob to 84 (again, the “magic” CV number to get the octave switching correctly). Flip around to the front of Thor, and in the Step Sequencer set Run Mode to “Step” and Direction to “Forward.” Also set the number of steps to 1 only and with the Edit knob set to “note,” adjust the Step 1 knob to C4 (which is set fully right). enter the following in the Master Bus Routing Section (MBRS):
Seq.Note : 100 > S. Transp
Seq.Note : 100 > CV Out1
Again, this is used to transpose the value of Thor, and thereby all the NN-XT devices down by one octave. Since you already set up the Spider CV Splitter/Mergers to take the incoming CV values from both Thor devices and merge them to send output to the Osc Pitch parameter of the NN-XT devices, you’re all done connecting your CV cables.

One last thing to do. . .
Open up the Combinator Programmer, and select the first NN-XT. Uncheck the “Receive Notes” checkbox at the bottom left corner of the programmer window. Do this for all the NN-XT and Thor devices inside the Combinator. The Kong is the only device that should be receiving notes. If you don’t do this, and end up playing on the Combinator device’s sequencer track, you’ll end up triggering all the NN-XT devices at once. Instead, I would suggest you create a separate track for the Kong device in your sequencer and then add all your midi clips/notes on this Kong track. That way, things are laid out a little more logically.
Note: there’s nothing to prevent you from using the Combinator itself and playing notes on the Combinator’s note lane. Just remember that if you do, you’ll need to play Kong via the proper “Kong note range” with your keyboard (which kind of defeats the purpose here — the whole idea is to use your pad controller to play the Kong device and use it as a keyboard).
Try playing a few notes by using Kong’s pads, and then switch the Octaves up or down accordingly. You’ve now created a fully-functioning keyboard in Kong, which can be used via any 16-pad controller to enter notes or chords for any sound device you can come up with in Reason. The only thing to keep in mind is that the sound coming out of all 13 devices need to be exactly the same (aside from being pitched upward by 1 semitone for each subsequent device).
Now add some labels to the front of your Kong device. Here you can see how I labeled things very simply so that you can see the notes you’re playing via each pad. You can also play combinations (ie: chords) by playing multiple pads at once. Very simple idea, but a profound new way to play your instruments via your pad controller.

Where do You go from Here?
Since all the devices inside Reason (except Kong and the Redrum) have a way to adjust pitch via CV (they all have an “Oscillator Pitch” CV input on the back), you can use this technique for any Reason-created sound. Furthermore, if you are creative enough, you could even apply this technique to a stack of Combinators. Yup. That’s right. You’ll just need to program the pitch changes via a Rotary in the Combinator Programmer, and then send the CV cable into the Rotary CV input. So this is perfectly “doable.”
As always, I’d love to hear what you think of this setup. Does this help you use Reason more creatively? Does it fill a need to perform all your music from your favorite pad controller? Tell me what uses you’ve found for this type of patch. I am always eager to hear what you come up with. Happy music-making!
