There is a wealth of devices, patches and samples available in the Factory, Record, and Orkester Soundbanks. And the amount of refills available on the internet grows each and every day. So why are we going to discuss yet another Device Toolbox? Because this one is going to be a little different. Here, I’m going to explore what isn’t in any of the prefab refills provided with the software. Here I’m going to discuss ways in which you can create your own repository of Matrixes. If you extend this idea, you can create your own Redrum devices as well, or how about a complete storehouse of Bass lines and melody lines. It all revolves around the same idea below. So let’s discuss the possibility of adding a whole new dimension to your sound arsenal by creating device templates that will speed up your workflow 10 times over. Sound like something that could benefit you? Read on. . .
Device Toolbox – a multitude of kits
- Let’s start by creating an empty document. This document is going to be used to house a variety of matrixes, but no sounds will be generated. So contrary to the way you usually start off a song, you won’t need a mixer or any kind of insert or send effects. Simply start by opening a blank document and off we go.
- You should get into the habit of saving your document right off the bat. So let’s do that now. Give the document a name like “Matrix Toolbox” or something you will remember.
- Next, create a matrix. Change the switch from Keys to Curve, and Steps to 32. Add in a curve that you use most often. Perhaps a sawtooth or sine-shaped curve. Now switch to the second pattern. Since the Matrix can house up to 32 curves, you may as well maximize the use of the Matrix and use up all those slots. That way when you insert this matrix into your projects, you have 32 choices right off the hop. So add in the next pattern. You can elect to store the Resolution and number of steps along with the pattern settings, but I prefer to leave these as is when creating some general curves (for CV control, such as panning or level control on a mixer channel, for example). This is because using all 32 steps allows you a greater degree of control over the curve. And the resolution will change depending on your song, so change that later when you insert the Matrix into an actual project.
- We’re only creating the repository here, so go nuts. Add in a bunch of Matrixes. In my project file I’ve added a lot of random Matrixes, with random notes and curves because this can do wonders for glitch tunes. Use 10 Matrixes tied to the 10 channels of a Redrum and you have an instant glitch kit. So keep adding. When you’re done, save the entire project as an .rns or .record file. Then when you have a song file open that requires some CV control, you’ve got a whole warehouse of Matrixes at your fingertips. Just open up the toolbox, and copy the Matrix into your song file. Don’t forget this can work in reverse as well, so as you work on your song projects, and create new Matrixes with new curves, open up the toolbox file and add the new curve(s) into a new Matrix for later retrieval.
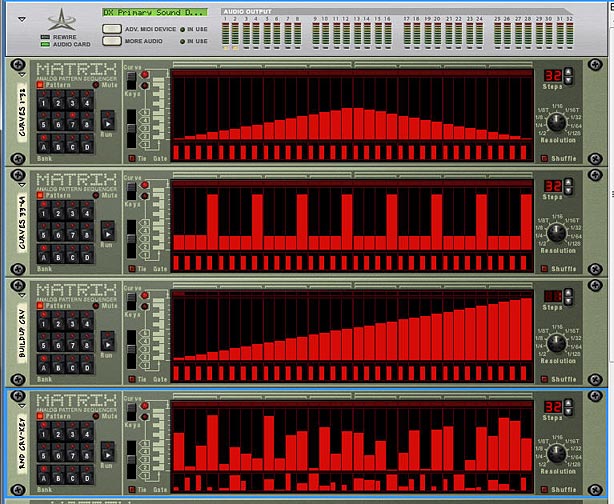
There are quite a few ways you can use a Matrix. You can have them control a sound device’s LFO, Filter Frequency, Resonance, etc. or you can use the Matrix as a monophonic note player which plays the sound device for you. You can also use it to control many different parameters in a combinator, and you can even control the pattern selection of the Matrix itself via a rotary on a combinator. These are pretty powerful devices. See below for a some suggestions. I’ve also included a ton of pattern variations in a nice little package for you (so all the legwork is done). You can download the file below.
matrix-toolbox
What’s in this Package? Here’s the highlights:
Curves 1-32: Contains Main Curves that can be used for CV control of other devices, with a focus on LFO curves. Most of the main curves here are familiar ones, with Sine, Sawtooth, Pulse Width, etc. Make sure that you switch to Bipolar on the back of the matrix in order to open up the curves to any control which is bipolar in nature (such as controlling the panning of a channel). Switching between Unipolar and Bipolar is a simple way to extend the use of these curves and essentially doubles the amount of curves contained in a single matrix from 32 to 64.
Curves 33-64: More curve fun. This set is more focused on melody and beat than LFO use, but of course you can use any one of these curves to control any CV parameter (LFO, beats, filter frequency, filter resonance, etc).
Buildup Crv: This Matrix uses a sawtooth curve as its basis. You’ll see the same curve in all 32 banks, but each slot adjusts the steps upward incrementally (A1 has 1 step, A2 has 2 steps, etc.). This is more experimental than anything else, but the thought is that you can use this Matrix to slowly build up a pad or any other sound by placing this matrix in a combinator, having the matrix control a sound device, and programming the pattern to a rotary. Then create an automation track for the combi, and slowly bring up the rotary along the length of the sequencer, the sound should build upward incrementally. Of course, you don’t have to use it in a combi, and instead can program the pattern section of the matrix directly in the sequencer, but this would take you much more time as you would have to fiddle with the pattern changes in the sequencer. Try the combi idea first. It’s easier. Then also If you want to create a fade-out “build-down” instead, simply reverse the programming of the Pattern section in the combi’s mod matrix. Simple.
Rnd Crv-Key: This can be used for random curves or random keys. Every pattern in this matrix lasts for 32 steps and is using 1/16th resolution. So the timing and length of the patterns stay the same, however, the patterns themselves are different.
Rnd Step: Same as the Rnd Crv-Key Matrix, however, this time, the Length of the Patterns is also randomized (sequentially from 1 step in Bank A1 up to 32 steps in Bank D8). Try adding this to a combi and programming the pattern section to a rotary. Then in the sequencer create some crazy random vector automation to switch between all the patterns. Or control the rotary on your controller and have some fun spinning the dial for a bit of craziness.
Rnd Res: The same as the Rnd Step Matrix, except the Steps remain constant at 32 for each pattern. What changes here is the Resolution. Be warned that this can get a little chaotic because the Matrix switches in and out of Triplets, which I’ve always found a little jarring. But it’s there to play with.
Rnd All: The granddaddy of them all. This is the “everything-but-the-kitchen sink” of Matrixes. All banks are loaded with patterns, and everything is randomized: Steps, Resolution, Patterns. It’s the whole enchilada. Just be warned, this may create some complete and utter nonsense and may cause aural nausea. But again, it’s fun to tinker.
Rnd 4/4: This Matrix can be used for random curves or random keys. But it’s a lot less random than the Rnd All matrix. As the name suggests, all the notes and curves are completely random, however, the beats are kept to a basic 4/4 structure, and in 4 steps or beats per bar. Bank A1-A8 all use ¼ time, with 4/8/12/16/20/24/28 and 32 steps respectively. Same goes for Bank B1-B8, with the difference being everything is set in 1/8 time. Bank C1-C8 is 1/16 time, and Bank D1-D8 is 1/32 time. I set it up this way because I rarely utilize the ½, 1/64 or 1/128 time unless it’s something very specific. So this can be used in most general circumstances and create a cohesiveness to whatever parameter you’re controlling. At the same time it is still a random controller, so expect the unexpected. If you want to work only within a specific time, then place this matrix in a combi, and assign the pattern section to a rotary which controls only a specific bank (A: 0-7, B: 8-15, C: 16-23, or D: 24-31). If you instead want to work with only a specific amount of steps in different timings, then create a track for the matrix in the sequencer, and program the same numbers in each bank. For example, working with 8-step patterns only, you would program A2/B2/C2 and D2 in the sequencer. This way, all the timing would be different, but the amount of steps for each pattern remains the same.
The real power in this project lies in the fact that you only need to build the toolbox once, and you can reuse it as many times as you like. The more variety you have in the toolbox, the more variety you can insert into your song projects and the more organized you are, the quicker you can do it. So think about applying this idea not only to Matrixes, but how about Redrum patterns, and other things like basslines or melody lines. You can create a whole series of quick beat loops or chord sequences that you can recall at a moment’s notice. Break out and create your own toolboxes to suit your needs.
Do you think this can help you out in your own work? What kinds of other items do you think you can turn into a toolbox? What other matrixes do you have that you’d like to share? Any suggestions for some Matrix patterns that I may have missed? Let me know and I’ll add it into the package.
Happy Reasoning!

