Usually we think of Multiband being reserved for Compression, but why not divide any type of effect, sound, or multiple effects and sounds into different bands using the BV512 Vocoder / Equalizer supplied with Reason. Doing so, you can divide effects and sounds into 32 distinct frequency bands, and that, my friend, can open the doors to a whole wealth of possibilities.
You can download the project files here: multiband-anything This is a zip file which contains an .rns file with 6 Effects Combinators to showcase how you can use the BV512 in Equalizer mode to split different effects to different frequencies in order to process your sound. All the Combinators process the same matrix pattern which is sequencing a Thor synth. Each combinator then outputs the sound to a separate channel on the main 14:2 Mixer. To hear the various effects, mute/solo the specific channels on this mixer.
Starting off Small: Understanding the BV512 Digital Vocoder
The BV512 is a Digital Vocoder which can be used as an EQ device as well. When set in EQ mode, you can select 4, 8, 16, 32, and 512 bands of EQ separation. You’ll have to understand that the 512 bands is an FFT (Fast Fourier Transfer) mode, which for all practical purposes will color your sound and will cause a slight delay in the realm of 20 ms. when processing audio through it. There will only be 32 bands displayed, but each of those 32 bands will actually control a higher amount of bands (512 / 32 = 16 bands each). So for this tutorial and for processing purposes I’m going to stay away from the FFT (512) setting, and instead focus on 32 bands or less (a much more manageable number for the following types of effects).
Just because I’m staying away from using the FFT (512) setting doesn’t mean it’s not useful. Try it out in your own patches, because you never know where you’re going to find that signature sound that makes your brain melt. And in certain situations, I really like the color of the FFT (512) setting.
A Basic Multiband Delay
At it’s simplest, here’s a method to split out a different delay to affect different frequency bands. First, the video. Then the instructions below:
First, Create a Combinator. Then inside, while holding down the Shift key, create a 14:2 Mixer, Spider Audio Merger/Splitter, BV512 Vocoder, and DDL-1 Digital Delay device, in that order.
Set the Vocoder’s Band Count to 16 Bands, and switch from Vocoder mode to “Equalizer” mode.
Hit to tab key to flip the rack around and route the L/R master outs of the Mixer to the L/R “From Devices” of the Combinator. Then route the Combinator’s L/R “To Devices” into the Spider Audio’s main L/R Splitter inputs. Send one pair of L/R split outputs to the Vocoder’s L/R Carrier inputs. Then send the Vocoder’s L/R Carrier outputs to the Delay’s L/R inputs. Finally, send the Delay’s L/R outputs to the Mixer’s L/R channel 1 inputs.
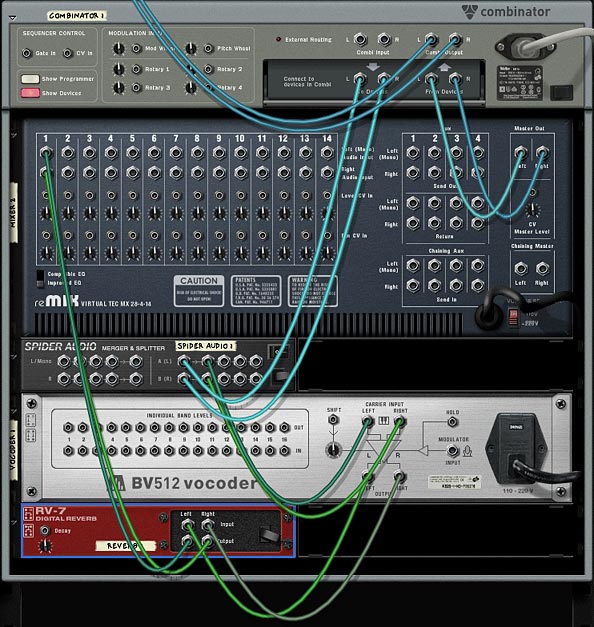
Hit the tab key again to flip the rack around to the front. Hold the Shift key (if using Reason), or hold the Ctrl key (if using Record), and select both the Vocoder and the Delay devices. Then right-click and select “Duplicate Devices and Tracks.” Do this two more times to create 4 sets of Vocoder/Delay devices.
On the first BV512 (the low range), set bands 5-16 to zero. On the second BV512 (The low-mid range), set bands 1-4 and 9-16 to zero. On the third BV512 (the mid-high range), set bands 1-8 and 13-16 to zero. On the fourth and final BV512 (the high range), set bands 1-12 to zero.
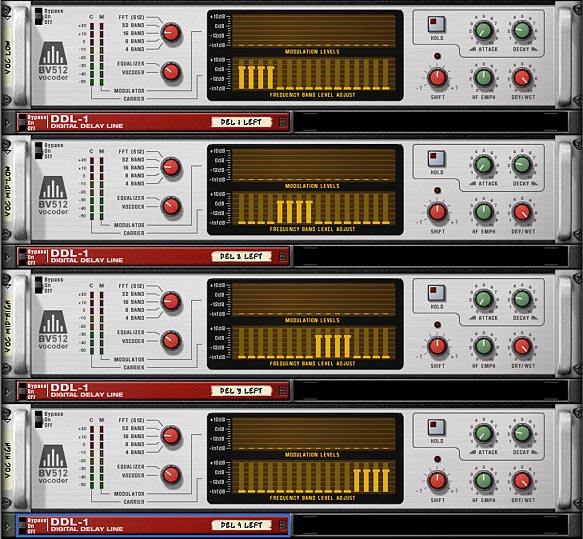
Set the first Delay unit at the top (the low range) to 1 step, set the second one (low-mid range) to 3 steps, the third one (mid-high range) to 5 steps, and the fourth one (the high range) to 7 steps. This way, each frequency will produce a different delay.
Again, press tab to flip to the back of the rack. Send the other 3 L/R splits from the Audio Splitter into each of the other 3 Vocoder’s L/R carrier Inputs. Then send each of the Delay’s L/R audio outputs to their own Channels on the mixer, so that Channels 1-4 are taken by the Delay Devices outputs.
Now all that’s left is to save the Combinator, and load up your favorite sound to pipe into this effect. To do so, open any instrument and route it’s L/R audio output into the Delay Combinator’s L/R “Combi Input.” Play the sound on your controller keyboard or set up a matrix pattern to sequence the instrument and you’ll hear a different delay for each of the four sets of bands. In other words, the frequency of the sounds you put into the combinator will determine which delay affects the sound. Different frequencies will get different delays applied. Then the sum of all these delayed sounds are mixed into the Mixer, and sent back out the Combinator.
If you give this some thought, you’ll realize that you can apply any number of effects chains to any of the 32-frequency bands of the BV512 to split up effects according to frequency. Furthermore, you can apply this multi-band technique not only to audio and effects, but also to Filters, LFOs and Envelopes which affect the audio. Let’s take a deeper look into how this is done by creating a multiband filter.
MultiBand Filtering: The next step
Now to get a little more complex. Let’s try Filtering our audio based on the Frequency of the incoming signal, and then providing a way to adjust the filter applied to each set of bands. Using our above technique, this becomes child’s play.
Building on the last Delay device we created, select all the DDL-1 Delay units and delete them all.
Then under the first Vocoder, hold Shift down and create a Thor device. Bring all the levels of Thor down to zero (what I call truly initializing Thor). Bring the range on the pitch wheel down to zero, bring polyphony down to zero, bypass all the oscillators and filters, bring all the levels down to zero, and turn all the green buttons off. Leave only the Global envelope Gate Trigger button on, and leave the Global Evelope ADSR envelope in its default position. This way, the envelope can affect Filter 3, which we’ll turn on a little later.
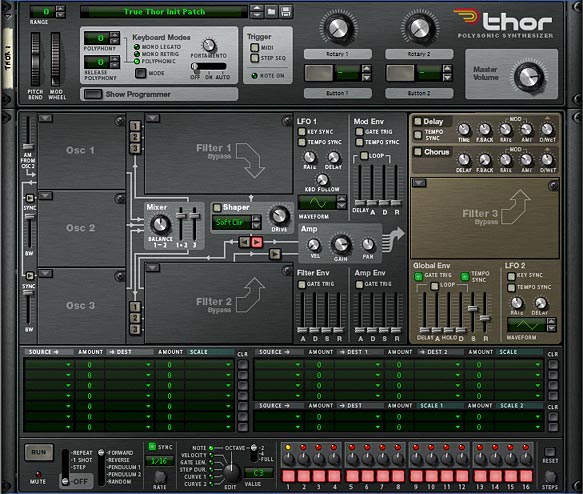
Now that Thor is much more initialized, go into the MBRS (Modulation Bus Routing Section) and set up the following modulations:
Audio In1: 100 > Filt3 L.In
Audio In2: 100 > Filt3 R.In

Next, duplicate the Thor device 3 times, and place each new Thor under each of the other Vocoders.
Flip the rack around and Move the L/R Carrier output on each Vocoder to the L /R Audio outputs of each corresponding Thor device (1 Mono/Left and 2 Right output on each Thor). Then route new cables from the L/R Carrier output on each Vocoder to the L/R Audio inputs of each corresponding Thor device (Audio In 1 and Audio In 2, respectively on each Thor).
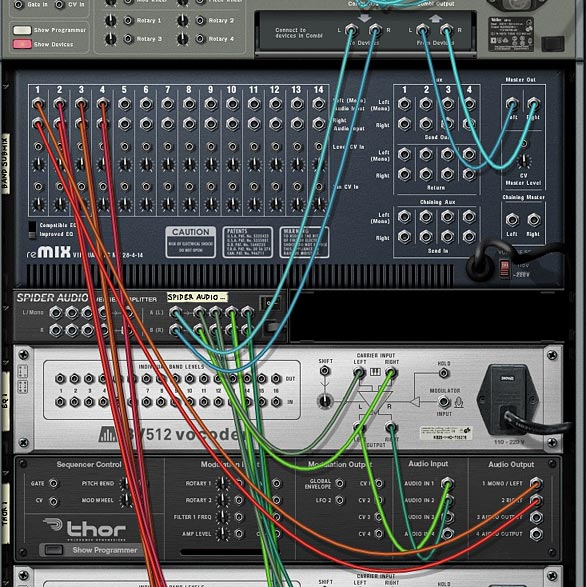
Flip the rack around to the front again, and open up the Combinator’s Programmer. It’s time to add in our Filters and make them adjustable for each set of BV512 bands. For each Thor device, add the following modulations:
Button 1 > Filter 3 Type: 0 / 2
Button 2 > Filter 3 Comb Preset: 0 / 1
Mod Wheel > Filter 3 Res: 0 / 100
Now for each Thor, assign the Filter 3 Frequency to it’s corresponding Rotary as follows:
Thor 1: Rotary 1 > Filter 3 Freq: 1 / 127
Thor 2: Rotary 2 > Filter 3 Freq: 1 / 127
Thor 3: Rotary 3 > Filter 3 Freq: 1 / 127
Thor 4: Rotary 4 > Filter 3 Freq: 1 / 127

Now when you plug an instrument into this Combinator, you can selectively adjust the filtering of the various frequencies of the sound using the 4 Rotaries of the Combinator. Rotary 1 will affect the low range, Rotary 2 and 3 will affect the mid range, and Rotary 4 will affect the high end.
Where do you go from here
Included in the project files are a set of 6 effects unit that utilize the Equalizer mode of the BV512 to divide the audio source into separate bands and apply effects to each of those bands. Here’s a brief explanation of each:
4 x 16-Band Delay FX: This Combinator uses the Vocoder in 16-band mode to create 4 splits of the audio source going through 4 different delay units. This combinator is the same one created at the beginning of this tutorial, except that there’s an additional delay created under each Vocoder in order to split the delays left and right (for a wider stereo separation). Each rotary controls the delay time for each left/right delay pair. And the buttons underneath each rotary will change the rotary between Steps / MS delay count. A very important feature of this Combinator is the Mod Wheel, which is used as a global Dry/Wet knob for the delay. In its default low-end position, there is no delay. Push the Mod Wheel all the way up and you’ll push the delay fully wet.
8 x 32-Band Delay FX: This combinator is exactly the same as the above 4-way delay, however this uses the Vocoder’s 32-band setting, and splits the signal into 8 different delay units (affecting 4 bands each). Since there’s only 4 rotaries and buttons, you can’t control each delay individually as you can with the previous Combinator. So I opted to put the global dry/wet delay knob on Rotary 1, and put a global steps/ms switcher on Button 1. The only real effect button 1 has is if you want to quickly edit all the delays and have them in MS mode instead, you simply press the button, then go into each delay to edit the delay time.
2-Band Phased Delay FX: This Combinator really was more of an experiment than anything else. The one interesting feature here is that the Vocoder Bands are curved so they blend into each other, rather than have an abrupt frequency change. You can see this on the Vocoder Band area.
Mixed-Band Reverb FX: This combinator uses the Vocoder bands as a notch and Bandpass frequency filter to send your audio through two very different Reverb effects. This goes to show you that there are a lot of possibilities when you start bending different frequencies on the BV512. Use the first Rotary to adjust the Dry/Wet Reverb signal affecting the low and high range of frequencies. Use Rotary 2 to adjust the Dry/Wet Reverb signal affecting the middle range of frequencies. I put a tight small room reverb on the low & high frequencies and a long hall reverb on the middle range of frequencies to show how drastically you can affect the ambience of your sound by toying with the different frequency ranges.
SuperSpreader FX: This is one way you can get some severe (and almost irritating) amount of stereo separation from a single sound source. I had to add a bunch of ECF-42 envelope filters in order to tame the sound somewhat. You can program this up if it’s to your taste. One thing that I wanted to point out here is that you can use Rotary 1 to invert the Frequencies, thereby flipping them around in real-time or in automation if you want to program the knob in the sequencer. Check out the Modulation Routing inside the Combinator to see how this is done. One drawback is that you can only affect 10 bands at once for any given vocoder, which limits you to using a set amount of band counts. But I’m sure there’s a way to push this limit using CV. Any takers want to give this a shot?
MultiBand Filter FX: Finally, you have the multiband filter FX Combinator which was featured in this tutorial, so I won’t go into too much detail here. Just note that I added a Delay and Chorus on Buttons 3 and 4 if you want to give those a try.
I can almost see the next question on your mind. If we can do all this with the BV512 in Equalizer mode, then what’s to prevent us from applying these same techniques using the MClass Equalizer? The truth is nothing! In fact, you can tailor the MClass Equalizer to a much finer degree than the Vocoder. However, the Vocoder can be a great way to test out quick ideas in a visually intuitive way. And as I hope I’ve shown here, you can still find this device highly flexible and usable. But that being said, there’s nothing stopping you from separating your signals using the MClass EQ, and even combining this with the MClass Stereo Imager to create some very unique Effects Combinators. If you have any ideas or come up with some brilliant effect unit out of this tutorial, please share, comment, and let us know about it.

