In this second installment of Reason 101’s Guide to creating better patches, I’m going to focus on Performance, Velocity, and how the MBRS (Modulation Bus Routing Section) in Thor relates to both. The focus is to look at new creative ways you can improve how Thor reacts to your playing style and explain some of the reasons why Thor is such a powerhouse of flexibility in this area. Again, I’m not going to be approaching this as a complete guide to every possible performance technique you can accomplish inside Thor, but rather try to outline its flexibility and show you a few key aspects of performance that you should think about as you develop your own patches.
What is Performance?
Performance has less to do with the actual sound than it does with how the sound is played. If sound is the Motor that moves the car, Performance is the route it takes. It adds dynamism, movement, and modulation. And it is just as important as the actual sound you are hearing, or in our case, “creating” inside Thor. Both the sound and the performance of the sound are intrinsically interconnected. Without performance, sound would be very lifeless and dull, devoid of any movement or humanity. In terms of creating a patch in Thor, there are several performance parameters that you can use to determine how the sound is affected (changed or modulated) based on the way the patch is played by the musician. It is up to you, as a sound designer, to select what changes are made to the sound when a key is struck softly versus when the key is struck hard. It is up to you to determine what happens to the sound when the patch is played at different pitches along the keyboard, or when the Mod Wheel is used. And Thor offers an endless variety of ways you can harness the power of performance.
Performance Parameters
Performance parameters fall into the following categories (note the names in parentheses refer to the different names these performance parameters are given on the front panel of the Thor synth):
- Velocity (or Vel): How soft/slow or hard/fast the keys on your keyboard are initially pressed.
- Keyboard Scale (or “KBD,” or “Key Sync” or “KBD Follow”): The Keyboard register/pitch, or, where you play on the length of the keyboard (from -C2 to G8)
- Aftertouch: Also called “Pressure Sensitivity,” Aftertouch responds to the pressure you place on the keys after they have initially been pressed down.
- Mod (Modulation) Wheel: A unipolar (0 – 127) wheel that is generally used to (but not limited to) control vibrato (pitch wobble), tremolo (amp wobble), or both.
- Pitch Bend: A bipolar (-8,192 – 8,191) wheel that is generally used to (but not limited to) control the pitch of the sound upward or downward.
- Breath: Used with a breath or wind controller. Breathing into the controller will usually cause the sound to be modulated in some way. And if you’re interested in how a breath controller can be used, check out http://www.ewireasonsounds.com/ and http://www.berniekenerson.com/
- Expression: Usually this parameter is tied to an Expression Pedal, usually found on an organ or piano.
- Sustain Pedal: Usually this parameter is tied to a Sustain Pedal, usually found on an organ or piano.
Note: While performance relates to how the physical instrument / MIDI Controller is played by the musician, any performance parameter can also be programmed or automated in the Main Sequencer in Reason.
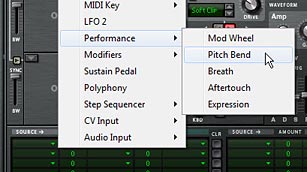
While all these parameters can be “turned on” or “turned off” (“implemented” or “not implemented”) in a patch, generally you want to make use of most of these parameters in order to make your patches highly flexible and dynamic. However, I don’t use the Breath, Expression, or Sustain Pedal controls. To my mind, these three controls are very specific, and unless the Musician has a pedal or a wind controller (like a MIDI Flute), they won’t be able to make much use of them. If I were designing a ReFill specifically for a Wind Controller, however, then the Breath parameter would be extremely important and you would probably design most of your patches with this type of control in mind. But for the majority, these controls probably won’t need your attention. And I won’t be discussing them here.
Out of the remaining controls, you can break them down into two groups:
A: Keyboard controls: Velocity, Keyboard Scale, and Aftertouch. These are the Performance parameters that rely on how you play the keys on your MIDI keyboard. Velocity and Keyboard Scale are vital in my opinion. Aftertouch is not as vital, since not every MIDI Keyboard controller can utilize Aftertouch. But many CAN utilize it, and as a designer trying to make your patches stand out, this is one area that can separate your patches from others; making them shine. Note: If your keyboard is not equipped with Aftertouch, you can still test your patches by creating an aftertouch automation lane in the Main Sequencer in Reason, and drawing in your automation. This is true of any of the above Performance parameters. However, this kind of testing can be rather tedious. Better to try and purchase a controller that comes equipped with Aftertouch capability if you can spare the money.
B: Wheel controls: Pitch Bend and Mod Wheel. These are the Performance parameters that rely on how you play the two wheels on your MIDI controller. It’s rare you will find a MIDI keyboard that doesn’t have these two control wheels as commonplace controls, so it’s always a good idea to design your patch with these two controls assigned to modulate something in your patch. Furthermore, even if you don’t have a keyboard controller that has these wheels, you can still test the controls by turning the Thor wheels up or down on-screen with your mouse.
Let’s start with the Keyboard controls:
Velocity
Think of a sound that has no velocity sensitivity. You actually don’t need to travel too far to think about it. Load up a Redrum, set the Velocity switch to Medium, and enter a Kick drum that beats on every fourth step (typical four to the floor programming). Now play the pattern back. Sure, the drum sounds great, and it has a beat. But it has no change in level. It’s as lifeless as a bag of hammers.
Now put a high velocity on the second and low velocity on the third drum beats. Listen to the difference. Obviously this is still pretty lifeless, but by introducing Velocity, you’ve introduced a small degree of movement to the pattern. It’s more dynamic “with” velocity than “without” velocity. It doesn’t sound stilted or robotic. It starts to take a better shape. You’ve just added a performance characteristic by changing how the sound is played, albeit, you’re programming the velocity instead of playing it on a keyboard.
Now instead of putting the Kick drum through Redrum, what if you built your own Kick drum in Thor, and played it from your MIDI controller, Your keyboard is capable of a range which goes from 0-127, so you can have 127 different degrees of Velocity (or put another way, you have 127 different velocity levels). When you strike the keyboard to play your Kick drum, the “Velocity” at which you strike the keys can be used to determine the amplitude of your Kick Drum sound.
Velocity in Thor’s MBRS
Now here’s where things get interesting, and Modular / Semi-modular, in Thor terms. Thor offers both hard-wired (fixed) routings, and programmable (adjustable) routings. What you see on the front panel of Thor is what I would term as “Fixed,” while the Modulation Bus Routing Section (the green area below the front panel) offers you the ability to create your own custom routings; not just audio routings, but also performance routings. Using the MBRS, you can adjust what these performance characteristics will affect in an incredibly open-ended way. In other words, you can use any of these performance parameters to change any other Thor parameters you wish (within a few limitations).
Now let’s look at a fundamental use of Velocity in Thor.
Velocity = How soft or hard you play your keyboard. How the note is performed.
Amplitude = The amplitude or volume of a note. How soft or loud the note sounds.
By combining these two parameters together, you end up with the following:
Velocity Amplitude = A change in amplitude when you play your keyboard soft versus hard. Put another way, the “Velocity” is what is “performing the change” while the “amp” is “being changed.” Velocity is the “How” and Amplitude is the “What.” Velocity is the “Verb” and Amplitude is the “Subject.” Or put in Thor terms, Velocity is the “Source” and Amplitude Gain is the “Destination.”
I’m stressing this concept for a very good reason, because it’s the basis of all modulation concepts inside Thor (and any other really good modular synth for that matter). The main reason why people go kookoo for cocoa puffs over the MBRS in Thor is because you can change the “Verbs” and “Subjects” around in any wacky way you like. So any of these “Performance Parameters” can be used to change any other “Thor Parameters.” And not just that, but you can have as many “Verbs” affecting as many “Subjects” as you like. Or have one “Verb” affecting many “Subjects” or have many “Verbs” affecting one “Subject.” The only limitation to how many routings you can create is the number of MBRS rows provided in Thor.
At this point, you might want to know the complete list of Verbs and Subjects right? No problem. In the MBRS, click on the first “Source” field. Those are your “Verbs.” Now click on the first “Destination” field. Those are your “Subjects.”
Typically, you want your Velocity to affect the amplitude in such a way that the softer you press the key, the lower the amplitude is, while the harder you press the key, the higher the amplitude is. But what if we want to reverse this relationship. What if we want softer key strikes to result in louder sounds, and harder key strikes to result in softer sounds. We can very easily accomplish this in Thor using the “Amount” field in the MBRS. Since you can set up the amount to go from -100 to +100, you can make the Velocity affect the Amplitude by a “positive amount” or a “negative amount.” Here’s how both Velocities would look inside the Thor MBRS:
First, turn down the Velocity and Amp Gain knobs on Thor’s front panel, so they are fully left. Then Add the following routing in the first line of Thor’s MBRS:
Positive Velocity Amplitude = MIDI Velocity (Source) modulates by +100 (Amount) to affect Amp Gain (Destination)
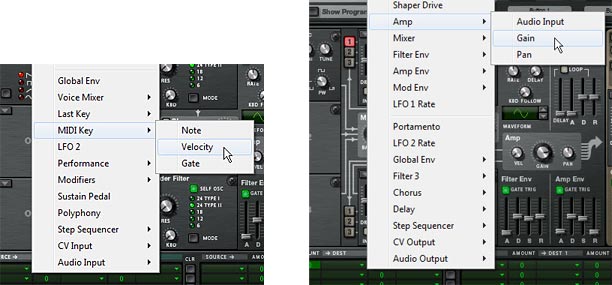
Next, turn the Amp Gain knob up, fully right. Then change the amount in the MBRS line you previously created, as follows:
Negative Velocity Amplitude = MIDI Velocity (Source) modulates by –100 (Amount) to affect Amp Gain (Destination)
I’m sure by now you’ve noticed that the amount does not necessarily need to be exactly 100 in either direction. You can, of course, enter any amount between -100 and +100 as well. What happens if you lower the Positive Velocity Amplitude? You end up with Velocity affecting the Amp Gain to a lesser degree. In this respect, Amount is actually a way to “Scale” back on the Amp Gain when Velocity is used.
Now what if you want Velocity to affect Amp Gain some of the time, but not all the time? For example, I want to create a patch where the performer can use Velocity some of the time, but not all the time. You can create an on/off switch for this very easily using the “Scale” parameter in the MBRS. Just add the following:
Positive Velocity Amplitude = MIDI Velocity (Source) modulates by +100 (Amount) to affect Amp Gain (Destination)
and this Positive Velocity Amplitude modulation is scaled by +100 (amount) from the Button 1 (Scale) control.
Put another way:
PVA = [MIDI Vel (Source) modulates +100 (Amount) to affect Amp Gain (Destination)] scaled by +100 (Amount) from the Button 1 (Scale) control.
In the grand scheme of things, Sources and Scales are the same. Anything that can be used as a source can also be used to Scale a modulation. The only limitation is that you can’t have a “per voice” parameter scale a “global” modulation. For example, you can’t have the Modulation Envelope Scale the LFO2 Source changing the Global Envelope Attack. Anything that is “per voice” is considered anything in the “black area” on Thor’s front panel, while anything “global” is located in the “brown area” on Thor’s front panel. There’s also a line that separates the “Per Voice” parameters from the “global” parameters in the menu that opens when you click on “Source,” “Destination,” and “Scale” fields in Thor. “Per voice” parameters are located above the separator, while “global” parameters are located below the separator. If you choose a global modulation to scale a per voice modulation, a strikethrough line will appear over the text in the MBRS row.
Now, when Button 1 is turned on (lit up), the Positive Velocity Amplitude is active for the performer. When the Button 1 is turned off, the Positive Velocity Amplitude is inactive. By now, I’m sure you have figured out that you can reverse this “Button 1 on/off behavior” by reversing the Scale amount to -100. This would mean the PVA is active when Button 1 is off, and inactive when Button 1 is on.
You might also want to provide “degrees” or “gradations” of changes in the way the PVA is modulated. If this is the case, change “Button 1” to “Rotary 1” and then use the Rotary to provide 127 shades to how “active” the PVA modulation is. The more the Rotary is turned right, the stronger the effect of the PVA becomes. The lower you turn the Rotary, the less impact PVA will have on the performance. How you set this up is totally up to you, the sound designer.
Important Point: Your setting in the MBRS works “in conjunction with” the fixed parameters in the Thor synth. This means that the amount of your Amp Gain knob is going to determine how the routing you’ve set up for it in the MBRS operates. If the Amp Gain knob is set to zero (0) on the front panel, and you’ve set up a Positive Velocity Amplitude as shown above, the knob has no effect, and the MBRS settings are doing all the work to control the Amp Gain. If, on the other hand, you turn up the Amp Gain knob, the sum of the knob’s gain position is added “on top of” the amplitude increase you’ve set up in the MBRS. It is cumulative. This is why you need to adjust the “Amp Gain” knob in the above examples, even when you enter the MBRS settings. The fixed “Amp Gain” knob setting works in conjunction with the adjustable MBRS “Amp Gain” routing assignment.
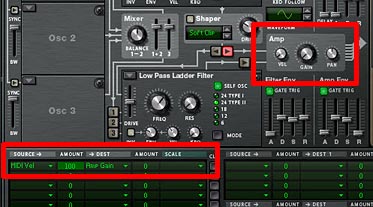
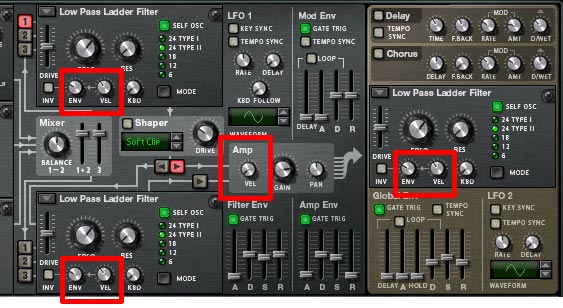
Now that you know a little bit about how the MBRS works, I’m going to completely throw all of the above away, because you don’t have to set any of this up in the MBRS at all. Notice the little “Vel” knob next to the Amp Gain knob? This is an example of one of those “fixed” elements of Thor. And since a “Positive Velocity Amplitude” is such a basic principle in most sounds or patches, The Propellerheads gave it a “fixed” position in Thor, next to the Amp Gain knob. By default, it is turned down or off, but you can raise it (turn it right) to achieve the same effect as if you created a line for it in the MBRS.
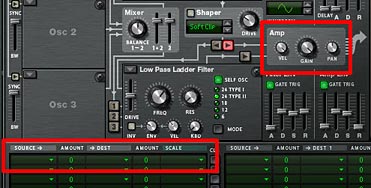
Also keep in mind that since both the “fixed” parameter (the Velocity knob) and routing (the MBRS) work in tandem, if you have the Velocity knob set to 127 (fully right), and have a line in the MBRS set up for Positive Velocity Amplitude as outlined above, you are essentially doubling the degree to which your Velocity is affecting the Amp Gain (+200). Same goes if your Velocity knob is set to zero (0), and you create two lines in the MBRS that both have Velocity affecting the Amp Gain by +100. If you duplicate lines in the MBRS, you ARE going beyond a value of 100, and this is true if you go in a positive or a negative direction. Lastly, if you have the Velocity knob set to +127 and the MBRS is set to -100, then they cancel each other out, and Velocity DOES NOT affect Amp Gain at all.
It should be noted that there are actually three different Velocities that can be used as a Source or a Scale in Thor. Here’s how they differ:
- Voice Key > Velocity: This setting sources velocity on a “per note” basis. In this respect, it’s the most granular of the Velocity settings in Thor. Each note polyphonically will receive a different Velocity setting based on how soft or hard you play each key. Of course, if you use this setting, you probably also want to be using a polyphonic patch that has more than one voice. Otherwise, it will react the same way as the MIDI Key > Velocity setting.
- Last Key > Velocity: This allows you to use the Step Sequencer or incoming MIDI key signal to source Velocity. This is also global, so it is also “monophonic” by nature. The idea is that the last key played (from either the Step Sequencer or the MIDI Key) determines how the velocity is sourced.
- MIDI Key > Velocity: This sources the Velocity globally via the incoming MIDI key signal. It is different from the Voice Key Velocity setting because it is monophonic, and it is different from the Last Key Velocity because it does not react to incoming signals from the Step Sequencer; only incoming MIDI signals (ie: a keyboard controller).
So before you start assigning Velocity settings, think about how your patch will be played by the musician. If your patch is programmed via Thor’s step sequencer, then you will need to use “Last Key Velocity.” If you want Velocity to be accessed via the MIDI Keyboard, all three settings will work, but you have the option to set up velocity on a per-note basis using “Voice Key Velocity” or on a global basis using “Last Key Velocity” or “MIDI Key Velocity.”
Beyond Typical Velocity Settings
Up to this point, all we’ve accomplished is how to create one simple performance parameter in the MBRS which is used the majority of the time in most patches in one way or another: Positive Velocity Amplitude. And yet I can’t tell you how many times I’ve seen patches that don’t even go this far. No, I’m not going to name names. But my point is that if you do anything at all in your patches, at the very least turn up the “Vel” knob next to the Amp Gain at least a little bit. Or keep the Filter envelope and velocity settings at their default in order to create a little movement in your patches that are tied to Velocity. Sure, there are cases where Velocity does not effect Amp Gain, and even cases were Velocity is not used at all. There will always be exceptions. But if you do anything at all, use the velocity knobs that Thor is giving you in the main panel. This will bring your patch designs from Noob to “Beginner” or “Good” as far as Velocity goes. Don’t forget to think about Velocity! It can be of the most expressive of qualities of your patch, and it adds yet another dimension to your patch that shouldn’t be overlooked.
Now if you want to make your patches go from “Good” to “Great” might I suggest getting your feet wet in the MBRS and experimenting with the following ideas:
- Change the destination around. What if we have Velocity affect the Filter Cutoff, or the FM Frequency, or the Mix between Oscillator 1 and 2? The point is, try it out for yourself and see what creativity you can come up with. See if it enhances your sound or detracts from it. Remember that you are not limited to tying volume to velocity.
- Test out the “Amount” setting when you are creating an MBRS routing. Sometimes a negative value will produce a better result than a positive one. If a velocity setting produces a very harsh jump in modulation from soft to hard key presses (or vice versa), you might need to scale back the amount to a more comfortable setting.
- Try having the Velocity affect more than just a single parameter. Have Velocity affecting both the Filter Cutoff and the Filter Resonance at the same time. Or perhaps, if two filters are used, have the Velocity setting open up one filter (positive amount) and close the other filter (negative amount). This creates something akin to a Filter Crossover.
- Try assigning different destinations to the “Voice Key > Velocity” and “MIDI Key > Velocity” sources. I haven’t tried doing this yet, but I would imagine it can create some very interesting Velocity-sensitive sounds, since one is “per voice” and the other is “global.”
- Something I’ve been experimenting with lately is having the Velocity affect the Rate of an LFO, and then having the LFO affecting another parameter in Thor. This has the effect of creating a slow modulation on one end of the velocity spectrum and a faster modulation on the other end of the spectrum. Using positive amounts, when you press the key softly, the LFO is slow, and when you press the key hard, the LFO speeds up. Using negative amounts will reverse the process.
- Velocity is independent of the Amp Envelope. Whereas the Velocity is a measurement of how soft or hard you press the key (a function of Weight+Speed on the keys), the Amp Envelope is a measurement of loudness over time. That being said, Velocity occurs before the Attack portion of the Amp Envelope, and therefore, it can be used as a source to control the Attack, Decay, or Release portion of the Amp Envelope (or any other envelope) in Thor. Try using Velocity to change these aspects of your patch. It can produce interesting results as well.
So go make some killer patches and practice changing the destinations and the amounts, so that you hone in on just the performance quality you want out of your patch. And ensure that you keep testing using your Keyboard Controller. Play your patches at low velocities and high velocities as you create modulation routings so that you can hear the effect Velocity has on your sound.
Note: Most Keyboard Controllers have built-in velocity sensitivity and even come with specialized settings that allow you to select from different Velocity scales, depending on your playing style. But before you begin, ensure your keyboard IS velocity sensitive. In the rare case that it is not, you can press F4 (in Reason 6) to access the on-screen keyboard. Using the keyboard, you can switch between velocities. It’s time-consuming to test this way, but I would be remiss if I didn’t mention it as an option.
Fixed Velocities in Thor
In Thor, there are essentially two types of “Fixed” Velocities. I’ve already discussed the first fixed velocity as the “Positive Velocity Amplitude” which is otherwise known as the “Vel” knob in the Amp section of Thor. So I won’t go into detail about that. But there’s also another kind of Velocity which is located as a knob on all Filters in Thor. This is what I like to call the “Positive Filter Envelope Velocity” knob. This sets how much the velocity you play on your keyboard affects the envelope of the Filter. Think of it as having Velocity affecting the Envelope. If the envelope is set to zero, the Velocity knob has no effect on the envelope. Nothing happens. If your envelope is turned higher, and Velocity is turned up to 100, for example, the Velocity you play will have a pretty significant effect on whether or not you hear the envelope affecting the filter. Sounds complicated, but test it out by creating a very noticeable Filter envelope, and then turning up both the envelope and velocity knobs, then play your key controller softly and very hard. Notice the difference?
So that does it for the second part of the series. I’ll continue with the other Performance parameters in part 3. As always, if you have any questions or want to contribute your thoughts and ideas, I encourage you to do so. I’m always interested in hearing new ways you’ve found to work with Reason. All my best until next time.
