At long last, the much awaited Crapre is here from PEFF! Outstandingly crappy sound quality can only make your tracks betterer than ever. And so I thought I would provide some much needed information and documentation about this heavy duty device. After taking all last month to document Spacre (lengthy article posting to follow), I thought I would give this device a much-needed test-drive and overview. It was a daunting task.
We’re a fun bunch, us Reason developers & users. And PEFF just keeps putting the fun back in Reason. At long last, the much awaited Crapre is here! Outstandingly crappy sound quality can only make your tracks betterer than ever. And so I thought I would provide some much needed information and documentation about this heavy duty device. After taking all last month to document Spacre (lengthy article posting to follow), I thought I would give this device a much-needed test-drive and overview. It was a daunting task.
The Craptastic new RE from PEFF. Get it while it’s out. Offers expire on May 1, 2014.
How could I pass up the opportunity to fully document this beautiful device? Download it here: Crapre Guide. And if you want to get your hands on the insanity, it’s available in the Propellerhead shop here: Crapre Rack Extension.
Stack ’em in your rack to make supercrapasonic textures and intriguing effects for all your sounds. It’s the missing preset on the Audiomatic Retro Transformer that you always wanted, and never knew you needed.
It’s a game changre for sure. You should get it for the Combinator skin alone! I might even post some of my crappy patches for it at some point in the future. For now, get it for the love of all the kittens & unicorns out there.
. . . and now back to your regularly scheduled program.
Complete coverage of Reason 7.0 Core devices & 8 Rack Extensions, with 101 in-depth Tutorials focusing on Basics, Utility constructions, Sound Design, Advanced usage and Rack Extension integration. This book is built from the ground up to explore all aspects of the Reason Rack.
With forewords from Kurt Kurasaki (Peff) and Ed Bauman (EditED4TV).
Robert Anselmi’s Reason101 Visual Guide to the Reason Rack
Complete coverage of all Reason 7.0 core devices & 8 Rack Extensions, with 101 in-depth tutorials focusing on basics, utility constructions, sound design, advanced usage and Rack Extensions. This book is built from the ground up to explore all aspects of the Reason Rack.
With forewords from Kurt Kurasaki (Peff) and Ed Bauman (EditED4TV).
The first half covers all core rack devices & 8 Rack Extensions front and back. All sliders, rotaries, buttons, and audio & CV connections are explored visually. The second half of the book provides 101 different ways you can integrate those devices together to create practical applications.
This manual provides all you need to know to start out using reason and take your skills from Basic to advanced, and beyond. Save time learning the Rack in the most intuitive way possible, and keep your copy handy as a desk reference while you work.
Features & Benefits:
Save time and learn Reason visually, in the most intuitive way possible.
101 detailed step-by-step tutorials cover basic to advanced Reason lessons.
Device section cross-referenced with Tutorial section for easy navigation
Learn the secrets of Reason sound design, FX & audio routing, and utility construction.
Merges the theory with the practical, offering many creative ideas along the way.
Useful as a handy desk reference when looking for answers.
Premium options provide an additional 250-patch ReFill and coil binding.
Full Color options with higher quality paper.
All options provide both an electronic PDF & printed book.
Picks up where the Operation Manual leaves off.
Ordering Options
Black & White
Color
Standard
Premium
Standard
Premium
Black & White Book
(Perfect Binding).
B&W PDF Copy*
Black & White Book
(Coil Binding).
B&W PDF Copy*
Companion ReFill*
Color Book
(Perfect Binding).
Color PDF Copy*
Color Book
(Coil Binding).
Color PDF Copy*
Companion ReFill*
$49.99 USD.
$69.99 USD.
$109.99 USD.
$129.99 USD.
*Note: To receive the PDF Copy and Companion ReFill, you must forward the receipt that was sent to you from www.lulu.com after your order is placed. Forward the receipt to webmaster@reason101.net. Once I receive your receipt, I will send you the PDF and ReFill download links (depending on the order option you chose). The PDF and ReFill download links will be sent to you in two separate emails, and will be sent to the same email you used to forward the receipt. This is a manual process, so please allow up to 24 hours for download file delivery.
When you click the “buy now” button, you are directed to www.lulu.com to order the hard copy book. You will then receive two emails from Lulu: a “Thank You” email and a “Receipt” email. To receive the electronic PDF copy and Companion ReFill, forward a copy of your Lulu receipt to webmaster@reason101.net. Once I receive your receipt, I will send you the electronic PDF, and ReFill file (depending on the order option you chose). The PDF and ReFill are sent to you in two separate emails, and are sent to the same email you used to forward me the receipt. This is a manual process, so please allow up to 24 hours for download file delivery.
This process must be performed because Lulu does not provide customer information to publishers. Without this information, there is no way for me to track your order, and no way for me to know where to forward the electronic files. The receipt is only used to confirm you have placed an order, and to fulfill the electronic portion of your order. This information will not be shared with any other third parties.
Are the tutorials provided on your Reason101 website found in the book?
While many of the tutorials found on my website are found in the book, most of them have been updated and expanded. I took a year off to organize and update them. In addition, there are numerous tutorials in the book that are not found on the website. Finally, the first half of the book where all the devices are outlined are exclusive to the book, and not found on the website.
What are the product specifications?
Book: 360-pages. Publisher: Reason101. Author: Robert Anselmi. Language: English. Product Dimensions: U.S. Letter 8.50 x 11” or 21.59 x 27.94 cm. Shipping Distribution: www.lulu.com.
PDF (black & white or color): Encrypted PDF Optimized for fast web view (smallest file size). PDF stamped with customer Name / Email / Transaction ID.
The “Reason101 Visual Guide to the Reason Rack” is a book loaded with information. Part technical manual, part creative resource, and part practical “how-to” guide, this takes you on a tour through the past 10 years of my Reason experience, and provides it to you in one comprehensive 360-page volume. Use it as a reference to save you time, and shorten your Reason learning curve. Time to show you what’s inside the book.
The Reason101 Visual Guide to the Reason Rack is a book loaded with information. Part technical manual, part creative resource, and part practical “how-to” guide, this takes you on a tour through the past 10 years of my Reason experience, and provides it to you in one comprehensive 360-page volume. Use it as a reference to save you time, and shorten your Reason learning curve.
I’ve shown you the video and a few still shots from the hard copy. See my previous post for that. So what are you going to get when you purchase?
The book is divided into two main sections:
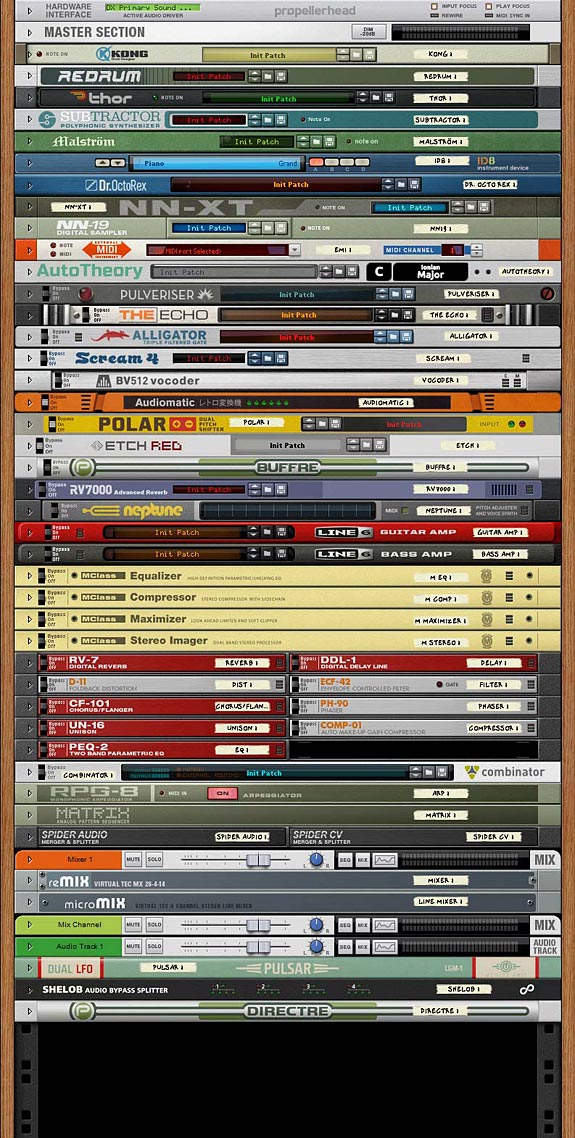
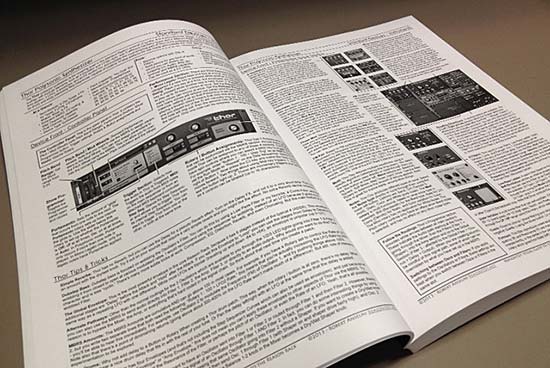
The Core Reason Devices & 8 Rack Extensions outlined fully front to back (see the image below for all the devices covered).
101 in-depth Tutorials that cover Basics, Utility Construction, Sound Design, FX Design, Advanced Setups, and Rack Extension Integration. (see the PDF Table of Contents for a listing of all the Tutorials).
Both of these sections are cross-referenced, so that it’s easy to navigate between the two sections. For example, when you are reading about the SubTractor device, all the tutorials related to the SubTractor are outlined (by number) in the SubTractor heading section. When you are in a specific Tutorial, all the devices used in that Tutorial are outlined in the Tutorial’s heading section.
Note: There’s also a Companion ReFill that will be provided with “premium” options, containing 250 patches. These patches serve to complement the Tutorials. There’s also several additional routing and sound ideas in there for you to explore.
I wanted to give you a few samples from the book. So I’m providing them here as free PDF files:
That should give you a pretty good idea of what you get with the book and the book’s layout. Now for a visual listing of all the devices covered in the first half of the book:
The Book covers all 43 Core Reason Devices, as well as 8 additional Rack Extensions; all of which are shown here.
I think you’ll agree that this is unlike any other Reason book on the market. This is the only Reason book you’ll find that offers a Coil-Bound, full Color purchase option. And the only book that provides a full copy PDF with all purchase options.
You can pick up your copy of the Reason101 Visual Guide to the Reason Rack exclusively athttp://www.reason101.net/shop
A picture is worth a thousand words. 864 pictures and 312,000 words on 360 pages becomes an invaluable story. Especially when what it conveys is everything you’ve ever wanted to know about the Reason Rack in a logical, easy-to-follow way. Take a sneak peek inside the “Reason101 Visual Guide to the Reason Rack” – There’s a lot to cover, with 51 devices presented in full detail, along with many creative and practical ideas, tips, tricks, sounds, and utilities. Stay tuned for more updates to come.
A picture is worth a thousand words. 864 pictures and 312,000 words on 360 pages becomes an invaluable story. Especially when that story conveys the inner workings of the software tool used to get the music in your head out to the world. And especially when that story is packaged in a logical, easy-to-follow book. That’s what you’ll find in the Reason101 Visual Guide to the Reason Rack
Want to know a bit more? Here’s a video that should answer most of your questions about what it is and why you should invest in it:
Here’s a little preview of some of the test copies I got back from the printer. 51 devices are covered top to bottom, and there are full visual outlines of how every parameter on each one of them functions. And all this is cross-referenced with the 101 Tutorials on everything from basic to advanced sound design, effects design, and utility construction.
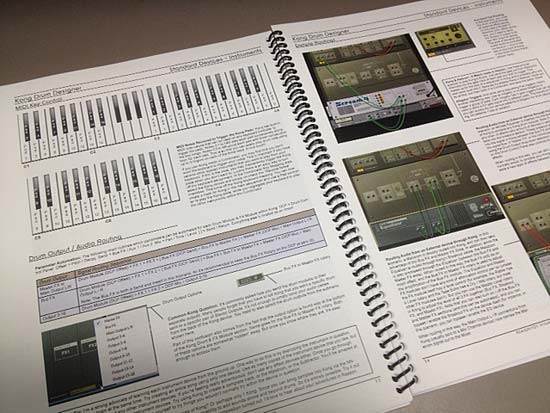
A few pages from the Kong device section (Color test copy)
The idea was to create a dual purpose book whereby the Device section can be used as a quick reference as well as completely cover all front and back panel parameters. The Tutorial section can open up new ideas on how all the devices can be integrated together to create different sounds, effects, and utilities. A complete course in a book.
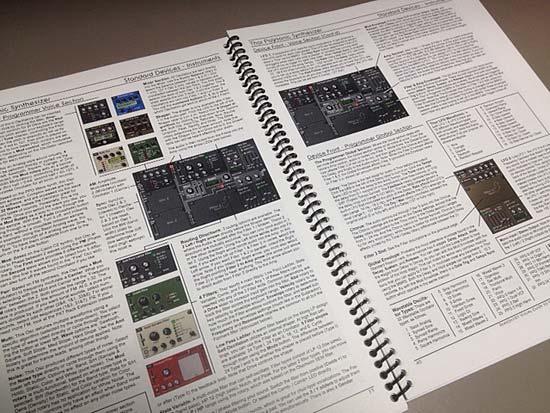
A few pages from the Thor device section (Color test copy)
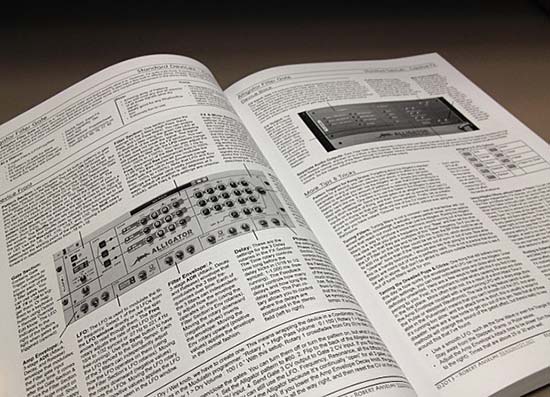
As I progressed with the devices, I found that you could explain most all of them in a very concise way over 3-4 pages each. Of course, some devices took considerable more space, such as Thor and Kong, which are each about 9 pages. But each page had to be laid out according to the device’s design, not a “one-size-fits-all” book layout. Each page was hand-crafted, and required completely different layouts, balanced against the consistency of the headings, fonts., page size, and other elements to give the book its flow.
I’ve been a technical writer for 12 years, and that often involves working on your own layouts and graphic design. I was very mindful of this when crafting the book to give you the best learning experience I could. Part technical manual, part creative index of ideas, and part practical “how-to,” I hope this book encourages you to push your limits with the Reason software.
A few pages from the “Thor” section (Black & White test copy)
One of the most important aspects of working on this project was ensuring that all the visuals presented the devices in full view as you would see them on-screen. I wanted to make everything easy to follow and simple to navigate. I didn’t want to intrude too much on the imagery. Therefore, all the call-out lines are simple and don’t cover any important device areas.
A few pages from the “Alligator” section (Black & White test copy)
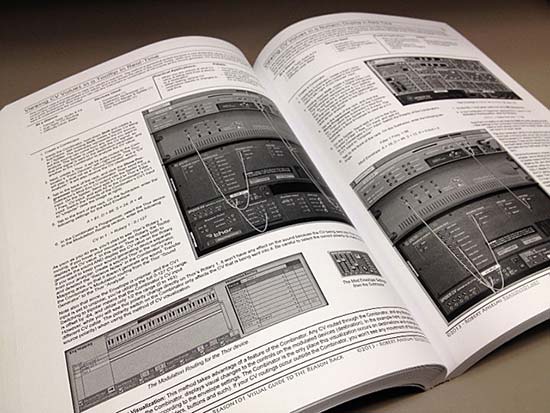
As you can see, all the tutorials have full visuals as well, so you can follow along and recreate exactly what I’m explaining. And with 101 Tutorials, there’s plenty in there to work on. Many of these tutorials also have alternative ways to accomplish something, or additional ideas and tips. This isn’t a rehash of what you’ll find on my website. There are many new tutorials, as well as expansions and re-workings of many of the most popular articles found on my site.
A few pages from the “Tutorials” section (Black & White test copy)
Well, that’s a quick look at the actual copy. Let me know what you think.
You can pick up your copy of the Reason101 Visual Guide to the Reason Rack exclusively athttp://www.reason101.net/shop
10 Years in the making. What I will present to you on December 1st, 2013 is the book I always envisioned for the program, and I want to invite you to stand over my shoulder and see why I find this software such a compelling and creative tool for anyone with a love of music and audio. I wrote the “Reason101 Visual Guide to the Reason Rack” so that I could convey all the amazing things this program can do in a logical, easy-to-follow way. I wanted to shorten your learning curve, and at the same time share my 10-year Reason journey with you. I hope you enjoy learning about Reason as much as I do.
Robert Anselmi’s Reason101 Visual Guide to the Reason Rack
When I first started working with Reason, I was amazed at the breadth and depth of the program. It had such a wide array of devices and options, it made my head spin. And the visual design of the software was truly stunning. I was excited and wanted to learn more. I had longed for a book that would walk me through all these Rack devices, and more importantly, would explain how to connect all these devices together to create what I wanted. It had to be highly visual as well, doing justice to the fine artistic efforts put into the Reason software design. I searched everywhere for a concise and comprehensive book that would teach me all the possibilities. Yet, nothing like that existed at the time. And it was at that point I decided to eventually write that book. I’m more than happy to provide it to you now, a decade later.
What I will present to you on December 1st, 2013 is the book I always envisioned for the program, and I want to invite you to stand over my shoulder and see why I find this software such a compelling and creative tool for anyone with a love of music and audio. I guarantee two things will happen when you invest in it: 1. It will save you time when seeking out answers to how the software operates; making you more efficient, and 2. It will teach you something new; no matter what level of expertise. These are bold claims. And I promise to deliver.
Reason is a gigantic Lego set, and you’re free to construct anything you can think up. Using the devices, audio, CV, and all the related sliders, rotaries, and buttons as your building blocks, you’re free to construct an endless amount of sounds, effects, and utilities.
But without an understanding of how these blocks fit together, it’s difficult to build anything. And that’s where this book comes in. The first half will provide you with the theory. Every core device and 8 Rack Extensions are comprehensively outlined in a clear, concise, and visual way. You’ll learn how each device operates, front to back, A-Z. It can be read straight through, or used as a desk reference when you are seeking out how a particular control or connection works.
The second half of the book will provide you with the practical side of Reason, and can be thought of as a complete course, from basic to advanced, over the span of 101 in-depth lessons. You can read them straight through, or focus on specific tutorials that interest you. To help you navigate through these two sections, I’ve cross-referenced them. This way, you can see the tutorials that relate to a specific device in each device section, and which devices are used in a specific tutorial in each tutorial section.
I wrote the Reason101 Visual Guide to the Reason Rack so that I could convey all the amazing things this program can do in a logical, easy-to-follow way. I wanted to shorten your learning curve, and at the same time share my 10-year Reason journey with you. I hope you enjoy learning about Reason as much as I do.
You can pick up your copy of the Reason101 Visual Guide to the Reason Rack exclusively at http://www.reason101.net/shop
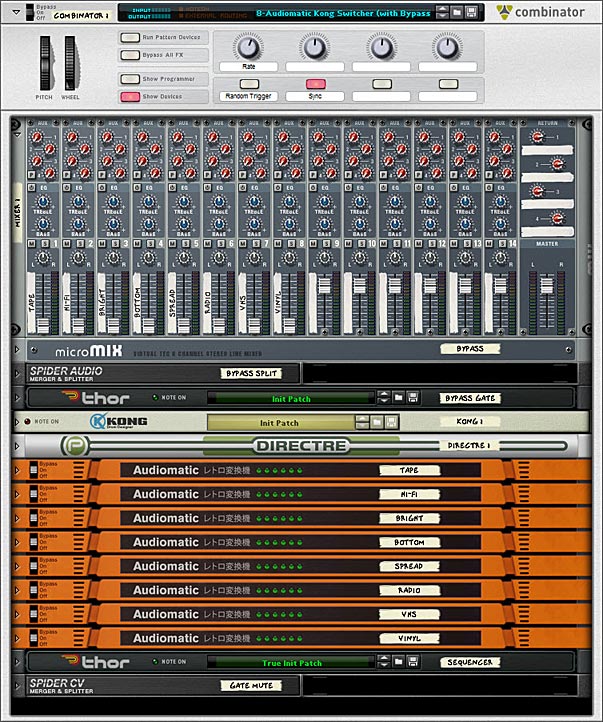
With the advent of Reason 7, you get the Audiomatic Retro Transformer Rack Extension for free. This is like Instagram for photos, except it creates musical snapshots that can be applied to the whole mix or individual tracks. So I thought, why not create an FX combinator where you can select different Audiomatic presets using the Kong pads. The added benefit is that you can switch between them in real-time at any point you like using automation. I even added a bypass so that when an audiomatic preset is not selected, the original audio is passed through unaffected. Or, there’s a method to play it parallel with the original loop.
In this tutorial I’m going to go over how to create an 8-way Audiomatic Retro Transformer Switcher using the Pads in a Kong device. You can easily add all 16 on all Kong Pads and then switch between any of them using your Pad Controller or Key Controller. Or you can use a built-in randomizer. This is just one idea I came up with out of a discussion with Kurt Kurasaki on Facebook. So I thought I would share it with everyone.
With the advent of Reason 7, you get the Audiomatic Retro Transformer Rack Extension for free. This is like Instagram for photos, except it creates musical snapshots that can be applied to the whole mix or individual tracks. So I thought, why not create an FX combinator where you can select different Audiomatic presets using the Kong pads. The added benefit is that you can switch between them in real-time at any point you like using automation. I even added a bypass so that when an audiomatic preset is not selected, the original audio is passed through unaffected. Or, there’s a method to play it parallel with the original loop.
You can download the project files here: 8-way-audiomatic-kong-switcher. There’s 2 Combinator files included. One file with an audio bypass, and one without. It requires Reason 7.0, Audiomatic Retro Transformer and Directre.
The Audiomatic Retro Transformer Instantaneous Switcher
Create a Dr. Octo Rex Loop Player. Click the Browse Patch folder icon and open the AC Guitar | Open Strums Key of A 90 bpm.drex patch. This provides a sound source for our Combinator FX setup.
Hold down Shift and create a Combinator. Click the Show Programmer button.
Inside the Combinator, create a Mixer 14:2. Reduce the Level Faders on Channels 1-8 all the way to 0. We’re going to control the volume of these Channels using Kong.
Hold down Shift and create a Kong Drum Designer. Relabel pads 1-8 in the following way:
Pad 1 = Spread
Pad 2 = Radio
Pad 3 = VHS
Pad 4 = Vinyl
Pad 5 = Tape
Pad 6 = Hi-Fi
Pad 7 = Bright
Pad 8 = Bottom
Hold down Shift and create a Directre Audio Router. Turn on all 8 Channels using the Enable buttons. We’ll use this to split the incoming audio out to 8 different Channels on Directre (note that you can also use another Mixer 14:2 for this task, instead of Directre).
Hold down Shift and create 8 Audiomatic Retro Transformer devices. Label them the same way you labeled the first 8 Pads on Kong above. Then switch each device’s Preset to the corresponding label. In this case, we will have 8 Audiomatic devices, each with a different preset. The basic premise is to send audio splits from each Directre output into the Audiomatic, and then send that back out to the Main Mixer and then out of the Combinator.
Hold down Shift and create a Thor device. Click the Show Programmer buttton. Name the Thor device “Sequencer.” On the Global panel, set the Pitch Bend range, Polyphony, and Release Polyphony to 0. Relabel Button 1 “Trig Step Seq” and disable both the MIDI & Step Seq buttons. In the Programmer panel, turn off Oscillator 1, disable routing Oscillator 1 from the Mixer to Filter 1 by deselecting the “1” button, bypass Filter 1, and turn off the Global Envelope. Rename Thor 1 “Bass Filter” and Thor 2 “Snare Filter” (see image at right). Enter the following into the first line of the Modulation Bus Routing System (MBRS):
Button 1 : 100 > S. Trig [This allows you to enable the Run button on Thor’s Step Sequencer from Thor’s Button 1]
Still inside the “Sequencer” Thor, set the Run Mode to Repeat, and the Direction to Random. Set the Octave Switch to 4. Create an 8-step sequence where each step is set to subsequent Note values from C1 to G1. Since these notes trigger Kong’s first 8 pads via the internal MIDI Pad assignments, we’re setting up Thor to trigger these Pads randomly.
Still inside the “Sequencer” Thor device, switch the Edit rotary to “Gate Length” and set all 8 steps to 100%. This ensures that switching among Audiomatic presets is instantaneous, as it takes up the full length of the gate. Going from one to the other is a smooth transition.
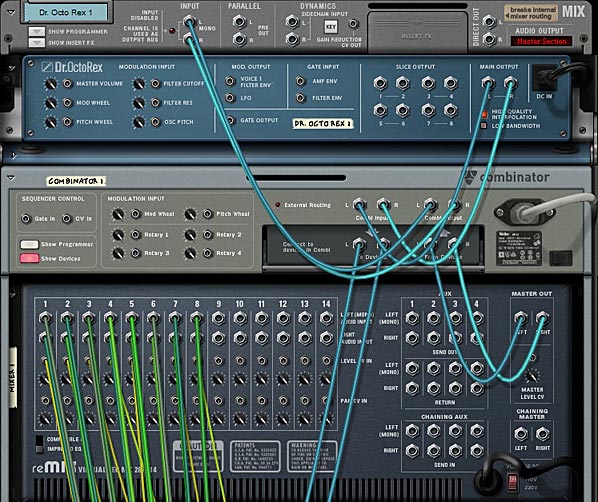
The front panel showing all the devices in the Audiomatic Retro Transformer Combinator patch.
Tab to the back of the rack. Move the left / right Main Output cables from the Dr. Octo Rex to the left / right “Combi Output.” Create a new audio cable pair from the left / right Main output of Dr. Octo Rex to the left / right “Combi Input.” Create another audio cable pair from the Combinator’s left / right “To Devices” to the left / right “Main In” on Directre.
The back of the rack showing the routings between the Dr. Octo Rex and the Combinator, as well as the routings for the Main Mixer.
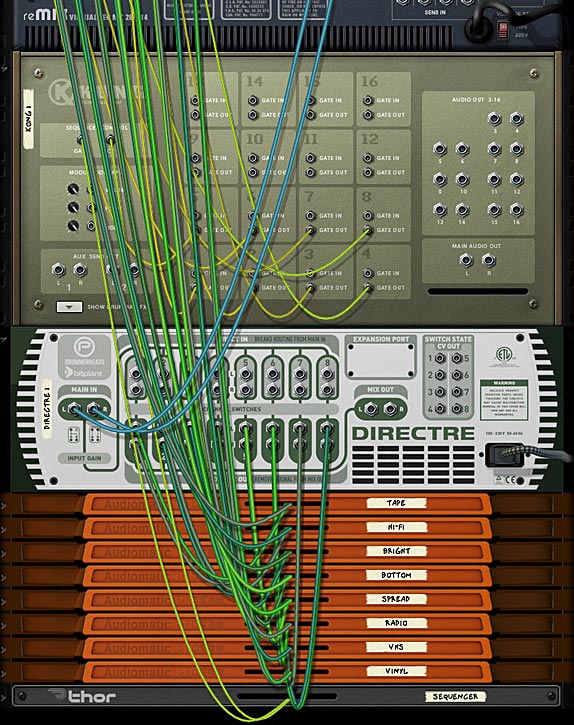
Send Channels 1-8 left / right Direct Out from Directre into the 8 Audiomatic left / right inputs. Then send the left / right outputs of all 8 Audiomatic devices into the first 8 Channels on the Mixer 14:2.
On Kong, send the first 8 Pad Gate Out CV cables to their respective Level CV In on the Mixer 14:2. However, set it up so that Pads 1-4 on Kong are going into Channels 5-8 on the Mixer, and Pads 5-8 on Kong are going into Channels 1-4 on the Mixer.
Finally, on the “Sequencer” Thor device, send the Note & Gate/Velocity from Thor’s Step Sequencer into the Kong’s CV & Gate inputs. This sets up Kong to be sequenced from Thor.
The back of the rack showing the routings between the Mixer, Kong, Directre and the Audiomatic devices.
Tab to the front of the rack. On the Combinator, label Rotary 1 “Rate,” Button 1 “Rnd Sequence,” and Button 2 “Sync.” In the Programmer, select the “Sequencer” Thor device in the Key Mapping area, and enter the following in the Modulation Routing section:
Rotary 1 > Synced Rate : 0 / 20 [Ensures you have access to the full rate of Thor’s sequencer via Rotary 1 on the Combinator]
Rotary 1 > Free Rate : 1 / 2,500 [Ensures you have access to the full rate of Thor’s sequencer via Rotary 1 on the Combinator]
Button 1 > Button 1 : 0 / 1 [Since Thor’s Button 1 sets the Sequencer in motion, this Button turns the Sequencer on when enabled]
Button 2 > Synced : 0 / 1 [Syncs Thor’s Step Sequencer to the Rate to the Song Tempo when enabled]
Set Rotary 1 on the Combinator to 72 (which equals a rate of 1/4 in the Sequencer). Then press Button 2 to set the Sequencer to Sync mode (even though it’s already set up like this by default, it engages the button to operate in Sync).
Press the Run button on the Dr. Octo Rex or press play on the Transport. This starts the Dr. Octo Rex guitar loop. You won’t hear anything though, because there’s no audio bypass. However, when you now press Button 1 on the Combinator, Thor’s Sequencer is set in motion. This, in turn, triggers the Kong Pads to play the first 8 pads randomly (and this, I should add, is wonderful for many different applications). However, you may want to play the Pads manually, or from your Pad Controller, without using the Thor sequencer. You can do this by creating a track for Kong and then going nuts on the first 8 pads. Since the audio is always going through all 8 Audiomatic devices, the switch from Pad to Pad is instantaneous. However, when no pad is pressed, you won’t hear anything. So let’s set up our Combinator so that if the Pads are not pressed, the original audio still passes through. The following explains how to set this up.
Setting up an Audio Bypass
Continuing with our above tutorial, go inside the Combinator and select the Mixer 14:2. Hold Shift down, and create a Line Mixer 6:2, a Spider Audio Merger / Splitter, and a Thor. Name the Line Mixer “Bypass,” the Spider “Bypass Split,” and the Thor “Bypass Gate.”
In the “Bypass Gate” Thor device, set the Pitch Bend Range to 0, the Polyphony & Release Polyphony to 0, and click the Show Programmer buttton. Turn off Oscillator 1, disable routing Oscillator 1 from the Mixer to Filter 1 by deselecting the “1” button, bypass Filter 1, and turn off all the Envelope (Gate Trig) buttons. Enter the following in the first 2 lines of the MBRS:
Audio In1 : 100 > Audio Out1 : -100 > MIDI Gate
Audio In2 : 100 > Audio Out2 : -100 > MIDI Gate
The negative MIDI gate values in the MBRS mean that the original unprocessed sound will shine through when the keys are NOT played. They will also cut the sound when the keys ARE played. In this case, since you have the effects loaded on the keys, the FX signal will take over and you’ll hear the effects processing the sounds while those keys are played. Click the Show Programmer button again to fold up the “Bypass Gate” Thor device.
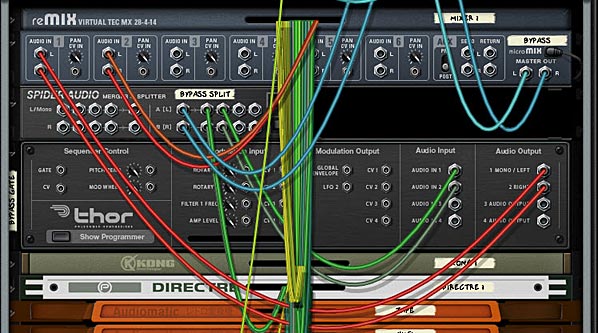
Tab to the back of the rack, and Move the Directre’s left / right “Main In” audio cables to the “Bypass Split” Spider’s left / right Split Inputs. Send Split 1 left / right outputs on the “Bypass Split” Spider back into the Directre’s left / right “Main In.” Then send a second Split from the “Bypass Split” (Split 2) left / right outputs into the “Bypass Gate” Thor device’s Audio In 1 / Audio In 2.
On the “Bypass Gate” Thor device, send 1 / Left & 2 / Right Audio Outputs into the Channel 1 left / right inputs on the “Bypass” Line Mixer. Move the left / right Master Outputs from the Mixer 14:2 into the Master Outputs of the “Bypass” Line Mixer. Then create a new audio connection from the left / right Master Outputs of the Main Mixer 14:2 to the Channel 2 left / right inputs on the “Bypass” Line Mixer.
The back of the rack showing the routings for the Audio / FX Bypass setup.
Tab to the front of the rack. So far we’ve set up the routing for the bypass. As it stands now, if you press Run on the Dr. Octo Rex, you’ll hear the original loop. If you then press Button 1 on the Combinator, you’ll hear BOTH the original Loop and the Audiomatic Preset playing at once (in a Parallel manner). To set things up so that you don’t hear both at once do the following:
Hold Shift and create a Spider CV Merger / Splitter at the bottom of the Combinator’s device stack. Tab to the back of the rack. Move the “Sequencer” Thor’s Gate / Velocity CV output from the Step Sequencer into the A Split 1 on the Spider CV Splitter. Then create a new CV cable from the “Sequencer” Thor Gate / Velocity CV output into the Spider CV Splitter’s A input. Send another Split (A Split 2) into the Combinator’s CV 1 Input. Change the CV Switch on Input 1 to Unipolar.
Tab to the front of the rack, and in the Combinator, select the “Bypass” Line Mixer in the Key Mapping area. Enter the following in the Modulation Routing section:
CV In 1 > Channel 1 Mute : 0 / 1
When you press Run on the Dr. Octo Rex, you’ll hear the original loop. If you now press Button 1 on the Combinator, the original loop is muted, and only the Audiomatic preset affecting the loop will be heard. Note that with this setup, you cannot play the pads individually via your Pad Controller. If you do, you will still hear the parallel processed configuration with both the Original and processed loop at the same time. However, this gives you two methods to control the Audiomatic switching effect.
That’s it for now. Hope you find this idea useful. Try your hand at creating a 16-way switcher if you like.


 Robert Anselmi’s Reason101 Visual Guide to the Reason Rack