10 – Creative ReDrums (Part 2)

In part 1 of our Redrum tutorials, I showed you a few ways you can improve the drum kits in your arsenal by using Thor’s filters, and some M Class Mastering devices. In this tutorial, I’m going to work in reverse and show you how to use the Redrum as a gate CV device to trigger a series of 10 Thors, which act as the drum sounds.

Creative Redrums (Part 2)

In part 1 of our Redrum tutorials, I showed you a few ways you can improve the drum kits in your arsenal by using Thor’s filters, and some M Class Mastering devices. In this tutorial, I’m going to work in reverse and show you how to use the Redrum as a gate CV device to trigger a series of 10 Thors, which act as the drum sounds. This is where things can get pretty interesting, as you can gain complete control over the drum sounds by creating them from scratch using Thor’s Oscillators and Filters. Then, we’ll try to use a technique laid out by Matt Piper in which all the drums are filtered through a Vocoder. This is yet another way to get some beef and boom out of the drums. So let’s work some creative Redrum magic.

The project file contains an .rns file with a single Combinator which outlines a complete drum kit with vocoder filtering, Mastering, and a few extra effects thrown in. Download the Project Files here: creative-redrums-2.

The Basic Setup

  1. Create a Combinator, and inside create a 14:2 Mixer. Then holding Shift down, create in order a Redrum, Spider CV Merger/Splitter, and Thor Synth.
  2. Right-click over the Redrum Pattern section and select “Randomize Pattern” just to quickly add a pattern. For this tutorial, the Redrum is used as a sequencer, and nothing more. You’ll be able to change the Resolution of the Pattern, number of steps, and use the Mute/Solo functions, but samples are not necessary.
  3. Next, Create a Bass Drum sound in Thor. Here’s an example of one way you could go about doing this (see the screenshot below). In the Sequencer section, change the Run Mode to 1-shot, and reduce the steps down to 2. Then in the Modulation Bus Routing Section (MBRS), enter the following:

    CV In1: 100 > Filt1 In
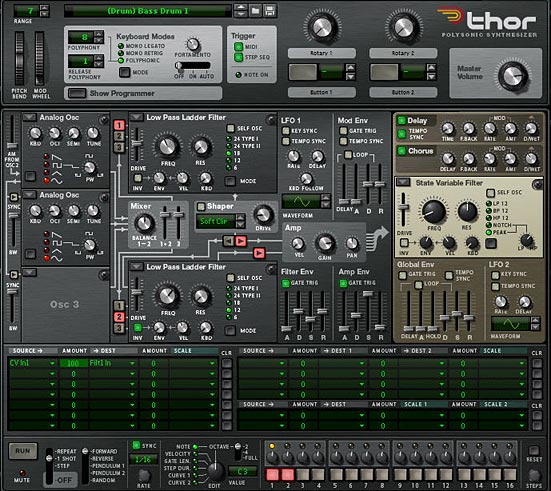
    The Front Panel of Thor with our Analog Bass Drum Sound
    The Front Panel of Thor with our Analog Bass Drum Sound
  4. Now let’s flip the rack around to the back and make our routing connections. First, connect the Left and Right Audio Outputs (1 and 2) from Thor into the Left and Right Audio Inputs on Channel 1 on the Mixer. Then connect the Gate Out on Channel 1 of the Redrum into the Split A input. Send one split output to the CV 1 In on Thor, and send another split to the Gate in (Trig) CV input on the Thor Step Sequencer (at the bottom of Thor).
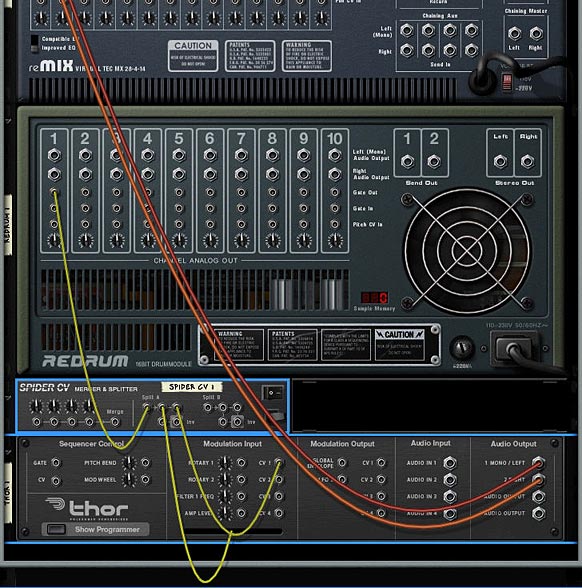
    Routings on the Back of the rack
    Routings on the Back of the rack
  5. Press Play, and if you will hear the Bass Drum playing. If you don’t hear anything, be sure to check the Pattern in the Redrum and make sure there are some Bass Drum parts in the Pattern Sequencer.
  6. Still on the back of the rack, select the Spider Merger/Splitter and Thor together by shift+clicking on both devices. Right-click and select “Duplicate Devices and Tracks.” Then connect the Left and Right Audio Outputs (1 and 2) from the second Thor into the Left and Right Audio Inputs on Channel 2 on the Mixer. And connect the Gate Out CV from the Redrum second channel into Split A on the Spider CV Merger/Splitter.
  7. Flip the rack around to the front and create a new drum sound in Thor, maybe another Bass Drum or Snare. Repeat this process until you have all 10 Redrum channels filled up. Congratulations! You’ve just created a complete drum kit.

Vocoder Filtering

This trick was shown in Matt Piper’s great Youtube video where he set up a Vocoder to filter his drums. To see the video, visit his tutorial here: propellerhead-record-reason-vocoding-with-drums

  1. Once you have your drum kit set up, go to the back of the rack, and select the Mixer. Hold Shift down, and create a BV512 Vocoder, Thor, and a Spider Audio Merger/Splitter.
  2. Move the Left and Right Audio input cables on the Combinator (From Devices) to the Left and Right Carrier Input on the Vocoder. Then connect the Left and Right Carrier Output from the Vocoder to the Left and Right Audio input on the Combinator (From Devices).
  3. Route The 1 Mono/Left and 2 Right Outputs from the Thor device to two Left Merge channels on the Spider Audio Merger/Splitter. Connect the Merged output from those two cables to the Modulator Input on the Vocoder. With our routing set up, flip around to the front of the rack.
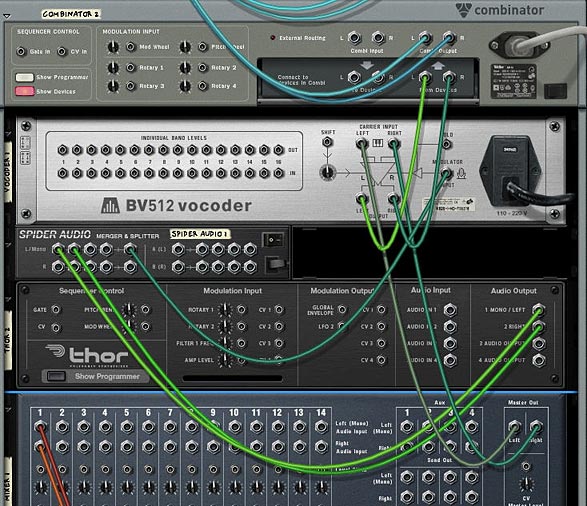
    Vocoder Routing setup
    Vocoder Routing setup
  4. On the front panel of the Vocoder, set the Band Count to 4 Bands (I also found the 8 and 16 bands work well, depending what kind of sound you are looking for). Move the Shift knob to around -24, and Decay to around 80.
  5. In Thor’s global top panel, set the Polyphony to 1, Release Polyphony to 0, and Key Mode to mono Retrig. In the Voice section, add a Noise Oscillator in Slot 1, set the Noise Wave to Color, and Noise Mod to around 36. Then turn on “1” to send the Oscillator to Filter 1 slot (which is on Bypass by the way). Turn off everything else except the Filter and Amp Envelope. In the Step Sequencer section, set the Run Mode to Repeat.
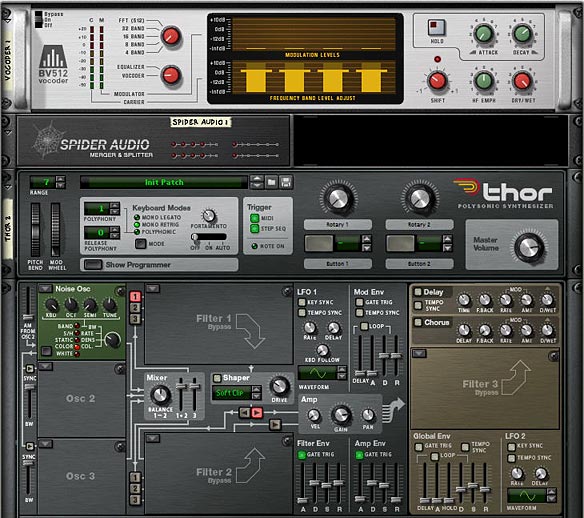
    The front panel settings for the Vocoder and Thor Modulator
    The front panel settings for the Vocoder and Thor Modulator

That’s really all there is to it. Not too complex, just time consuming to create all your drum sounds in the various Thor devices. But it’s very rewarding when you have your own custom drum kit set up just the way you want.

Where do you go from here?

  • You can try the same setup with a stack of Subtractors or Malstrom devices, or any combination of Subs, Mals and Thors to create your custom drum kits.
  • You can add a reverb and a delay to your drums. Also, for an instant doubling effect, you can modulate a button on the combinator to switch from 1-2 steps in all the Thors at once. This doubles up the drum beats (see below for this setup in my own Electro Drum kit).
  • Try going into the Thor which is used as the Vocoder’s Modulator, and switch the Oscillator 1 Noise wave from Color to Static, and then set the Noise mod dial to around 30 or so. You’ll create some very interesting glitch effects.
  • As you can see I’ve added a few effects here and there. There’s two phasers tied to the Hi Hats, for example. In this same way, you can chain some effects into the drums individually. Try adding some scream or even vocoding the drums separately. However, if you do, you’ll have to realize that the more effects, the more CPU intensive this gets. As it is, I only saw 2 bars on my CPU meter. Not too bad. Definitely less intensive than the last kit I put together.

Electro Drums Combinator Controls

Pitch Bend: Unassigned.

Mod Wheel: This controls the Band Count on the Vocoder from 4 bands (no modulation) to FFT (512) when pushed all the way up.

Rotary 1: Voc Filter – This controls the Noise Mod from the Vocoder’s Modulation Oscillator. This can be used to shape the sound of the Drum Filtering through the Vocoder.

Rotary 2: Shift – This controls the Shift parameter on the Vocoder. Again, this can be used to sculpt the sound of the Drum’s Vocoder Filter.

Rotary 3: Pattern Seq. – This knob is used to switch between all 31 patterns in the Redrum. You can assign any patterns you like in the redrum and it will be tied to this knob. In this way, when you’re playing the drums, you can switch on the fly. In my drum kit, I threw in a bunch of random patterns so that you can hear something playing no matter where the knob is set. Note that if the knob is turned fully left, an empty pattern plays (essentially turning the Pattern Sequencer off and silencing all the drums). This is good if you need an empty spot in your song.

Rotary 4: Master Level – This controls the master level of the Submixer, so that you can adjust the drum level globally.

Button 1: Doubler – This doubles all the drum beats via the Thor Step Sequencers. When on, the steps are set to 2, which will play two beats anytime the drum is triggered. When off, only one drum beat will occur when the drum is triggered.

Button 2: Alt Filter – This quickly switches the filters used to modulate the Vocoder, as well as adding a Scream and Reverb effect to the drums. I wanted to make this drum template as versatile as I could, so I thought why not add a completely different sound in the Combinator for some fun. It gives the drum sounds a completely different and more electronic (less organic) sound.

Button 3: Master Bypass – This button controls the Mastering (M Class) devices, as well as the Vocoder filter. If you don’t want to add any mastering or Vocoder Filter to the drums, turn this button on. The Drum sounds are then completely dry (or as they originally sound via the Thors). Leave it off if you want the drums compressed, EQ’d and Vocoded.

Button 4: HH FX – I added some Phaser FX to the High Hats just to give them a different feel. You’ll just have to try it out and see if you like it. I thought it was a cool sound, so I kept it in there as an option for you.

So let me know what you think of this setup, and if you have any other ideas or have some great tips for drum creativity, please feel free to share your comments.

Good Luck!

Ed’s Reasonable Help 2010

EditEd4TV’s Reasonable Help for 2010
Available now at: http://www.baumanproductions.com/reasonablehelp.html


It’s rare that I advocate a specific refill. I can actually count on my fingers how many refills I rely on in my own work, and would rather try and figure out the answer myself or else try building my own instruments and combinators. But when it comes to inspiration and I’m looking to expand my knowledge I can’t think of anyone better than Ed Bauman. In his latest refill offering “Reasonable Help 2010” he provides you with 50 amazing combinators which push the envelope on what Reason can do. And he sets off to prove that most anything you can think of in your head can be worked out in Reason routings and device Combinations.

Without a doubt this is one of the best refills I’ve seen, and it’s not because it’s packed to the brim with a ton of new sounds or new patches. If you’re looking for new sounds, there are other refills out there that can give you off-the-shelf sounds. This refill is aimed straight at the Sound designer who wants to learn how to route devices in reason. It’s also aimed at solving common problems that people face in Reason. How to create a noise gate? How do yo scrub your audio, how do you make reason strum a guitar? All of these questions and more are answered. Other common questions from the forum are answered too. How do you put your vocals through a vocoder to get that Telephone voice? Want an instant Steam Locomotive with Whistle and train speed included. It’s all in there.

In a nutshell, if you’re willing to sit down and look through the patches to see how they are routed, and read the accompanying documentation, you’re going to learn some new tricks and better your Reason skills. If you’re just starting out, you may not entirely be ready for this one. But if you have a decent grasp of how to route your devices together and want to take yourself to the next level, these 50 patches will open your eyes to some brand new ideas. The true benefit of Reasonable Help 2010 is in the educational value. What better way to expand your Reason knowledge than having a 50-session class provided by one of Reason’s top gurus: Ed. He’ll hold your hand the entire way, and speaking from personal experience, he’s always there to help if you get stuck. I highly recommend you purchase your copy now. At $50.00 it’s an awesome deal.

Ed was gracious enough to provide a free .rns file from Reasonable Help: EditEd4TV_GateModifier.

EditEd4TV's Reasonable Help Gate Modifier Combinator
EditEd4TV’s Gate Modifier Combinator

Ed also had some comments about this file, as well as some great insights into his work flow:

The reason I made this Gate Modifier patch was simple – the Slice Output of Dr. Rex is basically useless for triggering synth pads.  I wanted something that could easily serve as an “in-between” module to transform CV data into something more useful.  The concept is pretty simple: just take incoming slice data, which is basically just a small millisecond CV burst, and send that to Thor’s Step Sequencer CV Input Gate In Trigger.  That small gate burst is perfectly fine for triggering the Step Sequencer.  That trigger is used to trigger Thor’s Amp Envelope, which is held open depending upon the value of Combinator knob 1, which adjusts the Step Sequencer Gate Length value.  The Amp Envelope attack and release values are adjustable as well.  There’s also Gate Strength, which can be inverted so it sends negative CV values instead of positive values, which can be used as sort of a “ducking” feature.

So how do I go about this sort of thing?  Well, most of my patches always begin with a need, a want, a solution to a problem.  I always start with a Combinator with a Mixer inside.  I may ditch the Mixer later if it isn’t needed, but that’s the default.  At the heart of most of my problem solving solutions is Thor, since it offers so many incredible ways to take incoming audio or CV and manipulate it to death.  There’s almost always a way to solve a problem with Thor.
 
So sometimes I’ll just decide I’m going to tackle a problem, I’ll make the Combi and put the Mixer in there, along with one Thor, and I’ll just sit there and think, maybe for a few seconds, or maybe an hour or two… just thinking.  I’ll experiment along the way, maybe draw things out on paper so it makes sense visually instead of just mentally (sometimes if I’m away from home and I’m sitting somewhere on a video shoot I’ll start drawing out design concepts that just come to me, I’ll draw them out on paper, you can see 3 of them on the last few pages of the RH’10 PDF manual).
 
The worst is when inspiration hits when I’m driving, and all I can do is dictate the concept into my cell phone, which is somewhat difficult depending on the complexity of the design stuck in my head.  So, once I’ve come up with a solution, and I design it in a Combinator, I’ll sit and stare and think for maybe an hour or so, thinking… “If I’m the end user of this, what will I hate about it, what will I want, what would I change”, and I go about solving those problems.  Sometimes this can be really frustrating because I’ll come up with additions before I stumble upon some solutions, so I may end up programming knobs 3 and 4 to do something, then I discover it’s a much better solution if I have, say, the Mod Wheel do the same job as those two knobs, so I have to redesign my modulation routings and perhaps some CV cabling as well.
 
Eventually I land on the final design, and I’ll have some buttons or knobs left over empty, so I’ll try to come up with some fun stuff at that point.  That’s when I wish the Combi Pitch and Mod Wheels had labels as well, since they’re stuck being labeled via the Combi skin… Sometimes I use those two wheels for other things and I’m too busy/lazy to design a custom skin for those different purposes.  Also, I try to avoid tying up a knob with the “do not touch!” label, though sometimes it’s necessary.  And that’s when I wish the Combinator was 8×8 instead of 4×4, and I wish it had, say, 8 CV inputs and 8 CV outputs on the back as well, not necessarily tied to the knobs if you don’t want them to be.

And here is an explanation of the inner workings of the rns file, direct from Ed’s PDF documentation:

EditEd4TV_GateModifier

This Combinator allows you to modify/extend Dr. Rex gates into a more useful state.

Knob 1 “Gate Length”: This knob adjusts the gate length.

Knob 2 ” Gate Strength”: This knob adjusts the gate strength.

Knob 3 ” Gate Attack”: This knob adjusts the gate attack time.

Knob 4 ” Gate Release”: This knob adjusts the gate release time.

Button 1 “2 Ordered”: This button switches the gate mode from single to two varying triggers.

Button 2 “16 Random”: This button switches the gate mode from single to 16 random triggers.

Button 3 “n/a”: This parameter is unassigned.

Button 4 “n/a”: This parameter is unassigned.

Pitch Wheel: This wheel is unassigned.

Mod Wheel: This wheel is unassigned.

Details: This Combinator is particularly useful when used with a Dr. Rex loop player. On the rear panel of Dr. Rex you’ll find a Slice Gate Output. Note that this CV signal is routed to the Spider CV Slice Splitter – this is purely for demonstration purposes. Note that the first split output is routed directly to Thor 1 Pad’s Filter 1 Frequency Modulation Input, whereas the second split output is routed through the GateModifier, then into Thor 2 Pad’s Filter 1 Frequency Modulation Input. Play back the demonstration sequencer and solo Mixer channel 1. This is the drumbeat that we’re using to send gate signals to the two Thor units. Return the Mixer back to normal and now solo Mixer channel 2. This is Thor Pad 1. Notice very short and barely useful clicks in the audio signal, which is a result of the very short slice gates affecting Thor’s filter. Return the Mixer back to normal and now solo Mixer channel 3. This is Thor Pad 2. Notice the much more active and useful affects on the audio signal, which is a result of the GateModifier creating better gate signals.

Inside the GateModifier you’ll find a single Thor unit. CV control needs to come directly into this Thor, into the Step Sequencer CV Input Gate In (Trig) jack. Each incoming slice gate will trigger a step in the Step Sequencer. This first step is set for a gate of 0%, but Combinator knob 1 (Thor Rotary 1) is used to adjust this gate length up to 100%, thereby creating much more useful gate lengths. This new gate signal triggers Thor’s Amplitude Envelope, which is then routed to both CV 1 and CV 2 outputs, where CV 2 is a polar opposite of CV 1. Though not used in this demonstration, know that CV 2 output is ready for use if needed as an inverted output. Combinator knob 2 is used to trim the strength of both of these outputs. Note that Combinator knob 2 is bipolar, with no affect on strength when centered. Right of center results in positive results (with negative results from CV 2 output) and left of center results in negative results (with positive results from the CV 2 output).

Combinator button 1 is used to change the number of steps of the Step Sequencer from 1 to 2, in a back and forth pattern. Step 2 contains modified parameters that create a different result than step 1, thereby making a noticeable difference in how the gated signal controls Thor. Combinator button 2 is used to change the number of steps of the Step Sequencer from 1 to 16, in a random pattern, with all 16 steps set for variable settings that result in an unpredictable, yet still slice accurate, gate signal.

Combinator knobs 3 and 4 adjust the Amplitude Envelope attack and release times, respectively.

In our example we’ve sent the gated signal to Thor’s Filter 1 Frequency Modulation Input CV jack, but you can of course route this signal anywhere you like. You’ll find this new signal works much better than the standard slice output of Dr. Rex. This GateModifier is also useful to modify the gate signals coming out of a ReDrum, where the ReDrum channel is set for gate mode 0 (sawtooth wave). Though you can get workable results by switching the ReDrum gate mode to 1 (square wave), this potentially affects the ReDrum channels audio waveform; in the case of, say, a crash cymbal, the affect of switching the gate mode to mode 1 are more often than not unacceptable (muted crashes). The alternative is to sacrifice a ReDrum channel to use purely as a gate signal in mode 1, which may also be unacceptable. Your best option may be to use the GateModifier Combinator, allowing you to select any gate output for use.

The Dr. Rex, Spider CV, Thor units, and sequence in this file are provided simply to test the Combinator’s features.


A huge thanks to Ed for putting this package together. You truly are an inspiration to all of us Reason users. Please keep doing what you’re doing and I look forward to your future products as well. You can purchase Ed’s Reasonable Help 2010 here:  http://www.baumanproductions.com/reasonablehelp.html