Polar+Essentials Patch Pack

It’s another “Freebie Friday” here at Reason101 and this time I thought I would bring you more new instruments and effects for those with Polar and Reason Essentials. Last week’s Pulsar+Essentials Patch Pack seemed to be a hit, and generated some new ideas and thoughts from all you good folks. So let’s see if we can repeat that this week as well. And what better way to start the weekend than with a few new sound ideas. So download and enjoy.

Polar + Essentials Patch Pack.It’s another “Freebie Friday” here at Reason101 and this time I thought I would bring you more new instruments and effects for those with Polar and Reason Essentials. Last week’s Pulsar+Essentials Patch Pack seemed to be a hit, and generated some new ideas and thoughts from all you good folks. So let’s see if we can repeat that this week as well. And what better way to start the weekend than with a few new sound ideas. So download and enjoy.

The Polar+Essentials-Patch-Pack contains 11 Instruments and 9 Effects. Since Polar can save and load patches, some of the effects patches can be loaded directly into Polar. Some of the more complex effect patches and all instrument patches are Combinators. You will need to download the Polar Rack Extension in order to use any of these patches. While they were built for Reason Essentials 1.5  users in mind, there’s nothing stopping those who have the full version of Reason 6.5 from taking advantage of them. Try them out and if you like them, please consider donating: [paypal-donation]

There are two sections:

  1. Instruments — Use Polar in some way to enhance or add to the core Reason Essentials instrument’s sound (for example, the Subtractor, ID8, and other Essentials instruments).
  2. Effects — Use Polar on its own or with other effect devices in order to process your instrument in some way.

Here is a brief description of each patch you’ll find inside this pack:

Instruments

  • Aggrodesiac.cmb

This patch uses a Matrix to create an arpeggiated synth. The cool idea in this one has to do with using a Matrix Curve to play the Pitch shifting on Polar. To access this sound, you must first press the “Run Pattern Devices” button on the front of the Combinator. Then use Button 1 to turn on the Matrix sequencing, and Rotary 1 to adjust the Matrix pattern’s Rate. The main rate of the sequence can be controlled via Rotary 4. Rotary 2 detunes the Pitch shifters on Polar, creating a wider sound. And Rotary 3 controls the Phase offset in the Subtractor instrument.

Button 1 changes the LFO2 on the Subtractor from adjusting the Phase (Button off) to adjusting the Amp (Button on). Button 3 adds a heavy dose of Portamento, and Button 4 allows you to switch between playing the patch as a Mono lead (Button off) or adding Polyphony (Button on).

  •  Arpe Dulce [RUN + Play MIDI].cmb

This patch is another Arpeggiated sequence in which you can Run the Arpeggio by pressing the “Run Pattern Devices” button on the Combinator front panel. Once you do this, you can play the MIDI keyboard to hear the sequence. Note that you don’t HAVE TO run the pattern devices, but it might be a little dull and lifeless without it. You could also mess around with the Matrix sequencer to create your own arpeggiator if you like.

The cool thing about this patch (and the take-away I think), is the way in which the Matrix is used to “Gate” the Polar device. Notice on the front of Polar, the “Env to Amp” button is lit up. Essentially, the Matrix Gate/Note CV is used to trigger the Polar’s envelope section. Then this envelope section is sent to the Polar Amp section. The envelope parameters you set in Polar affect the Amplitude, as you would adjust the Amp Envelope in any of Reason’s synth devices. This is what causes the gated sound. I’ve also mapped Rotary 2 (Staccato) to the Envelope’s Release parameter. This has the effect of creating a very short Staccato sound as you turn the Rotary left. The sound gets longer as you turn the Rotary right.

  • Dreamy Island Progression [RUN].cmb
  • I-vi-ii-V (Blue Moon) Progression [RUN].cmb
  • Polar Synth Chord Progression [RUN].cmb
  • Wurly Triplet Progression [RUN].cmb
  • Wurly Trip MK II [RUN].cmb

These patches use 3 Matrixes and 2 Polar devices to control Harmonies by shifting the three notes found in chord triads. Each Matrix controls a single Pitch Shifter. There is a root, third, and fifth pitch shifter and when summed together, they provide the chords. Then a fourth Matrix is used to control the Note/Gate of the instrument. This provides the Rhythm mostly. All these instruments are in the Key of “C,” though some patterns venture outside this a little, creating some interesting sequences. To play the patch, you have to press the “Run Pattern Devices” button on the front Combinator panel. As long as button 1 is lit up on the Combi, the Note/Gate Matrix is turned on, and the pattern will run automatically to generate the sounds. Button 2 controls whether or not the Harmonies for the three pitch shifters are enabled or not. All three must run in tandem, so if you do decide to change the Resolution of any of the Chord Matrixes, ensure you change all three to the same value (otherwise the chords will shift out of sync – though maybe this is what you want).

Rotary 1 controls the Pattern used to play the patch. There are 4 patterns from which to select, and one of the patches has 6 patterns. Rotary 2 and 3 Control parameters on the device itself. Since most of these patches use the ID8 as the main instrument, I”ve mapped Rotary 2 and 3 to Parameters 1 and 2 on the ID8. Rotary 4 controls the Volume of the instrument. Button 3 controls the Analysis Type and Algorithm of the Polar Pitch Shifter. For the most part, if you leave Button 3 off, you have a fast pitch shift. If you turn Button 3 on, you have a slower pitch shift. Button 4 is used to spread the Chords across the Stereo Field. In one patch, Button 4 is used as an auto-panner.

The Pitch Shift Wheel is mapped to the Polar pitch shifter, and the Mod Wheel is mapped to the ID8’s hard-coded Mod assignment, which usually leads to a Vibrato effect.

I should note that you CAN play the patch via MIDI keyboard controller. Simply turn off Button 1. If you then keep Button 2 turned on, you’ll still hear the Chord Shifting as you play, provided the notes are sustained. If you turn off Button 2, you can still play the patch via MIDI, but this may be a bit boring. Still, you can do it.

Note also that since these patches use Matrixes, there may be a lag before the Matrixes kick in, which, depending on your song Tempo and the Pattern length, could be very short or a little longer. Best thing to do if you switch the pattern on Rotary 1 or turn Button 1 or 2 on is to give it a chance to kick in. However, turning buttons 1 and/or Button 2 off is instantaneous.

Dreamy Island Progression uses a Subtractor as the main instrument and it’s a fairly slow tempo sequence. It’s got a Carribean-type flavor with a nice meandering synth sound.

I-vi-ii-V (Blue Moon) Progression uses an ID8 set to the “Crystal Pad” Synth. It also provides a very mellow and slow progression. The idea here was to present one of the most common major chord progressions and show how it is put together. So this should sound very familiar.

Polar Synth Chord Progression uses an ID8 set to the “Synth” Bass. It’s a little more harder edge, with a faster sequence. It also doesn’t really come out sounding like a Bass; more like a synth lead. You can have a lot of fun simply toying with the “Tone” Rotary (Rotary 2).

Wurly Triplet Progression is probably my favorite of the bunch. Who doesn’t like a good Wurlitzer sound right? The Note sequencer is set to Triplet, and funny story: I had the chord Matrixes set to 1/2 Resolution, and forgot to set them to 1/8T during the creation stage. Of course if you change them, you’ll get a totally different sound. But it didn’t sound right, so I left them at 1/2 Resolution. It gives a much better Rhythm I think.

Wurly Trip MK II is slightly different than the Wurly Triplet Progression patch. It includes Drums, and only uses one pattern for the sequence. Instead, Rotary 1 allows you to transpose both the Piano and the Drums upward by 1 octave (in semitone increments). This way, the patch shows how you can program the Matrix to play the harmony sequence in any scale. It’s a slightly different take on the previous patch. Also, both the Piano and Drums have a lot of processing going on. In this respect, the Combinator is more of a “Song Starter” than single instrument patch.

  • Effigy Pad.cmb

This is my take on a Subtractor Pad, and uses 2 Subtractors and 2 Polar devices. The Polar devices are used to expand or widen the sound. The Rotaries are used to adjust the fattening of the sound via the Polar parameters (except Rotary 4, which is used to adjust the Polar Filters). The first three Buttons are used to change the Timbre of the sound, so that you can get more flexibility out of the patch. The final Button (Button 4) is used to pan the signals left and right on the Mixer, which again widens the sound in the Stereo field. The Mod Wheel also changes the Timbre of the sound, making it more ominous when the wheel is pushed upward. Pitch Bend naturally adjusts the instrument pitch upward or downward.

  • Fortitude Lead.cmb

This patch uses a Subtractor as its base sound, and Polar is used to both Widen the sound and provide Harmony (if you want, on Button 4). Using Button 4 shifts the pitch so that a major chord is played (Root – Third – Fifth / 0 – 4 – 7 interval). If the Button is off, a single note is played (Monophonic). There’s other fun things you can do with the sound, but as far as Polar is concerned, this is about as basic as you can get. The Polar setup in this patch really amplifies and lifts the sound up from boring to vibrant. Bypass Polar to hear the difference.

  • House of Mirrors.cmb
  • Serial Polar Strings.cmb

These are two other Instrument patches, and are probably the most “out there” of the bunch.

House of Mirrors is a very bouncy synth sound. It uses the “Gating” trick I described earlier, except this time, the Subtractor’s LFO is used as both the Gate and as part of the CV used to “Lock” the Delay Buffer in Polar. The CV in both this and the “Serial Polar Strings” patches are a little experimental and convoluted, but the experimentation was fun, and I think the results came out alright.

Serial Polar Strings uses an ID8 “Guitar” patch set to “Dulcimer.” I thought of trying to process the sound through two Polars that are connected in series. I found that doing this is very tricky, as the sound going from one to the other becomes pretty finicky. It’s hard to describe exactly, but it took a lot of work to try to get something interesting out of it. I’ll let you decide if it was worth the work or not.

Effects

  • Alien Galaxy.repatch
  • Creeper.repatch
  • Harmony Modulator (For Leads).repatch
  • Simple Octave Gate.repatch
  • Spiral Staircase.repatch
  • Tin Man.repatch

These are some basic Polar stand-alone effect patches.

Alien Galaxy creates an almost other-worldly sound that works well with most synth patches.

Creeper is exactly what it says. It shifts and modulates the sound to produce a highly spooky sound. Great for all kinds of sounds, but I like it with a Lead or a Pad sound. Just be careful if you’re using it with multiple notes (Polyphony), as it can tend to get a little loud. If you do, you may want to turn the Volume down on the dry signal and the two shifters.

Harmony Modulator (For Leads) is a rough harmonizer patch that works well on monophonic leads. Just a simple way you can add movement at the same time as harmony. Fun little rough patch.

Simple Octave Gate is a double-Octave spreader (up 1 Octave and down 1 Octave), with a rough LFO gate applied to the Low Pass Filter. Cool for most any kinds of sounds that you want Gated. The LFO which produces the gate is Tempo Synced, so if you want it faster or slower, simply adjust the LFO Rate.

Spiral Staircase is a slow-moving patch that takes advantage of the reverse sawtooth LFO wave to shift both pitch shifters by 50% – producing a downward moving pitch. At the same time, the auto-pan feature is applied to the original (Dry) sound, and the Feedback / Delay / Detune parameters produce a wider sound. Interesting in a wonky kind of way.

Tin Man, as the name suggests, provides a metallic chorus sound. Try it out on your guitar tracks. All guitars love a good Comb filter right?

  • Mayhem Glitchem.cmb

This patch is highly experimental. Basically, it sends the audio through a Polar device, then splits the audio into two streams: one is the original audio, and the second is a Hi band pass through two Screams and a second Polar. It’s fun to tweak around with the parameters on this one. There’s two Distortion algorithms on Button 2, and you can adjust Parameter 2 with Rotary 2. Rotary 1 and Button 1 adjust the Rate of the first Polar’s LFO, which can provide some really freaky sounds.

Rotary 3 and 4 control the original Audio Level and the Screams’ Distortion Level. Pretty straightforward. Use these two Rotaries to parallel process and mix the sound together. Button 3 changes the first Polar’s Algorithm from fast to slow. Button 4 is an added bonus. It allows you to lock the Buffer (Delay) from both Polar devices. Depending on the patch you’re sending through this effect Combinator, you can get some interesting glitchy effects when the Buffer is locked.

The Mod Wheel actually detunes both shifters on the first Polar, and the Pitch Bend Wheel is tied to the original Polar’s Pitch Bend Wheel.

  • Pseudo-Doppler (For Sustained Sounds).cmb

This patch is a simple Polar device that’s doctored up inside a Combinator. It creates a really cool Doppler-style effect (as dopplers inside Polar can go, that is). The Loop Length can be adjusted via Rotary 1. The shorter the loop (towards the left), the shorter the Doppler sound is. The longer the loop, the longer the amount of original sound gets through (and the more strange the sound becomes). You can also play with the Pitch Width on Rotary 2 and the Amp Width on Rotary 4. The LFO Rate on Rotary 3 controls the speed of the Doppler effect (slower speeds to the left; faster speeds to the right).

Button 1 switches the filter from a Low Pass to a High Pass, and Button 2 is used to widen the Filter. In this control, as in all the other “Widener” controls, the LFO intensity increases for said parameter. For example, with Button 2 turned off, the LFO affects the Filter to a smaller degree than if Button 2 is turned on. Likewise for the Pitch Widener. Turn it to the left and the LFO affects the Pitch Shifters to a smaller degree than if you turn this Rotary to the right.

Finally, Button 3 adds a huge amount of Resonance, and Button 4 allows you to include the dry signal, if you like. The Mod Wheel is also mapped to the Polar device. Try this out on sustained sounds, like Pads, sustained Organs, or even Guitars.

  • Tape Stop Lite (Btn 1 or Mod Wheel).cmb

This patch came out of my desire to rework a patch that I put together for inclusion with Polar. If you look in the patches that ship with Polar, there’s a Tape Stop patch under the “Tweaky” folder. This patch uses a Thor to gate the Polar device, which helps drive the Tape Stop effect. The reason why I wanted to rework it is so that I could recreate the same type of effect using only Reason Essentials devices. In this instance, a Scream is used to convert the incoming audio to a CV signal, which then triggers the gate on Polar. This has almost the same effect as the original Tape Stop patch, but without the need to use Thor. This means that even Reason Essentials users can take advantage of a fully functional Tape Stop Combinator effect.

Button 1 or the Mod Wheel is used to trigger the Tape Stop action. This the heart of the effect. All the other Rotaries, Buttons, etc. are used to adjust how the Tape Stop sounds or how fast / slow the tape stop effect works.

One note about this Combinator. If you enable the Tape Stop effect (button 1 or Mod Wheel), and then disable it too quickly, you’ll hear the original sound kick back in. So it’s probably not the most ideal solution for rapid stuttering. And in most cases, I would assume you’ll want to use this effect at the end of a passage instead, where the effect is enabled and the song ends, for example. In this case, you won’t need to disable the effect after the fact, so it won’t be a problem. And who knows, maybe there’s some creative call for having the sound jump back in. Either way, this “issue” only occurs with this “Lite” Combinator. The one that ships with Polar does not work in the same way, and the sound does not come back in afterwards. If anyone knows a workaround for this issue, please let me know. 🙂


That about does it for Freebie Friday here at Reason101. If you have any cool Polar patches, please share them. I’m always on the lookout for new ideas on how to use these devices, whether they be the stock Reason devices or the new Rack Extensions. Carry on. . .

56 – Key FluX FX Processor

One week, 300 + devices, enough cables to circle the earth at least once, and a massive caffeine-induced headache, here is my “Key Flux FX Processor.” If some of the other tutorials I’ve written have yet to melt your brain, then this might actually fit the bill. Here I created a massive chaotic Reason 5 FX processor. Each effect is triggered via Midi Key on the Combinator track.

If some of the other tutorials I’ve written have not yet melted your brain, then this might actually do it. It melted mine as I was creating it and I’m only just now recovering (and not in an EditEd4TV kind of way). Here, I’m going to delve into creation of a massive chaotic Reason 5 FX processor using a Combinator. And each Effect is going to be triggered via Midi Key on the Combinator track. It’s kind of like Ned Rush’s own Extreme FX Combinator (included in the NedFX refill), and Hydlide’s FX Triggering Combinator, but ummm…. yeah…. different.

So one week, 300 + devices, 84 FX chains, enough cables to circle the earth at least once, and a massive caffeine-induced headache, here is my “Key Flux FX Processor.” Ta-da!

You can download the whole thing here: Key-Flux-FX-Processors. This contains the Reason 5.0 .rns and Combinator file enclosed in a zip package. Note that this is for Reason 5 users only. There’s several Kongs and the CV inputs on the Combinator are used. If I have some time, I might put together a version for R4, but right now, this is what I’ve got. Note also that your CPU will take a hit. If you have an older computer, you may not even be able to open it or use it. So I’ve included 2 “Lite” Combinators which have 21 FX chains in each. Of course there should be nothing stopping you from building your own, and you should give that a try.

The “Key Flux FX Processor” Combinator

First off, a bit about the way the Combinator operates. It is just a massive chaotic Effects processor that can be added after any sound source in Reason. So open the .rns file and take a look inside. I have a Thor patch that is being played by a matrix. And then the sound is processed through the Combinator. That’s straightforward enough. But if you press “play” on the Transport, you’ll notice you don’t hear any sound. If you want to hear the original sound, just bypass the FX Combinator.

Assuming you want to play the sound through the FX, make sure the Combinator is NOT bypassed, and instead play any key from C-2 to B4. There are 84 different effects tied to the first 84 midi keys. So playing each key will process your sound differently. Fun right?

  • Key C-2 to F1: These keys play 42 different FX chains, depending on which key you press.
  • Key F#1 to B4: These keys play 42 additional FX chains, which are combinations of the first 42.
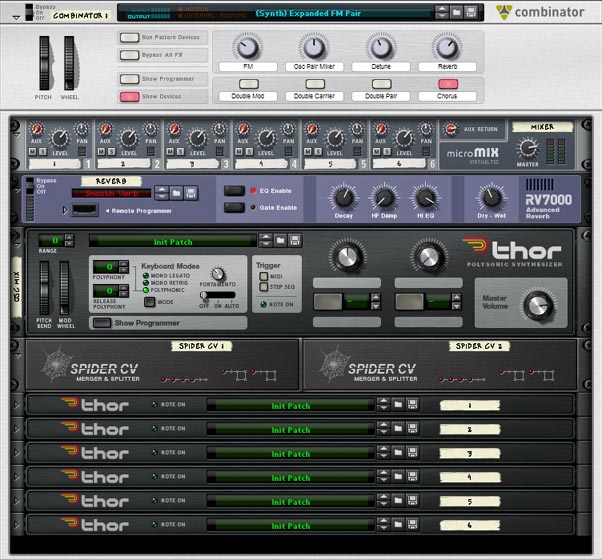
The Combinator Key Mapping and Modulation Routing section showing each key mapped to a Thor device.
The Combinator Key Mapping and Modulation Routing section showing each key mapped to a Thor device. The Mod 1 Scale Amount scales the velocity so that Button 1 can act as a Global Velocity Sensitivity on/off switch.

Taking this a step further, you can do many different things based on the parameters that are set up on the Combinator controls, and this is where things differ greatly with the way this patch operates and others, like Ned Rush’s very awesome patch. Here are the Combinator controls:

  • Pitch Bend: Not intentionally mapped to any device, but may still provide some variations. I haven’t really gone through the whole thing to see where it’s mapped. Just kind of left this one hanging.
  • Mod Wheel: Changes the randomization pattern. 32 patterns are mapped to the Mod Wheel, and the patterns will only be heard if you have button 2 (Run Randomly) enabled.
  • Rotary 1: Parameter 1 – This knob is mapped to one or two parameters inside each of the effects chains. So utilizing it will definitely affect your sound in some weird and quirky way, no matter which effect is being played. I would caution, however, not to turn the knob before first listening to each of the effects. All the effects were built to have their parameters exactly where they are. But if you want to mangle things even more, you can do so with this knob. If you ever want to reset it back to the original values, just reload the Combinator again (of course, make sure you don’t overwrite the original file by saving over it after you’ve changed this Rotary to a different position. If you do so, all bets are off and your parameter will be permanently changed. Make sense?)
  • Rotary 2: Parameter 2 – Same as Rotary 1, except this knob is mapped to one or two “different” parameters than Rotary 1. It is mapped to at least one or two parameters inside each of the effects chains. So utilizing it will definitely affect your sound in some weird and quirky way, no matter which effect is being played. I would caution, however, not to turn the knob before first listening to each of the effects. All the effects were built to have their parameters exactly where they are. But if you want to mangle things even more, you can do so with this knob. If you ever want to reset it back to the original values, just reload the Combinator again (of course, make sure you don’t overwrite the original file by saving over it after you’ve changed this Rotary to a different position. If you do so, all bets are off and your parameter will be permanently changed. Make sense?)
  • Rotary 3: Master Volume – This is the master volume for all the effects. Sometimes things can get a little loud due to all the effects running, and while I tried to make sure all the effects are somewhat leveled out so they are all somewhere around the same volume, you can control the overall global volume using this knob. Careful not to set it too high, unless you are going for something specific, because it can go all the way up to 127 midi volume.
  • Rotary 4: Beat Delay Time – Changes the Beat Repeater time from very short (turned more left) to very long (turned more right). Used in conjunction with Button 4. In other words, you need to first turn on the Beat repeater for this to do anything.
  • Button 1: Velocity On – Turns on / off the Velocity sensitivity on a global level. So if you enable this button, you will essentially make the volume of each effect you play via your midi keys sensitive to the velocity at which you strike the keys.
  • Button 2: Run Randomly – This will turn on the Random pattern generator which randomly plays the Combinator keys. If you wish to change the rate, you’ll have to go into the “Random” matrix inside the Combinator and switch the resolution on any or all of the Matrix patterns. But this provides a nice way to randomly play the various effects in the combinator (kind of a last minute thought to add that into the mix).
  • Button 3: Beat Steps / MS – Switches the beat repeater delays from Steps (off) to milliseconds (on). Used in conjunction with Button 4. In other words, you need to first turn on the Beat repeater for this to do anything.
  • Button 4: Beat Repeat – Turns on the global beat repeater, so that you can add a beat repeat effect after any of the FX chains you are playing.

How was it all Built?

The biggest issue with building this thing was mostly time. Time to figure out the effects, and time to piece everything together. But the main concepts behind it are actually very easy to understand, so I’ll try to guide you on the building blocks and let you take things from there.

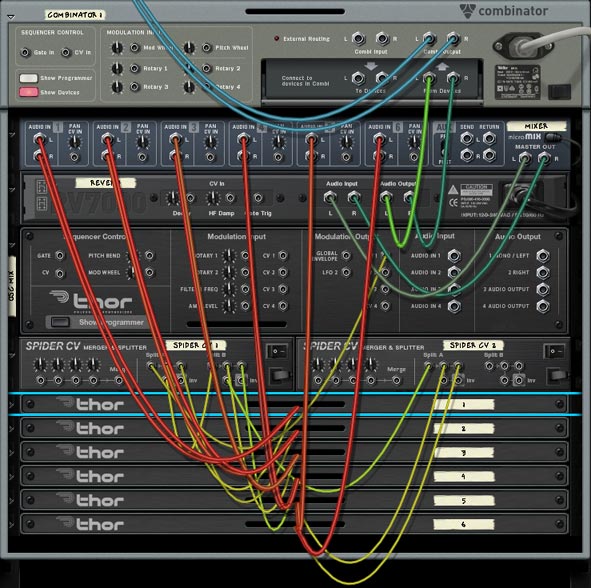
First thing’s first. You need to build all your effects chains. The easiest way to do that involves starting with one Spider Audio/Merger and sending the “To Devices” cable of the Combinator into the splitter side of the Spider. Then you can create as many more Spiders as you need, and endlessly split the signal to create as many FX chains as you like. When you have finished building your first Effects chain, send the outgoing audio signal back into a channel on a 14:2 mixer.

Second, you need to create one Thor per key (this is mostly so that you can make everything velocity sensitive by toying with the Midi Velocity setting via the “Mod Bus > Destination Scale Amount” on the front panel of the Thor in the Modulation Bus Routing Section (MBRS). In the above Modulation Routing image of the Combinator, you’ll see that each Thor has the following line:

Button 1 > Mod 1 Scale Amount: 0 / 100

In the Thor, you need to enter the following in the MBRS:

Midi Gate : 100 > CV Out1 : 0 >  Midi Vel

So in the first image below, you’ll see what needs to be placed in the front Thor panel:

The front panel of Thor, showing the MBRS line. Each key triggering Thor needs to have this same line.

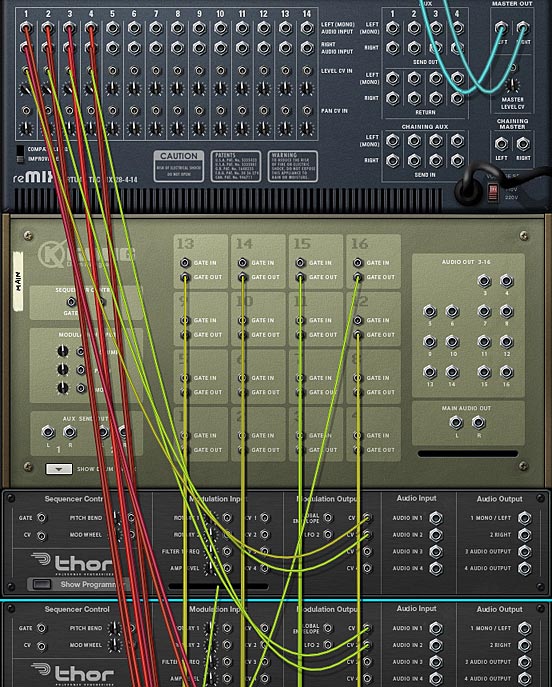
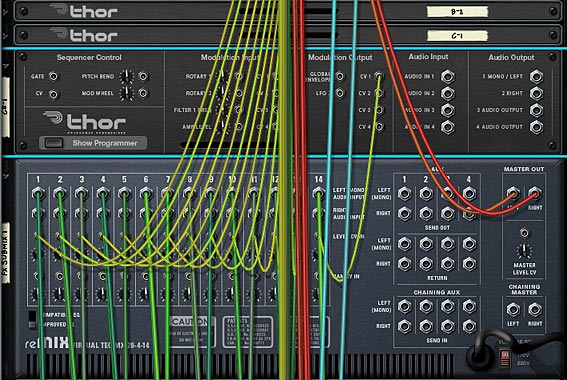
And in the image below,  you’ll see how the CV1 output from each Thor is sent to the level CV input of each FX chain channel on the 14:2 mixer. Note that the trim knob for each “level cv input” on the mixer is set to full (127).

One of the FX 14:2 Submixers showing the CV from each Thor is used to trigger the level of each FX chain.

Once you’ve got one chain built and run through your Mixer, you can have fun duplicating this setup and repeating the process 42 times to fill up 3 mixers of chains on each channel. Then you can have some fun reworking the chains by combining the chains. For example, what I did in the above was create a bank of 28 Audio Spider Splitters / Mergers. I then wired the 14 Audio inputs from the first FX Submixer through the first 14 Spiders (on the split side). I then sent one split from each back to the channels on the first FX Submixer, and another split over to the Merger side of the spiders. Then on the other 14 splitters, do the same for the second FX Submixer, only be sure to send one split back to the merger side of the first 14 Spiders. Finally, send the merged output of the first 14 Spiders back to a new FX submixer. Bingo! You now have a new (fourth FX Submixer) with 14 new effects that basically combine the FX output from FX Submixer 1 and 2. I repeated this process to create a fifth FX Submixer (combining FX submixer 2 & 3), and a sixth FX submixer (combining FX submixer 1 & 3). You could actually create crossover mixes as well, for example, combine channel 1 from submix 1 to channel 5 of submix 2, etc. etc. But I didn’t want to seem like a complete lunatic! I mean 84 keys should be enough to keep you happy for a long time. Or at least until next week and a new tutorial right?

Wait. . . does anyone actually read this? hmmmm.

Ok, well then here’s the videos showcasing the sounds and what you can do with this little puppy:

And here’s a video that shows you how to build your own FX processor with velocity-sensitivity (not the whole thing, that would be CRAZY man! And it would take me hours upon hours to show you. No, this just shows you how to start things off and get the ball rolling. It’s really not a difficult concept to grasp, and it’s mostly repetition and legwork:

So now you have a system which utilizes the first 84 keys. But there’s a few more ideas I built into this whole thing. For instance, you have the global beat repeater which affects all the sounds and can be manipulated by turning it on/off on button 4. You have a simple random player which you can turn on/off via button 2. And don’t forget that when the random player is on, you can use the mod wheel to switch between 32 different patterns. If you don’t like the patterns, you can go in and change them using the first Matrix at the top of the set of Combinator devices (labelled “Random”). You also have two knobs to mangle the FX parameters, and a simple volume control on rotary 3. I honestly can’t think of too much more to pack into this little science experiment.

If the Combinator breaks your CPU. . .

It seems that there’s a lot of people that can’t open the main Combinator or run it because the FX chains inside are too much for their CPU to handle. To deal with this, I broke up the file into 2 discreet Combinators that each have 21 FX chains inside them. This way you can load up half the original FX chains and run just the ones you want. Hopefully this means that more people can use the FX. All the files are available in the project files at the top of the page. The FX can be run via keys C1 to G#2. This way, you can create some random playing via the Matrix (which is actually already built in – but it just makes it easier to tack on a Matrix after the whole thing and start adding some patterns in there to play the FX chains). There are now 2 Combinators and 2 .rns files included in the project files: “Key Flux FX Processor (Lite – A)” and “Key Flux FX Processor (Lite – B).”

Note: I have since updated these patches so that they contain a “Bypass” ability. In other words, if you don’t play the keys, the original unprocessed sound can still be heard. Then when you press the keys to hear the effects, the original sound is cut and the affected sound is passed through. For more information on how this is done, as well as the updated version of these effect Combinators, visit my Effects Bypass Methods article.


Your thoughts?

55 – Key Trig Patterns (Part 3)

In this tutorial, I’m going to go all out and create a one-finger band Combinator which makes use of MIDI Key Triggering to launch an array of patterns for all my instruments. In other words, I’m going to construct a song using a single Combinator and some Reason devices. You can use this as a template for your own ideas, and simply switch out the sound generating devices and patterns to create your own track.

In this tutorial, I’m going to go all out and create a one-finger band Combinator which makes use of MIDI Key Triggering to launch an array of patterns for all my instruments. In other words, I’m going to construct a song using a single Combinator and some Reason devices. You can use this as a template for your own ideas, and simply switch out the sound generating devices and patterns to create your own track.

You can download the project files here: one-finger-band. There are two .rns files for those using Reason 5, and 2 Combinator files (one for Reason 5 and the other for those still running Reason 4). You can also open up the Combinator inside Record and use it there if you like. Note: please respect that these project files, like everything else on this site, is under the Creative Commons 3.0 licensing, meaning you can mix, remix, share, and play around with the song to your heart’s content, but you will need to provide the source info and a link back to my site here in any productions you do with this file. Share and share alike ok? And you can’t make any money off the file. It’s not going to win any awards anyway. But if you remix or play with the file, send them back to me privately and I’d be happy to showcase them here in a new posting (send to my email in the top menu), I’d love to see what you come up with. Don’t be shy!

Before jumping in, I just wanted to give a shout out to Hydlide, who did a great tutorial over at TSOR (The Sound of Reason) site which shows you how you can split several Thor patterns along all the octaves of the Combinator Key Range. Have a look at his creative Thor Step Sequencer tutorial for some fresh ideas. So thanks for ripping off my idea Hyd. Thief! 🙂 All joking aside, if it wasn’t for him wanting to see a third part to this series, I wouldn’t have written this “next part.” And now you’ll all have to suffer through more MIDI Key Triggering madness.

Here’s a video showing you what I’m explaining below. It’s a bit of a showcase for the song I created. Read on to see how the Combinator is setup.

Explaining the “One Finger Band (Latched – R5)” Combinator

The idea behind the Combinator builds upon the previous two tutorials I wrote about Key Triggering your Patterns. However, there’s a few new ideas in this one which I’m going to highlight below. I also have a few tips for those of you trying this out on your own.

The main thing I learned while doing this is that it’s much easier to program a song using the “Momentary” method of Key Triggering. The reason is that it’s easier to write notes into the sequencer. You place the note along the clip lane for as long as you want your pattern running. Simple enough. If, on the other hand, you are programming your notes in using the “Latch” method, you need to provide a start and stop note on the same key to trigger your pattern to turn on, and then turn off. Which can get a bit fiddly. Even so, I tried it using the “Latched” method, just to see how it would work. So to summarize, if you are programming your song in the studio, you’re probably better off using the “Momentary” method. If, on the other hand, you are playing “Live,” you’ll probably benefit more from the “Latched” method, because you don’t have to have your fingers on the keys to keep things running. BUT (and this is a big BUT), you DO need to remember which patterns are running at any given time, so you know which key to press to turn them off when you want them to stop.

It would be really nice if you had a keyboard that had lighted keys to note which ones are on and which are off. But I don’t know of any manufacturers that supply such a keyboard. Pad Controllers are a different story. And controllers with lighted buttons are even better (like the Livid Ohm64, Novation Launchpad, and Akai APC40), because you can assign a key note to each button and they will be lit when on and unlit when off, making this whole setup a piece of cake.

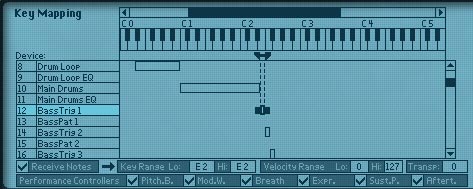
So back to the template. Here’s how the key range works for the Combinator:

The Key Mapping area of the Combinator, where we use the Key Range to map our Kong drum pads, Dr.OctoRex Loop Slots, and sound device pattern triggers to individual keys.

The root of this method is in how you program the Combinator Key Range assignments for the various devices. And we went over most of this in the second part of the tutorial. However, I’ve added in a few Dr.Rex loops and some variations, as well as a Kong device to play our drums. Since both those devices already have default key assignments, you don’t need to do too much to get them working for you. The other sounds are placed on other free key areas on the keyboard. Here’s how it breaks down:

  • MIDI Keys D#0 – B0: Dr. OctoRex Loop Player (Drum Loop with 8 variations in the 8 different slots). D#0 Stops the Loop. E0 – B0: Plays Loop slots 1-8. You can switch between the slots in mid-stream. And depending on how you have your “Trig Next Loop” set up, switching from one slot to the next will follow one of those three methods: Bar, Beat, or 1/16th note.
  • MIDI Keys C1 – D#2: Kong Drum Designer (Main Drums with a Basic drum setup on all 16 Pads). Plays Pads 1-16.
  • MIDI Keys E2 – G#2: Subtractor Bass. E2 – G2 plays Bass patterns 1 – 4 in a “Latched” mode. Therefore, you need to press the key once to trigger the pattern, and press once more to stop playing the pattern. G#2 applies a delay / reverb effect to the bass patterns. You can play each of the bass patterns or all of them combined if you like. Then press G#2 to apply the effect to the bass sound.
  • MIDI Keys A2 – C3: Thor Pad Sounds 1 & 2. These keys play 4 different pad patterns. Both pad sounds are joined together, so the patterns here will play both simultaneously. That’s why I separated them by panning them left and right. The Pad patterns are also “Latched” to the keys. You can also shuttle both pad sounds left and right by using Rotary 4 on the Combinator. This applies an LFO waveform to pan the sounds back and forth inversely. Increase the amount of movement by moving the Rotary further to the right. Reduce the auto-pan completely by moving the rotary all the way left.
  • MIDI Keys C#3 – E3: Thor Synth. These keys play 4 different synth patterns also in a “Latched” mode.
  • MIDI Keys F3 – A3: Thor Rhythm section. Keys F3 – G#3 plays 4 different Rhythm patterns also in a “Latched” mode. A3 applies a distortion effect to the Rhythm patterns. In the same way as the bass works, you can play any patterns using the first 4 keys, and then press A3 to apply the distortion to the sound.

In just under 4 octaves, we’ve managed to provide all the instruments necessary to produce a track. That still leaves plenty more keys to assign to anything from sounds, patterns, and FX switches. Just because I stopped here doesn’t mean you have to. You can use the file as a template, but you’ll gain more out of understanding how the routings work, and what they are doing. This way, you can truly make the Combinator your own. So I encourage you to try your hand at creating your own template file along these lines. You might find it not only a creative exercise, but also a challenging and engaging way to work with the software. And finally, you might get a really nice reusable template that makes creating tracks quicker or “Live” play with Reason better.

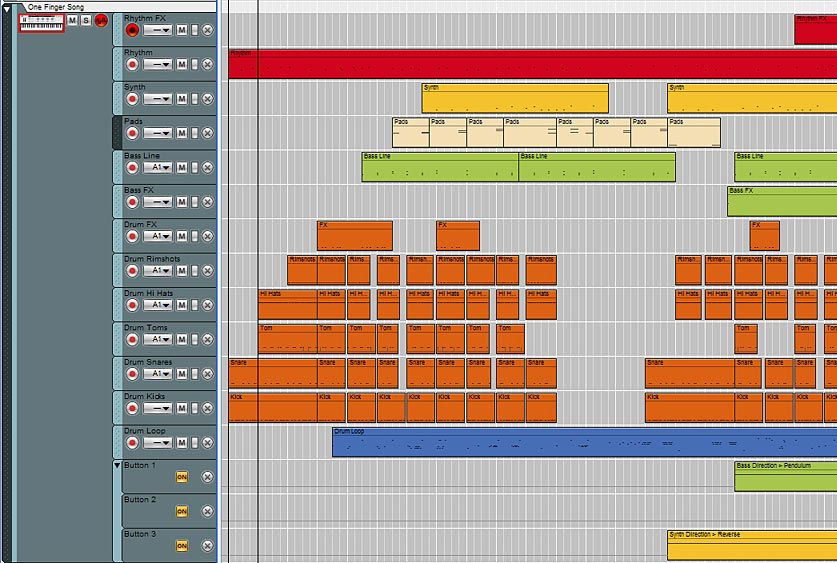
This image shows the various Note Lanes for the Combinator. Each note lane represents a different sound source, Kong drum pad, or Rex Loop Slot selection.

If you are programming a song, you need to create a new note lane for each new track you introduce, because the Combinator IS the song. This is how I set it up in the project’s .rns file. So you can go through one track at a time on each note lane and place all your note triggers there. Alternately, if you are playing live, you can have the entire song on a single note lane.

In addition, when you load the Combinator into your project, you should be aware that the mastering is already built into the Combinator. Rotary 1 controls the Compression Input and Rotary 2 controls the Maximizer input. This mastering setup was largely borrowed from the “Hip Hop” mastering patch in the Factory Soundbank and then the devices were moved and rerouted into the Combinator. You can also create a “bypass” for the entire set of mastering devices and put that on button 4 of the Combinator if you like.

This brings up another point. All the sounds inside the file come from the Factory Soundbank or else were built by me (most of the Kong drums, Synth, and Effects were my creation, while the rest were default patches, drum samples, and Rex files that ship with R5). So you shouldn’t have any problems opening the Combinator or .rns files on your computer.

Differences with the “One Finger Band (Latched – R4)” Combinator

Since Reason 4 users don’t have the new Kong device, I replaced this with a Redrum. The clips and notes in the main sequencer are still the same, but the drum sounds will be different. Each Redrum channel is triggered by a Thor device, and the Thor devices are mapped to the Combinator Keys in the Combinator Programmer. So the key assignments for the drums are different than the R5 file. Those with R5 can, of course, open both .rns files. Those with R4 can only open the R4 Combinator.

One other difference is that I had to remove the Dr. OctoRex device, so there is no “Drum Loop” note lane for the R4 .rns file. You can, of course add in any number of legacy Dr.Rex devices and Rex loops in your own template. Since I do all my work in Reason 5 and Record 1.5 now, I have to stop working with the legacy Dr. Rex loop player. So farewell Dr. Rex. I loved you while you were with us. R.I.P.

Careful with that Pitchfork, Eugene (any Pink Floyd fans out there?)

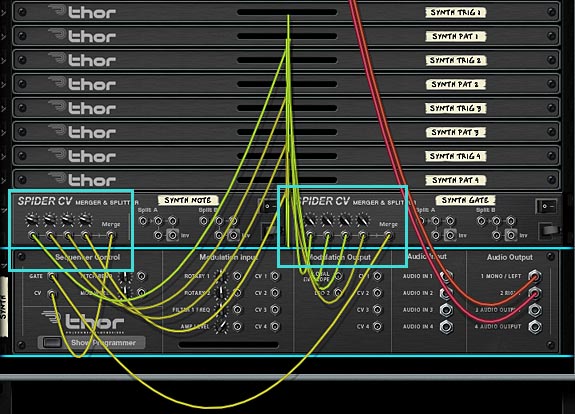
When I was trying to streamline things a bit, I got into a bit of a pickle. Rather than duplicate all the sound sources over and over just to recreate new patterns, I decided to Merge the Note/Gate CV from the “Pattern” Thors into the sound source devices. In order to do this, you need to use 2 Spider CV Mergers; one for the Note and the other for the Gate. However, when you do this, you’ll notice that the pitch of your sounds will go upward, depending how many sound sources you have connected to the Spider. You’ll need to pitch downward using the trim knobs next to the CV inputs on the Merger side of the Spider. This is fiddly because you need to adjust all four downward until you get the pitch you want (assuming you have four pattern devices merged into one CV output). Even merging 2 note CV sources into one will force you to lower the trim knobs a bit toward the left. As for the Gate CV inputs, you can turn all the trim knobs way up to 127. I don’t think this has any noticeable affect on the Gate.

This image shows the attenuation of the pitch on the "Note" CV Merger on the left and the attenuation of the "Gate" CV Merger on the right, using the CV trim knobs.
This image shows the attenuation of the pitch on the “Note” CV Merger on the left and the attenuation of the “Gate” CV Merger on the right, using the CV trim knobs.

This also complicates matters a little bit because you now have 3 parameters affecting the pitch of your sound: The Oscillators in the sound source, the Note values of the Step Sequencers on the “Pattern” Thors, and the combined CV output from the Spider CV Merger (which is attenuated using the trim knobs). Just be aware that the combination of all three parameters will affect the pitch of your sound. You can, of course, play around with all three to affect your pitch, but I found it’s usually easier to first set up your trim knobs to be in the right vicinity of the Octave you want the sound source playing, then leaving them alone and using the Pattern knobs to adjust the pitch.

Suggestions for Using this Combinator setup

  • Live Play. Ultimately, this has the potential to create some really monster setups where you have a wide array of devices and patterns playing those devices all along a single keyboard controller. And with the new Ableton Controllers out there, you can make great use of them for Reason also. All you need is a lot of lighted buttons that are set up to trigger MIDI Key notes, and you’re golden. You can even set things up logically. If you have an 8×8 64-button controller, you can use the first two rows to control Kong, the third row to control a Dr. OctoRex with loop slots (use 1 slot to stop the loop from playing, and 7 other ones for loop variations or entirely new loops in the other slots. And so on and so forth.
  • Remixing potential. Change around the patterns inside the various “Pattern” Thors and/or change the sound sources to your own patches to instantly create a variation on the Midi data that’s in your main sequencer. This takes very little time to do and can generate an entirely new sound or track for you. The beauty is in the fact that you’ve already built the template and laid down midi data. All the hard lifting is done.
  • If you’re feeling ambitious you can set things up to trigger the instrument direction switches (currently set up on Combinator buttons 1-3) from MIDI keys instead.

So there you have it: Part 3 in our MIDI Key Triggering explorations. Should I delve into a “Part 4” or move on to something new? And let me know if you have any other ideas that come to mind where Key Triggering is concerned. In parting, I’ll leave you with the sweetly dark ambient glitch sounds of my little experiment:

53 – Key Trig Patterns (Part 1)

I’m sure most of us have used the Matrix or Thor Step Sequencer to some extent. But how often have we thought about using our keyboard to trigger those patterns? I know I’ve never given it much serious thought, since I usually sequence all the parts into the main sequencer. But this time I’m going to explore the possibility of triggering patterns from our Keyboard. This has a lot of “live play” applications.

By now, most of us know how to use Pattern sequencers to play parts in their tracks. I’m sure most of us have used the Matrix or Thor Step Sequencer to some extent or degree. But how often have we thought about using our keyboard to trigger those patterns? I know I’ve never given it much serious thought, and it’s probably due to the fact that I don’t play “live.” I usually sequence all the parts into the main sequencer. So this time, we’re going to explore the possibility of triggering patterns from our Keyboard.

The project files can be downloaded here: key-trig-pattern-methods. This file contains some combinators and an .rns file with all the combinators inside. These Combinators outline some of the methods presented in the tutorial below. Try them out and see what you can do with these ideas.

Furthermore, we’ll see just how far we can take this idea. The whole thing will be contained inside a Combinator (or a Kong device, if you wish), and the notes on the keyboard will trigger different patterns playing different instruments. It’s like having full control of the band at your fingertips on your piano or controller keyboard.

Sound interesting to you? Yeah, it was interesting to me too.

Before I jump into the various methods of Key Triggering, I want to give a huge shout out to Peff for providing help on figuring out the “Latching” method below. Without his help, I would have spent several more hours tearing out my hair. So thanks Kurt! I really appreciate all the help you provide, not just to me, but to the whole community.

Triggering Matrix Patterns

Let me start off by saying this is a huge PITA where the Matrix is concerned. The main problem lies in the delay of Pattern triggering from the moment when you press the trigger key to the moment the pattern starts (variable, depending on when the key was hit during playback). Yes I know, you can plop your patterns down on the Matrix pattern lanes, but that’s defeating the whole purpose of this tutorial, which is all about triggering patterns via different keys on your keyboard. But for the sake of argument (and to be complete), I’ll show you first how to set it up this way using a Matrix, but I’m not going to spend a lot of time on this one. Maybe this is beneficial on some planet where delay is a “cool” and “hip” concept. Here’s a video where I outline 2 methods to key trigger a Matrix Pattern. The first method is not described in detail here because it introduces the dreaded delay. But the second method (outlined in detail below) can be useful in a somewhat chaotic and free-running way.

Note: Ed Bauman highlights a method you can use to Trigger Matrix Patterns “almost” instantaneously here: “When Reason’s Time Signature is set to 4/4, patterns will switch on every measure, a full 16 x 16th notes, but if you set the Time Signature to 1/16, patterns will switch on every 16th note, so it’s basically immediate. Of course, if you’re playing back a sequence, doing this completely screws up the measures in a song and makes the whole song gigantic as far as measure count goes, but it definitely works for the Matrix and ReDrum. It used to apply to Dr. Rex as well but with Dr. Octo Rex we now have the Trig Next Loop region which essentially does the same thing if you’re switching around rex files within one Dr. Octo Rex.”

  1. First, Create a Combinator. Then create a 14:2 Mixer, and a sound source (in this case a Subtractor). Load up a Subtractor patch or else create your own synth sound in the Subtractor. Then create a Matrix underneath. It should automatically connect the Note / Gate CV for you. Enter a pattern into the Matrix (or press Ctrl+R to quickly enter a random pattern).
  2. In between the Subtractor and the Matrix, we’re going to create a Thor and completely initialize the patch (this means removing any Oscillators and Filters, and dropping all the values down to zero.
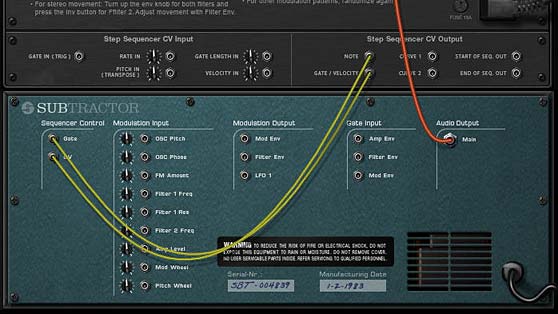
  3. The Thor is simply used as the gate trigger. So flip around to the back of the rack and connect the Note / Gate CV from the Matrix into the Thor CV1 & 2 inputs. Also connect the CV 1 & 2 outputs from Thor back into the Note / Gate CV inputs on the Subtractor.
The back of the rack showing the CV passing from the Matrix through the Thor and into the Subtractor.
  1. Flip around to the front again, and in the Thor Modulation Bus Routing Section (MBRS), enter the following:
      CV In1 : 100 > CV Out1 : 100 > Midi Gate (under Midi Key > Gate)
    CV In2 : 100 > CV Out2 : 100 > Midi Gate (under Midi Key > Gate)
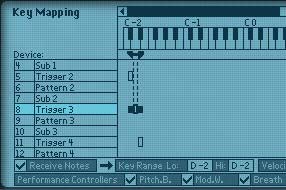
  • Open up the Programmer Modulation Routing on the Combinator and for the Subtractor device uncheck the “Receive Notes” checkbox. Then select the Thor device and enter the following for the Key Range: Lo: C-2 / Hi: C-2. This way, when you press C-2 on your keyboard controller, it will open the gate and play the pattern on the Matrix.
  • Now press Run so the Matrix pattern is running. You won’t hear anything yet. In order to hear the pattern (turning it on or off) you need to press the C-2 key. This allows you to hear the pattern. The crappy part is that there’s no telling when the pattern will be picked up when you press the key. Put another way, the pattern is continually running, but only sounds when you press and hold the key down. Not the most elegant solution.
  • To add multiple instruments or parts, select the Subtractor, Thor, and the Matrix (holding down your “Shift” key to multiple-select the devices), right-click and select “duplicate devices and tracks.” Enter your new pattern in the Matrix. Then flip to the back of the rack and route the audio out of the Subtractor to a new channel. Finally, go into the Combinator programmer, and adjust the Thor device so that only one key on your keyboard controller is used to trigger the Thor (C#-2, for example).
  • Repeat the above process for as many sounds as you need (up to the total amount of keys that your keyboard will allow: 88 for a full size piano or synth controller keyboard, or 128 for the full midi range which a Reason or Record Combinator allows — from C-2 to G8). This is more than enough of a range to create a complete set of instruments and sounds for most any standard songs or performances.
  • Using Thor’s Step Sequencer for Precise Pattern Key Triggering

    Now that you have an understanding of how the Matrix is key triggered, I’ll move on to a more robust way of accessing patterns via the keyboard. This method replaces the Matrix in favor of the Thor Step Sequencer. Since the Thor Step Sequencer can be programmed to start and stop precisely where you want it, using it is the best option when you want precise control over your sounds. It’s just too bad that it’s more of a pain to enter and edit notes into it. The Matrix, to my eyes, provide a simple visual way to add patterns. The Thor Step Sequencer is more tedious by changing rotary knobs all the time.

    The Momentary Key Method

    The first method is the easiest and allows you to create a “momentary” trigger via your midi keys. This means that when you press a key, the Step Sequencer plays the pattern. When you release the key, the pattern stops.

    1. To set this up, first create a Combinator, and then in order a 6:2 Mixer, a sound device (here, a Subtractor), and holding the “Shift” key, a Thor device. While you’re at the front of the rack, add a sound into the Subtractor that you’d like to hear. Any sound will do.
    2. Completely Initialize the Thor device. This means removing the Oscillators, Filters, bringing all values to zero as well.
    3. In the Thor MBRS, enter the following:
        Button 1 : 100 > S.Trig (found under Step Sequencer > Trig)
    4. Directly to the rght of Button 1 on the Thor, use the upward spin control arrow to set this to C-2. This means that the Thor Step Sequencer is triggered when the C-2 key is pressed. In the Step Sequencer, set the Run Mode to “Repeat” and enter a pattern into the Step Sequencer (note that to gain access to the full note range, you’ll need to switch the Octave setting to “Full”).

    Note that an alternate way to trigger the Step Sequencer is outlined in the Video. Though this is a more labor intensive way to trigger things. If you want to use this method, switch the “Button 1” source in the MBRS to “MIDI Gate (found under MIDI Key > Gate)” and then open the Combinator Programmer and adjust the Key Range of the Thor device to Lo: C-2 / Hi: C-2 (so one key is selected). This achieves the same outcome.

    1. Flip the rack around and in the “Step Sequencer CV Output,” send the Note and Gate/Velocity CV outputs into the Gate / CV inputs on the Subtractor.
    The back of the rack showing the Thor routing from the Step Sequencer into the Subtractor.
    The back of the rack showing the Thor routing from the Step Sequencer into the Subtractor.
    1. Lastly, go into the Combinator Programmer, and deselect the “Receive Notes” checkbox for the Subtractor (so that the Subtractor only receives notes from the Thor Step Sequencer).

    Now, when you play the C-2 key, the Thor Step Sequencer will start and play for as long as the key is held down. Cool right? If you want to create more instruments along other keys, create the new sound device (or even another Combinator), duplicate the Thor, connect the new Thor CV outputs to the new device, and move the button spin control to the new key setting. Done.

    The Latched Key Method

    No, this is not the latched key kid hanging outside his parents’ house with the key around his neck. This is the second method to trigger patterns via MIDI keys. It is is a little more complex because you need two Thors to produce it. This method is a “latch” or “hold” style of triggering. Another way to look at it is a toggled pattern on / pattern off method. In this procedure, you press a key and the pattern starts. The pattern then plays through even when you release the key. You then press the same key again, and the pattern stops. In this way, the pattern is “latched” by the key.

    1. Building on the first method, we need to change a few things. First, reset the Combinator by removing the key assignment (using the spin control to the right of the button — which should be set to “-“). We also need to remove the “Button 1” line in the MBRS (not necessary, but for cleanliness’ sake). Label this Thor “Pattern.”
    2. Create a new Thor and completely initialize it as we did previously. Label it “Trigger.” In the Step Sequencer, set the Run Mode to “Step,” change the Edit knob to “Curve 1” and create a 2-step pattern, with Step 1 set to zero (0) and Step 2 set to 100. Then enter the following line in the MBRS:
        MIDI Gate : 100 > S. Trig
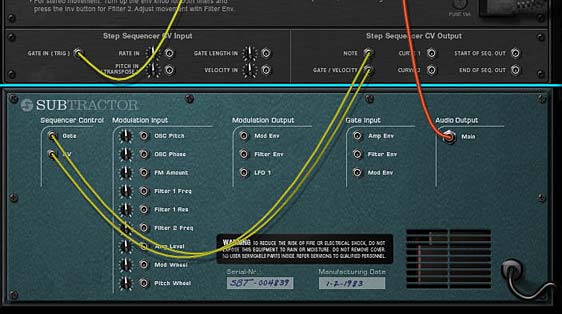
    3. Flip the rack around and send the “Curve 1” CV output from the “Trigger” Thor into the “Gate In (Trig)” CV input on the “Pattern” Thor.
    The back of the Reason rack with the CV routings for the latched setup. One Thor triggers the other Thor's Step Sequencer to start
    The back of the Reason rack with the CV routings for the latched setup. One Thor triggers the other Thor's Step Sequencer to start
    1. Flip the rack back to the front and in the Combinator Programmer, ensure both the Subtractor and “Pattern” Thor is not receiving notes (uncheck the “Receive Notes” checkbox), and ensure the “Trigger” Thor is receiving notes (the “Receive Notes” checkbox has a check in it). Also set the Key Range value for the “Trigger” Thor to Lo: C-2 / Hi: C-2.
    The Combinator Programmer Modulation Routing
    The Combinator Programmer Modulation Routing

    Now press the C-2 key on your keyboard. The Step Sequencer starts and plays through even when you release the key. Press the key again, and the Step Sequencer stops. If you wish to add more devices to different keys that are “latch” triggered, create the new sound device (or even another Combinator), duplicate the 2 Thors, connect the new Thor CV outputs from the “Pattern” Thor to the new device, and adjust the Key Range to a new key for the “Trigger” Thor within the Combinator Programmer. Then you can set up your pattern in the “Pattern” Thor Step Sequencer, and you’re all set. Simple right?

    Where do you go from here?

    Here’s a few suggestions, which we will explore in the next part in our “Key Triggering Patterns” tutorial series:

    • Now that we have the hang of the way in which we can trigger the Thor Step Sequencer via your keyboard controller, you can duplicate the same sound source as many times as you like to create new patterns for the same sound source. Yes, you can merge the CV to control the same sound source (instead of duplicating the sound source), but it’s often quicker just to copy the whole thing and change your pattern.
    • You can create many different sound source instruments (any synths, samplers, Rex or Drum modules) that are controlled by different Thor Step Sequencers and map them to your keyboard to create complex multi-instrument Combinators. Using this method, you could even create an entire song within a single Combinator, and play the parts of the song by playing notes on your keyboard. In this way, you can bring the sounds in and out based on how you play the keyboard, or program the notes directly into the main Reason sequencer.
    • Instead of setting this all up in a Combinator, try setting it up on a Kong device, and using the Pads to trigger the patterns instead of the Combinator.
    • Feeling ambitious? Try combining the two methods: “Momentary” and “Latched,” then designating a key on your keyboard, a button on the Combinator, or a Pad on Kong to switch between the two methods.

    These ideas are great for setting up “Live Play” templates in Reason Combinators. It takes a lot of preparation to set up a complete song in this manner, but once it’s set up, it will make you look like a magician as you play complete part sequences with the press of a key.


    What do you think of these ideas? Have any others that you’d like to share here? Post a comment and let me know what you’re thinking. As always, thanks for watching, listening, and reading.

    Thor Tremolo-Pan-Freq FX

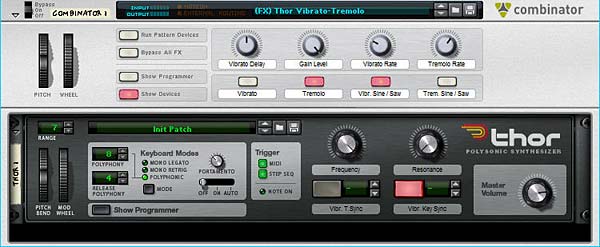
    This patch came out of a request to have a Tremolo effect in Reason. There’s many ways you can create one. But this time I wanted to expand upon that a little bit and create a triple effect using a single Thor device. So here is a Tremolo / Pan / Frequency Modulation effect patch that you can use.

    This patch came out of a request to have a Tremolo effect in Reason. There’s many ways you can create one. But this time I wanted to expand upon that a little bit and create a triple effect using a single Thor device. So here is a Tremolo / Pan / Frequency Modulation effect patch that you can use.

    Download the 2 Combinator patches here in zip file format: thor-tremolo-pan-freq-fx. Note: You will need Reason 5 or above to use the Combinators, because they both use the CV inputs on the Combinator, which was a new feature of Reason 5. If you have a previous version of Reason, the Combinator will give you a “bad format” error message.

    (FX) Thor Tremolo-Pan-Frequency Combinator

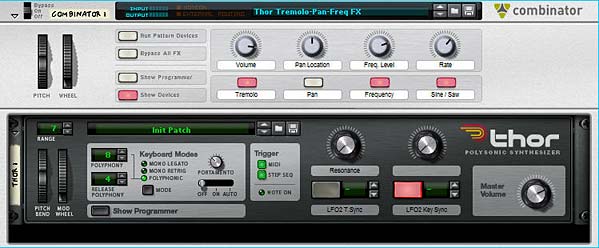
    Thor Triple effect patch: Tremolo, Pan, and Frequency Modulations
    Thor Triple effect patch: Tremolo, Pan, and Frequency Modulations

    This patch uses the Combinator Mod Wheel to trigger the level of the effect(s) in question. The patch is very simple in design, using only a single Thor inside the Combinator. The LFO 2 in Thor is used to modulate the following 3 effects:

    1. Tremolo
    2. Pan Modulation
    3. Frequency Modulation

    Note: You must use the Mod Wheel in order to trigger these effects. You won’t hear anything happening to your audio if you don’t use the Mod Wheel!

    The other nice thing about this patch is that you can have any combination of these three effects running at the same time. Or you can use only one of the effects at a time. The choice is yours.

    The following explains how the patch rotaries and buttons work:

    Pitch Bend: This parameter is not used.

    Mod Wheel: Controls the level of the effects globally (i.e.: all three at once).

    Rotary 1: Volume – Controls the global volume of the audio going out of the Combinator via the Master Level on the Thor device.

    Rotary 2: Pan Location – Controls the location of the Audio in the stereo field. If the Pan modulation is turned on (see Button 2), then the panning still floats from left to right and back again like a pendulum, however, the Pan location is static and can be set anywhere along the stereo field. Try using this rotary in tandem with the Pan modulation turned on to get a feel for it.

    Rotary 3: Frequency Level – Controls the Frequency of the incoming audio. Fully right cuts off the frequency entirely. Fully left opens the frequency completely. Use this in tandem with the Frequency Modulation enabled (see Button 3) for some interesting effects.

    Rotary 4: Rate – This controls the rate of Thor’s LFO 2, which affects the modulation of the three effects globally.

    Button 1: Tremolo – Turns on the Tremolo effect, which basically modulates the Amp Gain in Thor based on Thor’s LFO 2.

    Button 2: Pan – Turns on the Panning modulation effect, which pans based on Thor’s LFO 2.

    Button 3: Frequency – Turns on the Frequency modulation effect, with is modulated based on Thor’s LFO 2.

    Button 4: Sine / Saw – Determines whether a Sine waveform is used or a Sawtooth wave is used. Sine is used if the button is off (disabled), and a Sawtooth waveform is used if the button is on (enabled).

    And there are some extensions to this patch that I’ve set up on the Thor Rotaries and Buttons which can be accessed by Showing the Combinator devices:

    Thor Rotary 1: Resonance – Controls the Resonance of Thor’s Filter 3. Minimum is set to zero (0) and Maximum is set to 96.

    Thor Rotary 2: This parameter is not used.

    Thor Button 1: LFO 2 Tempo Sync – Turns on the Tempo Sync for Thor’s LFO 2. When turned on, the LFO 2 Rate is tied to the song Tempo. When turned off, it is free-running.

    Thor Button 2: LFO 2 Key Sync – Turns on the Key Sync for Thor’s LFO2. When turned on, the LFO 2 is re-triggered each time a key is pressed. When turned off, the LFO 2 wave is not re-triggered.

    (FX) Thor Vibrato-Tremolo Combinator

    This patch idea came courtesy of Eric Kloeckner. He said you could create a Vibrato in Thor by sending the audio through the Chorus effect and turning down the feedback. And voila, there it was. So now, I’ve created a second patch and placed both in the download file at the top of this posting. I also separated the LFOs in Thor, so that you can adjust the two LFOs independantly; meaning, you can turn on both the Vibrato and Tremolo and have them cycling at different rates and modulate both differently as they both act on your audio. Fun stuff.

    Second Thor FX Patch with separate Vibrato and Tremolo effects
    Second Thor FX Patch with separate Vibrato and Tremolo effects

    The following explains how the patch rotaries and buttons work:

    Pitch Bend: This parameter is not used.

    Mod Wheel: Controls the level of the effects globally (i.e.: all three at once). Note again, you must use the Mod wheel to use the effect. No Mod Wheel, no effect. Very important to remember!

    Rotary 1: Vibrato Delay – Controls the Chorus Delay, which can give some interesting effects and add a little more life to your Vibrato.

    Rotary 2: Gain Level – Controls the Gain position of the Audio. In other words, it’s a volume level, but it’s most useful if you use it while the Tremolo is on. This way you can adjust the amount of gain (Tremolo) and the range at which the Mod Wheel affects the Tremolo.

    Rotary 3: Vibrato Rate – Controls the rate of the Vibrato by adjusting the Rate of Thor’s LFO 2. In this patch, LFO 2 is tied to the Vibrato, and LFO 1 is tied to the Tremolo.

    Rotary 4: Tremolo Rate – This controls the rate of the Tremolo by adjusting the Rate of Thor’s LFO 1. In this patch, LFO 2 is tied to the Vibrato, and LFO 1 is tied to the Tremolo.

    Button 1: Vibrato – Turns the Vibrato effect on or off.

    Button 2: Tremolo – Turns the Tremolo effect on or off.

    Button 3: Vibrato Sine / Saw – Switches LFO 2 between a Sine and Sawtooth waveform, which in turn affects the shape of the Vibrato.

    Button 4: Tremolo Sine / Saw – Switches LFO 2 between a Sine and Sawtooth waveform, which in turn affects the shape of the Tremolo.

    And there are some extensions to this patch that I’ve set up on the Thor Rotaries and Buttons which can be accessed by Showing the Combinator devices:

    Thor Rotary 1: Frequency – Controls the Frequency of Thor’s Filter 3. Minimum is set to zero (0) and Maximum is set to 127.

    Thor Rotary 2: Resonance – Controls the Resonance of Thor’s Filter 3. Minimum is set to zero (0) and Maximum is set to 96.

    Thor Button 1: Vibrato Tempo Sync – Turns on the Tempo Sync for Thor’s LFO 2. When turned on, the LFO 2 Rate is tied to the song Tempo. When turned off, it is free-running.

    Thor Button 2: Vibrato Key Sync – Turns on the Key Sync for Thor’s LFO 2. When turned on, the LFO 2 is re-triggered each time a key is pressed. When turned off, the LFO 2 wave is not re-triggered.

    Hope you find this useful. Let me know what you think?

    47 – Beyond Kong Pad Banks

    In this tutorial, I’m going to dispel the myth that Kong can’t contain multiple pad banks — that is, multiple kits. Here I’ll show you two ways to extend Kong by either Layering multiple Kong devices, or switching between multiple kits (from one kit to another). Method 1 uses the Combinator buttons to trigger 4 different kits (which can be layered). And Method 2 uses a Kong pad to trigger 4 different Kong banks, making it self-contained in a single Kong device.

    It’s come up on more than one occasion that Kong does not have the ability to provide multiple pad banks; that is, multiple Kits inside the same Kong. This is a feature that most other MPC controllers have: usually providing 4 entire kits from which you can select. In this tutorial, I’m going to dispel the myth that Kong can’t do this, and in turn I’m going to show you two different ways you can trigger multiple “banks” or kits for Kong. Method 1 uses the Combinator buttons to trigger 4 different kits (which you can also Layer on top of each other, and also adjust the master volume for each kit independently using the Combinator Rotaries). On the other hand, Method 2 uses a Kong pad to trigger 4 different Kong banks, and is therefore, a self-contained method where everything can be switched within Kong.

    The project files can be downloaded here: beyond-kong-pad-banks. There are two Combinators included in a .rns file which is zipped up. These files outline the two different approaches discussed below.

    Method 1: Kong 4-bank Kit (Layered)

    This is not my favorite way to create banks, simply because you need to use the Combinator controls to determine which bank is being played, and it takes two clicks to a) turn off one bank and b) turn on the other. However, the advantage is that you can layer these banks on top of each other and adjust the volume for all 4 banks. Something you can’t do with the other method. Also, if you need to switch banks instantaneously, your best bet is to program the switch in the sequencer, otherwise you’ll have a slight lag which even the best two fingers pressing on both buttons at once won’t be able to do at precisely the same moment. Automation to the rescue.

    Ok, so here’s the low-down. You create a Combinator with a 6:2 Line mixer. Then create four Kong devices underneath the line mixer so they are automatically routed to the mixer’s first four channels. Then load up your favorite drum kits into all four Kong devices.

    Once the kits are in place, you open up the Combinator programmer, and for each Kong device, enter the following:

    Kong 1 – Button 1 > Receive Notes : 0 / 1

    Kong 2 – Button 2 > Receive Notes : 0 / 1

    Kong 3 – Button 3 > Receive Notes : 0 / 1

    Kong 4 – Button 4 > Receive Notes : 0 / 1

    That takes care of the Buttons. For the Rotaries, we’re going to use the Line Mixer to provide level adjustments for each bank, so select the 6:2 Line Mixer in the Combinator programmer and enter the following:

    Rotary 1 > Channel 1 Level : 0 / 100

    Rotary 2 > Channel 2 Level : 0 / 100

    Rotary 3 > Channel 3 Level : 0 / 100

    Rotary 4 > Channel 4 Level : 0 / 100

    That’s pretty much all there is to it. Now you use the buttons to switch between banks; turning them on or off. You use the rotaries to adjust the level of each bank. Notice that you can layer the banks on top of each other, depending which buttons on the Combinator are active.

    Method 2: Kong 4-bank Kit (Self-Contained)

    Now for a somewhat different, and possibly more robust, way to create 4 Kong banks. The upside to this method is that you can control everything from the Kong pads directly. You don’t need to use separate Combinator controls. The downside (if indeed this is a downside) is that you cannot layer the pad banks. Each bank is either on or off. And in my mind at least, this seems to work the way most Pad Controllers and MPC devices work. And another downside is that you have to give up one pad to act as the “Pad Bank Switcher.”

    Keep in mind that even though this method does not layer the pad banks, there’s nothing to prevent you from building up layers using the NN-Nano drum type inside the Kong kit itself. It’s for this reason that I call this method much more flexible, because you can both switch between pad banks with one pad press and at the same time use layered drums inside the kits you are building. It’s the best of both worlds.

    This method employs multiple Kong devices that are chained to each other via Gate CV connections. So first, create your Combinator, and then a 14:2 Line Mixer. Hold down your Shift key and create a Kong device underneath the Line Mixer. This Kong is going to be used as the Main “Player” but will not require any audio to be sent to the Mixer. Everything this Kong does is CV-based, to trigger the other Kong devices.

    The next step is to chain all the Kongs together. So starting with the first Kong, send the Gate Out CV from each pad to the Gate In from the corresponding pad in the second Kong. Do this for Pads 1-15, and when finished route Kong 2 to Kong 3 in the same manner, and finally Kong 3 to Kong 4.

    Now create a Thor device underneath the Main Kong (hold the “Shift” key down so nothing is routed). This Thor is merely used for CV purposes, so initialize everything, and turn on the “Step Seq” button in the “Global” area of Thor (top panel). Inside the step sequencer, change the Run Mode to “Step” and turn the Edit knob to “Curve 1.” Enter the following: 4 steps, with the first step CV value of 100, and the other three steps to CV value 0 (zero). Here’s what it looks like:

    Curve 1 setup in the first Thor's Step Sequencer
    Curve 1 setup in the first Thor's Step Sequencer

    Now change the Edit knob to “Curve 2” and enter the following: 4 steps, with the second step CV value of 100, and the first, third, and fourth steps to CV value 0 (zero). Here’s what it looks like:

    Curve 2 setup in the first Thor's Step Sequencer
    Curve 2 setup in the first Thor's Step Sequencer

    Enter the following in the Modulation Bus Routing Section (MBRS):

    S.Curve 1 : 100 > CV Out1

    S.Curve 2 : 100 > CV Out2

    Flip the rack around to the back and send CV Out 1 to the Mixer Channel 1 Level CV input, and turn the trim knob all the way up to 127. Then send CV Out 2 to the Mixer Channel 2 Level CV input, and turn its trim knob all the way up to 127.

    Flip the rack back to the front, select the Thor and duplicate the device. Inside this new Thor, you will have to make changes to the MBRS for the Curve 1 and Curve 2 values. Curve 1 will be set to 100 on the third step and Curve 2 will be set to 100 on the fourth step (with all other steps set to zero). This setup is shown below:

    Curve 1 setup in the second Thor's Step Sequencer
    Curve 1 setup in the second Thor's Step Sequencer
    Curve 2 setup in the second Thor's Step Sequencer
    Curve 2 setup in the second Thor's Step Sequencer

    Flip the rack around to the back and send CV Out 1 to the Mixer Channel 3 Level CV input, and turn the trim knob all the way up to 127. Then send CV Out 2 to the Mixer Channel 4 Level CV input, and turn its trim knob all the way up to 127.

    Under the Thor devices, hold the Shift key down and create a Spider CV Merger/Splitter. Then send the Main Kong’s CV Gate Out on Pad 16 into the Split A input on the Splitter. Send one split CV cable into the first Thor’s “Gate In (Trig)” CV input and another split into the second Thor’s “Gate In (Trig) CV input. Pad 16 on Kong will now switch between all the other Kong devices, and though they all play at the same time, only one will be heard, based on the Curve values you set up in the two Thor devices (which are used to control the level of the main mixer).

    The back of the rack showing the CV routing from the Main Kong and two Thor devices
    The back of the rack showing the CV routing from the Main Kong and two Thor devices

    So what do you think of these setups? Personally, I think it’s nice to have everything self-contained inside the Main Kong device so that you can trigger any pad bank you like without ever having to leave your pad controller. Note also that you are not limited to 4 banks. You can setup as many as you like using this technique. You just need to increase the step values in the Thors, and duplicate the Thor device to create more inputs. It’s an easy way to extend the Kong functionality. Good luck!

    42 – Stacking Modulated Filters

    In this tutorial I’m going to show you two things: 1. How to Stack multiple filters together to process a sound, and 2. How to use Thor’s filters to supplement other devices in Reason that don’t have those same filters (think of the Formant and some parts of the State Variable Filter).

    In this tutorial I’m going to show you two things: 1. How to Stack multiple filters together to process a sound, and 2. How to use Thor’s filters to supplement other devices in Reason that don’t have those same filters (think of the Formant and some parts of the State Variable Filter).

    You can download the project file here: stacking-filters. This is a zip file that contains the .rns file with the two Combinators used in the making of this tutorial. Those same two Combinators are provided separately as well. The files work with Reason 4 and above.

    Stacking Thor Filters (In a Nutshell)

    Before jumping into the tutorial, if you are a primarily visual person (or just a YouTube whore), you can watch the video below to see the process outlined:

    It should be noted that this is merely one method to stack a few filters. I find this method gives you a lot of flexibility when it comes to processing the sound, because you can adjust the amount of filtered sound which is mixed with the original sound (in other words, parallel processing). So let’s get started.

    1. First off, Create a Main 14:2 Mixer at the top of your rack. Then create a Combinator. Then inside the Combinator, create in order a 6:2 Line Mixer, RV7000, Spider Audio Merger/Splitter, and Malstrom. Then holding the shift key down (to prevent auto-routing), create a Thor synth device.
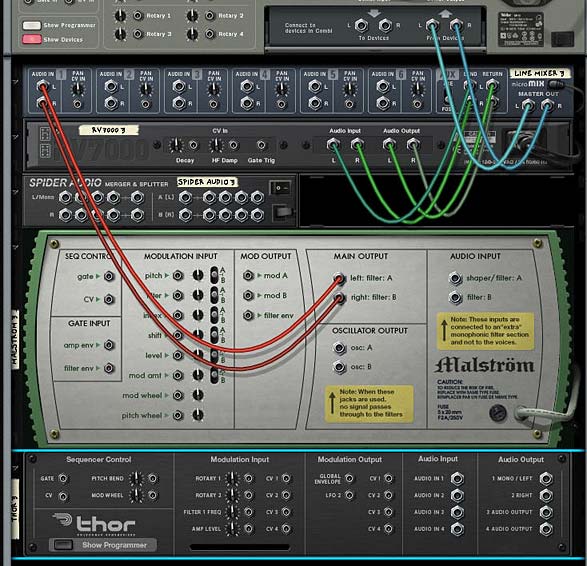
    2. Flip the rack around (Tab) and create the following routings: Remove the Malstrom Main A/B Outputs and reroute them to the Main Left/Right splits in the Audio Splitter. Then send one pair of splits to Channel 1 on the Line Mixer. Send another Split into Thor’s Audio Input 1 & 2. Then Send the Left/Right Audio outputs from Thor into Channel 2 on the Mixer.
      The view of the back of the Rack before all the routing
      The view of the back of the Rack before all the routing.

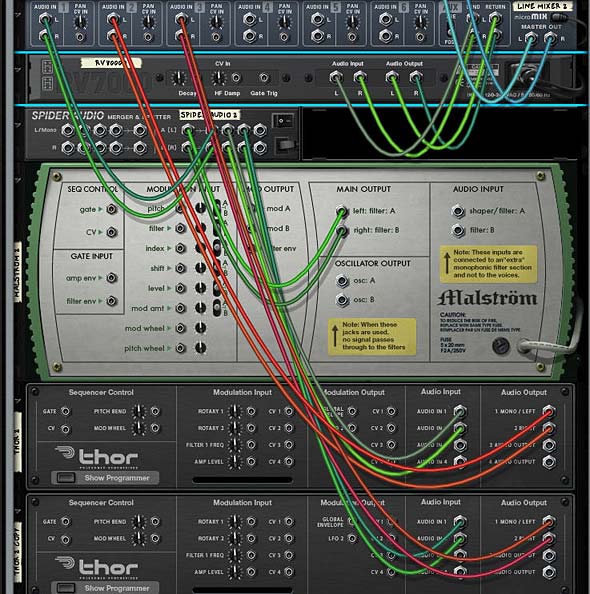
      The view at the back of the rack after all the routings -- we'll get to the second Thor's routing in a bit. . .
      The view at the back of the rack after all the routing -- we'll get to the second Thor's routing in a bit. . .
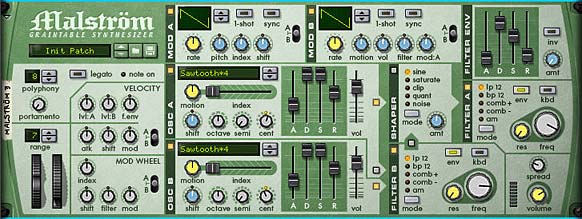
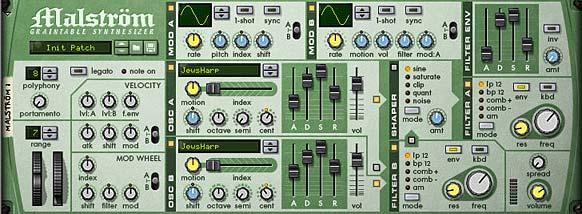
    3. Flip back around to the Front (Tab). In the Malstrom, turn on Oscillator 2, and set both Oscillators to “Sawtooth*4” and both Waveshapes in Mod A and Mod B to “Curve 2.” Set the ADSR envelopes of  both Oscillators to 40/127/127/75, respectively (This turns the sound into a much more progressive slow-moving Pad). Route Oscillator A to the Shaper and Oscillator B to the Filter B (Note: Do not turn on the Shaper). Set Filter A’s Frequency to somwhere around 116 or so. Set Filter B’s Frequency to somewhere around 106. This is so that we remove a bit of harshness in the final sound we’ll be building up. Set Oscillator A’s Cent value to “+7” and Oscillator B’s Cent value to “-7” which detunes the Oscillators from each other.

      The Malstrom settings
      The Malstrom settings
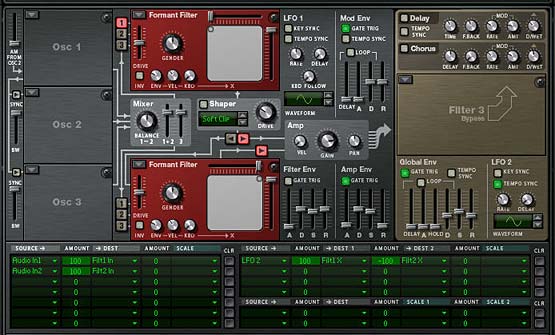
    4. Moving to the Thor, Turn Oscillator 1 Off, and uncheck the “1” button which routes Osc.1 to Filter 1. You don’t need Oscillators in Thor. We’re only using the Filters in Thor. Turn on the Formant Filter in both the first and second Filter Slots and set up Filter 1’s X/Y value to “0/127” and Filter 2’s X/Y value to “127/127.” Turn off the Filter Envelope’s “Gate Trig” button as well so that the Filters are not affected by the Filter Envelope. Then enable Filter 2 to be sent to the Amp section (the small arrow that leads from Filter 2 to Amp). Turn on the Tempo Sync for LFO2 and set the Rate to 6/4. Finally, set the Amp Envelope’s ADSR to the following values: 396 ms / 29.6 s / -0.0 dB / 6.98 s.
    5. Next, in Thor’s Modulation Bus Routing Section (MBRS), enter the following slots/lines:

      Slot 1 – Audio In1 : 100 > Filt1 In

      Slot 2 –  Audio In2 : 100 > Filt2 In

      Slot 8 – LFO2 : 100 > Filt1 X : -100 > Filt2 X

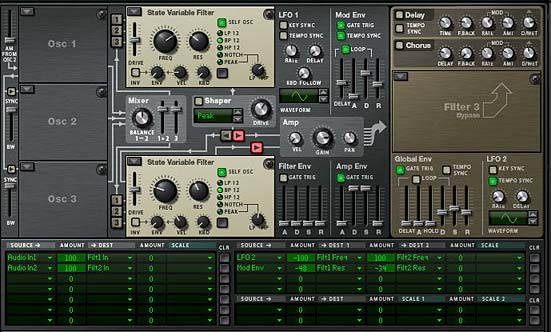
      The Thor Filter settings and Modulation Bus Routing Section (MBRS) settings.
      The Thor Filter settings and Modulation Bus Routing Section (MBRS) settings.

      The first 2 slots are telling Thor to take the audio input of the Left and Right Audio cables we set up previously, and sent them to Filter 1 and Filter 2 respectively. From that point onward, the signal travels through Thor as it normally would and then outputs to Channel 2 on the Line Mixer. The last line is what modulates the filter parameters in Thor. This basically creates a cross-over between filter 1 and filter 2 based on the default Sine wave in LFO2. Ok so far.

    6. Now with the Thor still selected, right-click and select “Duplicate Devices and Tracks.” In the duplicated Thor, set the LFO2 rate to 2/1 and change the Filter 1 X/Y value to “0/0” Then change the slot 8 line in the MBRS to the following:

      LFO2: 100 > Filt1 Y : -100 > Filt2 Y

    7. Flip the rack around and connect another split pair from the Audio Splitter to this new Thor’s Audio Input 1 & 2. Then Send the Left/Right Audio outputs from the new Thor into Channel 3 on the Mixer.
    8. Flip back around to the front of the rack and on the Line Mixer adjust the following:

      Channel 1 : Aux = 34; Level = 36; Pan = -14

      Channel 2: Aux = 50; Level = 92; Pan = 18

      Channel 3: Aux = 53; Level = 90; Pan = 22

    9. Finally, let’s take a look at the RV7000. Truth be told, you could enter whatever preset you like here which would work for a Pad sound. So enter your favorite RV7000 Patch. My settings were a low HF Damp, High EQ, with EQ turned on, and a lowering of the EQ curve on the low end with the gain set on the high EQ end to affect the midtones more than any other area. I also smoothed out the curve and made a few adjustments to the overall Reverb default “Hall” settings, as shown below.
      The RV7000 settings for the Hall Reverb
      The RV7000 settings for the Hall Reverb

      The settings for the Reverb's EQ.
      The settings for the Reverb's EQ.

    Now give it a play and see how it sounds. By layering the filters and sending Left and Right to different filters that are modulated with a simple Sine wave, you can create some very complex tones that you couldn’t get using the Malstrom on its own.

    Quickly Converting to a Whole New Sound

    Now we can do a few interesting things with our setup. For example, duplicate the Combinator and change all four filters to “State Variable Filters.” Set the Resonance in the two filters in the first Thor to 54 and 82 respectively. In the second Thor, set both filters to “BP” mode and set the first filter’s Frequency to 3.28 kHz and Resonance to 38. Set the second filter’s Frequency to 158 kHz and Resonance to 50. Reduce the Attack and Release settings on the first Thor’s Amp Envelope a little bit. And Reduce them completely on the second Thor’s Amp Envelope. You can also use the Mod Envelope to affect the Resonance of the filters as I have done here:

    Switching Filters and a few Parameters to get a completely different sound
    Switching Filters and a few Parameters to get a completely different sound

    Solo each Channel on the Mixer and see if the levels are ok. I found I had to insert a Maximizer after the second Thor just to boost things a bit. Trial and error is the key.

    Finally, go into the Malstrom and change the two Oscillators to use the “JewsHarp” graintable in both. Reduce the Filter A & B Frequencies to your liking, and have a listen by playing a few notes. You end up with a very different sound altogether; like a slow meandering rumble. With just a few minor changes you get all sorts of different sounds.

    The Malstrom Settings for this brand new sound. Use the JewsHarp Oscillators
    The Malstrom Settings for this brand new sound. Use the JewsHarp Oscillators

    Where do you go from here?

    Anyplace you like is the short answer. But try out different filters and different Malstrom Oscillators. You could also insert a Scream device with some mild settings to completely alter the sound. Or try your hand modulating the filters in different unexpected ways using different LFO waves and rates. The sky is really the limit.

    The only thing I might be wary of doing is creating delays on any of the parallel signals, as this can cause some phase shifting. But that might be something you are trying to achieve. It’s really up to you.

    Let me know what you think of this tutorial and please add your comments if you come up with something far more interesting than these designs. I’d love to hear your own sound designs and creations. Until next time, good luck in all your endeavors.

    41 – Layered FM Pair Oscillators

    In this article, I’m going to tackle a very simple idea from which you can end up creating several interesting patches. The idea is to create several layers of the FM Pair Oscillators in multiple Thors, which are mixed together for a final output that sounds very thick and rich, and is capable of several sounds from Bell-like high pitched to Deep thick Organ sounds (think the Wedding March to get a mental picture of where this can take you). So jump on the train and let’s go for an orgasmic FM ride.

    In this article, I’m going to tackle a very simple idea from which you can end up creating several interesting patches. The idea is to create several layers of the FM Pair Oscillators in multiple Thors, which are mixed together for a final output that sounds very thick and rich, and is capable of several sounds from Bell-like high pitched to Deep thick Organ sounds (think the Wedding March to get a mental picture of where this can take you). So jump on the train and let’s go for an orgasmic FM ride.

    If you really can’t wait and just want to get to the good stuff, here it is: Layered-FM-Pair-Synthesis. The download contains 4 Combinators that are variations on the Multiple FM Pair Oscillator Synthesis. The Combinators are in a single .rns file which is zipped up. Try playing around with the different Rotaries and Buttons to come up with a wide variety of sounds. It’s like an extended Thor FM Pair Oscillator playground.

    When I was building my FM 4-Operator System way back when, I went over most of the basics of FM synthesis. So I won’t rehash that again here. Instead, I’m going to outline one idea that I’ve noticed with FM which I’m hoping will help you build better patches. The idea is simple but very powerful, and if you haven’t played around with FM yet, you’ll soon realize it. The idea is this: when you have a modulator that is a multiple of the Carrier (or vice versa), you end up with very harmonic sounds. If you use a Carrier / Mod combination that are not multiples of each other, you end up with inharmonic sounds. This makes perfect sense when you read the technical description of what inharmonicity means. Namely, that when you depart from whole multiples of the fundamental frequency, you end up in a land where things start sounding strange (how’s that for a technical description?)

    So we can start making some interesting musical choices based on this idea. Namely, if we want something very harmonic, we can build ourselves a patch with Oscillators that contain exact multiples of the fundamental frequencies. If we want something outside this harmonic realm, we can mix things up and create odd relationships between Carriers and Modulators, and even between Oscillators. Let’s start off by seeing how we can create a “Harmonic 12-Oscillator FM Pair Synthesis Combinator” — in 3 parts below:

    The idea behind this is pretty simple, you set up 6 Thor devices and place an FM Pair Oscillator in both Slot 1 and Slot 2. The “Slot 1” Oscillator’s Carrier and Mod are set to 1/1, 2/2, 3/3, 4/4, 5/5, and 6/6 respectively. The Oscillators in slot 2 continue from the first Thor (7/7) to the sixth Thor (12/12).  In this way you have a layer of 12 Oscillators in total. However, you can effectively double the settings using some clever button assignments so that you can have button 1 affect the Modulators, and button 2 affect the Carriers. When pressed, the Carrier/Mod buttons are set to double their values, providing 4 different settings as follows:

    • Both buttons off: Carrier/Mod are set from 1/1 up to 12/12
    • With the Mod button on, but the Carrier button off: Carrier/Mod set from 1/2 up to 12/24
    • With the Mod button off, but the Carrier button on: Carrier/Mod set from 2/1 up to 24/12
    • With both Mod and Carrier buttons on: Carrier/Mod set from 2/2 up to 24/24

    The Combinator also allows for many other settings, as follows:

    • Rotary 1: Adjusts the FM knob on all Oscillator’s at the same time.
    • Rotary 2: Allows you to mix between Oscillator 1 and Oscillator 2 on all the Thor devices at once.
    • Rotary 3: Adjusts the Detuning amount by 12 ticks between Oscillator 1 and 2 on all the Thor devices at once.
    • Rotary 4: Adds some Reverb to the final audio output of all the Thors mixed together.
    • Button 3: Selects between only having 1 Oscillator per Thor (in slot 1), or having both Oscillators turned on (both slots 1 & 2).
    • Button 4: Turns on the Chorus setting in all the Thor devices (the Chorus is set to the default, but don’t be afraid to play around and get a Chorus setting that you like).

    The FM Layers shown from the front inside the Combinator.
    The FM Layers shown from the front inside the Combinator.
    The Thor routings shown at the back of the rack inside the Combinator.
    The Thor routings shown at the back of the rack inside the Combinator.

    I’ve also included a few other variations on this style of patch in the project files (found at the top of this article). I’m not going to go over all the settings in those patches, as you can open them up and see for yourself. Play around with the settings and you will see that it offers a wide variety of sounds.

    That about does it. And now that you have some of these ideas down, have a go at putting together multiple layered Analog, Wavetable, Phase Modulation, or Multi-Oscillator creations, using some of the techniques outlined here. And if you have any great creations that you’ve made or any ideas that you would like to share, I invite you to do so. Leave a comment and let me know what you think.

    All my best for now.

    35 – Glitch Box Redux (R4 & 5)

    In this tutorial, I’m going to show you some new ideas for Glitch Boxes in Reason 4 and Reason 5. Because, hey, we can never have enough glitch boxes or IDM-style sounds. Just like you can never have enough creativity. Consider this a “Glitch Box (Part 2)” for those that missed my first installment.

    In this tutorial, I’m going to show you some new ideas for Glitch Boxes in Reason 4 and Reason 5. Because, hey, we can never have enough glitch boxes or IDM-style sounds. Just like you can never have enough creativity. Consider this a “Glitch Box (Part 2)” for those that missed my first installment. And if you’re interested, go here for more: Glitch Boxes (Part 1).

    Download the project files here: more-glitch-boxes This is a single zip file with one RNS file containing both Combinators. Since those with Reason 4 won’t be able to open the file, I’ve included the Combinators separately. Note that one of the Combinators is for Reason 4 and up, while the other one is for Reason 5. Sorry to those who can’t open the R5 file, but you at least get to use the R4 Glitch Box Combinator right?

    Glitching up Keith LeBlanc via the Dr. OctoRex (for Reason 5)

    I’ll start with the Reason 5 approach, which uses a Dr. OctoRex to apply some interesting variations to a single loop, then copies that loop multiple times into various different slots. Once that’s done, you change all the slice parameters in all the different loops. Then send the 8 audio outputs of the OctoRex to different FX devices (even the Kong FX) and back into the Mixer channels. Using this setup, you could even apply different mastering FX to the different outputs.

    Incidentally, I’m using a rex file that’s located in the Factory Soundbank that was created by drummer Keith LeBlanc. I was supremely excited to see some of his material included in the FSB (among other very talented individuals). If you haven’t heard of him; he, along with Adrian Sherwood, Doug Wimbish, Skip McDonald, and even Mark Stewart, formed a group back in the 80’s called “Tackhead” which were revolutionary at the time. I would highly suggest you visit these links and explore them further on your own. While not the first band to ever use samples, they were one of the first bands to heavily rely on them for their music. And they ushered in the industrial hip hop genre which was an amazingly ecclectic mix of genres. Their music may sound a little dated now, but still gets me going. Definitely worth your time to explore. Luckily I have the original “Tackhead Tape Time” LP (yes, an actual original issue LP). But enough about that. Let’s get busy Glitching up Keith LeBlanc!

    Once the basic setup is in place, you can go crazy editing all the slice parameters, but pay special attention to the “Out” or “Output” parameter. This is what will send the various slices to the various FX devices. So that’s going to have the most impact on how the slice is played.

    Lastly (and this is discussed in Part 3 below), you can set up a few CV sources via Thor devices, and send them to the different FX device CV sources. In this way, you can take the Glitch Box to a whole new level of crazy. Don’t miss it.

    Glitch Box (Redux – for Reason 4)

    In this second approach, I wanted to give Reason 4 users another way to create some Glitch in their rack. This is an idea I got from delving into the Glitch Box Combinator that comes with the Factory Soundbank. It was an old patch that has been around since R3, and so it uses a few NN19s hooked up to a 14:2 Mixer, and the mixer levels are triggered by the Redrum CV Gate outs. In this one, I update the idea by using a few Thor devices. You can really have a lot of fun using a few different Wavetable oscillators, and changing around the LFO2 Wave types and rates between all the Thor devices (this is something I neglected to do in the video below, but I would think it would produce some interesting variations).  Anyway, this method can be used in R4 and above and is for all those who haven’t yet purchased Reason 5. But seriously, what are you waiting for?


    So does anyone else out there have some good glitch ideas or know ways in which these combinators can be improved? Possibly adding some mastering or Reverb before they hit the mixer is one thought I had. Any other ideas?

    Reese Bass & Trance Lead

    This time, I was trying out various Reese Bass ideas and other trance lead ideas after watching Hydlide do a few interesting tutorial videos on putting together a trance lead. So I thought I would try out creating some trancey sounds in a Combinator which everyone can use if they wish.

    Download the RNS file and two Combinators (in a single zip file) here: trance-leads.

    Description: This time, I was trying out various Reese Bass ideas and other trance lead ideas after watching Hydlide do a few interesting tutorial videos on putting together a trance lead. So I thought I would try out creating some trancey sounds in a Combinator which everyone can use if they wish.

    Features: The Combinators are pretty simple. Mostly, they use saw waveforms which are detuned. Add in a few special effects and you have some highly customizable sounds. The Reese’s Pieces Combinator was created with a Reese Bass sound in mind, so it’s better if you use this in the lower registers of your keyboard. The Trance Lead Combinator is pretty much what it says on the tin: a Trance Lead. Here are a rundown of each Combinator’s controls:

    Reese’s Pieces

    Reese's Pieces - Just one of my takes on a Reese Bass
    Reese's Pieces - Just one of my takes on a Reese Bass

    Here’s how the patch was put together:

    Pitch Bend: The pitch bend adjusts the Pitch up or down by 7 semitones.

    Mod Wheel: The mod wheel is assigned to the Malstrom only. Index is increased, Shift is reduced, and the Filter is increased.

    Rotary 1: Filter Frequency – This affects the Thor’s Filter 1 Frequency and allows you to play with the full frequency range. This knob is also tied to the ECF filter frequency which affects the sound coming out of the Malstrom in the same way. Essentially you can create a filter sweep with this Rotary.

    Rotary 2: Resonance – This gives you a limited, but useful range affecting the Thor and Malstrom Resonance kn0bs.

    Rotary 3: Unison – This Rotary affects the impact of the Unison affecting the Thor Oscillators. Fully left, and there is no Unison (fully dry), while turning the knob fully right provides you with a full Unison detuned sound (fully wet).

    Rotary 4: + Shift – This changes the Shift of the two Malstrom Oscillators (A and B) from 0 to +63. You just have to try this out to hear for yourself. It’s a very interesting and quirky application to the sound. But I personally like playing around with this rotary.

    Button 1: Twist 1 – This turns on the Thor Shaper. It provides a slightly overloaded or overdriven sound on top of all three sawtooth waves in Thor. It’s not overly heavy though, so it’s pretty safe to use. However, depending on how your Frequency and Resonance are set, this will affect how much you will hear the Shaper affect the sound.

    Button 2: Twist 2 – This turns on the Malstrom Shaper. It provides an overdriven sound effect. This is much higher pitched or brighter than the Thor Shaper, so it provides a more distinctive sound. However, depending on how your Frequency and Resonance are set, this will affect how much you will hear the Shaper affect the sound.

    Button 3: Reverb – Adds in a strong reverb sound, which I find is pretty common in these types of patches.

    Button 4: Unassigned

    Usage: You can use this any way you like. But mainly it can provide a very bass-heavy sound (my take on a Reese Synth Bass sound).

    Trance Lead

    A simple Trance Lead Combinator
    My take on a simple Trance Lead with lots of parameters to tweak.

    Pitch Bend: The pitch bend adjusts the Pitch up or down by 7 semitones.

    Mod Wheel: Unassigned

    Rotary 1: Bass Increase – As the name suggests, the bass is increased by increasing the Filter Frequency of Thor’s Filter 2.

    Rotary 2: Motion – This affects the Motion of the Malstrom Oscillators A and B from -64 to +30.

    Rotary 3: Reverb – Adds Reverb to the overall sound coming out of the Combinator. This is a Dry/Wet Reverb knob going from 0 to 70.

    Rotary 4: Filter Sweep: This affects the frequency of all the Oscillators. Use this rotary to create a simple filter sweep for build-ups in your songs.

    Button 1: FX 1 – Each of the buttons adds a specific effect which you may or may not like. I added these in as an afterthought just to provide more flexibility with the Combinator. Play around and experiment with them to see if they enhance the sound for you. Button 1 here Changes the Modulator A to Index from 0 to -64.

    Button 2: FX 2 – Changes Thor’s Oscillator 1 Octave from 3 to 4. Also changes the Malstrom’s Oscillator B Octave from 4 to 5.

    Button 3: FX 3 – Changes the Malstrom’s Modulator A to Shift from 0 to 22 and Modulator B to Motion from 0 to -10

    Button 4: FX 4 – Changes the Malstrom’s Modulator B to Filter from 0 to -64

    Usage: You can use this any way you like, but mainly it provides a basic trance lead sound.

    Other Notes: For both Combinators, you can really change this sound around quite a bit just by playing with all the parameters. So you’ll have to experiment to find something that suits your taste. In addition, you can use the Frequency rotary to create a frequency sweep or build-up in your tunes.

    As always, please let me know what you think or let me know if and how you use this in your own projects. Happy Reasoning!