37 – Dr. OctoKong Looper

In this tutorial, I’m going to show you how to use Kong and the Dr. OctoRex together to create some continuous looping fun. You’ll learn how to continually loop and play a series of OctoRex files with Kong. This way each pad turns the loop on and off as a toggle, with Velocity sensitivity too.

In this tutorial, I’m going to show you how to use Kong and the Dr. OctoRex together to create some continuous looping fun. You’ll learn how to continually loop and play a series of OctoRex files with Kong. This way each pad turns the loop on and off as a toggle. And it’s super easy to do. In addition, when played on your keyboard (C1 – D#2), you get velocity sensitivity.

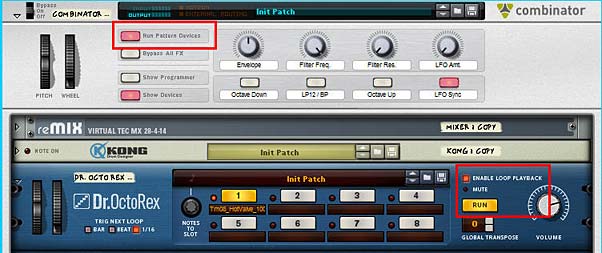
You can download the project file here: DrOctoKong1-v4. There are 2 RNS files containing 2 Combinators in this zip file. Both Combinators contain the Kong device and 10 Dr.OctoRex devices. The first rns file shows you ways you can play the loops and switch from slot to slot to cycle through all 80 loops. The second one is an update I did which shows how you can use a separate pad to Re-Trigger the loops at any point while they are playing. Keep in mind that what you need to play is the Kong device, and not the Combinator (though you could play the Combinator if you want to. But it might be easier to lay down the midi note clips on the Kong track so you can see what’s going on inside Kong itself). Also, make sure you press the “Run Pattern Devices” button on the Combinator. Alternately, press the “Play” or “Record” button on the Transport. This ensures everything runs as it should.

To see how this setup works, take a look at the video below.

So here’s the basics of how it all works

You create your Kong device without any audio routings. Then you create a series of up to 16 OctoRex devices, all with their audio routings sent to different channels on a 14:2 Mixer. Load them up with your favorite Rex files, flip the rack around and send the “Gate Out CV” from each pad in Kong to the “Master Volume CV In” on each Dr. OctoRex device. Then press “Run Pattern Devices” on the Combinator to initiate the “Run” button for all the OctoRex devices at once (or alternately, press the “Play” or “Record” button on the Transport), and your pads become a play/stop loop toggle for each of the attached OctoRex devices.
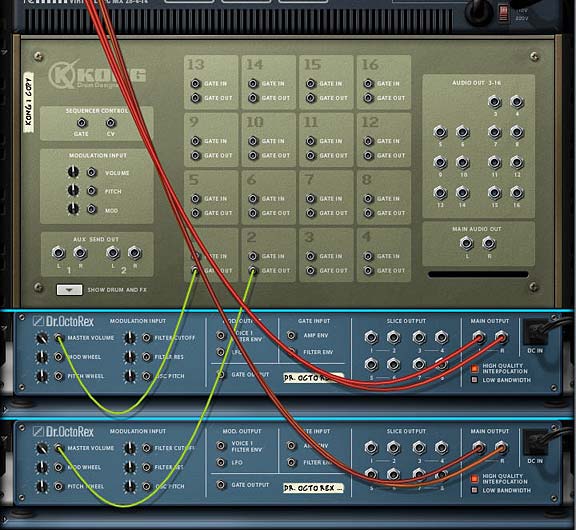
The Routing necessary on the Back to link up the Kong with the Rex files
The front panel of the Combinator and Dr.OctoRex devices - Turning on "Run Pattern Devices" will enable all the Rex files to continuously run

A few notes here:

  • The way it works is by having the Rex files continuously looping and running. All the Pad is doing is turning up the volume. For this reason, the rex files are free-running and do not re-trigger when the pad is pressed again. But as I said in the video, don’t let this discourage you. It’s still a very simple and great way to play the Rex loops from Kong.
  • The best way I’ve found to play the loops is by using the Keys from C1 – D#2 on your keyboard. I haven’t tried using a Korg or Akai pad controller to play the loops in this way, but I have a feeling if you do, the pads will end up running the loops continuously without a way to shut them off (you’ll have to press the pad with your mouse directly on the Kong device to stop it again). It’s a little quirky, but I’ve tested the keyboard, and it works great. Press a key and the Rex file sounds. Lift up the key and the Rex file sound stops.
  • One of the benefits of this setup is that the Pads (or keys rather), are velocity sensitive. The result is that the Rex loop volume can be controlled via the Velocity of your pads. This adds a nice dimension to your loops and dynamics to your sound.
  • You can setup the Rotaries and Buttons as I did here. For each Dr. OctoRex, you’ll need to set up the following Modulation parameters in the Combinator’s Modulation Bus Routing:
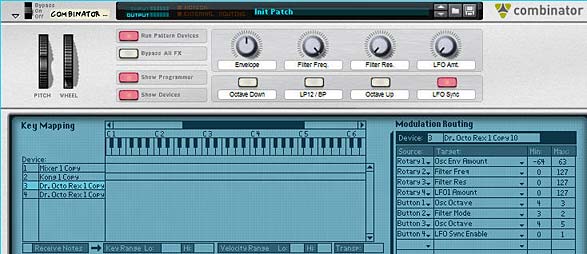
The Combinator's Modulation Bus Routing - Just a suggestion. ;-)
The Combinator's Modulation Bus Routing - Just a suggestion. 😉

Taking things a step further

One thing you can do is load up the other slots of the OctoRex devices, and then tie the Loop Slot to a free Rotary (you’ll have to give up one of the parameters above). This way, you not only have the ability to play multiple loops using the Kong device, but you can also switch slots for new Rex Loops by turning one of the Combinator Rotaries. Add to that the various parameters you can tweak at the slice level of each Rex loop, and you have some very powerful fun at your fingertips.

I decided to go ahead and implement this. However, I realized that there’s a nice little way to keep all our parameter automation in place in the Combinator, and still provide the ability to switch from loop slot to loop slot in all the OctoRex devices. It’s really not too complicated. Here’s a video to show you how it’s done.

The nice thing about this method is that it uses the new CV inputs on the back of the Combinator in conjunction with Thor’s step sequencer and triggering provided by Pads 15 and 16. So you can see how some of the Reason devices can be interconnected and operate together to provide some useful functionality.

The idea that you can trigger 80 Loops (and if you used all 14 pads you could trigger 112 loops!) using a single Kong can be pretty overwhelming, but can provide some interesting chaotic possibilities. And even structurally, you can create some amazing songs using little more than Rex loops. For example, think of having each OctoRex device contain 8 loops related to a single instrument. So the first OctoRex contains your drums, the second contains the basslines, the third contains guitar loops, and so on. You have a complete band that you can switch from verse to chorus with one press of a key or a pad.

Extra Bonus: Let’s add some Effects

Here’s a quick video to show you how to simply add an FX or two. I’ve also updated the main project file so be sure to download that at the top of this post. For now, here’s the method I used to show how to add the effects to some of the free pads. There’s also some Delays and Reverbs on two other pads that you can cycle through (5 delays and 5 reverbs). The cycling is somewhat similar to how the Loop Slot Changers work on Pad 15 and 16, except the audio gets split between a bunch of different FX devices with different settings. I didn’t go over how to set that up, but you can look at the file and figure out the routing. Hope you have lots of fun with this one. I had a really great time making it. And now… the video:

Re-Triggering the OctoRex Loops

This video is an update to the main tutorial above. A big thanks has to go out to EditEd4TV at Bauman Productions for helping me figure out how you can re-trigger all the loops as they are playing. Essentially, it uses the note function of the Thor step sequencer to start the loops from the beginning again. Very cool indeed. I also placed the finalized file in the project file download at the top of this article. So go check it out there. And if you want to know how it was put together, check out the video below:

As always, any comments or suggestions or ways we can improve upon this are welcome. So please let me know what you think and what other ideas you might have. And have fun Reasoning!

29 – Synth Drums from Scratch

The subject of today’s tutorial is how to create your own standard drum sounds via synthesis. Here, I’m going to show you a few techniques to bring these drums to life, with little more than a Thor, Malstrom, or Subtractor synth, and some supporting modules. This is a great alternative to using Drum samples or relying on sample CDs for your drum sounds, though those are both great alternatives that should not be overlooked.

Often times we don’t have access to a real drum kit and it’s not feasible to get real true-to-life drum samples to use in your own work. Or you may just want the sound of a synthetic drum as opposed to the real thing. One option is to purchase some sample CDs. Another is to create your own drum sounds from scratch, using the synths provided in Reason. That’s the subject of today’s tutorial. Here, I’m going to show you a few techniques to bring some standard drums to life, with little more than a Thor, Malstrom, or Subtractor synth, and some supporting modules.

I should start by saying that with the addition of Kong in Reason 5, creating drums has never been easier. Load up a physical drum or a synth drum module and you’re more than halfway there. However, for those that don’t have Reason 5 yet, then this tutorial is for you. Everything below is created using the Reason 4 devices. This goes to show you that you don’t necessarily need Kong to create interesting drum sounds. So let’s get started.

You can download the project files here: Synth Drums from Scratch. This is a zip file that contains 3 Combinators and 1 Thor patch outlining the different drum sounds from the tutorials below. The Combinator parameters will affect the sound of each drum. I’ve tried to tailor them so that you can get a very wide variety of drum sounds out of each Combinator. Have fun with the various buttons and rotaries to get the sound you want out of them.

The Bass Drum

The first drum we’ll emulate is a Kick or Bass drum. This is probably one of the easier drums to emulate because it has that very bassy deep and punchy feel to it. The hardest part about programming this kind of drum I think is in the Compression, which most every Kick drum should have. How it is compressed is really a matter of taste, but getting just the right sound you want is probably going to rely on the way you compress it. A close second in terms of seasoning your Bass Drum is using EQ to accentuate the correct frequency or frequencies. Here’s how I would go about creating a Kick Drum using Thor.

The Tom Drum

The second drum type we’ll create is a Tom Tom drum. This time, I’ll use a Malstrom with a TubeSlap Oscillator to emulate it. This oscillator is great for sounds like these, and can produce just the formant sound that is needed with a typical Tom drum. Of course, you can emulate all of these different drums using any of the synths. This is just one way to recreate the sound. You could instead, try using a Thor oscillator with a Formant filter to get the Tom Drum sound you’re after. Be sure to explore more on your own to find the sounds that truly inspire you.

The Snare Drum

The third type of drum I’ll recreate is a Snare drum. For this, I’ll use a subtractor with two Oscillators and a Bandpass filter. Then we’ll use a Noise Oscillator in Thor to add that extra tail that a Snare drum can have. To wrap it all up, we’ll combine them both and set up a little programming to the rotaries in order to get a little more out of our Snare sounds. Using these parameters we can create a variety of Snares, instead of a single type of sound. See how it’s done:

The Hi Hat

Finally, there is the tried and true Hi Hat sound, both open and closed. To emulate this one, we’ll use a Thor FM pair and Noise oscillator going through two State Variable filters set to High Pass and Notch mode in Thor. I’ll emulate the open and closed Hi Hat and tie it to a Thor button. This way, you can access both the closed and open state of the drum with the click of a button (and from within the same Thor synth, which makes it very CPU friendly). Of course, if you want to separate them, you can duplicate the Thor device and use one Thor for the “Open” Hi Hat position and one Thor for the “Closed” Hi Hat position. It’s all up to you and very flexible.

So there you have it. Four basic drums created with the three different synths in Reason 4. If you have any other drum sounds that you would like to contribute or tips for drum creation, please feel free to share with us. Until next time, have fun working your own magic in Reason and Record!

26 – Automating your Groove

As most of us know, you can’t automate the Re-Groove in any way within Reason and Record. . . or can you? As with all things Reason-esque, there’s usually a workaround or two available for you. And Automating your Re-Groove, though time consuming, can indeed be accomplished. Here’s how.

As most of us know, you can’t automate the Re-Groove in any way within Reason and Record. . . or can you? As with all things Reason-esque, there’s usually a workaround or two available for you. And Automating your Re-Groove, though time consuming, can indeed be accomplished. Here’s how:

ReGroove Mixer Automation Workaround

Let’s assume you have a drum track tied to a Redrum (or as most of you will be going nuts for Kong, let’s say you have a Kong track). The easy way to set this up is the following:

  1. First, decide on a groove. Open up the ReGroove Mixer and then place that groove inside channels 1-8, or however many channels will require your groove movement. For now let’s set up 8 slots with the same groove.
  2. Next, you will need to create the same amount of note lanes for the device which you will be “Grooving.” So create 8 note lanes.
  3. In the case of Redrum, create the drum pattern using the pattern sequencer, and place this pattern on the first note lane for the Redrum (right-click on the Redrum step sequencer and select “Copy Pattern to Track” which places it on the current note lane).
  4. Go to the sequencer and copy the Redrum pattern 8 times. Move each copy to a separate lane in sequence. So, for example, note lane 1 will have the pattern from bar 0-2; note lane 2 will have the pattern from bar 3-4; and so on, right up to the 8th note lane.
  5. Associate a different groove with each note lane from A1 on the first note lane, right up to A8 for the eighth note lane.
  6. Now comes the fun part. On the ReGroove mixer, set up each channel as though it were steps in the step sequencer of the Matrix, except this time you are creating different “grooves” for each step between Channel 1 to Channel 8. If you want to get a better feel for setting this up, loop through each note lane’s note clip and adjust the parameters for the groove as you listen. Let your ear be your guide in this instance.

I hope you see where I’m going with this now. When you play your track forward, the drum beats play in sequence as if they are on a single lane, however, since you set up each lane with a different groove, you are essentially applying different grooves to each note clip and therefore changing the groove as the song progresses and as the note lanes switch from one to the other. Since you can create 32 different groove patterns, you have a 32-step groove sequencer using this method. The only downside is that your sequencer can get pretty cluttered quickly; especially if you split your different drums on different lanes (for example, if you have all your kicks on one lane, and your hi hats on another, and want to provide different grooves for each, you’ll have to create different sets of note lanes for each drum — up to 32 of course).

Still, if you are willing to invest a little time into your track, this ReGroove automation trick might come in very handy to create some further dynamics in your tracks. And you are not limited to applying this to drums only. You can apply this to any set of note lanes for any note-generating devices.


Just a Quick Tip. . . don’t forget your Solos and Mutes!

I just wanted to post this quick video to point out the idea of automating your solos and mutes on your mixer. Often times it’s easy to forget to use your mixer as a creative tool when producing the track. Having some play with the solos, mutes, and other aspects of the mixer can open you up to a lot of creative potential. It’s a great way to add more dynamism to your tracks.


Here’s a file based on Emile’s comment below this post. Emile’s tip is about tying the Noise Oscillator in slot 1 to an Analog Oscillator in slot 2. I kind of ran with it to provide a bit of a strange patch here. But it might spark some ideas. It has to do with modulating the kbd and pitch of the Noise Oscillator to affect the sound of the Analog Oscillator. The file is a zip format file which contains an .rns with the setup. Have a look here: kbd-pitch-idea


Well, that’s it for now. Let me know how these tricks work for you? And if you have any others, please start up a discussion and let us all benefit. Until next time, happy reasoning!