High Strung Organ

I was playing around with a bunch of different Thor parameters and came up with a sound I really liked. So I worked on it some more and it turned into this little puppy. It’s not really a true organ, but it sounds somewhat similar. A bright twangy atonal organ.

Download the Combinator: high-strung-organ

Description: I was playing around with a bunch of different Thor parameters and came up with a sound I really liked. So I worked on it some more and it turned into this little puppy. It’s not really a true organ, but it sounds somewhat similar. A bright twangy atonal organ.

Features: The Combinator is fairly simple. It uses a Multi-Oscillator and an Analog Oscillator in Thor. Then it routes the Left part of the audio through a delay, and the Right part of the audio through a Phaser. After that, the two Mixers are used to Cross-fade the signals. You can then use Rotary 4 to decide where the signals are placed: Left or Right. Here’s the complete rundown of the Combinator controls:

Pitch Bend: The pitch bend adjusts the Pitch up or down by 7 semitones.

Mod Wheel: The mod wheel affects the Filter Frequency of the first Filter in Thor. Shifting the Mod Wheel up increases the Frequency a bit.

Rotary 1: Delay Dry/Wet – This controls the DDL1 Delay device’s dry/wet amount from fully dry (turned to the left) to fully wet (turned to the right).

Rotary 2: Shape – Controls the Bipulse Shaper drive from Thor. Increasing this rotary adds more shaper distortion to the signal. Lowering this Rotary lessens the distortion and provides a clearer sound.

Rotary 3: Envelope – Controls the envelope of the High-Pass Filter in Filter slot 1 in Thor. Use this to adjust the tone of the sound being filtered. You can get some very interesting results playing with this Rotary.

Rotary 4: Side Switcher – This crossfades the sounds. Since the Delay and Phaser are placed on opposite sides in the stereo field, this knob allows you to adjust which side you want to place them. When this Rotary is centered, both FX devices are placed center in the stereo field. In other words, there won’t be any panning when the Rotary is dead center.

Button 1: 1st Delay – This turns on the Thor Delay for some synched delay doubling. This simple switch will turn it on (when lit) and off (when unlit).

Button 2: Formant – If you want to completely change the way this patch sounds, you might want to try out this button. In essence, it adds a second Formant Filter in Thor’s second filter slot, so that both Oscillators are routed in series through both the High Pass Filter and the Formant Filter, and then out to the Amp. But this button will give your sound a whole new perspective.

Button 3: Alt Wave – This changes the Multi Osc Wave type for the first Thor Oscillator. When left off, the sound is more bright and distorted due to the saw wave. When turned on, the sound becomes much more dulled. You’ll have to play around with this button and see how it sounds along with changing the other parameters. It can add a whole new element to your sound.

Button 4: Chorus – I didn’t really know what to do with this button. But then I thought about creatinve some really wacky Chorusing, since this sound is already on the wacky side. So I adjusted the Chorus to affect the sound in a pretty severe way. Try it out. When lit, the Chorus is turned on, and when unlit, the Chorus is removed from the signal path.

Usage: You can use this any way you like. But mainly it provides a Synth Lead sound.

Other Notes: You can really change this sound around quite a bit just by playing with the Combinator Rotaries and Buttons. So you’ll have to experiment to find something that suits your taste. I’m sure there are also settings that might not necessarily sit well together because it’s sound range is pretty vast and varied. But I’ve found some pretty useful sounds out of this setup. I hope you do as well. Also note that there’s no finishing touches on it, such as compression or reverb, so this will sound pretty raw as is. You may want to add your own final touches through a second Dynamics Processor Combinator.

As always, please let me know what you think or let me know if and how you use this in your own projects. Happy Reasoning!

Wonderland

This is a cross between a beat or rhythm generator and a synth. I wanted to come up with a template to use as a hybrid that could be used to effect a great range of sounds and possibilities all from within a single combinator. Very light weight and easy to use. Great as a Combinator Template for your own sounds.

Download the Combinator: wonderland

Description: This is a cross between a beat or rhythm generator and a synth. I wanted to come up with a template to use as a hybrid that could be used to effect a great range of sounds and possibilities all from within a single combinator.

Features: Wonderland uses a Rex file for the driving rhythm behind a soft sounding synth. The NN-XT provides the synth layer, and the Rex provides the rhythmic layer. You can also adjust the filter frequency and a separate Pumping element in the mix. Here’s how the controls operate:

Pitch Bend: The pitch bend affects only the NN-XT synth layer, and pushes up or down by 4 semitones.

Mod Wheel: The mod wheel affects a few different parameters. Adjusting the wheel upward yields a more dreamy high-pitched sound.

Rotary 1: This controls the “Crudge” feature, which is a Sine wave sound shaper in Thor. Turned all the way left and you get no sound shaping applied. Turned fully right, and you get a grungy distortion to the synth layer. Note that higher filter frequencies will yield more distortion. Having the filter frequency Rotary all the way left will provide very little changes to the grunge effect.

Rotary 2: Controls the level of the Rhythm section (Rex file). All the way left and the Rex audio is essentially turned off. All the way right and the Rex can be heard fully (100).

Rotary 3: Controls the filter frequency of the synth layer. This Rotary is controlling Filter 3 in Thor. Turned all the way left and the Filter Frequency is fully cut off. Turned all the way right and the Filter Frequency is fully open.

Rotary 4: Adjusts the pumping of the Rhythm layer, however, the pumping is affecting the synth layer, so even if the Rex audio from Rotary 2 is all the way off, you can still get a Thumping from the Synth using this Rotary.

Button 1: When off, the Synth Delay (the Thor Global Delay) is not synced. When turned on, the Delay is synced to the beat of the main sequencer.

Button 2: This controls the distortion from the Scream device. Turned off you get no distortion. Turned on you get a Low Frequency Resonator distortion FX applied to the Rex Rhythm layer. This does not affect the Synth layer.

Button 3: This is an octave shift for the Rex Rhythm layer. When off, the Octave is set to the default (4). When on, the Rex loop plays 1 octave higher (5). This does not affect the Synth layer.

Button 4: This provides an “Underwater” feel to the Synth layer. Essentially it controls the Global Chorus in Thor. Left off, the Synth is untreated. Turned on, you get a very warbly chorus applied to the Synth which can only be described as a very quick oscillation as though you were under water.

Usage: You can use this any way you like. But mainly it provides a Synth/Rex Loop Rhythm for your tracks.

Other Notes: To edit the patch and use it as a template, switch out the NN-XT patch for some other synth sound you like (or any other sound patch or sound device, for that matter). You can also vary the rhythm layer by changing the Dr.Rex patch to something different as well. A final note: take a look at the CV setup happening with the Dr.Rex, Scream, and Thor, then look at the routings in Thor’s Modulation Bus. This provides a way you can use the Scream’s Auto CV to convert the Dr.Rex Audio into a CV source that is applied to several parameters within Thor to affect the NN-XT’s sound. Might provide some further inspiration for you.

As always, please let me know what you think or let me know if and how you use this in your own projects. Happy Reasoning!
Arp Box

This is an Arp Box Combinator I developed for Lewis from “Resonant Filter,” which uses 2 Arps working together to provide some interesting sound design potential. The Combinator is fully programmed and you can switch out the sound sources if you like.

Download the Combinator: arp-box


Description: Lewis from “Resonant Filter” told me he really liked Arps, so I thought I would put another one together which focusses solely on utilizing the Arp within a Combinator, and providing for most of the control of the Arps from the Combinator. So this is an Arp Box Combinator I developed, which uses 2 Arps working together to provide some interesting sound design potential. The Combinator has full automation applied to the Rotaries and Buttons. Furthermore, it uses the Malstrom Curves to adjust some settings on the Arps (documented below).

Features: The “Arp Box” has several features associated with it. I was attempting to get a cross between a playful glitch-inspired machine and a traditional Arp. The following are the main features according to Combinator assignments:

Pitch Bend: This affects the Modulation Rate of both the Rate and Gate for the 2 Arps. Moving it down slows down the arp, while moving it up can speed up the Arp, and create a fast-pitch stuttering effect. Best used when performing for quick little quirky Arp changes.

Mod Wheel: This affects the mode of the Arps at the same time. Moving the Mod wheel changes the Arps’ progressions (either Up / Up+Down/ Down, etc.)

Rotary 1: Controls the Rate/Gate Malstrom’s A curve, which in turn affects the Rate of both Arps. Adjusting this Rotary cycles through the Malstrom’s 31 curves.

Rotary 2: Controls the Rate/Gate Malstrom’s B curve, which in turn affects the Gate Length of both Arps. Adjusting this Rotary cycles through the Malstrom’s 31 curves.

Rotary 3: Controls the Velocity Malstrom’s A curve, which in turn affects the Velocity of both Arps. Adjusting this Rotary cycles through the Malstrom’s 31 curves.

Rotary 4: Adjust’s the Thor’s Filter 3 Frequency.

Button 1: This turns the Arps’ Hold buttons on (when lit) and keeps Hold off (when not lit).

Button 2: Affects the Insert of the Arps. When the button is not lit, the Insert is 3-1. When the button is lit, the Insert is 4-2.

Button 3: When this button is off, the Arps do not respond to velocity shifting from the Velocity Malstrom. Velocity is constant. When turned on, the Velocity is shifted according to the curve in the Velocity Malstrom. Note that with the Velocity turned off, adjusting Rotary 3 has no effect.

Button 4: When this button is off, there is very little resonance applied to the Thor Filter (and as a result, the sound). When this button is turned on, a high resonance is applied to the Filter. There’s also a little more balancing going on in order to more closely match the volume between low and high resonance, but essentially this is a quick way to get a whole new sound out of the Arp Box.

Note: In addition to the above programming, you can use the Thor Filter underneath the 6:2 Line Mixer to set up the Delay and Chorus for some quick FX. Button 1 turns on the Delay, and Rotary 1 adjusts the Delay Time. Button 2 turns on the Chorus, and Rotary 2 adjusts the Chorus Delay. So you have a few additional parameters with which to work.

Usage: It can be used as is to insert an adjustable Arp in your tracks, played in a live performance setting, or used as a template with your own sounds. Just keep the Arps as they are and switch out the sound source to your own device or patch.

Other Notes: Feel free to change the Patches for the two NN-XTs or change the device to another sound source (either a Sampler or Synth). Also, you don’t have to have both devices playing the same sound at all. So experiment here first. Also, by default (and for the default sound of the Arp Box), the first arp is set to -1 Octave Shift, and the second Arp is set to -2 Octave Shift. This is so that the first Arp provides the main melody line, while the second Arp provides a bottom end. Depending on your sound, you may want to adjust this Octave Shift setting to whatever you wish. Also, if you don’t like the Low Pass Ladder filter in Thor, you can switch it to any other filter. Depending on your sound source, one of the other filters may suit your own patch better. Finally, if the Rate of the Arp is not to your liking, you’ll have to change this setting on one or both Arps manually. Though the Pitch Bend wheel affects the Rate, it may not be the best rate when the Pitch Bend is in its default position. Playing with the Rates on both Arps can produce some interesting sound designs.

Let me know what you think?

Distorted Guitar

A distorted guitar I created with the use of a Scream and a Thor Synth. There are also a few Stereo enhancements that were added. I needed this type of sound for one of the songs I was working on.

Play Example or Download the File: distorted-guitar.zip
[ti_audio media=”251″ repeat=”1″]

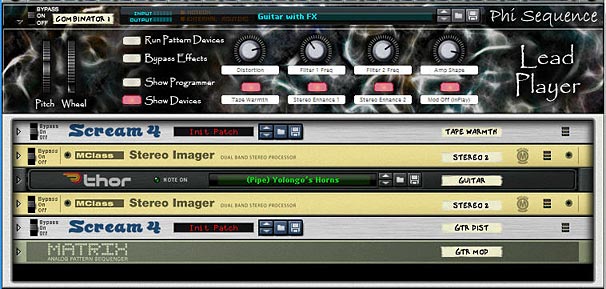
Description: This is a distorted guitar I created with the use of a Scream and a Thor Synth. There are also a few Stereo enhancements that were added. I needed this type of sound for one of the songs I was working on, and it fit perfectly in my mix. Maybe you can find a use for it as well.

distorted-guitar

Features: For the Thor, the Pitch Bend is set to +/- 7 semitones. Mod Wheel controls the Comb Filter (Filter 1) Frequency. The  Thor Rotaries and Buttons aren’t mapped to anything, so you can play with those if you like. The nice part of this Combi is the fact that it uses a Scream to control distortion. On the Combi, you can control the following:

Rotary 1: Controls the amount of Distortion of the Scream (along with Parameter 2). The higher you go, the more distortion.

Rotary 2: Controls the Thor’s Comb Filter (Filter 1) Frequency. Lower = more cutoff, Higher = less cutoff.

Rotary 3: Controls the Thor’s Low Pass Ladder Filter (Filter 2) Frequency. Lower = more cutoff, Higher = less cutoff.

Rotary 4: Controls the Thor’s Amp attack and Release. Lower = faster attack/less release. Higher = slower attack/more release.

Button 1: Adds Tape Warmth from the first Scream (Bypasses the Scream or enables it)

Button 2: Turns on the first Stereo Enhancement (Widens up the Hi band greatly and Lo band a little bit). The button enables or bypasses this Stereo Imager.

Button 3: Turns on the second Stereo Enhancement (Widens both the Lo and Hi bands quite a bit). The button enables or bypasses this Stereo Imager.

Button 4: Turns the Guitar Modulation on or off. This is some modulation that was set up on the back of the second scream unit and since it’s controlled by a Matrix, you need to have the song in play/record mode to hear it. Otherwise, you won’t hear anything. So, for example, if you are simply playing the combi without setting the song in motion with the play button, the matrix won’t be triggered and you won’t hear the modulation. This basically adds a certain amount of randomness to the sound, which worked out well for one of my own songs. Otherwise, you can turn it off by pressing this button (keeping the button on).

Usage: Used as a Lead Guitar.

Other Notes: Use the pitch bend wheel to create some pretty realistic string bending (at least to my ears).

Apollo Mission

These are two Pad sounds based on an FM tutorial I read on the Propellerhead site. However, this sound is completely different from the sound I heard there. I just love the space of the sounds. One is clean, the other is distorted with a moderate dose of noise.

Play Examples or Download the File
[ti_audio media=”130″ repeat=”1″]

[ti_audio media=”131″ repeat=”1″]

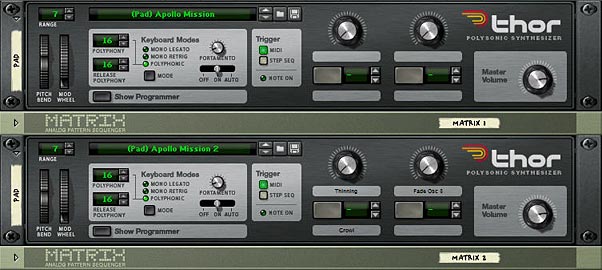
Description: These are two Pad sounds based on an FM tutorial I read on the Propellerhead site. However, this sound is completely different from the sound I heard there. I just love the space of the sounds. One is clean, the other is distorted with a moderate dose of noise.

Two Pad sounds - one clean, the other with noise

Features: The “Apollo Mission” Pad does not have any programming tied to it. It’s pretty much a one-off sound. The “Apollo Mission 2” Pad, however, has a few things going on. First, use the Mod Wheel to control the State Variable Filter (Filter 1) Frequency and Resonance. Turning up the wheel on it’s own will give it a new dimension, not quite as noise-laden, and the Resonance gives it a sweet warbling sound that I really like. Rotary 1 will increase the resonance on the third filter and at the same time reduces the shaper’s effect on the sound. The second Rotary fades the level of Oscillator 3, and removes a good portion of the noise. Turned fully up and you get a completely clean Pad sound. Using Button 1 will make the Pad Growl more. Essentially it Reduces the Pitch of Oscillator 3. You gotta love these FM sounds. They can do so much more than bells with very little effort.

Usage: Used as a Pad or Texture.

Other Notes: Try using a combination of the Mod Wheel and Rotary 1 together. This gives the whole pad a very soft and far away sound. I’m not partial to the sound made if you raise both Rotaries together to full max. So I would stay away from that. It can get to be a little too high-pitch for my taste. But see if you like it (obviously now that I said not to try it, you’ll go ahead and try it. 😉 If you want extra growl, Turn Button 1 on, and then push the Mod Wheel up. This provides a nice growling edge to the sound.

Shock Treatment

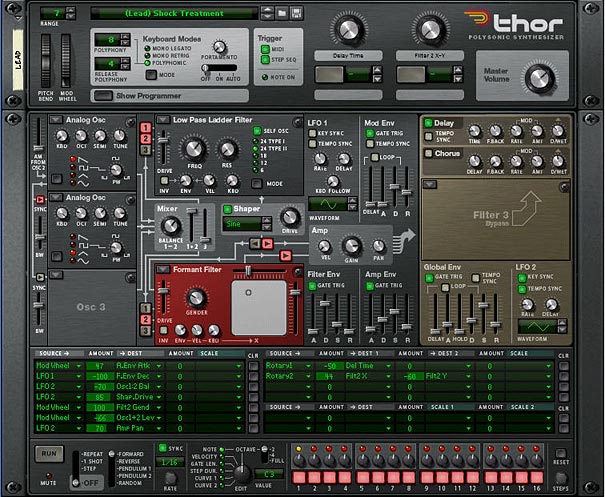
This is one of my signature Lead/Bass sounds. I used it for my song “A View from the Edge” found on my Phi Sequence Mount Royal & Fairmount page.

Play Example or Download the File
[ti_audio media=”104″ repeat=”1″]

Description: This is one of my signature sounds. I used it for my song “A View from the Edge” found on my Phi Sequence Mount Royal & Fairmount page.

Shock Treatment Lead

Features: Pitch Bend set to +/- 7 semitones. Mod Wheel controls the Formant Filter (Filter 2) gender (positive 100), as well as the level of Oscillator 1+2. Rotary 1 controls the global Delay Time from 142 ms backward by 50% to 72 ms for a very interesting spacey effect which makes the sound get more closed in, as if you’re using a “small space” reverb. Rotary 2 plays around with the X-Y of the Formant Filter (Filter 2).

Usage: Used as either a Lead or a Bass.

Other Notes: Try playing with the BW slider between Oscillator 1 and 2. I find that can generate some nice new sounds.