55 – Key Trig Patterns (Part 3)

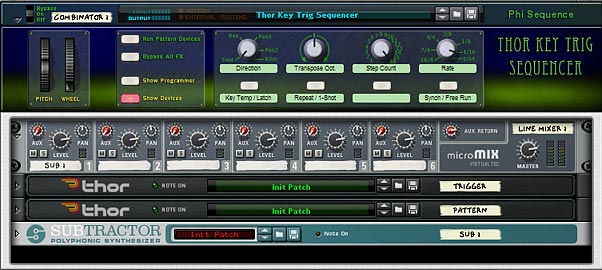
In this tutorial, I’m going to go all out and create a one-finger band Combinator which makes use of MIDI Key Triggering to launch an array of patterns for all my instruments. In other words, I’m going to construct a song using a single Combinator and some Reason devices. You can use this as a template for your own ideas, and simply switch out the sound generating devices and patterns to create your own track.

In this tutorial, I’m going to go all out and create a one-finger band Combinator which makes use of MIDI Key Triggering to launch an array of patterns for all my instruments. In other words, I’m going to construct a song using a single Combinator and some Reason devices. You can use this as a template for your own ideas, and simply switch out the sound generating devices and patterns to create your own track.

You can download the project files here: one-finger-band. There are two .rns files for those using Reason 5, and 2 Combinator files (one for Reason 5 and the other for those still running Reason 4). You can also open up the Combinator inside Record and use it there if you like. Note: please respect that these project files, like everything else on this site, is under the Creative Commons 3.0 licensing, meaning you can mix, remix, share, and play around with the song to your heart’s content, but you will need to provide the source info and a link back to my site here in any productions you do with this file. Share and share alike ok? And you can’t make any money off the file. It’s not going to win any awards anyway. But if you remix or play with the file, send them back to me privately and I’d be happy to showcase them here in a new posting (send to my email in the top menu), I’d love to see what you come up with. Don’t be shy!

Before jumping in, I just wanted to give a shout out to Hydlide, who did a great tutorial over at TSOR (The Sound of Reason) site which shows you how you can split several Thor patterns along all the octaves of the Combinator Key Range. Have a look at his creative Thor Step Sequencer tutorial for some fresh ideas. So thanks for ripping off my idea Hyd. Thief! 🙂 All joking aside, if it wasn’t for him wanting to see a third part to this series, I wouldn’t have written this “next part.” And now you’ll all have to suffer through more MIDI Key Triggering madness.

Here’s a video showing you what I’m explaining below. It’s a bit of a showcase for the song I created. Read on to see how the Combinator is setup.

Explaining the “One Finger Band (Latched – R5)” Combinator

The idea behind the Combinator builds upon the previous two tutorials I wrote about Key Triggering your Patterns. However, there’s a few new ideas in this one which I’m going to highlight below. I also have a few tips for those of you trying this out on your own.

The main thing I learned while doing this is that it’s much easier to program a song using the “Momentary” method of Key Triggering. The reason is that it’s easier to write notes into the sequencer. You place the note along the clip lane for as long as you want your pattern running. Simple enough. If, on the other hand, you are programming your notes in using the “Latch” method, you need to provide a start and stop note on the same key to trigger your pattern to turn on, and then turn off. Which can get a bit fiddly. Even so, I tried it using the “Latched” method, just to see how it would work. So to summarize, if you are programming your song in the studio, you’re probably better off using the “Momentary” method. If, on the other hand, you are playing “Live,” you’ll probably benefit more from the “Latched” method, because you don’t have to have your fingers on the keys to keep things running. BUT (and this is a big BUT), you DO need to remember which patterns are running at any given time, so you know which key to press to turn them off when you want them to stop.

It would be really nice if you had a keyboard that had lighted keys to note which ones are on and which are off. But I don’t know of any manufacturers that supply such a keyboard. Pad Controllers are a different story. And controllers with lighted buttons are even better (like the Livid Ohm64, Novation Launchpad, and Akai APC40), because you can assign a key note to each button and they will be lit when on and unlit when off, making this whole setup a piece of cake.

So back to the template. Here’s how the key range works for the Combinator:
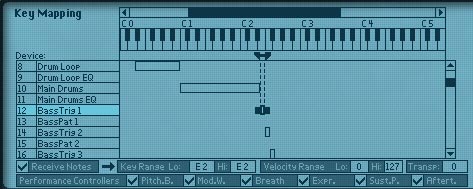
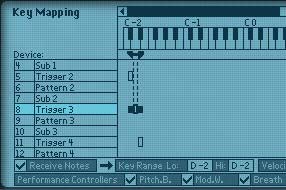
The Key Mapping area of the Combinator, where we use the Key Range to map our Kong drum pads, Dr.OctoRex Loop Slots, and sound device pattern triggers to individual keys.

The root of this method is in how you program the Combinator Key Range assignments for the various devices. And we went over most of this in the second part of the tutorial. However, I’ve added in a few Dr.Rex loops and some variations, as well as a Kong device to play our drums. Since both those devices already have default key assignments, you don’t need to do too much to get them working for you. The other sounds are placed on other free key areas on the keyboard. Here’s how it breaks down:

  • MIDI Keys D#0 – B0: Dr. OctoRex Loop Player (Drum Loop with 8 variations in the 8 different slots). D#0 Stops the Loop. E0 – B0: Plays Loop slots 1-8. You can switch between the slots in mid-stream. And depending on how you have your “Trig Next Loop” set up, switching from one slot to the next will follow one of those three methods: Bar, Beat, or 1/16th note.
  • MIDI Keys C1 – D#2: Kong Drum Designer (Main Drums with a Basic drum setup on all 16 Pads). Plays Pads 1-16.
  • MIDI Keys E2 – G#2: Subtractor Bass. E2 – G2 plays Bass patterns 1 – 4 in a “Latched” mode. Therefore, you need to press the key once to trigger the pattern, and press once more to stop playing the pattern. G#2 applies a delay / reverb effect to the bass patterns. You can play each of the bass patterns or all of them combined if you like. Then press G#2 to apply the effect to the bass sound.
  • MIDI Keys A2 – C3: Thor Pad Sounds 1 & 2. These keys play 4 different pad patterns. Both pad sounds are joined together, so the patterns here will play both simultaneously. That’s why I separated them by panning them left and right. The Pad patterns are also “Latched” to the keys. You can also shuttle both pad sounds left and right by using Rotary 4 on the Combinator. This applies an LFO waveform to pan the sounds back and forth inversely. Increase the amount of movement by moving the Rotary further to the right. Reduce the auto-pan completely by moving the rotary all the way left.
  • MIDI Keys C#3 – E3: Thor Synth. These keys play 4 different synth patterns also in a “Latched” mode.
  • MIDI Keys F3 – A3: Thor Rhythm section. Keys F3 – G#3 plays 4 different Rhythm patterns also in a “Latched” mode. A3 applies a distortion effect to the Rhythm patterns. In the same way as the bass works, you can play any patterns using the first 4 keys, and then press A3 to apply the distortion to the sound.

In just under 4 octaves, we’ve managed to provide all the instruments necessary to produce a track. That still leaves plenty more keys to assign to anything from sounds, patterns, and FX switches. Just because I stopped here doesn’t mean you have to. You can use the file as a template, but you’ll gain more out of understanding how the routings work, and what they are doing. This way, you can truly make the Combinator your own. So I encourage you to try your hand at creating your own template file along these lines. You might find it not only a creative exercise, but also a challenging and engaging way to work with the software. And finally, you might get a really nice reusable template that makes creating tracks quicker or “Live” play with Reason better.
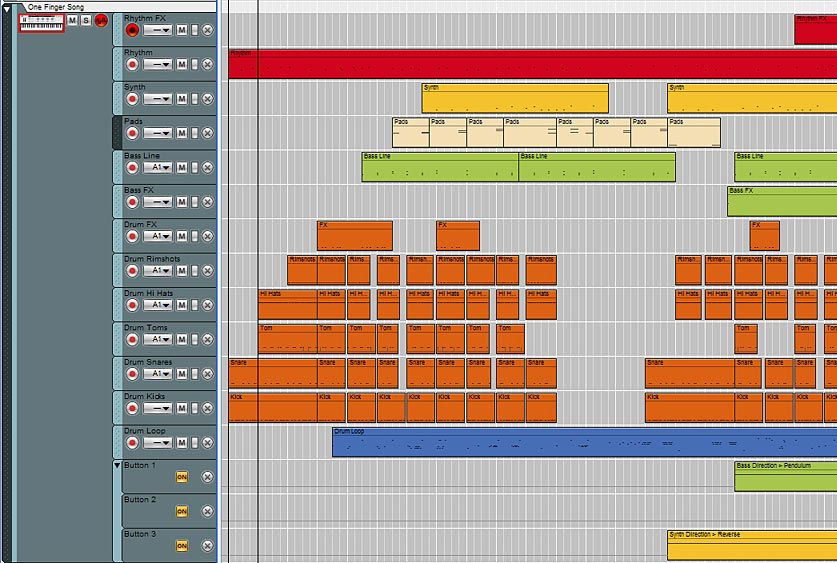
This image shows the various Note Lanes for the Combinator. Each note lane represents a different sound source, Kong drum pad, or Rex Loop Slot selection.

If you are programming a song, you need to create a new note lane for each new track you introduce, because the Combinator IS the song. This is how I set it up in the project’s .rns file. So you can go through one track at a time on each note lane and place all your note triggers there. Alternately, if you are playing live, you can have the entire song on a single note lane.

In addition, when you load the Combinator into your project, you should be aware that the mastering is already built into the Combinator. Rotary 1 controls the Compression Input and Rotary 2 controls the Maximizer input. This mastering setup was largely borrowed from the “Hip Hop” mastering patch in the Factory Soundbank and then the devices were moved and rerouted into the Combinator. You can also create a “bypass” for the entire set of mastering devices and put that on button 4 of the Combinator if you like.

This brings up another point. All the sounds inside the file come from the Factory Soundbank or else were built by me (most of the Kong drums, Synth, and Effects were my creation, while the rest were default patches, drum samples, and Rex files that ship with R5). So you shouldn’t have any problems opening the Combinator or .rns files on your computer.

Differences with the “One Finger Band (Latched – R4)” Combinator

Since Reason 4 users don’t have the new Kong device, I replaced this with a Redrum. The clips and notes in the main sequencer are still the same, but the drum sounds will be different. Each Redrum channel is triggered by a Thor device, and the Thor devices are mapped to the Combinator Keys in the Combinator Programmer. So the key assignments for the drums are different than the R5 file. Those with R5 can, of course, open both .rns files. Those with R4 can only open the R4 Combinator.

One other difference is that I had to remove the Dr. OctoRex device, so there is no “Drum Loop” note lane for the R4 .rns file. You can, of course add in any number of legacy Dr.Rex devices and Rex loops in your own template. Since I do all my work in Reason 5 and Record 1.5 now, I have to stop working with the legacy Dr. Rex loop player. So farewell Dr. Rex. I loved you while you were with us. R.I.P.

Careful with that Pitchfork, Eugene (any Pink Floyd fans out there?)

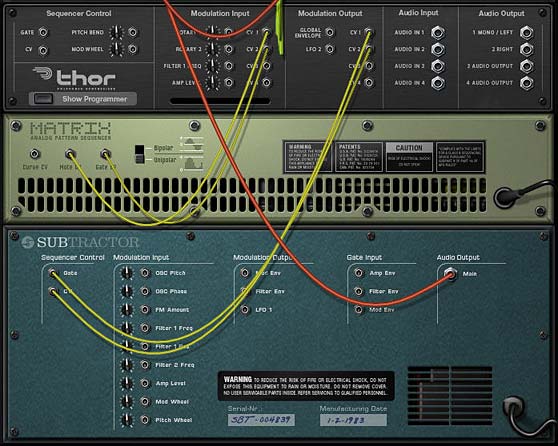
When I was trying to streamline things a bit, I got into a bit of a pickle. Rather than duplicate all the sound sources over and over just to recreate new patterns, I decided to Merge the Note/Gate CV from the “Pattern” Thors into the sound source devices. In order to do this, you need to use 2 Spider CV Mergers; one for the Note and the other for the Gate. However, when you do this, you’ll notice that the pitch of your sounds will go upward, depending how many sound sources you have connected to the Spider. You’ll need to pitch downward using the trim knobs next to the CV inputs on the Merger side of the Spider. This is fiddly because you need to adjust all four downward until you get the pitch you want (assuming you have four pattern devices merged into one CV output). Even merging 2 note CV sources into one will force you to lower the trim knobs a bit toward the left. As for the Gate CV inputs, you can turn all the trim knobs way up to 127. I don’t think this has any noticeable affect on the Gate.
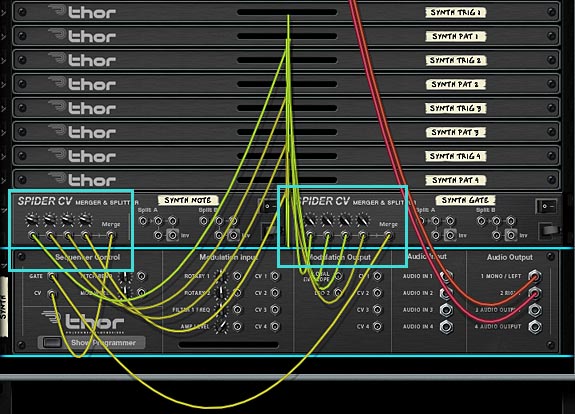
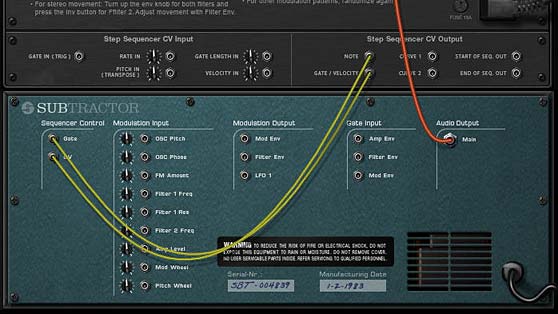
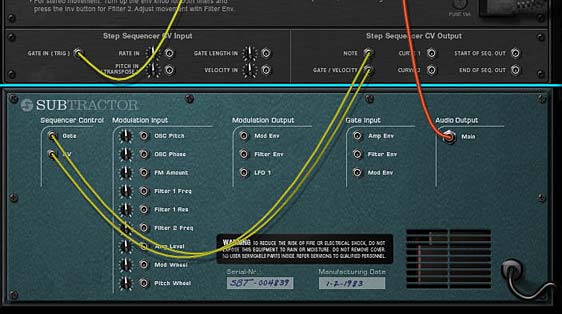
This image shows the attenuation of the pitch on the "Note" CV Merger on the left and the attenuation of the "Gate" CV Merger on the right, using the CV trim knobs.
This image shows the attenuation of the pitch on the “Note” CV Merger on the left and the attenuation of the “Gate” CV Merger on the right, using the CV trim knobs.

This also complicates matters a little bit because you now have 3 parameters affecting the pitch of your sound: The Oscillators in the sound source, the Note values of the Step Sequencers on the “Pattern” Thors, and the combined CV output from the Spider CV Merger (which is attenuated using the trim knobs). Just be aware that the combination of all three parameters will affect the pitch of your sound. You can, of course, play around with all three to affect your pitch, but I found it’s usually easier to first set up your trim knobs to be in the right vicinity of the Octave you want the sound source playing, then leaving them alone and using the Pattern knobs to adjust the pitch.

Suggestions for Using this Combinator setup

  • Live Play. Ultimately, this has the potential to create some really monster setups where you have a wide array of devices and patterns playing those devices all along a single keyboard controller. And with the new Ableton Controllers out there, you can make great use of them for Reason also. All you need is a lot of lighted buttons that are set up to trigger MIDI Key notes, and you’re golden. You can even set things up logically. If you have an 8×8 64-button controller, you can use the first two rows to control Kong, the third row to control a Dr. OctoRex with loop slots (use 1 slot to stop the loop from playing, and 7 other ones for loop variations or entirely new loops in the other slots. And so on and so forth.
  • Remixing potential. Change around the patterns inside the various “Pattern” Thors and/or change the sound sources to your own patches to instantly create a variation on the Midi data that’s in your main sequencer. This takes very little time to do and can generate an entirely new sound or track for you. The beauty is in the fact that you’ve already built the template and laid down midi data. All the hard lifting is done.
  • If you’re feeling ambitious you can set things up to trigger the instrument direction switches (currently set up on Combinator buttons 1-3) from MIDI keys instead.

So there you have it: Part 3 in our MIDI Key Triggering explorations. Should I delve into a “Part 4” or move on to something new? And let me know if you have any other ideas that come to mind where Key Triggering is concerned. In parting, I’ll leave you with the sweetly dark ambient glitch sounds of my little experiment:

54 – Key Trig Patterns (Part 2)

So here we are once again with part two in our series on key triggering our patterns. In this part, I’m going to bring both methods together so that you can switch between the two methods with the click of a button. I’m also going to add a few new tricks into the mix. And finally show you how to hook everything up to your Kong pads, in the event you want to use the pads as triggers instead of your keyboard. So let’s dig our heels in.

So here we are once again with part two in our series on key triggering our patterns. In this part, I’m going to bring both methods together so that you can switch between the two methods with the click of a button. I’m also going to add a few new tricks into the mix. And finally show you how to hook everything up to your Kong pads, in the event you want to use the pads as triggers instead of your keyboard. So let’s dig our heels in.

You can download the project files here: key-trig-pattern-methods-2. It contains 2 Combinators and the .rns file that showcases the 2 main patches we’re building here. Load up your sounds inside them and have fun tweaking the patterns and controlling them via your key controller or Pad controller.

Bringing together the “Momentary” and “Latched” Triggering Methods

The two triggering methods are great on their own, but think of how great it would be to have both of them right at your fingertips. This technique allows you to switch between “Momentary” and “Latched” key triggers. And if you’re not sure what the hell I’m talking about, then you haven’t read Part 1 of the series, so go back in and read it would ya! Because this is going to be fun. First, the video to show you how it’s done:

And next, the full step-by-step for those that prefer to read through:

  1. Create a Combinator, and inside create a 6:2 Mixer, Subtractor, and holding down “Shift,” create two Thors. Completely initialize the Thor by removing the Oscillator and Filter, and bring all the parameter values to zero.
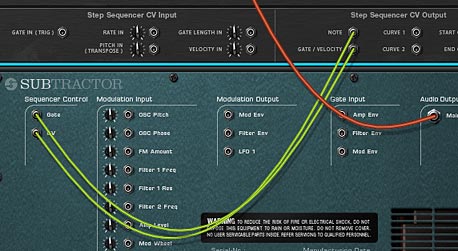
  2. Label the first Thor “Trigger” and the second Thor “Pattern. Flip the rack around and send the Curve 1 CV output from the “Trigger” Thor to the CV1 input on the “Pattern” Thor. Then send the Note and Gate/Velocity CV outputs from the “Pattern” Thor into the CV and Gate inputs on the Subtractor.
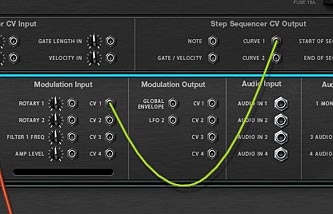
  3. The Curve 1 CV going from the "Trigger" Thor into the CV1 Input on the "Pattern" Thor.
    The Curve 1 CV going from the "Trigger" Thor into the CV1 Input on the "Pattern" Thor.
    The Note / Gate CV Connections from the "Pattern" Thor into the Subtractor.
    The Note / Gate CV Connections from the "Pattern" Thor into the Subtractor.
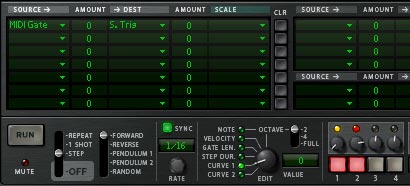
  4. Flip the rack back around to the front and create a 2-step pattern in the “Trigger” Thor. Switch the Edit knob to “Curve 1” and then set “Step 1” to zero (0) and “Step 2” to 100. Switch the Run Mode to “Step” and enter the following into the Modulator Bus Routing Section (MBRS):
      MIDI Gate (found under MIDI Key > Gate) : 0 > S. Trig (found under Step Sequencer > Trig)
  5. The Modulation Bus Routing Section for the "Trigger" Thor
    The Modulation Bus Routing Section for the "Trigger" Thor
  6. In the “Pattern” Thor, enter any pattern you like. Set the Run Mode to “Repeat” and in the MBRS, enter the following lines:
      CV In1 : 0 > S. Trig
      MIDI Gate : 100 > S. Trig
      Pitch Bend : 53 > S. Transp (found under Step Sequencer > Transpose)
  7. The Modulation Bus Routing Section for the "Pattern" Thor
    The Modulation Bus Routing Section for the "Pattern" Thor
  8. Open up the Combinator programmer, and uncheck the “Receive Notes” checkbox for the Subtractor. Also set the Key Range for both the “Trigger” and “Pattern” Thors to Lo: C-2 / Hi: C-2.
  9. Still inside the Combinator Modulation Routing area, select the “Trigger” Thor and set up the following line:
      Button 1 > Mod 1 Dest Amount : 0 / 100
  10. Then select the “Pattern” Thor, and set up the following lines:
      Button 1 > Mod 1 Dest Amount: 0 / 100
      Button 1 > Mod 2 Dest Amount: 100 / 0

That’s all there is to it. Now when you play the C-2 key on your keyboard controller, the trigger method is Momentary (the pattern starts when you press the key and stops when you release the key). Press Button 1 on the Combinator, and now when you press the key, the trigger method is “latched” (the pattern starts when you press the key and only stops when you press the key again).

Note: One sticky issue with this setup is as follows: Let’s say you have the “Latch” mode turned on (button 1) and press a key to play the pattern. If you switch the “Latch” mode off (button 1 again) before stopping the pattern, the next time you turn the “Latch” mode on again it will automatically run / play the pattern. If you always turn off your pattern before switching from “Latch” mode to “Momentary” mode, then you won’t have this problem. So keep that in mind. And if you have a workaround for this, let me know and I’ll be glad to update the patch.

The Completed Combinator front panel. Note that I mapped a few more Sequencer controls to the Combinator Rotaries and Buttons.
The Completed Combinator front panel. Note that I mapped a few more Sequencer controls to the Combinator Rotaries and Buttons. The patch is in the Project files so you can open it up and play with it.

Kong Pad Triggering (Obviously for Reason 5 users)

One other method is to use the Kong pads to trigger your patterns (and sounds). What we’re going to do here is set up the same Pattern which can be triggered from two Kong pads. Pad 1 will be a “Momentary” key trigger, and Pad 2 will be a “Latched” key trigger. In this way, we simply need to translate the triggers from Keys to Kong Pads. And it’s much easier than it seems. I’ll start over from the beginning. But first, here’s the video:

And next, is the step-by-step tutorial:

  1. First, Create a Combinator and inside the Combinator create a 6:2 Line Mixer and a Subtractor (with a sound you like loaded into the Subtractor — note that you can select any sound source you like inside Reason, even another Combinator). Then, holding your “Shift” key down, create in order a Kong, and two Thor devices. Move the Subtractor to the bottom of the devices in the Combinator (this just makes it a little easier to follow along our CV paths).
  2. Initialize both Thor devices, so that all the levels are set to zero, and all the oscillators, filters, and envelopes are turned off. Label the first Thor “Latch,” and second Thor “Pattern.”
  3. Flip around to the back and Show the Combinator programmer. Then send the Gate Out CV from Kong’s Pad 1 into the CV1 input on the “Pattern” Thor.  Then send the Gate Out CV from Kong’s Pad 2 into the “Gate In (Trig) of the “Latch” Thor.
  4. Send the Curve 1 CV output from the “Latch” Thor into the Gate In (Trig) of the “Pattern” Thor.
  5. On the “Pattern” Thor, send the Note and Gate/Velocity CV outputs into the CV and Gate inputs on the Subtractor.
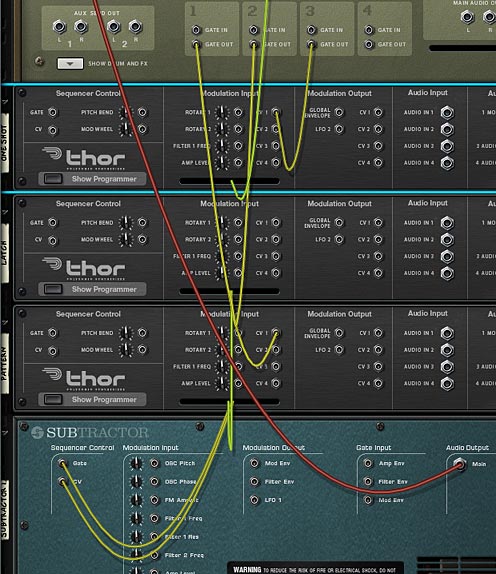
  6. The back of the rack showing most of the Thor - Kong - Subtractor CV routing. Hard to show this all in one screenshot.
    The back of the rack showing most of the Thor - Kong - Subtractor CV routing. Hard to show this all in one screenshot.
  7. With the routing all set, flip the rack back around to the front. In the Combinator programmer, ensure that the only device receiving notes is the Kong device. Uncheck the “Receive Notes” checkbox for all other devices. Also label “Pad 1” on Kong to “Temp Pattern” and label “Pad 2” on Kong to “Latch Pattern.”
  8. In the “Latch” Thor, create a 2-step pattern. Switch the Edit knob to “Curve 1” and then set “Step 1” to zero (0) and “Step 2” to 127. Switch the Run Mode to “Step” and enter the following into the Modulator Bus Routing Section (MBRS):
      CV In1 : 100 > S. Trig (found under Step Sequencer > Trig)
  9. In the “Pattern” Thor, set the Run Mode to “Repeat” and enter any pattern you like into the Step Sequencer. This will be the pattern that plays your Subtractor. Enter the following into the MBRS:
      CV In1 : 100 > S. Trig

Now when you press Pad 1 on Kong, the pattern starts and when you lift your finger from the pad, the pattern stops (Momentary). If you press Pad 2, the same pattern plays in “Latched” key trigger mode, which means the pattern starts and plays until you press on Pad 2 again. This is the easiest way I’ve found to set up both a “Momentary” and “Latched pattern on Kong Pads.

The front panel, showing the 3 Kong Pads setup to control your Pattern in the Thor Step Sequencer.

Taking Kong a Step Further (Stepping it up a Notch! — ok enough with the bad puns)

Let’s do one last thing. Let’s add a new element to a third pad which switches between the 1-shot and Repeat modes. This will affect the way the first 2 pads work a bit, but it will be worth it just to add this functionality.

  1. Duplicate the “Latch” Thor and label it “One Shot.” Then move it to the top of the other Thor device.
  2. Flip around to the back of the rack and send the Gate Out CV from Pad 3 into the CV1 input on the “One Shot” Thor device. Then send the Curve 1 CV output from the “One Shot” Thor into the CV1 input on the back of the Combinator (click the “Show Programmer” button if it’s not visible). Also set the trim knob to 127 and switch to “Unipolar” mode.
  3. Flip back to the front of the rack and in the Combinator’s programmer panel, select the “Pattern” Thor, and enter the following in the Modulation Routing:
      CV In 1 > Run Mode : 3 / 2

Label Pad 3 on the Kong device to “1-Shot / Rep.” and you’re done. Now you can switch between the two run modes using the Kong Pad 3. Note that if you switch from Repeat to 1-shot, both Pad 1 and Pad 2 will act the same way and play the Pattern through once and then stop. There won’t be any difference unless you have Pad 3 set to “Repeat” Run mode. But still, this can extend the Kong functionality just a little bit more. And with some ingenuity you can add other things to the Kong pads, such as an octave up/down shift (see my Kong Piano Roll tutorial for that little trick).

One Final Note about the Kong Setup

I know some people will say, “Well why can’t I put the ‘Momentary’ / ‘Latch’ on a single pad and then use that pad to switch between the two (as the Combinator button does)”? Truth is that I gave this idea a shot, and you can download the idea here: Kong-Pad-Trig-Sequencer(Alternate). However, I couldn’t seem to get around the fact that it was a little quirky. You’ll see the “Pattern” triggers from Pad 1 and the  “switch” toggle is on Pad 16. The problem is that if you press the pattern pad (Pad 1) an even number of times, everything works great. As soon as you press Pad 1 an odd number of times, and then switch from “Momentary” to “Latch” mode using pad 16, the pattern is set off and runs once Pad 16 is pressed. I traced it down to the fact that if the “Trigger” Thor’s step sequencer is left on the second step when switching to “Latched” mode, the pattern automatically runs (or remains open to run). Ultimately, I need a way to reset the Step Sequencer back to “Step 1” when Pad 16 is pressed (or rather, when sending the gate out from Pad 16). But it was very late last night and I couldn’t figure out how to do this. So if anyone has a solution, please let me know and I’ll fix the patch and re-upload it.


So what do you think? Does this setup work for you? Stick around. There’s going to be plenty more to come your way.

53 – Key Trig Patterns (Part 1)

I’m sure most of us have used the Matrix or Thor Step Sequencer to some extent. But how often have we thought about using our keyboard to trigger those patterns? I know I’ve never given it much serious thought, since I usually sequence all the parts into the main sequencer. But this time I’m going to explore the possibility of triggering patterns from our Keyboard. This has a lot of “live play” applications.

By now, most of us know how to use Pattern sequencers to play parts in their tracks. I’m sure most of us have used the Matrix or Thor Step Sequencer to some extent or degree. But how often have we thought about using our keyboard to trigger those patterns? I know I’ve never given it much serious thought, and it’s probably due to the fact that I don’t play “live.” I usually sequence all the parts into the main sequencer. So this time, we’re going to explore the possibility of triggering patterns from our Keyboard.

The project files can be downloaded here: key-trig-pattern-methods. This file contains some combinators and an .rns file with all the combinators inside. These Combinators outline some of the methods presented in the tutorial below. Try them out and see what you can do with these ideas.

Furthermore, we’ll see just how far we can take this idea. The whole thing will be contained inside a Combinator (or a Kong device, if you wish), and the notes on the keyboard will trigger different patterns playing different instruments. It’s like having full control of the band at your fingertips on your piano or controller keyboard.

Sound interesting to you? Yeah, it was interesting to me too.

Before I jump into the various methods of Key Triggering, I want to give a huge shout out to Peff for providing help on figuring out the “Latching” method below. Without his help, I would have spent several more hours tearing out my hair. So thanks Kurt! I really appreciate all the help you provide, not just to me, but to the whole community.

Triggering Matrix Patterns

Let me start off by saying this is a huge PITA where the Matrix is concerned. The main problem lies in the delay of Pattern triggering from the moment when you press the trigger key to the moment the pattern starts (variable, depending on when the key was hit during playback). Yes I know, you can plop your patterns down on the Matrix pattern lanes, but that’s defeating the whole purpose of this tutorial, which is all about triggering patterns via different keys on your keyboard. But for the sake of argument (and to be complete), I’ll show you first how to set it up this way using a Matrix, but I’m not going to spend a lot of time on this one. Maybe this is beneficial on some planet where delay is a “cool” and “hip” concept. Here’s a video where I outline 2 methods to key trigger a Matrix Pattern. The first method is not described in detail here because it introduces the dreaded delay. But the second method (outlined in detail below) can be useful in a somewhat chaotic and free-running way.

Note: Ed Bauman highlights a method you can use to Trigger Matrix Patterns “almost” instantaneously here: “When Reason’s Time Signature is set to 4/4, patterns will switch on every measure, a full 16 x 16th notes, but if you set the Time Signature to 1/16, patterns will switch on every 16th note, so it’s basically immediate. Of course, if you’re playing back a sequence, doing this completely screws up the measures in a song and makes the whole song gigantic as far as measure count goes, but it definitely works for the Matrix and ReDrum. It used to apply to Dr. Rex as well but with Dr. Octo Rex we now have the Trig Next Loop region which essentially does the same thing if you’re switching around rex files within one Dr. Octo Rex.”

  1. First, Create a Combinator. Then create a 14:2 Mixer, and a sound source (in this case a Subtractor). Load up a Subtractor patch or else create your own synth sound in the Subtractor. Then create a Matrix underneath. It should automatically connect the Note / Gate CV for you. Enter a pattern into the Matrix (or press Ctrl+R to quickly enter a random pattern).
  2. In between the Subtractor and the Matrix, we’re going to create a Thor and completely initialize the patch (this means removing any Oscillators and Filters, and dropping all the values down to zero.
  3. The Thor is simply used as the gate trigger. So flip around to the back of the rack and connect the Note / Gate CV from the Matrix into the Thor CV1 & 2 inputs. Also connect the CV 1 & 2 outputs from Thor back into the Note / Gate CV inputs on the Subtractor.
The back of the rack showing the CV passing from the Matrix through the Thor and into the Subtractor.
  1. Flip around to the front again, and in the Thor Modulation Bus Routing Section (MBRS), enter the following:
      CV In1 : 100 > CV Out1 : 100 > Midi Gate (under Midi Key > Gate)
    CV In2 : 100 > CV Out2 : 100 > Midi Gate (under Midi Key > Gate)
  • Open up the Programmer Modulation Routing on the Combinator and for the Subtractor device uncheck the “Receive Notes” checkbox. Then select the Thor device and enter the following for the Key Range: Lo: C-2 / Hi: C-2. This way, when you press C-2 on your keyboard controller, it will open the gate and play the pattern on the Matrix.
  • Now press Run so the Matrix pattern is running. You won’t hear anything yet. In order to hear the pattern (turning it on or off) you need to press the C-2 key. This allows you to hear the pattern. The crappy part is that there’s no telling when the pattern will be picked up when you press the key. Put another way, the pattern is continually running, but only sounds when you press and hold the key down. Not the most elegant solution.
  • To add multiple instruments or parts, select the Subtractor, Thor, and the Matrix (holding down your “Shift” key to multiple-select the devices), right-click and select “duplicate devices and tracks.” Enter your new pattern in the Matrix. Then flip to the back of the rack and route the audio out of the Subtractor to a new channel. Finally, go into the Combinator programmer, and adjust the Thor device so that only one key on your keyboard controller is used to trigger the Thor (C#-2, for example).
  • Repeat the above process for as many sounds as you need (up to the total amount of keys that your keyboard will allow: 88 for a full size piano or synth controller keyboard, or 128 for the full midi range which a Reason or Record Combinator allows — from C-2 to G8). This is more than enough of a range to create a complete set of instruments and sounds for most any standard songs or performances.
  • Using Thor’s Step Sequencer for Precise Pattern Key Triggering

    Now that you have an understanding of how the Matrix is key triggered, I’ll move on to a more robust way of accessing patterns via the keyboard. This method replaces the Matrix in favor of the Thor Step Sequencer. Since the Thor Step Sequencer can be programmed to start and stop precisely where you want it, using it is the best option when you want precise control over your sounds. It’s just too bad that it’s more of a pain to enter and edit notes into it. The Matrix, to my eyes, provide a simple visual way to add patterns. The Thor Step Sequencer is more tedious by changing rotary knobs all the time.

    The Momentary Key Method

    The first method is the easiest and allows you to create a “momentary” trigger via your midi keys. This means that when you press a key, the Step Sequencer plays the pattern. When you release the key, the pattern stops.

    1. To set this up, first create a Combinator, and then in order a 6:2 Mixer, a sound device (here, a Subtractor), and holding the “Shift” key, a Thor device. While you’re at the front of the rack, add a sound into the Subtractor that you’d like to hear. Any sound will do.
    2. Completely Initialize the Thor device. This means removing the Oscillators, Filters, bringing all values to zero as well.
    3. In the Thor MBRS, enter the following:
        Button 1 : 100 > S.Trig (found under Step Sequencer > Trig)
    4. Directly to the rght of Button 1 on the Thor, use the upward spin control arrow to set this to C-2. This means that the Thor Step Sequencer is triggered when the C-2 key is pressed. In the Step Sequencer, set the Run Mode to “Repeat” and enter a pattern into the Step Sequencer (note that to gain access to the full note range, you’ll need to switch the Octave setting to “Full”).

    Note that an alternate way to trigger the Step Sequencer is outlined in the Video. Though this is a more labor intensive way to trigger things. If you want to use this method, switch the “Button 1” source in the MBRS to “MIDI Gate (found under MIDI Key > Gate)” and then open the Combinator Programmer and adjust the Key Range of the Thor device to Lo: C-2 / Hi: C-2 (so one key is selected). This achieves the same outcome.

    1. Flip the rack around and in the “Step Sequencer CV Output,” send the Note and Gate/Velocity CV outputs into the Gate / CV inputs on the Subtractor.
    The back of the rack showing the Thor routing from the Step Sequencer into the Subtractor.
    The back of the rack showing the Thor routing from the Step Sequencer into the Subtractor.
    1. Lastly, go into the Combinator Programmer, and deselect the “Receive Notes” checkbox for the Subtractor (so that the Subtractor only receives notes from the Thor Step Sequencer).

    Now, when you play the C-2 key, the Thor Step Sequencer will start and play for as long as the key is held down. Cool right? If you want to create more instruments along other keys, create the new sound device (or even another Combinator), duplicate the Thor, connect the new Thor CV outputs to the new device, and move the button spin control to the new key setting. Done.

    The Latched Key Method

    No, this is not the latched key kid hanging outside his parents’ house with the key around his neck. This is the second method to trigger patterns via MIDI keys. It is is a little more complex because you need two Thors to produce it. This method is a “latch” or “hold” style of triggering. Another way to look at it is a toggled pattern on / pattern off method. In this procedure, you press a key and the pattern starts. The pattern then plays through even when you release the key. You then press the same key again, and the pattern stops. In this way, the pattern is “latched” by the key.

    1. Building on the first method, we need to change a few things. First, reset the Combinator by removing the key assignment (using the spin control to the right of the button — which should be set to “-“). We also need to remove the “Button 1” line in the MBRS (not necessary, but for cleanliness’ sake). Label this Thor “Pattern.”
    2. Create a new Thor and completely initialize it as we did previously. Label it “Trigger.” In the Step Sequencer, set the Run Mode to “Step,” change the Edit knob to “Curve 1” and create a 2-step pattern, with Step 1 set to zero (0) and Step 2 set to 100. Then enter the following line in the MBRS:
        MIDI Gate : 100 > S. Trig
    3. Flip the rack around and send the “Curve 1” CV output from the “Trigger” Thor into the “Gate In (Trig)” CV input on the “Pattern” Thor.
    The back of the Reason rack with the CV routings for the latched setup. One Thor triggers the other Thor's Step Sequencer to start
    The back of the Reason rack with the CV routings for the latched setup. One Thor triggers the other Thor's Step Sequencer to start
    1. Flip the rack back to the front and in the Combinator Programmer, ensure both the Subtractor and “Pattern” Thor is not receiving notes (uncheck the “Receive Notes” checkbox), and ensure the “Trigger” Thor is receiving notes (the “Receive Notes” checkbox has a check in it). Also set the Key Range value for the “Trigger” Thor to Lo: C-2 / Hi: C-2.
    The Combinator Programmer Modulation Routing
    The Combinator Programmer Modulation Routing

    Now press the C-2 key on your keyboard. The Step Sequencer starts and plays through even when you release the key. Press the key again, and the Step Sequencer stops. If you wish to add more devices to different keys that are “latch” triggered, create the new sound device (or even another Combinator), duplicate the 2 Thors, connect the new Thor CV outputs from the “Pattern” Thor to the new device, and adjust the Key Range to a new key for the “Trigger” Thor within the Combinator Programmer. Then you can set up your pattern in the “Pattern” Thor Step Sequencer, and you’re all set. Simple right?

    Where do you go from here?

    Here’s a few suggestions, which we will explore in the next part in our “Key Triggering Patterns” tutorial series:

    • Now that we have the hang of the way in which we can trigger the Thor Step Sequencer via your keyboard controller, you can duplicate the same sound source as many times as you like to create new patterns for the same sound source. Yes, you can merge the CV to control the same sound source (instead of duplicating the sound source), but it’s often quicker just to copy the whole thing and change your pattern.
    • You can create many different sound source instruments (any synths, samplers, Rex or Drum modules) that are controlled by different Thor Step Sequencers and map them to your keyboard to create complex multi-instrument Combinators. Using this method, you could even create an entire song within a single Combinator, and play the parts of the song by playing notes on your keyboard. In this way, you can bring the sounds in and out based on how you play the keyboard, or program the notes directly into the main Reason sequencer.
    • Instead of setting this all up in a Combinator, try setting it up on a Kong device, and using the Pads to trigger the patterns instead of the Combinator.
    • Feeling ambitious? Try combining the two methods: “Momentary” and “Latched,” then designating a key on your keyboard, a button on the Combinator, or a Pad on Kong to switch between the two methods.

    These ideas are great for setting up “Live Play” templates in Reason Combinators. It takes a lot of preparation to set up a complete song in this manner, but once it’s set up, it will make you look like a magician as you play complete part sequences with the press of a key.


    What do you think of these ideas? Have any others that you’d like to share here? Post a comment and let me know what you’re thinking. As always, thanks for watching, listening, and reading.

    51 – Matrix Track Building (Part 4)

    Just when you thought it was over. . . You were wrong! I’ve decided to extend this series of tutorials to explore a few things that I didn’t get to within the track I built. I could probably go on for 10 more parts to go over all the possible things you could do with the Matrix. But I wanted to focus on a few areas and explore them in a little more depth. So here’s a few things beyond the track, which you can do with the Matrix Step Sequencer.

    Just when you thought it was over. . . You were wrong! I’ve decided to extend this series of tutorials to explore a few things that I didn’t get to within the track I built. I could probably go on for 10 more parts to go over all the possible things you could do with the Matrix. But I wanted to focus on a few areas and explore them in a little more depth. So here’s a few things beyond the track, which you can do with the Matrix Step Sequencer.

    Download the new project files here: Matrix-Track-Building2(NoCheat). This zip file contains a new version of the main song .rns file, as well as the two new Combinators for the Bass and Pad tracks. They both contain new Matrix devices that can be used in place of the Mod Wheel Automation clips found in the song. Read on to see what was done to update them. Note: please respect that these project files, like everything else on this site, is under the Creative Commons 3.0 licensing, meaning you can mix, remix, share, and play around with the song to your heart’s content, but you will need to provide the source info and a link back to my site here in any productions you do with this file. Share and share alike ok? And you can’t make any money off the file. It’s not going to win any awards anyway. But if you remix or play with the file, send them back to me privately and I’d be happy to showcase them here in a new posting (send to my email in the top menu), I’d love to see what you come up with. Don’t be shy! 😉

    Chaining Patterns together to create a Pendulum Direction

    As I mentioned in Part 1 of this series, you can chain two patterns together to create a Pendulum direction for any pattern. To do this, simply have one pattern going one direction, and another pattern going the opposite direction. Then you can place the patterns back to back endlessly in the main sequencer on the pattern track. The pattern clips would alternate and sound exactly as if you used the Pendulum direction setting on the Thor Step Sequencer. Here’s a short video to show how that’s done.

    Automating the Resolution Knob

    Spend more than a few minutes with the Matrix, and you’ll realize that you can’t automate the Resolution knob in a Matrix. So how do you keep the pattern the same, but change the resolution of the pattern? I came across this problem when I was first starting out with Reason. And it’s no problem. The solution is to create copies of the pattern (A1, A2, A3, A4, etc.) and then change the resolution for each pattern. If you want a pattern that can travel across all resolutions in the Matrix, you’ll have to create 9 copies of the same pattern, and then change each pattern’s resolution setting from 1/2 to 1/128.

    Note: You can even put the Matrix inside a Combinator and assign a Combinator Rotary to switch between the different patterns (A1 to B1). In this way, the Combinator Rotary acts as a Resolution knob, and it IS automatable. Only downside is that your pattern must complete the full pattern cycle before it switches to the next pattern/resolution in this scenario (because the Matrix is “locked” to the main tempo).

    Finishing up the song. . . No Cheating this time!

    Now let’s delve back into the Track I completed and update those last two automations that were put on the Mod Wheel automation lanes, and change them to be controlled by the Matrix. Once this is done I can clear my conscience and bring this series to a close.

    Note: For a full explanation of how this is accomplished, refer back to “Part 2” of this series, where I go into great lengths on the subject of using the Matrix to create a long complex pattern (or rather, a compound pattern). If you’ve been reading this tutorial through chronologically, the hope is that you’ve given this a try yourself and come up with something similar to the solution I came up with here.

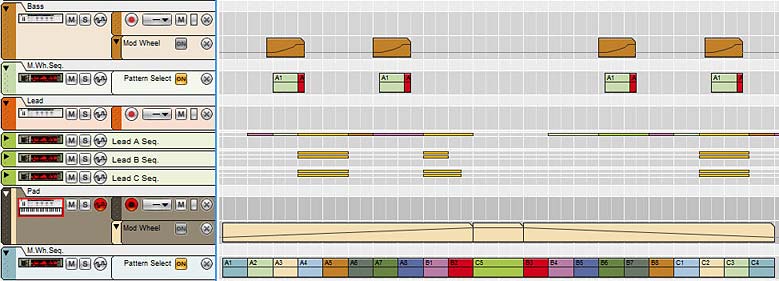
    If you look at the image below, you’ll see how I changed the automation in the main sequencer for the Bass and Pad track. For both those tracks I turned the automation lanes off (to keep them here to show you the relationship — they are just above the new Matrix Pattern Lanes), and added a new Matrix to control the Mod Wheel of each of those Combinators (labeled “M.Wh.Seq.”). This essentially does the same thing as the automation. If you open the Project files at the top of this posting, you’ll be able to open up the .RNS, solo each track and then play the song at the automation points to listen to how the Matrix is working. You can also open up the rack and see the Matrix cycle through the patterns. If you want to switch back to compare, just turn the Matrix pattern lane off, and turn on the automation lane again.

    The main sequencer showing how the Matrix patterns can be used in place of the Mod Wheel Automation clips
    The main sequencer showing how the Matrix patterns can be used in place of the Mod Wheel Automation clips

    And that about does it for the Matrix. I’m sure there are many other ways to use the device, but my hope is that this shows how you can get the Matrix to play most anything the Reason devices can dish out. I hope this also shows you some new creative ways that you might not have known about before. If you have any other uses for the Matrix, please feel free to share them here. It’s been an interesting creative journey for me, and I hope for you as well.

    As always, thanks to those who watch, read, and listen in.

    33 – One Rotary, 64 Patterns

    This is a problem that plagued me for a long time but with Thor, I found a very easy workaround. The idea is simple. I wanted to gain access to more than 32 patterns with a single Rotary on a Combinator. For the longest time I couldn’t figure out how to do it. Then it hit me like a ton of bricks and I had one of those “of course!” moments. I mean come on. Doesn’t everyone feel limited with only 32 patterns accessible from a Combinator rotary? How about 64 patterns?

    Let’s take a breather from all the Reason 5 action. Since many people are still on Reason 4, let’s do something that everyone in 4 & 5 can do together. This is a problem that plagued me for a long time but with Thor, I found a very easy workaround. The idea is simple. I wanted to gain access to more than 32 patterns with a single Rotary on a Combinator. For the longest time I couldn’t figure out how to do it. Then it hit me like a ton of bricks and I had one of those “of course!” moments. I mean come on. Doesn’t everyone feel limited with only 32 patterns accessible from a Combinator rotary? How about if I showed you how to double the amount of patterns you could access. Would that be worth 10 minutes of your time?

    Here is the project file for this tutorial: 64-patterns. It contains an .rns file (it was created in Reason 5, so I’m not sure if those with Reason 4 can open it or not. If not, let me know and I can create the same file in R4 for you). In the rns file there are two Combinator ideas. One that contains 64-pattern switching, and the other contains 128-pattern switching. Note that I have not populated all the matrixes with fully loaded patterns. Instead there is a single pattern on A1 for all the Matrixes. This way I was able to test switching from one matrix to another. It’s up to you to load the Matrixes with your own patterns, random or otherwise. Both Combinators are connected to the same mixer, so you will need to mute one channel to hear the outcome of the other and vice-versa. Have fun with these!

    So let’s get down to business. . .

    So why would you ever want to do this. Well, it gets me closer to what I would like to see out of Reason: a way to create truly generative music, where you can press a button and set sail a sea of sound that is ever-changing. Great if you want to have some Pad or Ambient sounds drift on in the background, ever changing and always new and interesting. You could also incorporate this into your glitch effects as a controlling device to provide an endless range of chaotic buzzes, blips and shazams. How you use it is really up to your own creativity. But at least with 64 (and even 128) different patterns, you can create a pretty long string of variety that, if played through from start to finish, no human could discern the repetition (think of it this way: at 120 BPM, a normal 4/4 bar with 64 patterns shifting at every 4 bars would last 8.5 minutes before any repetition occurs. In the case of 128 patterns, you could end up with an ever-changing pattern lasting 17 minutes long without any repetition.

    Yes, it’s a little spastic and insane, but it can definitely prove interesting, even as nothing more than a creative experiment. So let’s take a look at how you can create 64 patterns on one Combinator rotary knob.

    1. First, create a Combinator and inside create a 6:2 line mixer. Then, holding the Shift key down to force Reason not to autoroute the devices, create a sound source (let’s take a Subtractor so that we can differentiate from the Thor device which we’ll use as a CV switcher). Also create 2 Spider CV Mergers/Splitters, a Thor, and one Matrix pattern sequencer.
    2. Load up the Matrix sequencer with 32 patterns, then duplicate the matrix so that you have another copy with the same 32 patterns. At this point, change the patterns on the second matrix so that you have a new set of 32 unique patterns in the second matrix.

      You may want to temporarily tie the matrix to a sound source device so that you can audition the patterns and how they sound. You may alternately want random patterns, in which case you can select the Matrix device and press Ctrl+R in order to randomize a pattern into a pattern bank. Go to the next pattern (A2) and do the same. And so on, until you have all 32 pattern banks filled.

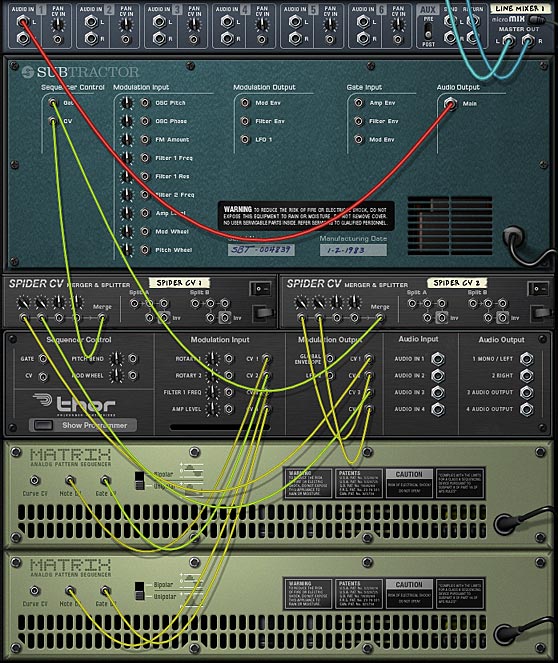
    3. Next, flip the rack around and start making connections. Send the Audio output of the Subtractor to the Audio Input of channel 1 on the Line Mixer. Send the Note CV output of Matrix 1 to the CV 1 input on the Thor. Send the Gate ouput of Matrix 1 to the CV 2 input on Thor. Then send the Note CV output of Matrix 2 to the CV 3 input on the Thor. Send the Gate ouput of Matrix 2 to the CV 4 input on Thor.
    4. Send CV 1 & CV3 outputs from Thor into the Merge input 1 & 2 on the first Spider. Then CV 2 & CV4 outputs from Thor into the Merge input 1 & 2 on the second Spider.
    5. Send the merge output from Spider 1 to the CV input on the Subtractor, and merge output from Spider 2 to the Gate input on the Subtractor. Also, turn the trim knobs on all the CV merge inputs that are occupied fully right (set to 127). If you don’t do this, you won’t get what you expect when you start playing the patterns.

      The CV and audio routings on the back of the rack
      The CV and audio routings on the back of the rack
    6. Now that everything is routed, we need to tell Thor what do do with all that CV stuff. So flip the rack around to the front again, and click the “Show Programmer button on Thor.

      Note: Since the Thor device is only used for CV purposes, you can remove all of Thor’s audio settings (bypass the Oscillator and Filter, turn off all the envelopes, etc.). Alternately, you can open up the Combinator Programming panel and deselect the “Receive Notes” checkbox for the Thor device. Either way will work.

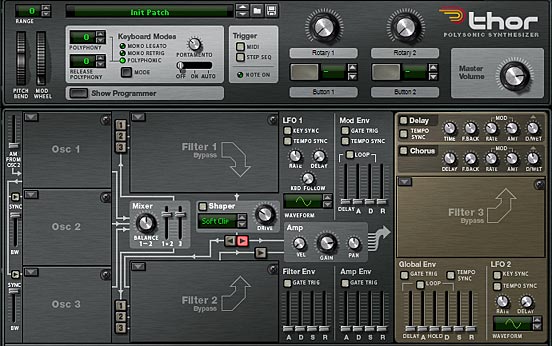
      A completely initialized Thor device
      A completely initialized Thor device
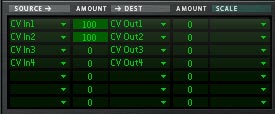
    7. Once the Thor programmer is open, enter the following in the Modulation Bus Routing System (MBRS):

      CV In1: 0 > CV Out1

      CV In2: 0 > CV Out2

      CV In3: 0 > CV Out3

      CV In4: 0 > CV Out4

      The Modulation Bus Routing Section (MBRS) in the Thor device
      The Modulation Bus Routing Section (MBRS) in the Thor device
    8. Now let’s do a little programming in the Combinator. Open up the Programmer panel for the Combinator. Select the Thor device and enter the following:

      Button 1 > Mod 1 Dest Amount: 100 / 0

      Button 1 > Mod 2 Dest Amount: 100 / 0

      Button 1 > Mod 3 Dest Amount: 0 / 100

      Button 1 > Mod 4 Dest Amount: 0 / 100

      Then select each matrix and tie them both to Rotary 1 as follows:

      Rotary 1> Pattern Select: 0 / 31

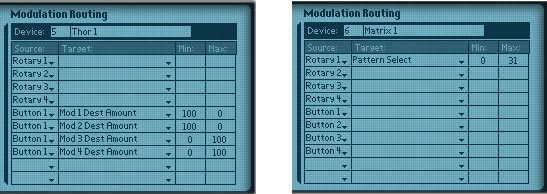
      The Modulation Bus of the Combinator: Thor settings on the left and the Matrix settings on the right.
      The Modulation Bus of the Combinator: Thor settings on the left and the Matrix settings on the right.

    Press button 1 twice to initialize it (turn it on and off). Also turn Rotary 1 in order to initialize it. Now when you play the sound source, moving Rotary 1 around will select pattern 1 – 32 on Matrix 1. When you press Button 1, the Rotary switches to Matrix 2 and you’ll be hearing pattern 1-32 on Matrix 2. This switch is instantaneous simply because both Matrix patterns are running at the same time. Thor and the Spiders are used to switch from one matrix to the other on-the-fly. It’s really that simple.

    And now let’s go for broke!

    Awesome. We have 64 patterns. Let’s go for broke. Let’s create 128 patterns! Because you can never have enough patterns. In this case, you essentially have to duplicate what you did for the previous section, and create a second set of 64 patterns on Rotary 2 / Button 2 in your Combinator. Once you’ve created those, and routed them up and programmed them (Tip: duplicate all your devices, that way you don’t have to reprogram the Thor again, and instead just need to set up the routings).

    Once that’s done, you’ll need to create yet one more Thor and 2 Spider Mergers/Splitters. This time, you’re going to take the merged output from the two spiders hooked up to Thor #1 and the merged output from the two spiders hooked up to Thor #2, and send them through the third Thor. The CV outs from Thor will then go into the 2 Spider Mergers/Splitters you just set up (on the merged side), and then the merged output from both will go into the CV / Gate inputs on the sound source device (in this case, the Subtractor).

    Now the only thing left to do is to program the Combinator. Open up the Programmer, select Thor #3, and again enter the following:

    Button 3 > Mod 1 Dest Amount: 100 / 0

    Button 3 > Mod 2 Dest Amount: 100 / 0

    Button 3 > Mod 3 Dest Amount: 0 / 100

    Button 3 > Mod 4 Dest Amount: 0 / 100

    Matrix 1 & 2 will need to have their “Pattern Select” both tied to Rotary 1, while Matrixes 3 & 4 will need to have their “Pattern Select” both tied to Rotary 2.

    This way, Rotary 1 controls which pattern is selected on Matrix 1 & 2 (64 patterns in total), and Rotary 2 controls which pattern is selected on Matrix 3 & 4 (64 additional patterns). Button 3 acts as a toggle switch between the two sets of Matrixes (Matrixes 1 & 2 on Rotary 1, and Matrixes 3 & 4 on Rotary 2). Phew. That’s it. You’re all set to play with the Rotaries/Buttons to switch between 128 unique patterns programmed into 4 Matrixes. If that’s not enough patterns, then even Reason can’t help you out.

    I know this might get a little confusing for some of you. It was confusing to set up the first few times. But if you run into trouble, just download the project files up at the beginning of this tutorial. There’s a fully-functional 128-pattern switcher Combinator in there. Good luck!


    So as far as practical applications, if you really need 64 or 128 unique patterns affecting the same sound source, you can do it all within a Combinator. With a little routing ingenuity you could probably access the Redrum patterns in much the same way and extend your creativity further. How’s that for an idea? Do you have any comments or questions? please jump in and post them here. Until next time, happy reasoning!