54 – Key Trig Patterns (Part 2)

So here we are once again with part two in our series on key triggering our patterns. In this part, I’m going to bring both methods together so that you can switch between the two methods with the click of a button. I’m also going to add a few new tricks into the mix. And finally show you how to hook everything up to your Kong pads, in the event you want to use the pads as triggers instead of your keyboard. So let’s dig our heels in.

So here we are once again with part two in our series on key triggering our patterns. In this part, I’m going to bring both methods together so that you can switch between the two methods with the click of a button. I’m also going to add a few new tricks into the mix. And finally show you how to hook everything up to your Kong pads, in the event you want to use the pads as triggers instead of your keyboard. So let’s dig our heels in.

You can download the project files here: key-trig-pattern-methods-2. It contains 2 Combinators and the .rns file that showcases the 2 main patches we’re building here. Load up your sounds inside them and have fun tweaking the patterns and controlling them via your key controller or Pad controller.

Bringing together the “Momentary” and “Latched” Triggering Methods

The two triggering methods are great on their own, but think of how great it would be to have both of them right at your fingertips. This technique allows you to switch between “Momentary” and “Latched” key triggers. And if you’re not sure what the hell I’m talking about, then you haven’t read Part 1 of the series, so go back in and read it would ya! Because this is going to be fun. First, the video to show you how it’s done:

And next, the full step-by-step for those that prefer to read through:

  1. Create a Combinator, and inside create a 6:2 Mixer, Subtractor, and holding down “Shift,” create two Thors. Completely initialize the Thor by removing the Oscillator and Filter, and bring all the parameter values to zero.
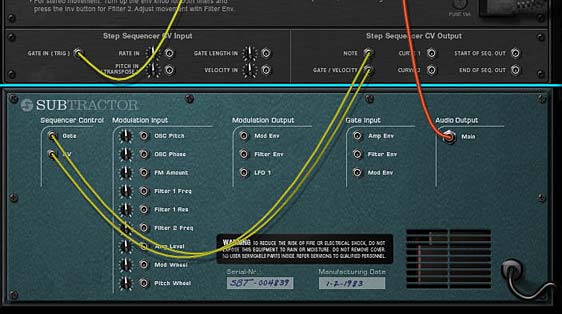
  2. Label the first Thor “Trigger” and the second Thor “Pattern. Flip the rack around and send the Curve 1 CV output from the “Trigger” Thor to the CV1 input on the “Pattern” Thor. Then send the Note and Gate/Velocity CV outputs from the “Pattern” Thor into the CV and Gate inputs on the Subtractor.
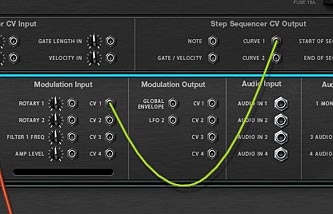
  3. The Curve 1 CV going from the "Trigger" Thor into the CV1 Input on the "Pattern" Thor.
    The Curve 1 CV going from the "Trigger" Thor into the CV1 Input on the "Pattern" Thor.
    The Note / Gate CV Connections from the "Pattern" Thor into the Subtractor.
    The Note / Gate CV Connections from the "Pattern" Thor into the Subtractor.
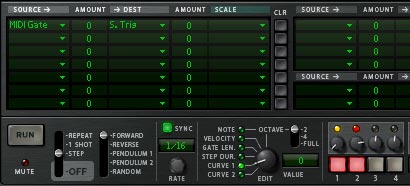
  4. Flip the rack back around to the front and create a 2-step pattern in the “Trigger” Thor. Switch the Edit knob to “Curve 1” and then set “Step 1” to zero (0) and “Step 2” to 100. Switch the Run Mode to “Step” and enter the following into the Modulator Bus Routing Section (MBRS):
      MIDI Gate (found under MIDI Key > Gate) : 0 > S. Trig (found under Step Sequencer > Trig)
  5. The Modulation Bus Routing Section for the "Trigger" Thor
    The Modulation Bus Routing Section for the "Trigger" Thor
  6. In the “Pattern” Thor, enter any pattern you like. Set the Run Mode to “Repeat” and in the MBRS, enter the following lines:
      CV In1 : 0 > S. Trig
      MIDI Gate : 100 > S. Trig
      Pitch Bend : 53 > S. Transp (found under Step Sequencer > Transpose)
  7. The Modulation Bus Routing Section for the "Pattern" Thor
    The Modulation Bus Routing Section for the "Pattern" Thor
  8. Open up the Combinator programmer, and uncheck the “Receive Notes” checkbox for the Subtractor. Also set the Key Range for both the “Trigger” and “Pattern” Thors to Lo: C-2 / Hi: C-2.
  9. Still inside the Combinator Modulation Routing area, select the “Trigger” Thor and set up the following line:
      Button 1 > Mod 1 Dest Amount : 0 / 100
  10. Then select the “Pattern” Thor, and set up the following lines:
      Button 1 > Mod 1 Dest Amount: 0 / 100
      Button 1 > Mod 2 Dest Amount: 100 / 0
That’s all there is to it. Now when you play the C-2 key on your keyboard controller, the trigger method is Momentary (the pattern starts when you press the key and stops when you release the key). Press Button 1 on the Combinator, and now when you press the key, the trigger method is “latched” (the pattern starts when you press the key and only stops when you press the key again).

Note: One sticky issue with this setup is as follows: Let’s say you have the “Latch” mode turned on (button 1) and press a key to play the pattern. If you switch the “Latch” mode off (button 1 again) before stopping the pattern, the next time you turn the “Latch” mode on again it will automatically run / play the pattern. If you always turn off your pattern before switching from “Latch” mode to “Momentary” mode, then you won’t have this problem. So keep that in mind. And if you have a workaround for this, let me know and I’ll be glad to update the patch.
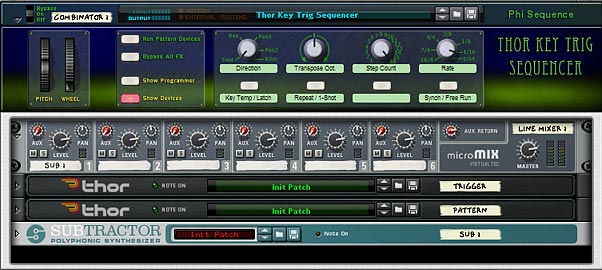
The Completed Combinator front panel. Note that I mapped a few more Sequencer controls to the Combinator Rotaries and Buttons.
The Completed Combinator front panel. Note that I mapped a few more Sequencer controls to the Combinator Rotaries and Buttons. The patch is in the Project files so you can open it up and play with it.

Kong Pad Triggering (Obviously for Reason 5 users)

One other method is to use the Kong pads to trigger your patterns (and sounds). What we’re going to do here is set up the same Pattern which can be triggered from two Kong pads. Pad 1 will be a “Momentary” key trigger, and Pad 2 will be a “Latched” key trigger. In this way, we simply need to translate the triggers from Keys to Kong Pads. And it’s much easier than it seems. I’ll start over from the beginning. But first, here’s the video:

And next, is the step-by-step tutorial:

  1. First, Create a Combinator and inside the Combinator create a 6:2 Line Mixer and a Subtractor (with a sound you like loaded into the Subtractor — note that you can select any sound source you like inside Reason, even another Combinator). Then, holding your “Shift” key down, create in order a Kong, and two Thor devices. Move the Subtractor to the bottom of the devices in the Combinator (this just makes it a little easier to follow along our CV paths).
  2. Initialize both Thor devices, so that all the levels are set to zero, and all the oscillators, filters, and envelopes are turned off. Label the first Thor “Latch,” and second Thor “Pattern.”
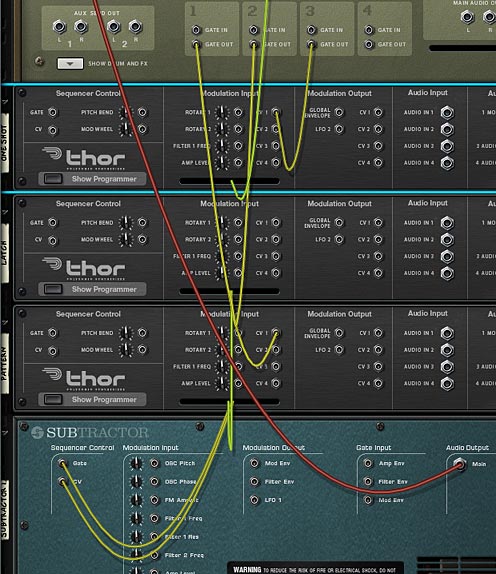
  3. Flip around to the back and Show the Combinator programmer. Then send the Gate Out CV from Kong’s Pad 1 into the CV1 input on the “Pattern” Thor.  Then send the Gate Out CV from Kong’s Pad 2 into the “Gate In (Trig) of the “Latch” Thor.
  4. Send the Curve 1 CV output from the “Latch” Thor into the Gate In (Trig) of the “Pattern” Thor.
  5. On the “Pattern” Thor, send the Note and Gate/Velocity CV outputs into the CV and Gate inputs on the Subtractor.
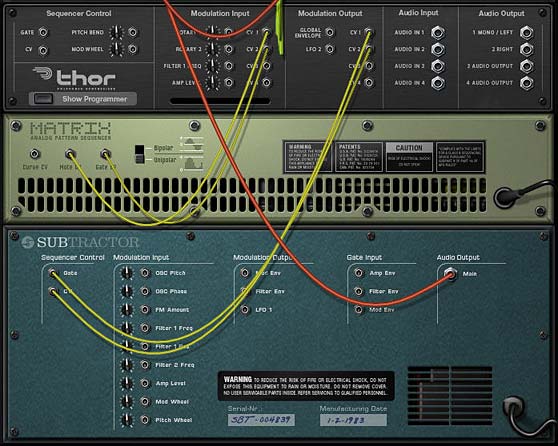
  6. The back of the rack showing most of the Thor - Kong - Subtractor CV routing. Hard to show this all in one screenshot.
    The back of the rack showing most of the Thor - Kong - Subtractor CV routing. Hard to show this all in one screenshot.
  7. With the routing all set, flip the rack back around to the front. In the Combinator programmer, ensure that the only device receiving notes is the Kong device. Uncheck the “Receive Notes” checkbox for all other devices. Also label “Pad 1” on Kong to “Temp Pattern” and label “Pad 2” on Kong to “Latch Pattern.”
  8. In the “Latch” Thor, create a 2-step pattern. Switch the Edit knob to “Curve 1” and then set “Step 1” to zero (0) and “Step 2” to 127. Switch the Run Mode to “Step” and enter the following into the Modulator Bus Routing Section (MBRS):
      CV In1 : 100 > S. Trig (found under Step Sequencer > Trig)
  9. In the “Pattern” Thor, set the Run Mode to “Repeat” and enter any pattern you like into the Step Sequencer. This will be the pattern that plays your Subtractor. Enter the following into the MBRS:
      CV In1 : 100 > S. Trig

Now when you press Pad 1 on Kong, the pattern starts and when you lift your finger from the pad, the pattern stops (Momentary). If you press Pad 2, the same pattern plays in “Latched” key trigger mode, which means the pattern starts and plays until you press on Pad 2 again. This is the easiest way I’ve found to set up both a “Momentary” and “Latched pattern on Kong Pads.

The front panel, showing the 3 Kong Pads setup to control your Pattern in the Thor Step Sequencer.

Taking Kong a Step Further (Stepping it up a Notch! — ok enough with the bad puns)

Let’s do one last thing. Let’s add a new element to a third pad which switches between the 1-shot and Repeat modes. This will affect the way the first 2 pads work a bit, but it will be worth it just to add this functionality.

  1. Duplicate the “Latch” Thor and label it “One Shot.” Then move it to the top of the other Thor device.
  2. Flip around to the back of the rack and send the Gate Out CV from Pad 3 into the CV1 input on the “One Shot” Thor device. Then send the Curve 1 CV output from the “One Shot” Thor into the CV1 input on the back of the Combinator (click the “Show Programmer” button if it’s not visible). Also set the trim knob to 127 and switch to “Unipolar” mode.
  3. Flip back to the front of the rack and in the Combinator’s programmer panel, select the “Pattern” Thor, and enter the following in the Modulation Routing:
      CV In 1 > Run Mode : 3 / 2

Label Pad 3 on the Kong device to “1-Shot / Rep.” and you’re done. Now you can switch between the two run modes using the Kong Pad 3. Note that if you switch from Repeat to 1-shot, both Pad 1 and Pad 2 will act the same way and play the Pattern through once and then stop. There won’t be any difference unless you have Pad 3 set to “Repeat” Run mode. But still, this can extend the Kong functionality just a little bit more. And with some ingenuity you can add other things to the Kong pads, such as an octave up/down shift (see my Kong Piano Roll tutorial for that little trick).

One Final Note about the Kong Setup

I know some people will say, “Well why can’t I put the ‘Momentary’ / ‘Latch’ on a single pad and then use that pad to switch between the two (as the Combinator button does)”? Truth is that I gave this idea a shot, and you can download the idea here: Kong-Pad-Trig-Sequencer(Alternate). However, I couldn’t seem to get around the fact that it was a little quirky. You’ll see the “Pattern” triggers from Pad 1 and the  “switch” toggle is on Pad 16. The problem is that if you press the pattern pad (Pad 1) an even number of times, everything works great. As soon as you press Pad 1 an odd number of times, and then switch from “Momentary” to “Latch” mode using pad 16, the pattern is set off and runs once Pad 16 is pressed. I traced it down to the fact that if the “Trigger” Thor’s step sequencer is left on the second step when switching to “Latched” mode, the pattern automatically runs (or remains open to run). Ultimately, I need a way to reset the Step Sequencer back to “Step 1” when Pad 16 is pressed (or rather, when sending the gate out from Pad 16). But it was very late last night and I couldn’t figure out how to do this. So if anyone has a solution, please let me know and I’ll fix the patch and re-upload it.


So what do you think? Does this setup work for you? Stick around. There’s going to be plenty more to come your way.

53 – Key Trig Patterns (Part 1)

I’m sure most of us have used the Matrix or Thor Step Sequencer to some extent. But how often have we thought about using our keyboard to trigger those patterns? I know I’ve never given it much serious thought, since I usually sequence all the parts into the main sequencer. But this time I’m going to explore the possibility of triggering patterns from our Keyboard. This has a lot of “live play” applications.

By now, most of us know how to use Pattern sequencers to play parts in their tracks. I’m sure most of us have used the Matrix or Thor Step Sequencer to some extent or degree. But how often have we thought about using our keyboard to trigger those patterns? I know I’ve never given it much serious thought, and it’s probably due to the fact that I don’t play “live.” I usually sequence all the parts into the main sequencer. So this time, we’re going to explore the possibility of triggering patterns from our Keyboard.

The project files can be downloaded here: key-trig-pattern-methods. This file contains some combinators and an .rns file with all the combinators inside. These Combinators outline some of the methods presented in the tutorial below. Try them out and see what you can do with these ideas.

Furthermore, we’ll see just how far we can take this idea. The whole thing will be contained inside a Combinator (or a Kong device, if you wish), and the notes on the keyboard will trigger different patterns playing different instruments. It’s like having full control of the band at your fingertips on your piano or controller keyboard.

Sound interesting to you? Yeah, it was interesting to me too.

Before I jump into the various methods of Key Triggering, I want to give a huge shout out to Peff for providing help on figuring out the “Latching” method below. Without his help, I would have spent several more hours tearing out my hair. So thanks Kurt! I really appreciate all the help you provide, not just to me, but to the whole community.

Triggering Matrix Patterns

Let me start off by saying this is a huge PITA where the Matrix is concerned. The main problem lies in the delay of Pattern triggering from the moment when you press the trigger key to the moment the pattern starts (variable, depending on when the key was hit during playback). Yes I know, you can plop your patterns down on the Matrix pattern lanes, but that’s defeating the whole purpose of this tutorial, which is all about triggering patterns via different keys on your keyboard. But for the sake of argument (and to be complete), I’ll show you first how to set it up this way using a Matrix, but I’m not going to spend a lot of time on this one. Maybe this is beneficial on some planet where delay is a “cool” and “hip” concept. Here’s a video where I outline 2 methods to key trigger a Matrix Pattern. The first method is not described in detail here because it introduces the dreaded delay. But the second method (outlined in detail below) can be useful in a somewhat chaotic and free-running way.

Note: Ed Bauman highlights a method you can use to Trigger Matrix Patterns “almost” instantaneously here: “When Reason’s Time Signature is set to 4/4, patterns will switch on every measure, a full 16 x 16th notes, but if you set the Time Signature to 1/16, patterns will switch on every 16th note, so it’s basically immediate. Of course, if you’re playing back a sequence, doing this completely screws up the measures in a song and makes the whole song gigantic as far as measure count goes, but it definitely works for the Matrix and ReDrum. It used to apply to Dr. Rex as well but with Dr. Octo Rex we now have the Trig Next Loop region which essentially does the same thing if you’re switching around rex files within one Dr. Octo Rex.”

  1. First, Create a Combinator. Then create a 14:2 Mixer, and a sound source (in this case a Subtractor). Load up a Subtractor patch or else create your own synth sound in the Subtractor. Then create a Matrix underneath. It should automatically connect the Note / Gate CV for you. Enter a pattern into the Matrix (or press Ctrl+R to quickly enter a random pattern).
  2. In between the Subtractor and the Matrix, we’re going to create a Thor and completely initialize the patch (this means removing any Oscillators and Filters, and dropping all the values down to zero.
  3. The Thor is simply used as the gate trigger. So flip around to the back of the rack and connect the Note / Gate CV from the Matrix into the Thor CV1 & 2 inputs. Also connect the CV 1 & 2 outputs from Thor back into the Note / Gate CV inputs on the Subtractor.
The back of the rack showing the CV passing from the Matrix through the Thor and into the Subtractor.
  1. Flip around to the front again, and in the Thor Modulation Bus Routing Section (MBRS), enter the following:
      CV In1 : 100 > CV Out1 : 100 > Midi Gate (under Midi Key > Gate)
    CV In2 : 100 > CV Out2 : 100 > Midi Gate (under Midi Key > Gate)
  • Open up the Programmer Modulation Routing on the Combinator and for the Subtractor device uncheck the “Receive Notes” checkbox. Then select the Thor device and enter the following for the Key Range: Lo: C-2 / Hi: C-2. This way, when you press C-2 on your keyboard controller, it will open the gate and play the pattern on the Matrix.
  • Now press Run so the Matrix pattern is running. You won’t hear anything yet. In order to hear the pattern (turning it on or off) you need to press the C-2 key. This allows you to hear the pattern. The crappy part is that there’s no telling when the pattern will be picked up when you press the key. Put another way, the pattern is continually running, but only sounds when you press and hold the key down. Not the most elegant solution.
  • To add multiple instruments or parts, select the Subtractor, Thor, and the Matrix (holding down your “Shift” key to multiple-select the devices), right-click and select “duplicate devices and tracks.” Enter your new pattern in the Matrix. Then flip to the back of the rack and route the audio out of the Subtractor to a new channel. Finally, go into the Combinator programmer, and adjust the Thor device so that only one key on your keyboard controller is used to trigger the Thor (C#-2, for example).
  • Repeat the above process for as many sounds as you need (up to the total amount of keys that your keyboard will allow: 88 for a full size piano or synth controller keyboard, or 128 for the full midi range which a Reason or Record Combinator allows — from C-2 to G8). This is more than enough of a range to create a complete set of instruments and sounds for most any standard songs or performances.
  • Using Thor’s Step Sequencer for Precise Pattern Key Triggering

    Now that you have an understanding of how the Matrix is key triggered, I’ll move on to a more robust way of accessing patterns via the keyboard. This method replaces the Matrix in favor of the Thor Step Sequencer. Since the Thor Step Sequencer can be programmed to start and stop precisely where you want it, using it is the best option when you want precise control over your sounds. It’s just too bad that it’s more of a pain to enter and edit notes into it. The Matrix, to my eyes, provide a simple visual way to add patterns. The Thor Step Sequencer is more tedious by changing rotary knobs all the time.

    The Momentary Key Method

    The first method is the easiest and allows you to create a “momentary” trigger via your midi keys. This means that when you press a key, the Step Sequencer plays the pattern. When you release the key, the pattern stops.

    1. To set this up, first create a Combinator, and then in order a 6:2 Mixer, a sound device (here, a Subtractor), and holding the “Shift” key, a Thor device. While you’re at the front of the rack, add a sound into the Subtractor that you’d like to hear. Any sound will do.
    2. Completely Initialize the Thor device. This means removing the Oscillators, Filters, bringing all values to zero as well.
    3. In the Thor MBRS, enter the following:
        Button 1 : 100 > S.Trig (found under Step Sequencer > Trig)
    4. Directly to the rght of Button 1 on the Thor, use the upward spin control arrow to set this to C-2. This means that the Thor Step Sequencer is triggered when the C-2 key is pressed. In the Step Sequencer, set the Run Mode to “Repeat” and enter a pattern into the Step Sequencer (note that to gain access to the full note range, you’ll need to switch the Octave setting to “Full”).

    Note that an alternate way to trigger the Step Sequencer is outlined in the Video. Though this is a more labor intensive way to trigger things. If you want to use this method, switch the “Button 1” source in the MBRS to “MIDI Gate (found under MIDI Key > Gate)” and then open the Combinator Programmer and adjust the Key Range of the Thor device to Lo: C-2 / Hi: C-2 (so one key is selected). This achieves the same outcome.

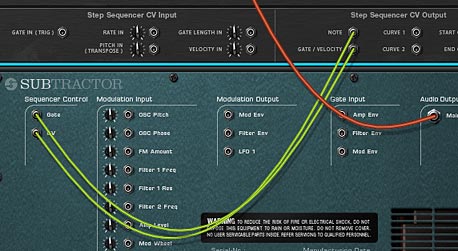
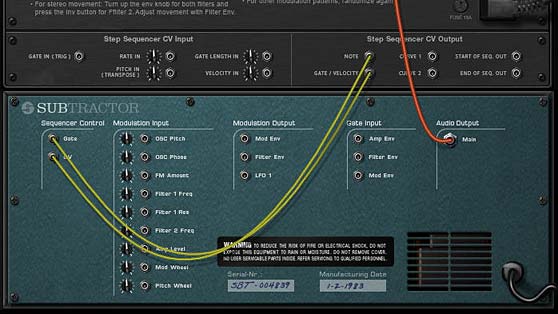
    1. Flip the rack around and in the “Step Sequencer CV Output,” send the Note and Gate/Velocity CV outputs into the Gate / CV inputs on the Subtractor.
    The back of the rack showing the Thor routing from the Step Sequencer into the Subtractor.
    The back of the rack showing the Thor routing from the Step Sequencer into the Subtractor.
    1. Lastly, go into the Combinator Programmer, and deselect the “Receive Notes” checkbox for the Subtractor (so that the Subtractor only receives notes from the Thor Step Sequencer).

    Now, when you play the C-2 key, the Thor Step Sequencer will start and play for as long as the key is held down. Cool right? If you want to create more instruments along other keys, create the new sound device (or even another Combinator), duplicate the Thor, connect the new Thor CV outputs to the new device, and move the button spin control to the new key setting. Done.

    The Latched Key Method

    No, this is not the latched key kid hanging outside his parents’ house with the key around his neck. This is the second method to trigger patterns via MIDI keys. It is is a little more complex because you need two Thors to produce it. This method is a “latch” or “hold” style of triggering. Another way to look at it is a toggled pattern on / pattern off method. In this procedure, you press a key and the pattern starts. The pattern then plays through even when you release the key. You then press the same key again, and the pattern stops. In this way, the pattern is “latched” by the key.

    1. Building on the first method, we need to change a few things. First, reset the Combinator by removing the key assignment (using the spin control to the right of the button — which should be set to “-“). We also need to remove the “Button 1” line in the MBRS (not necessary, but for cleanliness’ sake). Label this Thor “Pattern.”
    2. Create a new Thor and completely initialize it as we did previously. Label it “Trigger.” In the Step Sequencer, set the Run Mode to “Step,” change the Edit knob to “Curve 1” and create a 2-step pattern, with Step 1 set to zero (0) and Step 2 set to 100. Then enter the following line in the MBRS:
        MIDI Gate : 100 > S. Trig
    3. Flip the rack around and send the “Curve 1” CV output from the “Trigger” Thor into the “Gate In (Trig)” CV input on the “Pattern” Thor.
    The back of the Reason rack with the CV routings for the latched setup. One Thor triggers the other Thor's Step Sequencer to start
    The back of the Reason rack with the CV routings for the latched setup. One Thor triggers the other Thor's Step Sequencer to start
    1. Flip the rack back to the front and in the Combinator Programmer, ensure both the Subtractor and “Pattern” Thor is not receiving notes (uncheck the “Receive Notes” checkbox), and ensure the “Trigger” Thor is receiving notes (the “Receive Notes” checkbox has a check in it). Also set the Key Range value for the “Trigger” Thor to Lo: C-2 / Hi: C-2.
    The Combinator Programmer Modulation Routing
    The Combinator Programmer Modulation Routing

    Now press the C-2 key on your keyboard. The Step Sequencer starts and plays through even when you release the key. Press the key again, and the Step Sequencer stops. If you wish to add more devices to different keys that are “latch” triggered, create the new sound device (or even another Combinator), duplicate the 2 Thors, connect the new Thor CV outputs from the “Pattern” Thor to the new device, and adjust the Key Range to a new key for the “Trigger” Thor within the Combinator Programmer. Then you can set up your pattern in the “Pattern” Thor Step Sequencer, and you’re all set. Simple right?

    Where do you go from here?

    Here’s a few suggestions, which we will explore in the next part in our “Key Triggering Patterns” tutorial series:

    • Now that we have the hang of the way in which we can trigger the Thor Step Sequencer via your keyboard controller, you can duplicate the same sound source as many times as you like to create new patterns for the same sound source. Yes, you can merge the CV to control the same sound source (instead of duplicating the sound source), but it’s often quicker just to copy the whole thing and change your pattern.
    • You can create many different sound source instruments (any synths, samplers, Rex or Drum modules) that are controlled by different Thor Step Sequencers and map them to your keyboard to create complex multi-instrument Combinators. Using this method, you could even create an entire song within a single Combinator, and play the parts of the song by playing notes on your keyboard. In this way, you can bring the sounds in and out based on how you play the keyboard, or program the notes directly into the main Reason sequencer.
    • Instead of setting this all up in a Combinator, try setting it up on a Kong device, and using the Pads to trigger the patterns instead of the Combinator.
    • Feeling ambitious? Try combining the two methods: “Momentary” and “Latched,” then designating a key on your keyboard, a button on the Combinator, or a Pad on Kong to switch between the two methods.

    These ideas are great for setting up “Live Play” templates in Reason Combinators. It takes a lot of preparation to set up a complete song in this manner, but once it’s set up, it will make you look like a magician as you play complete part sequences with the press of a key.


    What do you think of these ideas? Have any others that you’d like to share here? Post a comment and let me know what you’re thinking. As always, thanks for watching, listening, and reading.

    21 – Massive Combi Drum Kit

    Turn a Combinator into a 61-synth drum kit that spans the range of the Matrix pattern sequencer so you can use the Matrix to trigger your drum hits. Yes it’s massive. Yes it’s crazy. And yes, you should try it out! Why? Because apart from being time consuming, it’s dead easy to accomplish. And it doesn’t have to break the CPU bank.

    This project was a real blast to put together. Essentially it involves turning a Combinator into a 61-synth drum kit that spans the range of the Matrix pattern sequencer so you can use the Matrix to trigger your drum hits. Yes it’s massive. Yes it’s crazy. And yes, you should try it out! Why? Because apart from being time consuming, it’s dead easy to accomplish. And it doesn’t have to break the CPU bank.

    Download the project file here: minimal-super-kit. This zip file contains my Minimal Super Drum Kit Combinator with 61 synth sounds that can be played by the Matrix. I’ve added 32 random patterns in the Matrix which is assigned to a Rotary knob so you can dial in a pattern you like. Also, you can turn the matrix off using button 1, so that you can play the drum kit with your keyboard controller if you wish. This is a great flexible way to show off your drum kit creation chops. So enjoy! And when you’ve had it with my own drum sounds, try your hand at creating your own. Read on to find out how.

    There’s also a few extra devices in the Combinator, and assignments on the other Rotaries / Buttons which affect the drums globally. Feel free to explore their routings as well if you’re interested. The focus here, however, is turning your Combinator into a massive drum kit which can be sequenced using the Matrix.

    Back to Basics: Setting things up

    1. Open up a new document with a 14:2 Mixer and then create a new Combinator. Inside the combinator, create five 14:2 mixers all in succession so that they are all chained one after the other.

      The five 14:2 Mixers are chained together.
      The five 14:2 Mixers are chained together.
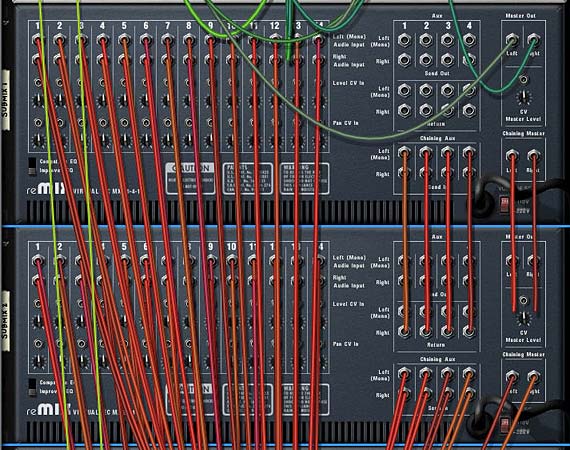
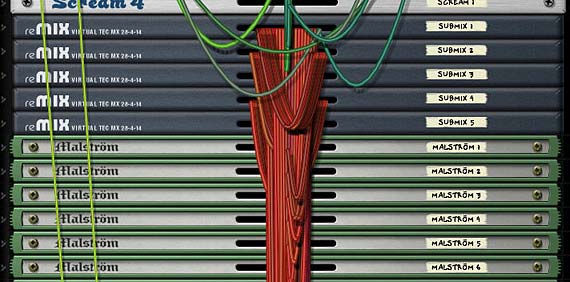
    2. Create 61 Synths. Yes, that’s right. 61 Synths. These can be any combination of Thors, Malstroms, or Subtractors. one trick before you go nuts copying and pasting is to create one instance of Thor, one Subtractor, and one Malstrom, and then initialize all 3. This way, only one oscillator or graintable is used and it will be light on the CPU. Once you’ve done that, copy and paste so you have 61 different synths and connect them each to their own mixer channel.

      Each of the synths are connected to their own Mixer channel.
      Each of the synths are connected to their own Mixer channel.
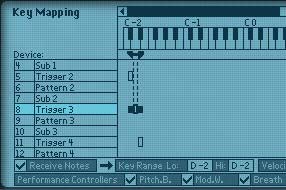
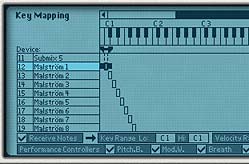
    3. Now this is the trickiest part of the whole tutorial. Click the “Show programmer” button on the front of the Combinator, and select the first synth in the list at the top. Notice in the Key Mapping area on the left part of the Combinator screen, the key range for this synth spans the entire keyboard range. If you look at the bottom of the Key Mapping area, the value under Key Range is C-2 (Lo) to G8 (Hi). We’re going to change these values so that both read C1. The easiest way to do this is to click and drag upward over the “Key Range Lo” field until it reads “C1.” Once you’ve done that, you can click and drag down all the way on the “Key Range Hi” field. This means that the synth will only be triggered by pressing C1 on your keyboard controller.
    4. The first Synth selected in Key Mapping. See that the range listed is C1 (Lo) to C1 (Hi)
      The first Synth selected in Key Mapping. See that the range listed is C1 (Lo) to C1 (Hi)
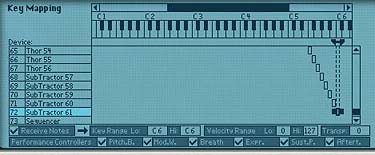
    5. Sweet! Now do this for each subsequent synth, but incrementing each one by one note value upward on the scale. So, for example, the next synth is only triggered by C#1 and the one following that by D1, and so on up the scale until you have the last synth in place at C6. Ta da! Now each synth can only be triggered and played from it’s corresponding note on the keyboard controller. And taken as a whole, the entire kit ranges the same 5-octave span of the Matrix (from C1 to C6).
    6. The last Synth selected in Key Mapping. See that the range listed is C6 (Lo) to C6 (Hi).
      The last Synth selected in Key Mapping. See that the range listed is C6 (Lo) to C6 (Hi).
    7. Now comes the really fun (but tedious) part. Go through each synth one at a time and sculpt your drum sounds. Go wild. Enter some amazing Kicks, Snares, Toms, Hi Hats, Rim shots, glitch mayhem, or whatever sounds you really enjoy listening to through Reason. Don’t be shy. Jump in and have some fun. And if you’re really hard pressed for some ideas, sift through the Factory Soundbank (FSB) for some inspiration. There are plenty of synth ideas in there.
    8. Note: audition your sounds using your keyboard controller. This way you can hear each note triggering each synth. If you forget your place on the keyboard, minimize your entire stack of synths by holding down Alt as you press on the minimize arrow of one of the devices. This will automatically minimize all devices within the Combinator. Now press a key on your controller and look for the “Note On” light as you press. This “Note On” light will show you which synth is triggered by the note you are playing. Since each synth is tied to an individual note on the keyboard, only a single “Note On” light will flash when you press a single key. Trust me, this is a great time saver when working with so many devices.

    9. Add a Matrix under everything, flip the rack around, and tie the “Note/Gate CV out” cables from the back of thedevice into the Sequencer Control “Note/Gate CV in” on the Combinator. Flip back around to the front again and start dialing in some Note/Gate patterns into the Matrix pattern banks. Or use the right-click context menu to select some random patterns for the various Matrix pattern banks.

      Connecting CV cables from the Matrix to the Combinator's Sequencer  Control section.
      Connecting CV cables from the Matrix to the Combi's Sequencer Control section.
    10. Finally, go back to the Combinator’s Modulation Routing section and with the Matrix device selected, enter the following settings:

    Rotary 1 > Pattern Select: 0 / 31 (assuming you’ve entered patterns in all 32 pattern banks of the Matrix)

    Button 1 > Pattern Enable: 0 / 1

    Entering the Matrix Sequencer Parameters in the Combi's Modulation Routing Section.
    Entering the Matrix Sequencer Parameters in the Combi's Modulation Routing Section.

    Keeping Button 1 off means that you can play the Combinator in a “live” situation, accessing the drums to be played in real time and ignoring the Matrix. Turning on Button 1 automates the drums and plays the drums according to what is programmed in the Matrix. Spinning the Rotary 1 knob will select from the 32 Matrix pattern banks. You can also automate pattern changes for the Matrix in the Sequencer if you create a sequencer track for the Matrix.

    I hope you’ve enjoyed this little exploration of what can be done with a bunch of synths and a Matrix inside a Combinator. You can create some gigantic kits using this technique. And it can be an alternative to using the NN-XT for a sample-based drum kit.

    As with any method, there are pros and cons to this approach. I like it because it can be much easier to tweak the sounds later if you want to adjust any of the synth parameters for your various hits. Personally, I feel this can give you more flexibility than storing your kit in an NN-XT. That being said, the downside is that it’s not quite as compact, takes some time to load up in your song, and it’s not sample-based so it’s not as “organic” as samples in an NN-XT can be. Both approaches, however, are valid. It all depends what you’re after.

    If you have any other ideas or unique ways in which you’ve created your own kits please share them with us. I’d love to know some new techniques that I may not have thought about before.

    Until next time, I hope this inspires you to build some kick-ass drum kits. Good luck!