So here we are once again with part two in our series on key triggering our patterns. In this part, I’m going to bring both methods together so that you can switch between the two methods with the click of a button. I’m also going to add a few new tricks into the mix. And finally show you how to hook everything up to your Kong pads, in the event you want to use the pads as triggers instead of your keyboard. So let’s dig our heels in.
You can download the project files here: key-trig-pattern-methods-2. It contains 2 Combinators and the .rns file that showcases the 2 main patches we’re building here. Load up your sounds inside them and have fun tweaking the patterns and controlling them via your key controller or Pad controller.
Bringing together the “Momentary” and “Latched” Triggering Methods
The two triggering methods are great on their own, but think of how great it would be to have both of them right at your fingertips. This technique allows you to switch between “Momentary” and “Latched” key triggers. And if you’re not sure what the hell I’m talking about, then you haven’t read Part 1 of the series, so go back in and read it would ya! Because this is going to be fun. First, the video to show you how it’s done:
And next, the full step-by-step for those that prefer to read through:
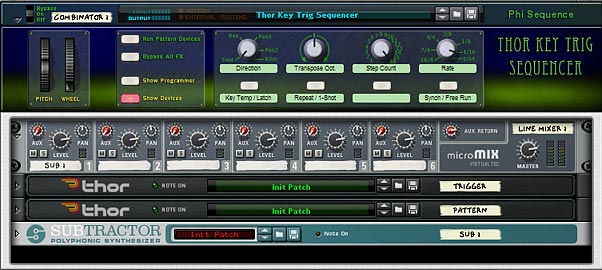
- Create a Combinator, and inside create a 6:2 Mixer, Subtractor, and holding down “Shift,” create two Thors. Completely initialize the Thor by removing the Oscillator and Filter, and bring all the parameter values to zero.
- Label the first Thor “Trigger” and the second Thor “Pattern. Flip the rack around and send the Curve 1 CV output from the “Trigger” Thor to the CV1 input on the “Pattern” Thor. Then send the Note and Gate/Velocity CV outputs from the “Pattern” Thor into the CV and Gate inputs on the Subtractor.
- Flip the rack back around to the front and create a 2-step pattern in the “Trigger” Thor. Switch the Edit knob to “Curve 1” and then set “Step 1” to zero (0) and “Step 2” to 100. Switch the Run Mode to “Step” and enter the following into the Modulator Bus Routing Section (MBRS):
- MIDI Gate (found under MIDI Key > Gate) : 0 > S. Trig (found under Step Sequencer > Trig)
- In the “Pattern” Thor, enter any pattern you like. Set the Run Mode to “Repeat” and in the MBRS, enter the following lines:
- CV In1 : 0 > S. Trig
MIDI Gate : 100 > S. Trig
Pitch Bend : 53 > S. Transp (found under Step Sequencer > Transpose) - Open up the Combinator programmer, and uncheck the “Receive Notes” checkbox for the Subtractor. Also set the Key Range for both the “Trigger” and “Pattern” Thors to Lo: C-2 / Hi: C-2.
- Still inside the Combinator Modulation Routing area, select the “Trigger” Thor and set up the following line:
- Button 1 > Mod 1 Dest Amount : 0 / 100
- Then select the “Pattern” Thor, and set up the following lines:
- Button 1 > Mod 1 Dest Amount: 0 / 100
Button 1 > Mod 2 Dest Amount: 100 / 0
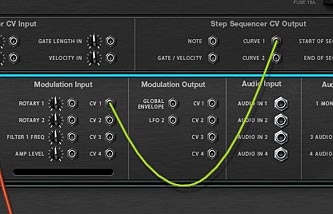
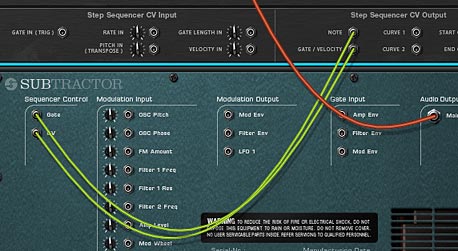
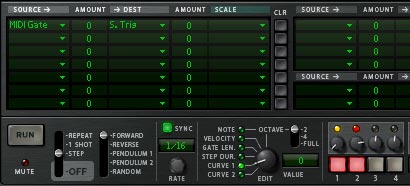

That’s all there is to it. Now when you play the C-2 key on your keyboard controller, the trigger method is Momentary (the pattern starts when you press the key and stops when you release the key). Press Button 1 on the Combinator, and now when you press the key, the trigger method is “latched” (the pattern starts when you press the key and only stops when you press the key again).
Note: One sticky issue with this setup is as follows: Let’s say you have the “Latch” mode turned on (button 1) and press a key to play the pattern. If you switch the “Latch” mode off (button 1 again) before stopping the pattern, the next time you turn the “Latch” mode on again it will automatically run / play the pattern. If you always turn off your pattern before switching from “Latch” mode to “Momentary” mode, then you won’t have this problem. So keep that in mind. And if you have a workaround for this, let me know and I’ll be glad to update the patch.
Kong Pad Triggering (Obviously for Reason 5 users)
One other method is to use the Kong pads to trigger your patterns (and sounds). What we’re going to do here is set up the same Pattern which can be triggered from two Kong pads. Pad 1 will be a “Momentary” key trigger, and Pad 2 will be a “Latched” key trigger. In this way, we simply need to translate the triggers from Keys to Kong Pads. And it’s much easier than it seems. I’ll start over from the beginning. But first, here’s the video:
And next, is the step-by-step tutorial:
- First, Create a Combinator and inside the Combinator create a 6:2 Line Mixer and a Subtractor (with a sound you like loaded into the Subtractor — note that you can select any sound source you like inside Reason, even another Combinator). Then, holding your “Shift” key down, create in order a Kong, and two Thor devices. Move the Subtractor to the bottom of the devices in the Combinator (this just makes it a little easier to follow along our CV paths).
- Initialize both Thor devices, so that all the levels are set to zero, and all the oscillators, filters, and envelopes are turned off. Label the first Thor “Latch,” and second Thor “Pattern.”
- Flip around to the back and Show the Combinator programmer. Then send the Gate Out CV from Kong’s Pad 1 into the CV1 input on the “Pattern” Thor. Then send the Gate Out CV from Kong’s Pad 2 into the “Gate In (Trig) of the “Latch” Thor.
- Send the Curve 1 CV output from the “Latch” Thor into the Gate In (Trig) of the “Pattern” Thor.
- On the “Pattern” Thor, send the Note and Gate/Velocity CV outputs into the CV and Gate inputs on the Subtractor.
- With the routing all set, flip the rack back around to the front. In the Combinator programmer, ensure that the only device receiving notes is the Kong device. Uncheck the “Receive Notes” checkbox for all other devices. Also label “Pad 1” on Kong to “Temp Pattern” and label “Pad 2” on Kong to “Latch Pattern.”
- In the “Latch” Thor, create a 2-step pattern. Switch the Edit knob to “Curve 1” and then set “Step 1” to zero (0) and “Step 2” to 127. Switch the Run Mode to “Step” and enter the following into the Modulator Bus Routing Section (MBRS):
- CV In1 : 100 > S. Trig (found under Step Sequencer > Trig)
- In the “Pattern” Thor, set the Run Mode to “Repeat” and enter any pattern you like into the Step Sequencer. This will be the pattern that plays your Subtractor. Enter the following into the MBRS:
- CV In1 : 100 > S. Trig
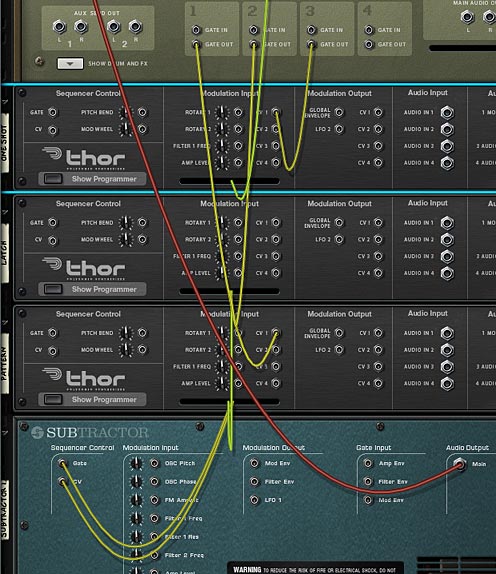
Now when you press Pad 1 on Kong, the pattern starts and when you lift your finger from the pad, the pattern stops (Momentary). If you press Pad 2, the same pattern plays in “Latched” key trigger mode, which means the pattern starts and plays until you press on Pad 2 again. This is the easiest way I’ve found to set up both a “Momentary” and “Latched pattern on Kong Pads.

Taking Kong a Step Further (Stepping it up a Notch! — ok enough with the bad puns)
Let’s do one last thing. Let’s add a new element to a third pad which switches between the 1-shot and Repeat modes. This will affect the way the first 2 pads work a bit, but it will be worth it just to add this functionality.
- Duplicate the “Latch” Thor and label it “One Shot.” Then move it to the top of the other Thor device.
- Flip around to the back of the rack and send the Gate Out CV from Pad 3 into the CV1 input on the “One Shot” Thor device. Then send the Curve 1 CV output from the “One Shot” Thor into the CV1 input on the back of the Combinator (click the “Show Programmer” button if it’s not visible). Also set the trim knob to 127 and switch to “Unipolar” mode.
- Flip back to the front of the rack and in the Combinator’s programmer panel, select the “Pattern” Thor, and enter the following in the Modulation Routing:
- CV In 1 > Run Mode : 3 / 2
Label Pad 3 on the Kong device to “1-Shot / Rep.” and you’re done. Now you can switch between the two run modes using the Kong Pad 3. Note that if you switch from Repeat to 1-shot, both Pad 1 and Pad 2 will act the same way and play the Pattern through once and then stop. There won’t be any difference unless you have Pad 3 set to “Repeat” Run mode. But still, this can extend the Kong functionality just a little bit more. And with some ingenuity you can add other things to the Kong pads, such as an octave up/down shift (see my Kong Piano Roll tutorial for that little trick).
One Final Note about the Kong Setup
I know some people will say, “Well why can’t I put the ‘Momentary’ / ‘Latch’ on a single pad and then use that pad to switch between the two (as the Combinator button does)”? Truth is that I gave this idea a shot, and you can download the idea here: Kong-Pad-Trig-Sequencer(Alternate). However, I couldn’t seem to get around the fact that it was a little quirky. You’ll see the “Pattern” triggers from Pad 1 and the “switch” toggle is on Pad 16. The problem is that if you press the pattern pad (Pad 1) an even number of times, everything works great. As soon as you press Pad 1 an odd number of times, and then switch from “Momentary” to “Latch” mode using pad 16, the pattern is set off and runs once Pad 16 is pressed. I traced it down to the fact that if the “Trigger” Thor’s step sequencer is left on the second step when switching to “Latched” mode, the pattern automatically runs (or remains open to run). Ultimately, I need a way to reset the Step Sequencer back to “Step 1” when Pad 16 is pressed (or rather, when sending the gate out from Pad 16). But it was very late last night and I couldn’t figure out how to do this. So if anyone has a solution, please let me know and I’ll fix the patch and re-upload it.
So what do you think? Does this setup work for you? Stick around. There’s going to be plenty more to come your way.

I like the idea where your going with this. Personally (but this is a personal thing), I am not really a great fan of the Step Sequencer of Thor. If I use it, I usually go with the “trigger” and play the complete sequencer when I press and hold a key. (midi key -> strig) that idea.
The only reason why I rarely use it though: workflow issue…
I like the way the matrix step sequencer works because of its simplicity. the thor step sequencer usually ends up getting RSI (repetitive strain injury) really rapidly (in a figure of way of speech. But I think you know where I am going with this).
But the thing with triggering a sequence with a stroke of a key does make the whole thing sound interesting though. Since most ‘simple’ music pieces are usually just endless loops thrown in a different sequence
Thanx for sharing this idea 😉
@Hyd,
Yes I do feel the same way. I find entering notes in the Matrix much easier. Constantly going back and forth between the Edit knob and all the various knobs in Thor is a bit painful. But the reward is that you can precisely trigger from the start of the key press and it will always sound exactly as you want it. And precision is usually more important to me than editing the notes (especially being a person who programs most of this stuff in the main sequencer). If I’m going for a “glitch” feel, where I don’t care about precision as much, then a matrix is definitely the way to go.
Thanks for your thoughts. 🙂
This has made my day. I wish all potsings were this good.
I’ve actually noticed that this doesn’t quite start *exactly* when you press the key either. Just as part 1 of your tutorial played in sync only when you and the clock matched up with the downbeat of the start of the measure, this method seems to depend on the downbeat of the start of the beat. In other words, now instead of hoping it lands on the 1st beat of your measure, you’ve reduced the rate of error down to within a beat but can still result in being a half-beat off at times. =-/
Really? I didn’t notice it’s off by a half-beat. Hmmm. You could always speed up the tempo of the song to a very fast setting. That’s always another option. But that can get a little unwieldy as well. Have you found a workaround?