This project was a real blast to put together. Essentially it involves turning a Combinator into a 61-synth drum kit that spans the range of the Matrix pattern sequencer so you can use the Matrix to trigger your drum hits. Yes it’s massive. Yes it’s crazy. And yes, you should try it out! Why? Because apart from being time consuming, it’s dead easy to accomplish. And it doesn’t have to break the CPU bank.
Download the project file here: minimal-super-kit. This zip file contains my Minimal Super Drum Kit Combinator with 61 synth sounds that can be played by the Matrix. I’ve added 32 random patterns in the Matrix which is assigned to a Rotary knob so you can dial in a pattern you like. Also, you can turn the matrix off using button 1, so that you can play the drum kit with your keyboard controller if you wish. This is a great flexible way to show off your drum kit creation chops. So enjoy! And when you’ve had it with my own drum sounds, try your hand at creating your own. Read on to find out how.
There’s also a few extra devices in the Combinator, and assignments on the other Rotaries / Buttons which affect the drums globally. Feel free to explore their routings as well if you’re interested. The focus here, however, is turning your Combinator into a massive drum kit which can be sequenced using the Matrix.
Back to Basics: Setting things up
- Open up a new document with a 14:2 Mixer and then create a new Combinator. Inside the combinator, create five 14:2 mixers all in succession so that they are all chained one after the other.
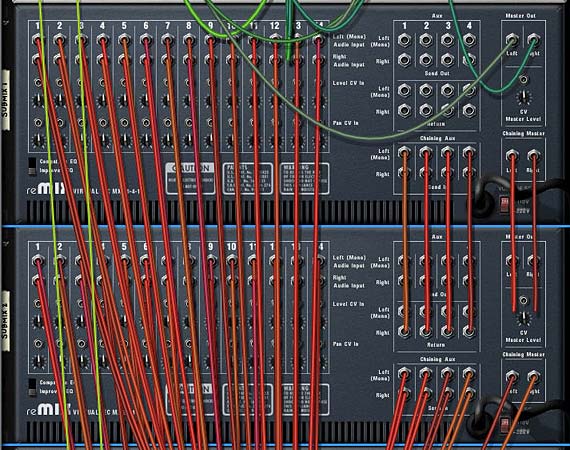
The five 14:2 Mixers are chained together. - Create 61 Synths. Yes, that’s right. 61 Synths. These can be any combination of Thors, Malstroms, or Subtractors. one trick before you go nuts copying and pasting is to create one instance of Thor, one Subtractor, and one Malstrom, and then initialize all 3. This way, only one oscillator or graintable is used and it will be light on the CPU. Once you’ve done that, copy and paste so you have 61 different synths and connect them each to their own mixer channel.
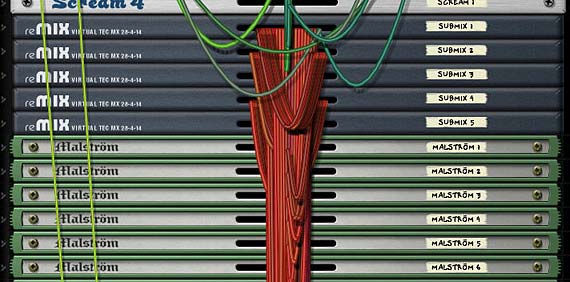
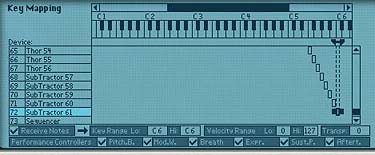
Each of the synths are connected to their own Mixer channel. - Now this is the trickiest part of the whole tutorial. Click the “Show programmer” button on the front of the Combinator, and select the first synth in the list at the top. Notice in the Key Mapping area on the left part of the Combinator screen, the key range for this synth spans the entire keyboard range. If you look at the bottom of the Key Mapping area, the value under Key Range is C-2 (Lo) to G8 (Hi). We’re going to change these values so that both read C1. The easiest way to do this is to click and drag upward over the “Key Range Lo” field until it reads “C1.” Once you’ve done that, you can click and drag down all the way on the “Key Range Hi” field. This means that the synth will only be triggered by pressing C1 on your keyboard controller.
- Sweet! Now do this for each subsequent synth, but incrementing each one by one note value upward on the scale. So, for example, the next synth is only triggered by C#1 and the one following that by D1, and so on up the scale until you have the last synth in place at C6. Ta da! Now each synth can only be triggered and played from it’s corresponding note on the keyboard controller. And taken as a whole, the entire kit ranges the same 5-octave span of the Matrix (from C1 to C6).
- Now comes the really fun (but tedious) part. Go through each synth one at a time and sculpt your drum sounds. Go wild. Enter some amazing Kicks, Snares, Toms, Hi Hats, Rim shots, glitch mayhem, or whatever sounds you really enjoy listening to through Reason. Don’t be shy. Jump in and have some fun. And if you’re really hard pressed for some ideas, sift through the Factory Soundbank (FSB) for some inspiration. There are plenty of synth ideas in there.
- Add a Matrix under everything, flip the rack around, and tie the “Note/Gate CV out” cables from the back of thedevice into the Sequencer Control “Note/Gate CV in” on the Combinator. Flip back around to the front again and start dialing in some Note/Gate patterns into the Matrix pattern banks. Or use the right-click context menu to select some random patterns for the various Matrix pattern banks.
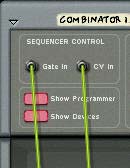
Connecting CV cables from the Matrix to the Combi's Sequencer Control section. - Finally, go back to the Combinator’s Modulation Routing section and with the Matrix device selected, enter the following settings:
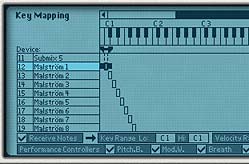
Note: audition your sounds using your keyboard controller. This way you can hear each note triggering each synth. If you forget your place on the keyboard, minimize your entire stack of synths by holding down Alt as you press on the minimize arrow of one of the devices. This will automatically minimize all devices within the Combinator. Now press a key on your controller and look for the “Note On” light as you press. This “Note On” light will show you which synth is triggered by the note you are playing. Since each synth is tied to an individual note on the keyboard, only a single “Note On” light will flash when you press a single key. Trust me, this is a great time saver when working with so many devices.
Rotary 1 > Pattern Select: 0 / 31 (assuming you’ve entered patterns in all 32 pattern banks of the Matrix)
Button 1 > Pattern Enable: 0 / 1

Keeping Button 1 off means that you can play the Combinator in a “live” situation, accessing the drums to be played in real time and ignoring the Matrix. Turning on Button 1 automates the drums and plays the drums according to what is programmed in the Matrix. Spinning the Rotary 1 knob will select from the 32 Matrix pattern banks. You can also automate pattern changes for the Matrix in the Sequencer if you create a sequencer track for the Matrix.
I hope you’ve enjoyed this little exploration of what can be done with a bunch of synths and a Matrix inside a Combinator. You can create some gigantic kits using this technique. And it can be an alternative to using the NN-XT for a sample-based drum kit.
As with any method, there are pros and cons to this approach. I like it because it can be much easier to tweak the sounds later if you want to adjust any of the synth parameters for your various hits. Personally, I feel this can give you more flexibility than storing your kit in an NN-XT. That being said, the downside is that it’s not quite as compact, takes some time to load up in your song, and it’s not sample-based so it’s not as “organic” as samples in an NN-XT can be. Both approaches, however, are valid. It all depends what you’re after.
If you have any other ideas or unique ways in which you’ve created your own kits please share them with us. I’d love to know some new techniques that I may not have thought about before.
Until next time, I hope this inspires you to build some kick-ass drum kits. Good luck!

Really dig the minimal super kit! Nice work Rob, will be using this template to come up with some of my own drum sounds while waiting for the king that is KONG!
Thank you so much, very nice combinator, I had also tried the idea but used only 12 devices (all the an old Pentium 2Duo can handle without trouble). Great for electro or tecky stuff!
The new Record/Reason can also simplify things by sampling. You can sample (and multisample) your synth-made drumhits for use in Kong, Redrum or NNXT which have multiple outputs for processing etc
Wow! that is one hell of a setup! most often i rarely use more then just 10 (each redrum channel one synth) to create stuff like this. But, it does show it is capable holding it inside one combi and still have it play without any problems.
I gotta give some deep thinking in this one and try to re-create something massive like this. Even if it is time consuming to make all those drums/effects etc. It is fun to create 😀
Respect!
Thanks folks. I’ve actually made 3 or 4 combinators like this (which will be available in my up and coming refill due out around August). A few other points I forgot to mention in the article:
Hope that gets you going. 😉
Rob
thats fantastic, just been doodling around with it and it quite fun randomising the matrix seq, fair play love the blog
Good Lord, man! That’s a VERY clever idea – Opens up a whole new realm of possibilities. As long as I’ve used Reason, your site demonstrates that I’ve only skimmed the surface of what it can do. Thanks! Shan 🙂
Shannon,
You’re very welcome. Reason is as deep as you care to go. And I’m always learning something new each and every day. The whole massive Combi drum kit was something I did when I was bored waiting for Kong to arrive. I thought: why wait? So happy reasoning!
Rob
How would I do this with redrums. I have two redrums each going into a 14:2 Mixer that are chained within a combi. Each redrum channel is going to a mixer channel. I have one combi lane in the sequencer with two lanes, one for my main drums(redrum1) the other perc and fills(redrum2), each with their own separate patterns. When I play the sequence both patterns trigger the same samples from redrum1 – sounds like a mess!
How can I transpose one redrum so that both play separate notes on the keyboard. (starting a c1 and going to b2)
Basically I want to make a 20 channel drum machine with two redrums in a combi so there is only one lane for all beats within my project. And so I can play two octaves of keys with drum samples without switching devices.
Thanks
I hope this makes sense
Nevermind Got it going! Didn’t have the sounds going into consecutive mixer channels so it wouldn’t play or transpose cause I guess it saw them as separate. Works great thanks for the tips
@Cameron,
I’m glad you got it going. It was just an idea I had where you could do some massive kits using a Combi and bunch of synths. But if you are doing things through Redrums, it might take a little bit of a different setup. But as you saw, you can definitely do it. Really glad you found it useful. 😉
Hello!
I would like to get some help here, because I’m sort of stuck. I’m trying to do the same as Cameron did (putting two ReDrums into one combinator to have access to more drum samples), but no matter how often I read your guide+comments I just can’t seem to figure out how to do it.
I want one ReDrum to go from range: C1-A1, and the other: A#1-G2.
I tried to put them together in the Combinator, but when I play for example the C1 key on my controller it triggers both Redrum channels. As Cameron said this just makes a whole big mess of everything.
Could I get a step-by-step instruction on how to do it please? 🙁
@Kidney,
From your post it sounds like you want to trigger your drums from the Midi Key Controller, and don’t need the Redrum’s pattern sequencer at all. If this is the case, combining two redrums together is going to cause conflicts because the Redrum is mapped (internally) to a set of keys on your keyboard. the mutes and solos are also mapped. What happens is that both redrums are mapped to the same set of keys and so both trigger at the same time. See the manual for info on the Redrum mappings.
What I would suggest is a much simpler method (which actually gives you even more control over each drum sample). Create a Combinator, and add a line mixer 6:2. Then add an NN-XT. Open up the “Remote Editor” and click the “browse Samples” icon (looks like a folder). Then navigate to the Factory Soundbank > Redrum Drum Kits > xclusive drums-sorted folder. Inside that folder are all the drum samples from all the Redrum kits. You can add as many of them into the NN-XT as you like (use Ctrl or Shift to multiple select an entire set if you wish — it sucks that they are sorted by instrument rather than by “kit” or “set” but anyway).
Once you have a set of samples in the NN-XT which makes up the entire “kit,” you can select all the samples by placing focus on the sample window area and selecting Ctrl+A (or click on the leftmost column in the sample window area). Right-click and select “Automap Zones Chromatically,” which forces all the samples to have their own key on the keybaord (Note: the key editor / sample window area works pretty much the same way as the key mapping area in the Combinator so you can still follow some of the same ideas from my tutorial. The only difference is that now all the key assignments are in the NN-XT and NOT in the Combinator).
Now go to your sequencer and make sure your midi key controller has the Combinator track as its focus. Start playing the keys and you’ll hear the drum samples you just mapped in the NN-XT. The reason why I said earlier that this gives you greater control is that you can tweak each individual sample in your kit using the NN-XT Remote Editor parameters. This is where you make the prefab Factory Soundbank samples truly your own. So don’t be shy about twisting knobs and seeing what each one does to affect each sample.
One other note: you can add any samples you like into the NN-XT and map them all across the keyboard. They don’t have to be from the Factory Soundbank. And they don’t necessarily need to be drums. Probably an obvious point, but thought I would mention it.
Let me know if that works for you?
Rob
Cool! the idea of combi analog drums made of subtractors or malstroms is not new but that is really massive setup 😉
kudos!
Mike
Mike, I agree. Nothing really “new” here. But many people still don’t know you can set things up this way, and have a field day creating all sorts of interesting sounds based on the synths in Reason. And what’s more, you can trigger each sound from each key on your keyboard. I still get excited by these simple concepts. Simple yes, but very powerful. Have a read through #56 here if you want something a little more challenging, and using separate FX on each key, instead of drums. http://www.reason101.net/101-creative-reason-projects/56-key-flux-fx-processor/ Cheers!