36 – Let’s Talk Compression

Let’s start talking about Compression. In one of my previous tutorials, I showed a way you could use Kong to parallel compress a Kick Drum. So that was one method. But here are a few others that everyone should know about, especially if you’re working on most dance music genres.

Let’s start talking about Compression. In one of my previous tutorials, I showed a way you could use Kong to parallel compress a Kick Drum. So that was one method. But here are a few others that everyone should know about, especially if you’re working on most dance music genres.

Sidechain Compression (aka: “Ducking” or “Gating”)

This is a basic concept that everyone should know. But the twist is that we’ll use Kong, instead of Redrum, to compress a Thor bassline. This way, when the kick drum sounds, the bass is compressed and “ducks out” of the mix. This ensures the Kick drum cuts through the bass in your track.

Compression can also be used for other things as well. It does not have to be confined to a Kick drum and Bassline. You can use any sound source to duck out any other sound source and create a pumping rhythm like this. For instance, you can use a Kick drum to compress your main synth line. This can create some interesting gating effects if used properly.

Parallel Compression

Parallel Compression occurs when you mix a dry sound source together with that same sound source which has been compressed. In this way you get a wider, fatter sound, and you also get the flexibility of controlling the mix between the dry and wet signals. I put together a video to show you how Kong can be used in a Parallel Compression scenario on YouTube. However, why don’t I show you another way you can use a Redrum to parallel process a Kick Drum (a very common usage of this technique), or an entire set of drums (this is a little more unorthodox because you would usually parallel compress one drum at a time, but just to show you that you have options. . . ). Here’s the video:

Frequency-Based Compression

This approach is a little different, but the concept is similar. A lot of times, you might have a specific frequency that you want to “duck” out of the mix. One method you can use is Frequency-based compression, where you compress only a specific frequency in your mix. This is usually used to remove an unwanted sound, and probably the most popular usage for this kind of compression is “de-essing” where those nasty sibilant “S” sounds are removed from vocals. This is really childs play with Reason and the M Class EQ and Compressor devices. Let’s take a look at how it’s done:

As an alternative to using the M Class Eq device, you can use the BV512 Vocoder. In this way, the sound is colored slightly (and moreso if you use the 512 FFT setting), but it’s still a legitimate way that has its own technique. You can see the video of it below. Try it out. You might come to like this method.

Multi-Band Compression

Of course, there’s also something called “Multi-band Compression” which takes the EQ frequency idea to an extreme. This is usually applied to the whole mix at the end of the signal path, before going to the audio outputs. In this way, you set up multiple compressors each affecting a specific range of frequencies. The concept is not entirely difficult, depending on how many compressors you want to set up. For a really great introduction to multi-band compression, I would advise you to check out James Bernard’s week 7 video tutorial on Multi-Band Compression. In addition, James also has a complete multi-band toolkit available as a free download. So go check it out now if you haven’t already!


So that’s it. I’m sure there are other creative ways you can use Compression, but I hope that begins to inspire you to look at compression as a useful dynamic processing tool or even special effect. If you have any comments on this or any other tutorials, please let me know.

22 – Parallel Effects Processing

Split an audio signal into multiple parallel audio signals, send them to various effects, and then merge them back together. You control the mix level of all 3 effects and the original signal. As an example, we’ll create a Dynamic Effects processor (Compressors / Equalizers) to apply to your bass sounds.

In this tutorial, I’m going to show you how to split an audio signal into multiple parallel audio signals, send them to various effects, and then merge them back together. You control the mix level of all 3 effects and the original signal. As an example, we’ll create a Dynamic Effects processor (Compressors / Equalizers) to apply to your bass sounds. The Combinator knobs will be used as the basis to sculpt your sounds. Add some additional effects to the buttons and you have yourself some very powerful sound development indeed.

The inspiration for this tutorial came from a procedure I had read about in which the Kick drum is compressed and then the original Kick is mixed back in with this compressed Kick drum to give a beefier sound. So I thought, if you could do this with a Kick drum, how about doing it with other sounds such as a Bass, and then allowing you to mix in not only the original sound, but also different compression schemes. With the Combinator allowing you to utilize 4 knobs, you can actually create 3 different compression/EQ schemes (each tied to their own Rotary on the Combinator), and then tie the original mix to the fourth Rotary. This way, you can have some fun adjusting the balance of all 3 compressions as well as the original to create your final sound. This opens up a huge array of sound possibilities.

Once I show you the method to do this, you’ll be able to parallel process any kind of effect you can create in Reason or Record. For example, we can take 3 variations on a Chorus, and tie each variation to their own Rotary, then have some fun mixing them together. This turns your Combinator into a very flexible Chorus machine.

The project files can be downloaded here: parallel-effects-processing The zip file contains 1 Combinator inside an .rns file and a Combinator template. The .rns file contains the Parallel Processor which we’ll create here. You can use it to process your bass sounds. Different Bass tones and cabinet models are packed inside the Combinator. The template file can be used to start you off creating your own effects. You won’t have to enter any settings in the Combinator’s Modulation Routing, unless you tie some effects to the buttons. Otherwise, have at it building your own Parallel processing effects.

Here’s the basic Combinator setup:

  1. First, Create a new Reason document and then create a 14:2 Mixer. Next, create a sound module, such as a Bass sound. You can find great bass sounds under the Factory Sound Bank (FSB) or you can create one of your own using a Thor, Mal, or Sub. You can even create a sampled Bass sound using the NN-19 or NN-XT. It’s up to you, but since we’re going to create a Combinator effect unit, you’ll need some kind of sound which is to be affected.
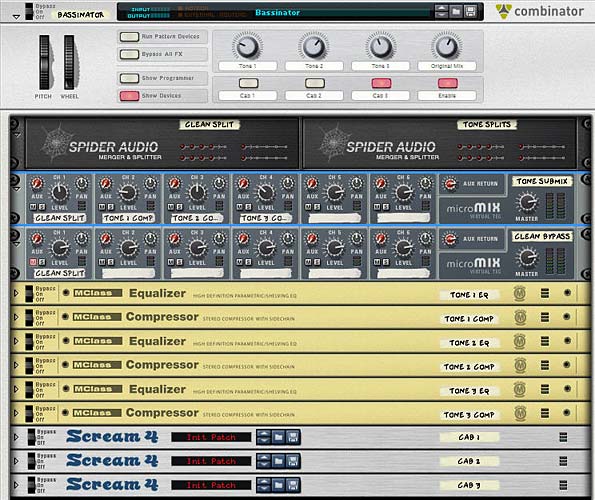
  2. Next, create a Combinator under the sound source and in the Combinator hold down shift and create in the following order two Audio Spiders/Mergers, two 6:2 Line Mixers, 3 sets of M-Class Equalizer/M-Class Compressor devices, and 3 Scream devices.
  3. Label the first Audio Spider/ Merger “Clean Split” and label the second Spider/Merger “Tone Splits.” Label the first 6:2 Mixer “Tone Submix” and the second 6:2 mixer “Clean Bypass.” Label each set of EQ/Compressor as follows: Tone EQ 1/Tone Comp 1, Tone EQ 2/Tone Comp 2, and Tone EQ 3/Tone Comp 3. Finally, label the 3 Scream devices “Cab 1,” “Cab 2,” and “Cab 3.” These will be our cabinet emulations. This is how we will refer to each device for the remainder of the tutorial.
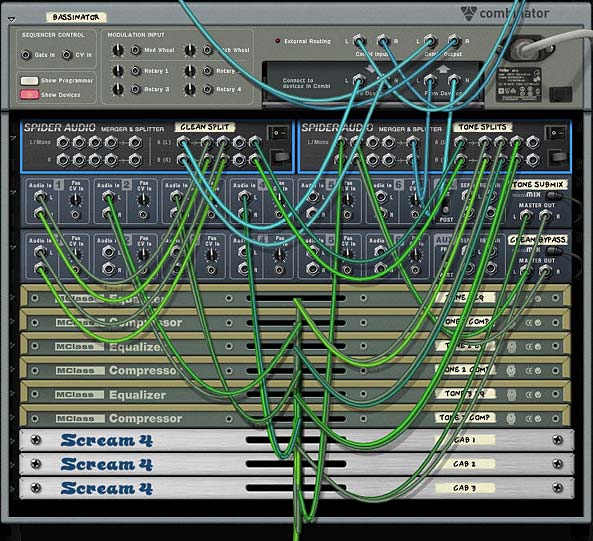
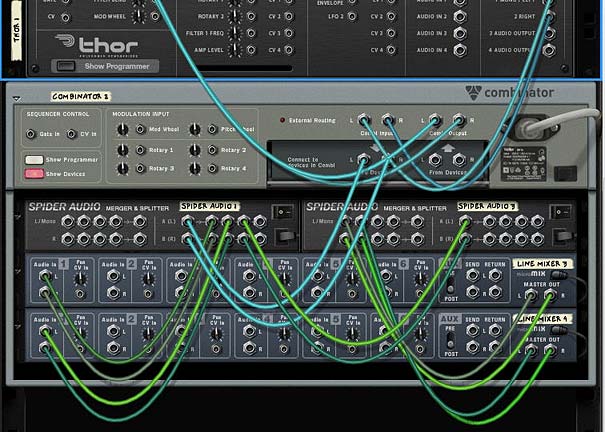
  4. Flip the rack around to the back as it’s time to do some serious routing. Note that all the routings below are Left/Right stereo pairs. Move the Audio outputs from the sound device to the Combinator inputs, and then move the Combinator audio outputs to the Main 14:2 Mixer’s Channel 1 inputs. Route the “To Devices” cables from the Combinator to the main inputs on the splitter side of the “Clean Split” Spider device.
  5. Send one of the splits from the “Clean Split” device to Channel 1 input of the “Tone Submix” mixer, another split to Channel 1 of the “Clean Bypass” mixer, and a third split to Main inputs on the splitter side of the “Tone  Splits” Spider device.

    The back of the rack for the Template file.
    The back of the rack for the Template file. I'm jumping ahead a little. But this shows the basic routing before setting up any of the Effect devices.
  6. Send one split from the “Tone Splits” Spider to the “Tone EQ 1” inputs. Send a second split to the “Tone EQ 2” inputs. Send a third split to the “Tone EQ 3” inputs. Then send the audio outputs from each of the EQ devices to the audio inputs of their respective Compressor devices. Then send the outputs of each of the Compressor devices into Channels 2, 3, and 4 of the “Tone Submix” mixer device.
  7. Next, send the Master output of the “Tone Submix” mixer to the input of the “Cab 1” scream device. The “Cab 1” output goes to the “Cab 2” input, the “Cab 2” output goes to the “Cab 3 input,” and finally the “Cab 3” output goes back into the Merge side input of the “Tone Splits” Spider device. Also send the Master output of the “Clean Bypass” mixer device to another merge input on the “Tone Splits” Spider device.
  8. Last but not least, send the Merged output from the “Tone Splits” Spider device to the “From Devices” input on the main Combinator panel. I know this all looks really messy, but sometimes you just have to get in there and get dirty to get what you want out of Reason.
    The back of the rack when finished routing
    The back of the rack when finished routing

    The front of the rack
    The front of the rack
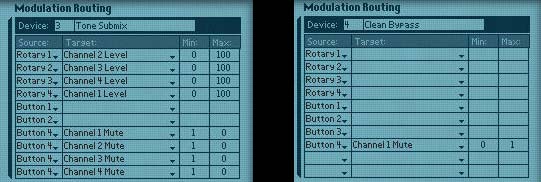
  9. Now let’s flip the rack around to the front and work on the Combinator Modulation Routing section. Click the “Show Programmer” button on the Combinator. Enter the following settings:

    For the “Tone Submix” mixer device:

    Rotary 1 > Channel 2 Level: 0 / 100

    Rotary 2 > Channel 3 Level: 0 / 100

    Rotary 3 > Channel 4 Level: 0 / 100

    Rotary 4 > Channel 1 Level: 0 / 100

    Button 4 > Channel 1 Mute: 1 / 0

    Button 4 > Channel 2 Mute: 1 / 0

    Button 4 > Channel 3 Mute: 1 / 0

    Button 4 > Channel 4 Mute: 1 / 0

    For the “Clean Bypass” mixer device:

    Button 4 > Channel 1 Mute: 0 / 1

    For each the “Cab 1” Scream device (note, each Cab device has the same settings, except Cab 2 is tied to Button 2 and Cab 3 is tied to Button 3):

    Button 1 > Damage On/Off: 0 / 1

    Button 1 > Cut On/Off: 0 / 1

    Button 1 > Body On/Off: 0 / 1

    Combinator Modulation routing for the two Mixers
    Combinator Modulation routing for the two Mixers

Here’s what is happening:

Button 4 is used as a bypass switch. When this button is turned off, the original sound will travel through the Combinator untouched. When Button 4 is turned on, you can use the 4 Rotaries to create a custom mix between all the sets of effects. Rotary 4 is a “special” rotary, in that it allows you to mix the original audio back into the mix. It’s important to note that this original audio is separate from the audio that goes through the Combinator when button 4 is off. Hence the need for two different mixers inside the Combinator. This way you can have the original mix work as though it were just another tone alongside the others, and when you switch back to a “clean” signal, a separate “original audio” is piped through the Combinator.

Buttons 1, 2, and 3 are your different Cabinet emulations. Those with Record are even luckier in that they can add in a few Line 6 Cabinet modeling devices and use those instead of the Scream. But with Reason, you can still get some amazing cabinet models by using the “Body” setting of the Scream unit (in conjunction with a little distortion and EQ cutting if you wish).

Another thing to keep in mind is that the Tones attached to the Rotaries are independent of the Cabinet models. You can dial in Tones without ever having to use the Cabinet models. However, button 4 must be turned on or enabled for you to hear any of the Tones or Cabinet models. In addition, you can have two Cabinet models used in series (note however, that this was not really the intended purpose — my thinking was that you can use each Cab model individually, and not together, but if you want to use them together, go for it).

Now as a final step, you will need to enter individual settings in the Equalizer / Compressor and Scream units. I won’t go into all the settings you can enter, but rather, you should build your own settings within these devices to your taste. However, take a look at my own settings to see what I used for Bass processing. The idea is to create each set of Equalizer/Compressor settings separately. So, for instance, turn rotary 1 all the way right and turn down all other rotaries to zero (fully left). Now listen to your sound source going through the device, and adjust the “Tone EQ 1” and “Tone Comp 1” devices until you hit on a nice bass processing setting.

Next, turn Rotary 1 all the way down and turn Rotary 2 all the way up. Now work on the second set of EQ/Comp devices to get an entirely new bass processing outcome from the devices. Once that’s done, repeat this for the final set of EQ/Comp devices.

Note: If you want to cheat a little bit, select your sound source, and then right-click and select “Create Effect.” Open up the Factory Sound Bank and look under the ALL Effects Patches > Dynamics > Basses folder and open up one of the bass Combinator patches that you like. Now be sure to adjust the settings on the front of this Combinator patch until you find the sound you’re looking for. Then click the “Show Devices” button on the Combinator, and copy/paste the devices from this Bass patch into your parallel processing Combinator. Delete the (now empty) bass Combinator. In the parallel processing Combinator, you will need to do a little routing to set things up as I have (routing into the main inputs of the first device, and routing the outputs from the last device). But once you do, you can then repeat this process two more times choosing different Combinator patches to copy from in the FSB.

Here’s a 2-part video series that expands upon this idea. It doesn’t always come out exactly the way you expect. But that’s the fun of trying out the technique. You may find something worth keeping, and then you can save the Combinator as a patch and use it in your own compositions.

Part 1:

Part 2:

Now for your cabinet models (Scream devices) you would go through the same process.

Note: When working with the Scream devices, in order to balance the volume level between the Original sound / Tones (using Button 4), you will need to raise all the Scream device Master volume settings up to 100. In this way, if you use Button 4 to switch between the Original volume on Rotary 4 and the volume of the clean bypass (being sent to the “Clean Bypass” mixer), the volume levels will match. So first raise all the master levels for all Scream units to 100.

Listen to the bass sound going only through Rotary 1 and with Button 1 enabled. Then enter a proper Cab setting in the “Cab 1” Scream device. When you have something that sounds nice, test it out with the other Tones on the other Rotaries individually. Note that you may need to put a limiter (M Class Compressor) after the Scream device to tame the sound if it gets too crazy.

Why I feel this setup is so powerful

This type of setup can be very flexible and powerful. Instead of using a single effects processor (one EQ and one Compressor) you can create any kind of mix between three different EQ/Compressor setups. Add to that the Cab models and you end up with some very powerful audio processing.

Another reason I feel this setup is powerful is because you end up with a processor that is greater than the sum of its individual parts. It’s also a handy way to store three setups (plus the original mix) in a single Combinator.


So what are your thoughts? Does this open up some new possibilities for you? Have you used this technique before in other areas or with other devices? I’d love to hear your thoughts on this. Thanks for reading. Now go out there and make some amazing music!

BV512 Spectrum Analyzer

This is what fills my heart with warm fuzzies. When those that are part of the Reason and Record community come together to Analyze and tackle some of the more difficult aspects of the software and fill in the gaps that may be left by incomplete specifications. Wendy Dunham and Giles Reaves have teamed up to provide the penultimate BV512 Vocoder Spectrum Analyzer for Reason and Record.

This is what fills my heart with warm fuzzies. When those that are part of the Reason and Record community come together to Analyze and tackle some of the more difficult aspects of the software and fill in the gaps that may be left by incomplete specifications. Ed did it previously with his Thor Sine Wave Shaper tutorial, using it to cross-fade between 4 different devices. And now Allen Day (“rogerraa”), Wendy of Wendy Dunham Music fame and Giles Reaves (Selig) from the Selig B3-Leslie refill fame have teamed up to provide the penultimate BV512  Spectrum Analyzer. Selig provided the charts, and Wendy provided the Combinator with a backdrop that cleverly shows the frequency bands.

Download the charts along with the Combinators here:  spectrum-analyzer-project-files. This zip file contains the two charts outlined below, and Wendy’s 2 Combinators: 1. A 16-band Spectrum Analyzer and 2. A 32-band Spectrum Analyzer. They both use the BV512 Vocoder/Equilizer in Reason. You can, however, use this in Reason or Reason+Record.

So how do you use this? Well, let’s let Wendy explain:

Note: This excerpt is taken from her site. There is also a video you can watch about how it works here: http://www.galxygirl.com/videos/music-making/spectrum-combinators.html. She has graciously allowed me to present it here on my blog (thanks Wendy, you are indeed amazing for sharing this with us 🙂 )


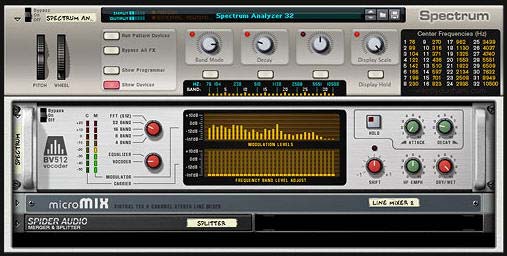
BV512 Spectrum Analyzer with Frequency Band labeled Backdrop

These are convenient Spectrum Analyzer Combinators to see your song’s frequency spectra. Each one has an accurate Scale with Band and Hz labels. I prefer the Spectrum Analyzer 32 band version, but in case you don’t want that much resolution, I also created a Spectrum Analyzer 16 band version.

  • Band Select: 4, 8, 16, 32, FFT (512)
  • Decay: Lower = faster display; higher = overall averaging.
  • Display Scale: Roll this back to see the peaks.
  • Display Hold: Take a snapshot in time.

Place before final output. It’s a great aid for balancing your mix!

You can leave this on without adversely affecting your output. The main signal passes straight through the combinator via an Audio Spider, so it’s monitoring the frequency safely.
Vocoder Band Frequencies

These reference charts for all band frequencies are printed on each combinator. The frequencies were measured accurately by Giles Reaves (“selig”) and Allen Day (“rogerraa”) on the Propellerhead User Forum.

Here’s another tip:

If you have an MClass EQ somewhere in your song, temporarily sweep one filter back & forth (with max Q, max Gain), and you should be able to see that peak on the analyzer and identify the frequency.

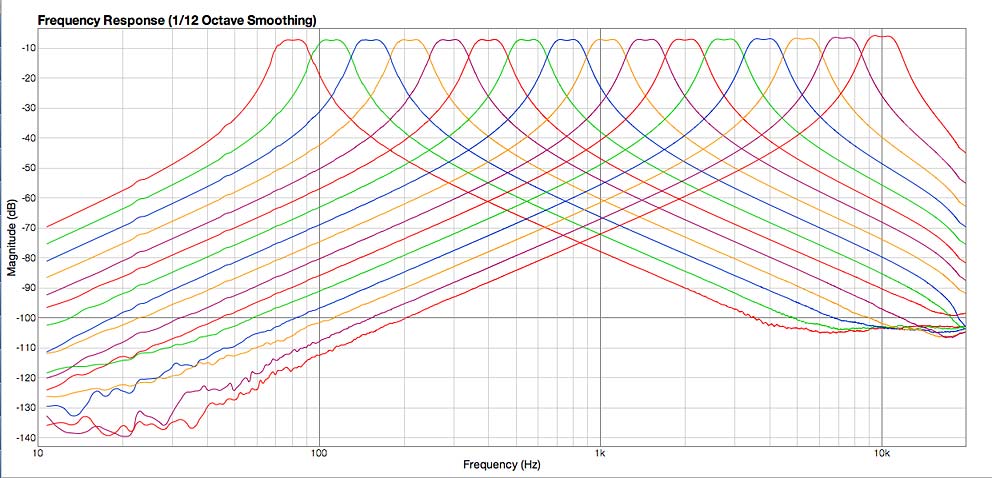
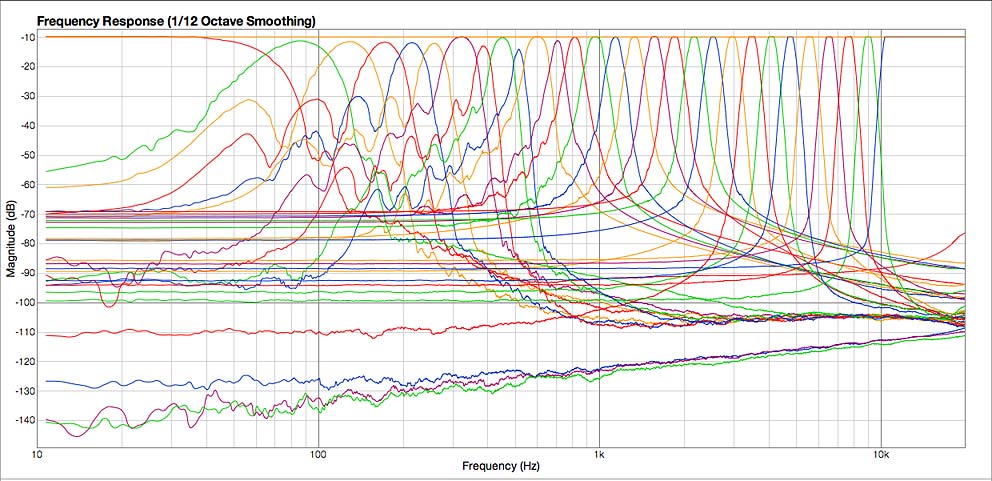
For those interested, Selig did a great job putting together the frequency charts for the 16- and 512 (FFT) -band modes of the Vocoder. Here are the screenshots:

BV512 Vocoder - 16-Band mode Frequency Chart
BV512 Vocoder – 16-Band mode Frequency Chart
BV512 Vocoder - 32-Band mode Frequency Chart
BV512 Vocoder – 512 (FFT) Band mode Frequency Chart

There you have it. Thanks so much to Wendy, Giles, and Allen for these great resources. Your important work does not go unnoticed.

9 – Creative ReDrums (Part 1)

I decided to try out some Redrum creativity by taking a standard Redrum patch from the Factory Sound Bank and punching it up. At the same time, I tried to get creative with the Filtering and Routings. A new way to use your Redrum device.

I often get asked and see on the Props forum many complaints that the supplied drum kits are lacking in depth and sound flat. Often this takes the form of slams against the props for providing lacklustre drum kits in the Factory Soundbank. Truth is, the drum sounds can be expanded upon, and if you’re willing to take some time, they can be made to sound much deeper and more punchy. It’s all in what you do with them. The power is all there in front of you, and with the Redrum there’s a lot of flexibility.  

With this in mind, I decided to try out some Redrum creativity and put together a flexible drum kit that takes a basic kit from the props and turns it into something unique . There’s two things I want to accomplish with this tutorial: First: Create a Drum Kit that is more expansive sounding, and Second: Find some creative ways in which the Redrum can be used. So let’s see how far we can take it.  

Before jumping in let me first say that this template is fairly massive. It contains a lot of Thor filters, and as such it can be a little expensive on CPU. If you find it taxing your CPU, you can scale it down (see my notes in the “Where do you go from here” section below), or you can bounce it to an audio track to be put into a Dr. Rex device or as a separate audio track entirely. Second, there’s two main ways I find can bolster the sound of your drums: Compression/Mastering, and Filtering the drums, so those methods will be explored below.  

Download the Project files here: creative-redrums. The project files contain two Combinators inside an rns file. The first Combinator is the Original untouched kit put through the same Matrix sequencing. The second Combinator is the Drums we’re going to create below. Mute/unmute the channels in the mixer to listen to how they sound compared to one another.  

  1. As with all great Reason patches, let’s start by creating a Combinator. Inside the Combinator, create in order, an M Class Compressor, M Class Equilizer, M Class Stereo Imager, M Class Maximizer, 14:2 Mixer, Redrum Drum Machine, Thor Synth, DDL-1, and Spider Audio Merger/Splitter. Then hold Shift down and create a Matrix Pattern Sequencer.
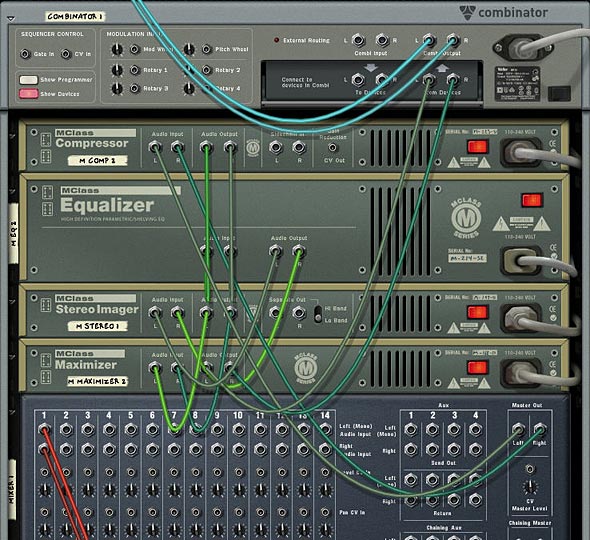
  2. Flip the Rack around and let’s start working on our Routings. First, move the Cables from the Combinator’s “From Devices” ins to the Audio Inputs of the Compressor. Then connect the Audio Outputs from the Maximizer to the “From Devices” inputs on the Combinator. This sets up the main mastering for the Redrum.

    The Mastering setup on the back of the rack
    The Mastering setup on the back of the rack
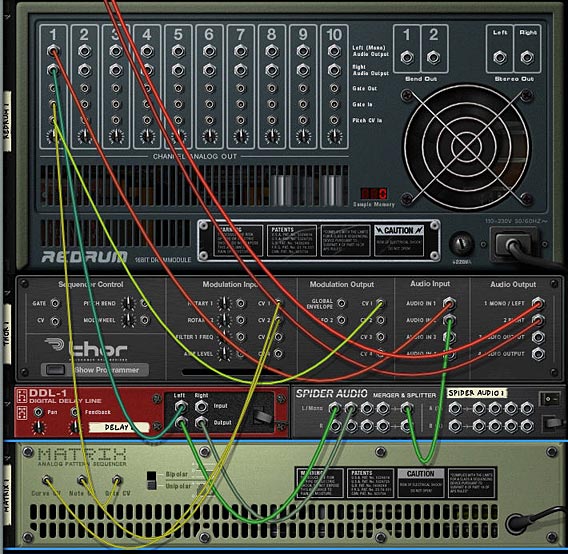
  3. Next, move the DDL 1 Left and Right input cables to the Left and Right Channel 1 on the 14:2 Mixer. At the same time, disconnect the Chaining Aux cables from the 14:2 Mixer. Also, connect the Left output from Channel 1 on the Redrum to the Audio In 1 on the Thor. Then connect the Right output from Channel 1 on the Redrum to the Left input on the DDL-1.
  4. Next, move the Left and Right Audio Inputs from Channel 2 on the Mixer to two Left Audio Inputs on the Merger side of the Spider. Then route a cable from the Left Merged Output to Audio In 2 on Thor. With this setup, you’ll have no delay on the Left audio channel for the drum, while the Right Channel goes through the delay device.
  5. Moving to our CV routing, plumb a CV cable from the Gate CV output of the Matrix to the Gate In on Channel 1 on the Redrum. And plumb a CV cable from the CV 1 Output on the Thor to the Pitch CV In on Channel 1 of the Redrum. Also cable the Note CV output from the Matrix to the CV 1 Input on the Thor, and the Curve CV output from the Matrix to the CV 2 Input on Thor. If this is all starting to get confusing for you, check out the routings in the Combinator file download, or else check out the image below.

    The routings for the Thor Filter, Delay, and Matrix Sequencer
    The routings for the Thor Filter, Delay, and Matrix Sequencer.
  6. Next, let’s flip the rack around and start working on applying settings to the front of the devices. First, click the “Enable Pattern Section” button on the Redrum so that the pattern is disabled. Click the browse button and load a patch (drum kit) into Redrum. I used the Chemical Kit 7 from the Factory Soundbank (under Redrum Drum Kits > Chemical Kits). Now you have a basis from which to work.
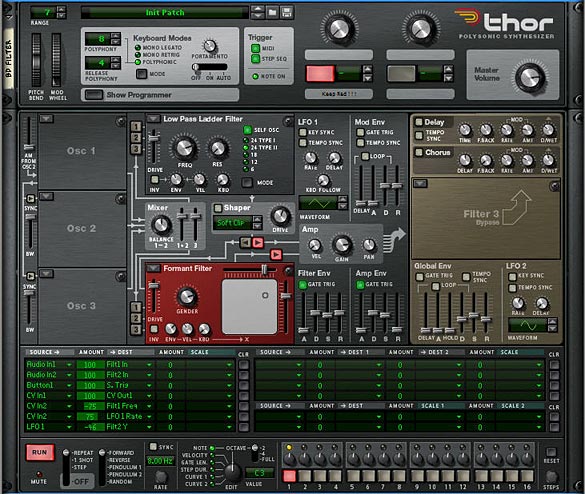
  7. In Thor, we’re going to use multiple filters which will be applied to the Bass Drum (Channel 1 on the Redrum). So the first thing to do is to ensure that the Bass Drum Left and Right channels are routed into Filter 1 and Filter 2. In the Mod Matrix, apply the following settings:

    Audio In1: 100 > Filt1 In  

    Audio In2: 100 > Filt2 In  

    This setup means that the Left (dry) Channel goes through Filter 1, while the Right (delay) Channel goes through Filter 2, and then both are sent in Stereo to be output to the Submixer. 

  8. Next, since Thor is not free running, like the Subtractor, we need to use the step sequencer to keep Thor “On.” To do this, set up a one step long pattern in the sequencer. Turn Button 1 on (so it’s Red) on the top panel of Thor. Then add the following setting into the Mod Matrix:

    Button1: 100 > S. Trig  

    To be honest, since everything will be triggered when you hit the play button, you probably don’t need to setup the above (step 8). But it will ensure that Thor remains on and is running, which will ensure you can use the filters in the Voice section of Thor (the first two filter slots), as well as the Global filter section (Third Filter slot).  If I’m wrong, please feel free to correct me.

  9. Add a Low Pass Filter into Filter slot 1, and a Formant Filter into Filter slot 2. Route both the filters parallel into the Amp section of Thor. Turn off any Oscillators and Oscillator routings, as well as the Mod Envelope and Global Envelope sections. And Then add the rest of the MBRS settings as follows:

    CV In1: 100 > CV Out1 (sends the Note CV data from the Matrix to the CV Pitch in on the Redrum Channel — yes you can send the CV cable directly from the Matrix to the Pitch In on the Redrum, but If you set it up this way, you can then use the Note CV to affect other parameters in Thor, if you wish).  

    CV In2: -75 > Filt1 Freq (sends the Curve CV data from the Matrix to the Filter 1 Frequency).  

    CV In2: 75 > LFO 1 Rate (sends the Curve CV data from the Matrix to the LFO 1 Rate).  

    LFO1: -46 > Filt2 Y (sends the LFO 1 to the Filter 2 – Formant Filter – Y Parameter).  

    Here’s the image which shows the front of the Thor Device and the Filter settings:  

    Thor settings for the main Bass Drum Filtering
    Thor settings for the main Bass Drum Filtering
  10. Next, on the DDL-1, select 4 Steps, and in the Matrix, create a Random pattern. Alternately, you can build your pattern as you play the sequence. The Matrix will trigger the Drum’s Channel 1 gate, and play the pattern you enter. So it can be much easier to build up a drum pattern as you play. Also, as you play, adjust the filter settings in Thor until you come up with your own unique brand of Drums. At the same time, flip the rack and adjust the Pitch In Trim knob on the Redrum Channel 1 to taste.
  11. Now comes the tedious part. Select the Thor, DDL-1, Spider Audio Merger/Splitter, and Matrix. Then right-click and select “Duplicate Devices and Tracks.” Once duplicated, flip the rack around to the back of the devices, and set up the routings into the second Channel of the Redrum and Submix (along with the CV routings, etc.). Do this for each Channel of the Redrum.
  12. Once everything is routed properly, you can start to work on filtering each individual drum channel. Try out different Thor filters, as well as different Matrix patterns (right-clicking and using “Alternate Pattern” works well here, along with shifting the patterns left or right). Also try alternating some of the delay routings from left and right (by reversing the audio inputs on the back of the Thor. Finally, try out different delay steps for each of the delays. There’s lots you can do to fine tune this type of setup.

Combinator Mod Matrix

Going into all the modulations in the Combinator is pretty intense, so instead I’ll let you download the project files and see what’s going on. But a few words about how the Rotaries/Buttons work:  

The Pitch Bend moves all the drum pitches up or down. This can be fun to play with while performing with the drums. The downside is that when the Pitch Bend is static center, so are all the drum pitches. But you can always automate it so that it stays in a non-static, non-centered position.  

The Mod Wheel is tied to a basic drum Reverb which also affects all the drums equally. If you don’t like this Reverb, you can use your own. This way you can apply a little or a lot of Reverb to the overall mix. And then of course there’s nothing saying you can’t add a Reverb or other FX as Send FX on the Submixer. This was a last-minute thought.  

Rotary 1-3: Applies Compression, EQ, and Maximizer Gain to the overall mix. In this way you can master the drums to your liking.  

Rotary 4: Affects the Delay Levels for all drums at once. You can go from no delay (at the far left) to a pretty heavy delay (on the far right).  

Buttons 1-3: Turns on/off the delays for the Bass Drums (1), Snare Drums (2), and High Hats (3).  

Button 4: Turns on/off the Ride by muting it on Channel 10 of the Submixer.  

Where do you go from here?

  • Add different variations and drum patterns (fills and rolls) in the Matrix pattern sections. Then create sequencer tracks for all the Matrixes. In this way you can play the patterns for each of the drums in their own separate tracks on the sequencer, and they are all pattern-based. This makes creating several variations very easy not only to explore, but also to apply in your song.
  • If things are a little too chaotic having all 10 drums running at once, simply mute some of them in the Drum Submixer, so let’s say you have a Bass Drum, Snare, and Hi Hat instead of an all-on cacophony of drums.
  • At the same time, if the CPU load is a little too much, try minimizing the number of filters used, and instead run each drum channel through only one filter, instead of two. Or delete the drums you aren’t using, along with their associated Thor/Delay/Splitter/Matrix.
  • Once you have this template built (and you already have mine done for you), you can add different drum kits into Redrum, and adjust settings for your filters, mastering, etc. One thing that helps is to work on the drums in a build-them-up-as-you-go way. So first do the Bass Drum, then mute the bass drum and go on to the Snare, then unmute and see if they work together. Once they do, move on to the next drum.

And no more than a few days after I posted this article, Matt Piper posted a great little youtube tutorial on how to process your drums through a BV512 Vocoder. You have to check it out. It sounds awesome. Great inspiration for those that want another way to beef up your drum kits: propellerhead-record-reason-vocoding-with-drums

So let me know what you think of this setup. Do you know of some great methods for getting more out of the drum sounds provided in the Factory Soundbank? Do you have any creative drumming techniques. Please feel free to share them. I’d love to see what can be done to boost the supplied drums and learn some new creative ways to ReDrum the kits. Good luck in your Reason projects!

Panning to Punch out your Mix

Kevin Parks is a former architectural designer, artist, and boatbuilder with a life-long love of music. Learn how he uses Panning in Record to punch up his mixes, giving them enough sonic space to have a fighting chance.

Your mastering will go a lot better when your mix is fine tuned.

These are some procedures that have evolved for me through time, advice, and experience. Everyone’s work flow is different, but we are all trying to solve the same sorts of problems, so I hope what follows will add something to your bag of tricks.

Before adding a lot of FX to try to punch out a mix, there are some things I like to do to give my mixes enough sonic space to have a fighting chance.

Working with Audio

First of all, since Record gives us audio capability now, let’s start with audio.

For all audio recording, I want to get the cleanest signal possible going into my computer.  Electronic noise takes up space better used for actual audio content.

I spent weeks routing and re-routing cables, getting rid of bad connections, separating all my power cords from my audio cables, and gain-staging to get the cleanest signal I could going into my computer.

While my input signal is *much* improved, it isn’t perfect, and electronic noise is cumulative. So if you mix a lot of tracks, each with a little noise, it adds up. If you don’t have noise reduction software, what can you do?

One thing you can do about that in Record is to use the razor tool and cut out the silent stretches in each audio track.  That will eliminate your hardware’s noise profile, at least from those stretches.  Nothing worse than teaching people’s ears how to tune into the static, just as they are ready for the music to start. This can make a really surprising difference. Noise can hide rather nicely within the audio content when the listener isn’t being trained how to hear it.

So now that we have gotten off to a good start by getting rid of obvious  problems with the audio tracks. Now what?

Next step , before adding a lot of FX to the mix, is to make sure to give all your tracks a place to be in the mix,  their own sonic space. No sense to start cutting freqs with EQ to solve problems that will go away with proper panning.  So start out with panning before using EQ.

To pan your tracks well, the first thing to consider is what goes center stage?

Be careful not to stack too many things in the center. 

Keep in mind that bass  frequencies are non directional to a great extent, so try to avoid panning low freqs very far if at all. The farther you pan a low frequency track the muddier your mix will get. (I have sometimes panned a bass and a kick a little bit, say 10-15%, and then gone back later to help separate them with some judicious EQ work.)

Separate freq ranges work OK together in the center, but if the freqs are too close to each other it will get “crowded” very quickly.  Think in terms of low, medium and high frequencies, and choose what  tracks you will stack in the center. Then  preview just  those tracks in your center channel.  You can try out different instruments until your center shines.

Next idea to remember:  The higher the frequency, the easier it is for it to sit farther from center. Since I use a lot of guitar tracks, I often balance the rhythm and lead guitars by placing them approximately the same distance from center, say 30-50%.

I like to continue to keep balance in my mix by pairing up higher freq tracks and placing them likewise the same distance apart. Higher freq tracks I place farther out than the guitar tracks. More often than not, it is better not to go all the way to 100% .  

Placing higher freqs farther apart is a good rule of thumb to start off with. I  get a sense of how many pairs I have and then divide up the space between pairs accordingly. Then preview different ideas; it’s fun, it’s free, and it’s going to improve your mix.

On the psycho-acoustic side, keep in mind that people tend to rely more on their right ear for things that they pay more attention to, so I like to place the lead somewhat, but not extremely, to the right. It helps hold peoples attention.

So remember,  you will need to do less fiddling with EQ when the tracks each have their own place in the sound field. Panning is powerful stuff.

Now, just to touch on EQ and Reverb:

OK, at this point,  panning has just given you the ability to place your tracks/instruments in different locations from left to right across the sound field. Then if there is a conflict, if  there is an instrument or track that is masking another one, then use EQ to tweak that  problem specifically.  Using a bass track and a kick drum as an example, solo those two tracks and tweak the EQ gently on each  until you can hear them both clearly. (Research this aspect if necessary.) 

Apply reverb last: Now I evaluate where I need/want reverb. Reverb will push a track farther back in the mix.  Sometimes you might need some reverb on a guitar track to help it cut through the mix. I often like to give my guitar tracks an ethereal feel with reverb. Avoid using reverb on low freqs; it makes muddy, harmonics. Reverb is much more pleasant and clean when used on higher freqs.

Once in a while I find that a *little* reverb applied globally to the finished song, can help integrate the tracks. Be careful though. If you are having to do very much of that, chances are that there is a track that needs more attention.

That’s all for now.  Knock ’em out, baby!


Kevin Parks is a former architectural designer, artist, and boatbuilder with a life-long love of music.  Translating uncharted realms of emotion using rhythm, space, and harmony..weaving real world instruments and software synths into experiential ambient synthesis. You can visit his website at http://www.soundclick.com/ambientsynthesis where he showcases several of his musical works.