In this tutorial I’m going to show you two things: 1. How to Stack multiple filters together to process a sound, and 2. How to use Thor’s filters to supplement other devices in Reason that don’t have those same filters (think of the Formant and some parts of the State Variable Filter).
You can download the project file here: stacking-filters. This is a zip file that contains the .rns file with the two Combinators used in the making of this tutorial. Those same two Combinators are provided separately as well. The files work with Reason 4 and above.
Stacking Thor Filters (In a Nutshell)
Before jumping into the tutorial, if you are a primarily visual person (or just a YouTube whore), you can watch the video below to see the process outlined:
It should be noted that this is merely one method to stack a few filters. I find this method gives you a lot of flexibility when it comes to processing the sound, because you can adjust the amount of filtered sound which is mixed with the original sound (in other words, parallel processing). So let’s get started.
- First off, Create a Main 14:2 Mixer at the top of your rack. Then create a Combinator. Then inside the Combinator, create in order a 6:2 Line Mixer, RV7000, Spider Audio Merger/Splitter, and Malstrom. Then holding the shift key down (to prevent auto-routing), create a Thor synth device.
- Flip the rack around (Tab) and create the following routings: Remove the Malstrom Main A/B Outputs and reroute them to the Main Left/Right splits in the Audio Splitter. Then send one pair of splits to Channel 1 on the Line Mixer. Send another Split into Thor’s Audio Input 1 & 2. Then Send the Left/Right Audio outputs from Thor into Channel 2 on the Mixer.
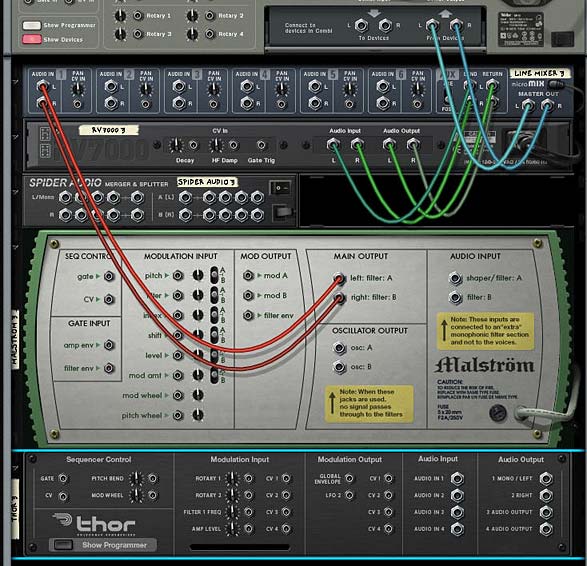
The view of the back of the Rack before all the routing. 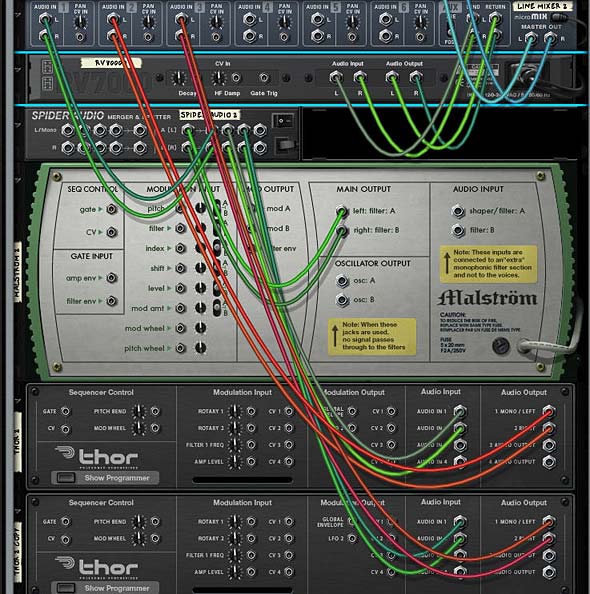
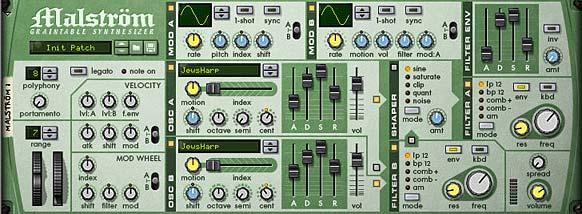
The view at the back of the rack after all the routing -- we'll get to the second Thor's routing in a bit. . . - Flip back around to the Front (Tab). In the Malstrom, turn on Oscillator 2, and set both Oscillators to “Sawtooth*4” and both Waveshapes in Mod A and Mod B to “Curve 2.” Set the ADSR envelopes of both Oscillators to 40/127/127/75, respectively (This turns the sound into a much more progressive slow-moving Pad). Route Oscillator A to the Shaper and Oscillator B to the Filter B (Note: Do not turn on the Shaper). Set Filter A’s Frequency to somwhere around 116 or so. Set Filter B’s Frequency to somewhere around 106. This is so that we remove a bit of harshness in the final sound we’ll be building up. Set Oscillator A’s Cent value to “+7” and Oscillator B’s Cent value to “-7” which detunes the Oscillators from each other.
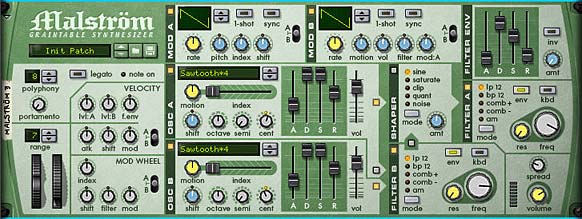
The Malstrom settings - Moving to the Thor, Turn Oscillator 1 Off, and uncheck the “1” button which routes Osc.1 to Filter 1. You don’t need Oscillators in Thor. We’re only using the Filters in Thor. Turn on the Formant Filter in both the first and second Filter Slots and set up Filter 1’s X/Y value to “0/127” and Filter 2’s X/Y value to “127/127.” Turn off the Filter Envelope’s “Gate Trig” button as well so that the Filters are not affected by the Filter Envelope. Then enable Filter 2 to be sent to the Amp section (the small arrow that leads from Filter 2 to Amp). Turn on the Tempo Sync for LFO2 and set the Rate to 6/4. Finally, set the Amp Envelope’s ADSR to the following values: 396 ms / 29.6 s / -0.0 dB / 6.98 s.
- Next, in Thor’s Modulation Bus Routing Section (MBRS), enter the following slots/lines:
Slot 1 – Audio In1 : 100 > Filt1 In
Slot 2 – Audio In2 : 100 > Filt2 In
Slot 8 – LFO2 : 100 > Filt1 X : -100 > Filt2 X
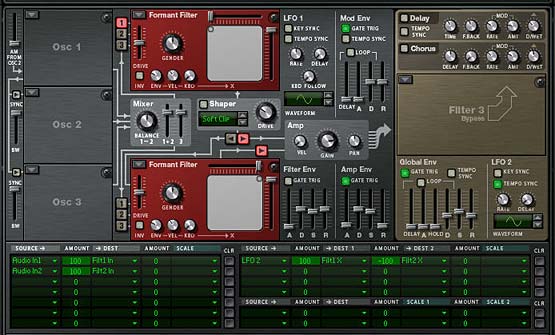
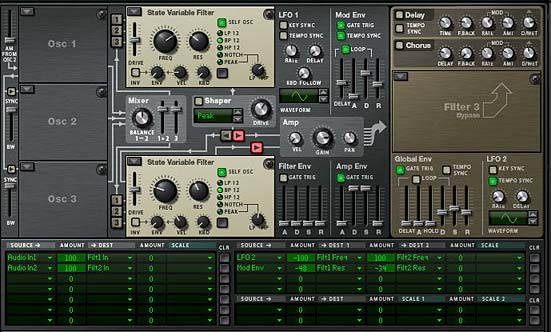
The Thor Filter settings and Modulation Bus Routing Section (MBRS) settings. The first 2 slots are telling Thor to take the audio input of the Left and Right Audio cables we set up previously, and sent them to Filter 1 and Filter 2 respectively. From that point onward, the signal travels through Thor as it normally would and then outputs to Channel 2 on the Line Mixer. The last line is what modulates the filter parameters in Thor. This basically creates a cross-over between filter 1 and filter 2 based on the default Sine wave in LFO2. Ok so far.
- Now with the Thor still selected, right-click and select “Duplicate Devices and Tracks.” In the duplicated Thor, set the LFO2 rate to 2/1 and change the Filter 1 X/Y value to “0/0” Then change the slot 8 line in the MBRS to the following:
LFO2: 100 > Filt1 Y : -100 > Filt2 Y
- Flip the rack around and connect another split pair from the Audio Splitter to this new Thor’s Audio Input 1 & 2. Then Send the Left/Right Audio outputs from the new Thor into Channel 3 on the Mixer.
- Flip back around to the front of the rack and on the Line Mixer adjust the following:
Channel 1 : Aux = 34; Level = 36; Pan = -14
Channel 2: Aux = 50; Level = 92; Pan = 18
Channel 3: Aux = 53; Level = 90; Pan = 22
- Finally, let’s take a look at the RV7000. Truth be told, you could enter whatever preset you like here which would work for a Pad sound. So enter your favorite RV7000 Patch. My settings were a low HF Damp, High EQ, with EQ turned on, and a lowering of the EQ curve on the low end with the gain set on the high EQ end to affect the midtones more than any other area. I also smoothed out the curve and made a few adjustments to the overall Reverb default “Hall” settings, as shown below.

The RV7000 settings for the Hall Reverb 
The settings for the Reverb's EQ.
Now give it a play and see how it sounds. By layering the filters and sending Left and Right to different filters that are modulated with a simple Sine wave, you can create some very complex tones that you couldn’t get using the Malstrom on its own.
Quickly Converting to a Whole New Sound
Now we can do a few interesting things with our setup. For example, duplicate the Combinator and change all four filters to “State Variable Filters.” Set the Resonance in the two filters in the first Thor to 54 and 82 respectively. In the second Thor, set both filters to “BP” mode and set the first filter’s Frequency to 3.28 kHz and Resonance to 38. Set the second filter’s Frequency to 158 kHz and Resonance to 50. Reduce the Attack and Release settings on the first Thor’s Amp Envelope a little bit. And Reduce them completely on the second Thor’s Amp Envelope. You can also use the Mod Envelope to affect the Resonance of the filters as I have done here:
Solo each Channel on the Mixer and see if the levels are ok. I found I had to insert a Maximizer after the second Thor just to boost things a bit. Trial and error is the key.
Finally, go into the Malstrom and change the two Oscillators to use the “JewsHarp” graintable in both. Reduce the Filter A & B Frequencies to your liking, and have a listen by playing a few notes. You end up with a very different sound altogether; like a slow meandering rumble. With just a few minor changes you get all sorts of different sounds.
Where do you go from here?
Anyplace you like is the short answer. But try out different filters and different Malstrom Oscillators. You could also insert a Scream device with some mild settings to completely alter the sound. Or try your hand modulating the filters in different unexpected ways using different LFO waves and rates. The sky is really the limit.
The only thing I might be wary of doing is creating delays on any of the parallel signals, as this can cause some phase shifting. But that might be something you are trying to achieve. It’s really up to you.
Let me know what you think of this tutorial and please add your comments if you come up with something far more interesting than these designs. I’d love to hear your own sound designs and creations. Until next time, good luck in all your endeavors.

This was a great video Rob. Thanks for the ideas and hope everyone realizes its applicability to any number of other devices too. Most salient for a lot of people too is the tip towards the end and one I have used for years regarding the EQ section of the 7000. I tend to not use EQ at all if I can help it and get my synth patches into the range I find useful any section through using the filters in the synths themselves. In the rare time when I can’t seem to get a synth to stand clear of a mix from the rest of the material- if that is what I want in the first place, of course-then I will go to using the Master EQ, the half rack, or the SSL’s which are superb. I think it is most intructive for anyone wanting to learn about the frequency spectrum to do exactly what you did: locate the area you want to effect by turning the gain to full and then sweep through it. It also helps you to understand ranges of certain instruments and where the majority of their frequenices are. There is no point in boosting or cutting a frequency area if that instrument has none of them. Percussion instruments such as congas tend, for instance, to have small ranges that it makes any sense to boost or cut.
Thanks for commenting Geoff. I find using EQ in a general sense is something I end up using in one way or another on most of my tracks (usually while I’m mixing the track itself). Most sounds usually don’t automatically “fit” and it usually takes a degree of maneuvering to get it “right” to my ears. But that being said, the less EQ you need to do the better. That’s what I find.
But if you’re talking about the RV7000, the EQ is somewhat different. I find without some degree of EQ or “taming” of the reverb, you can end up with a huge wash which floods the mix and the sound. EQ is just one method you can use to help you “fit” the reverb into the rest of the mix.
But it’s such a subjective idea, and if you start everything from scratch (all sounds, samples, etc) you probably have less of a need for EQ than if you fit a bunch of prefab sounds together. Good conversation though!
When it comes to equalization used as a modifier of reverb, I agree totally Rob. In a way, I should have indicated that I was talking about using EQ in general for instruments, as opposed to reverb. You are totally correct about how reverb used on instruments can make a terrible mushing of the end sound if certain parts of the frequency spectrum end up too highlighted/amplified given the nature of reverberated sound. To clarify what I meant with regards to synth patches, rather than using EQ to sit/highlight a sound(s), I more often go back to the synth and try working with the filter section(s) first to get it to sit/stand out. If I can’t get it that way, then I will resort to EQ to achieve this. That said, I love the EQ in the 7000 and it’s a really useful feature that I use more often not. In the next piece I am going to post on Soundcloud in the next couple of days, I think I used the SSL’s EQ on only one or two tracks, even though I used a couple of Master EQs before some tracks got to the board. Each new piece I do these days seems to be a delightful set of new lessons in using Record, from using the whole SSL board, to inserts, to using or not using Master Compression and automating any number of things within each track. It’s the cliched “kid in a candy shop” scenario. 🙂 Great discussions, and it’s like we’re in recording/engineering school without an instructor or tuition fees. lol
Geoff,
I totally agree with you. I knew you were talking about EQ on the instruments, rather than on the reverb. Just providing my thoughts on the RV7000 use of Reverbs, for which I believe we’re both in sync. Yes, I love these discussions. I learn just as much, if not more, from others out there like yourself. More contributions and discussions lead to other avenues of thought and sometimes to other videos and tutorials that I put together.
I just got two or three other ideas for new tutorials. Better get cracking! 😉