I often get asked and see on the Props forum many complaints that the supplied drum kits are lacking in depth and sound flat. Often this takes the form of slams against the props for providing lacklustre drum kits in the Factory Soundbank. Truth is, the drum sounds can be expanded upon, and if you’re willing to take some time, they can be made to sound much deeper and more punchy. It’s all in what you do with them. The power is all there in front of you, and with the Redrum there’s a lot of flexibility.
With this in mind, I decided to try out some Redrum creativity and put together a flexible drum kit that takes a basic kit from the props and turns it into something unique . There’s two things I want to accomplish with this tutorial: First: Create a Drum Kit that is more expansive sounding, and Second: Find some creative ways in which the Redrum can be used. So let’s see how far we can take it.
Before jumping in let me first say that this template is fairly massive. It contains a lot of Thor filters, and as such it can be a little expensive on CPU. If you find it taxing your CPU, you can scale it down (see my notes in the “Where do you go from here” section below), or you can bounce it to an audio track to be put into a Dr. Rex device or as a separate audio track entirely. Second, there’s two main ways I find can bolster the sound of your drums: Compression/Mastering, and Filtering the drums, so those methods will be explored below.
Download the Project files here: creative-redrums. The project files contain two Combinators inside an rns file. The first Combinator is the Original untouched kit put through the same Matrix sequencing. The second Combinator is the Drums we’re going to create below. Mute/unmute the channels in the mixer to listen to how they sound compared to one another.
- As with all great Reason patches, let’s start by creating a Combinator. Inside the Combinator, create in order, an M Class Compressor, M Class Equilizer, M Class Stereo Imager, M Class Maximizer, 14:2 Mixer, Redrum Drum Machine, Thor Synth, DDL-1, and Spider Audio Merger/Splitter. Then hold Shift down and create a Matrix Pattern Sequencer.
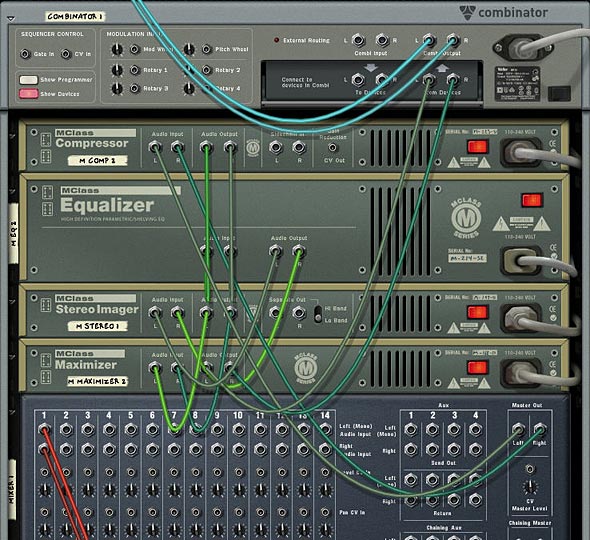
- Flip the Rack around and let’s start working on our Routings. First, move the Cables from the Combinator’s “From Devices” ins to the Audio Inputs of the Compressor. Then connect the Audio Outputs from the Maximizer to the “From Devices” inputs on the Combinator. This sets up the main mastering for the Redrum.

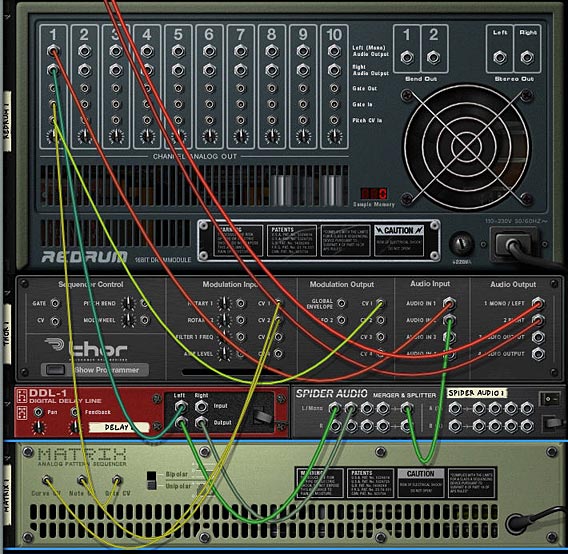
The Mastering setup on the back of the rack - Next, move the DDL 1 Left and Right input cables to the Left and Right Channel 1 on the 14:2 Mixer. At the same time, disconnect the Chaining Aux cables from the 14:2 Mixer. Also, connect the Left output from Channel 1 on the Redrum to the Audio In 1 on the Thor. Then connect the Right output from Channel 1 on the Redrum to the Left input on the DDL-1.
- Next, move the Left and Right Audio Inputs from Channel 2 on the Mixer to two Left Audio Inputs on the Merger side of the Spider. Then route a cable from the Left Merged Output to Audio In 2 on Thor. With this setup, you’ll have no delay on the Left audio channel for the drum, while the Right Channel goes through the delay device.
- Moving to our CV routing, plumb a CV cable from the Gate CV output of the Matrix to the Gate In on Channel 1 on the Redrum. And plumb a CV cable from the CV 1 Output on the Thor to the Pitch CV In on Channel 1 of the Redrum. Also cable the Note CV output from the Matrix to the CV 1 Input on the Thor, and the Curve CV output from the Matrix to the CV 2 Input on Thor. If this is all starting to get confusing for you, check out the routings in the Combinator file download, or else check out the image below.

The routings for the Thor Filter, Delay, and Matrix Sequencer. - Next, let’s flip the rack around and start working on applying settings to the front of the devices. First, click the “Enable Pattern Section” button on the Redrum so that the pattern is disabled. Click the browse button and load a patch (drum kit) into Redrum. I used the Chemical Kit 7 from the Factory Soundbank (under Redrum Drum Kits > Chemical Kits). Now you have a basis from which to work.
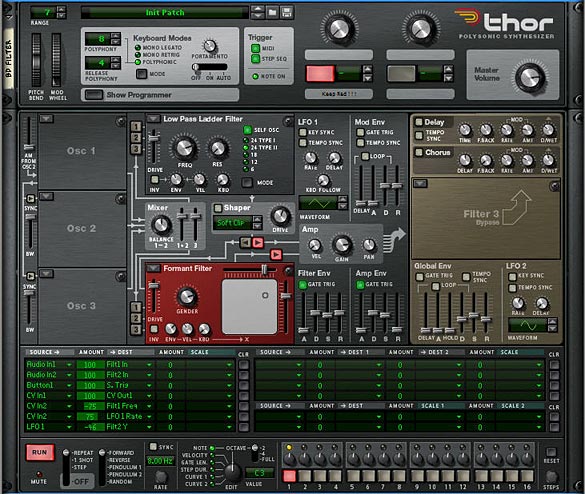
- In Thor, we’re going to use multiple filters which will be applied to the Bass Drum (Channel 1 on the Redrum). So the first thing to do is to ensure that the Bass Drum Left and Right channels are routed into Filter 1 and Filter 2. In the Mod Matrix, apply the following settings:
Audio In1: 100 > Filt1 In
Audio In2: 100 > Filt2 In
This setup means that the Left (dry) Channel goes through Filter 1, while the Right (delay) Channel goes through Filter 2, and then both are sent in Stereo to be output to the Submixer.
- Next, since Thor is not free running, like the Subtractor, we need to use the step sequencer to keep Thor “On.” To do this, set up a one step long pattern in the sequencer. Turn Button 1 on (so it’s Red) on the top panel of Thor. Then add the following setting into the Mod Matrix:
Button1: 100 > S. Trig
To be honest, since everything will be triggered when you hit the play button, you probably don’t need to setup the above (step 8). But it will ensure that Thor remains on and is running, which will ensure you can use the filters in the Voice section of Thor (the first two filter slots), as well as the Global filter section (Third Filter slot). If I’m wrong, please feel free to correct me.
- Add a Low Pass Filter into Filter slot 1, and a Formant Filter into Filter slot 2. Route both the filters parallel into the Amp section of Thor. Turn off any Oscillators and Oscillator routings, as well as the Mod Envelope and Global Envelope sections. And Then add the rest of the MBRS settings as follows:
CV In1: 100 > CV Out1 (sends the Note CV data from the Matrix to the CV Pitch in on the Redrum Channel — yes you can send the CV cable directly from the Matrix to the Pitch In on the Redrum, but If you set it up this way, you can then use the Note CV to affect other parameters in Thor, if you wish).
CV In2: -75 > Filt1 Freq (sends the Curve CV data from the Matrix to the Filter 1 Frequency).
CV In2: 75 > LFO 1 Rate (sends the Curve CV data from the Matrix to the LFO 1 Rate).
LFO1: -46 > Filt2 Y (sends the LFO 1 to the Filter 2 – Formant Filter – Y Parameter).
Here’s the image which shows the front of the Thor Device and the Filter settings:

Thor settings for the main Bass Drum Filtering - Next, on the DDL-1, select 4 Steps, and in the Matrix, create a Random pattern. Alternately, you can build your pattern as you play the sequence. The Matrix will trigger the Drum’s Channel 1 gate, and play the pattern you enter. So it can be much easier to build up a drum pattern as you play. Also, as you play, adjust the filter settings in Thor until you come up with your own unique brand of Drums. At the same time, flip the rack and adjust the Pitch In Trim knob on the Redrum Channel 1 to taste.
- Now comes the tedious part. Select the Thor, DDL-1, Spider Audio Merger/Splitter, and Matrix. Then right-click and select “Duplicate Devices and Tracks.” Once duplicated, flip the rack around to the back of the devices, and set up the routings into the second Channel of the Redrum and Submix (along with the CV routings, etc.). Do this for each Channel of the Redrum.
- Once everything is routed properly, you can start to work on filtering each individual drum channel. Try out different Thor filters, as well as different Matrix patterns (right-clicking and using “Alternate Pattern” works well here, along with shifting the patterns left or right). Also try alternating some of the delay routings from left and right (by reversing the audio inputs on the back of the Thor. Finally, try out different delay steps for each of the delays. There’s lots you can do to fine tune this type of setup.
Combinator Mod Matrix
Going into all the modulations in the Combinator is pretty intense, so instead I’ll let you download the project files and see what’s going on. But a few words about how the Rotaries/Buttons work:
The Pitch Bend moves all the drum pitches up or down. This can be fun to play with while performing with the drums. The downside is that when the Pitch Bend is static center, so are all the drum pitches. But you can always automate it so that it stays in a non-static, non-centered position.
The Mod Wheel is tied to a basic drum Reverb which also affects all the drums equally. If you don’t like this Reverb, you can use your own. This way you can apply a little or a lot of Reverb to the overall mix. And then of course there’s nothing saying you can’t add a Reverb or other FX as Send FX on the Submixer. This was a last-minute thought.
Rotary 1-3: Applies Compression, EQ, and Maximizer Gain to the overall mix. In this way you can master the drums to your liking.
Rotary 4: Affects the Delay Levels for all drums at once. You can go from no delay (at the far left) to a pretty heavy delay (on the far right).
Buttons 1-3: Turns on/off the delays for the Bass Drums (1), Snare Drums (2), and High Hats (3).
Button 4: Turns on/off the Ride by muting it on Channel 10 of the Submixer.
Where do you go from here?
- Add different variations and drum patterns (fills and rolls) in the Matrix pattern sections. Then create sequencer tracks for all the Matrixes. In this way you can play the patterns for each of the drums in their own separate tracks on the sequencer, and they are all pattern-based. This makes creating several variations very easy not only to explore, but also to apply in your song.
- If things are a little too chaotic having all 10 drums running at once, simply mute some of them in the Drum Submixer, so let’s say you have a Bass Drum, Snare, and Hi Hat instead of an all-on cacophony of drums.
- At the same time, if the CPU load is a little too much, try minimizing the number of filters used, and instead run each drum channel through only one filter, instead of two. Or delete the drums you aren’t using, along with their associated Thor/Delay/Splitter/Matrix.
- Once you have this template built (and you already have mine done for you), you can add different drum kits into Redrum, and adjust settings for your filters, mastering, etc. One thing that helps is to work on the drums in a build-them-up-as-you-go way. So first do the Bass Drum, then mute the bass drum and go on to the Snare, then unmute and see if they work together. Once they do, move on to the next drum.
And no more than a few days after I posted this article, Matt Piper posted a great little youtube tutorial on how to process your drums through a BV512 Vocoder. You have to check it out. It sounds awesome. Great inspiration for those that want another way to beef up your drum kits: propellerhead-record-reason-vocoding-with-drums
So let me know what you think of this setup. Do you know of some great methods for getting more out of the drum sounds provided in the Factory Soundbank? Do you have any creative drumming techniques. Please feel free to share them. I’d love to see what can be done to boost the supplied drums and learn some new creative ways to ReDrum the kits. Good luck in your Reason projects!

Really comprehensive stuff here,you spent some time on this I’m sure…very good thanks a mill…
Thanks Steve.
It did take some time to get the sounds I wanted. But it was definitely fun to put together. Glad you like it. Let me know how you make out with it or if you find it useful.
All my best,
Will try this out when I find some time. Awesome blog btw, please keep going! Unbelievable the depths you can go to with Reason, guarantee you the majority of its users have no idea(and I’m one of them) 😉
Thanks Mark,
I just hope that some of these tutorials inspire you all to try doing something amazing on your own. The key is to keep experimenting and trying new things out with your routings and devices. So just keep digging. The more you do, the easier it becomes and you start delving into new directions.
All my best.