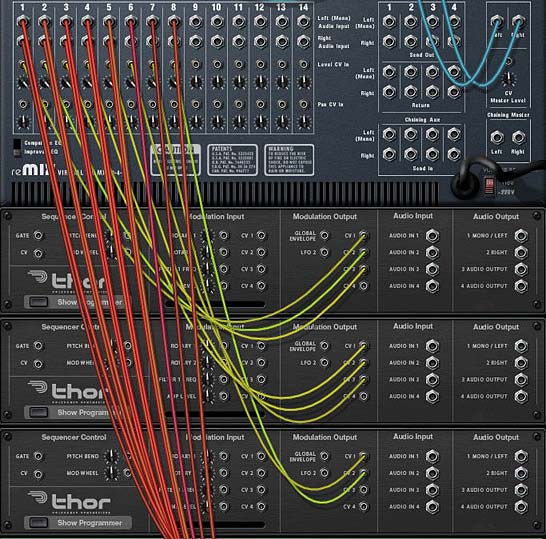
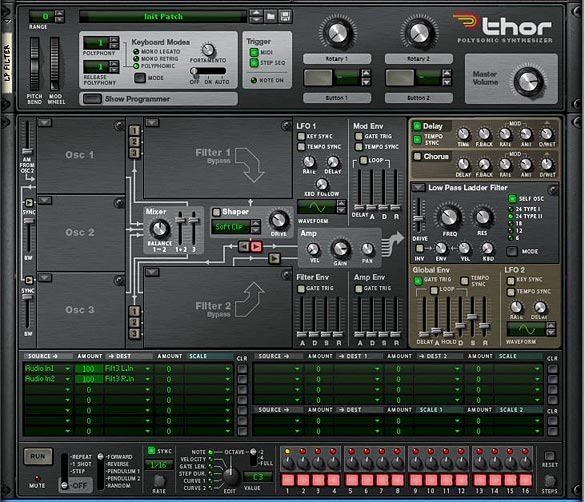
48 – Matrix Track Building (Part 1)

In this tutorial, I’m going to work with the Matrix and build a track by step sequencing. Egads! I hear the purists gasp, as they turn away in disgust. But rest assured, I’m merely presenting this as a creative idea to force you to think about alternative ways to build your songs. Take from that what you will. In the end, I hope this shows you how the Matrix, and step sequencing in general, can be a powerful ally when you compose your tracks.

In this tutorial, I’m going to work with the Matrix and show how you can build a track by sequencing, rather than by plugging notes into the standard Reason sequencer. Egads! I’m not saying this is the best and only approach. Indeed, a lot of people (purists mostly) would probably turn away in disgust at a tutorial like this. I’m merely presenting it as one way you can use to build your songs. Take from that what you will. In the end, I hope this shows you how the Matrix can be a powerful ally when you compose your track, whether or not you go to the extreme of building an entire track using step sequencing or not.

In this first part of the series, I’m going to familiarize you with the Matrix device, and show you how it works. I’m also going to show you a few ways you can use it, as there are an infinite array of ways in which it can be applied. So let’s start out with the Basics, and then we can move on to Part 2, where we get a little more complex.

Matrix Basics

First, a bit about the Matrix. The Matrix is a monophonic step sequencer that is used to generate CV signals to control other devices. It makes no sound on its own. Rather, it must be used in conjunction with other devices for you to achieve anything with it.

Here’s a short video that goes over the various parameters of the Matrix:

The Matrix controls other devices via the 3 CV outputs on the back. Here’s a rundown of the purpose of each of the CV outputs:

  1. To send a gate on/off signal to tell other devices when to start and stop (or to turn a parameter on another device on or off).
  2. To send a note output in a 5-octave range a from C1 to C6 (take note that this is not the full range of all octaves on the keyboard, but rather a subset — for this reason, certain notes and triggers are outside the reach of the Matrix – for example triggering a rex loop to start and stop).
  3. And finally, there is a curve CV which is a straight CV value that can be used for a variety of purposes (much like the Curve 1 or 2 value in a Thor Step Sequencer). The Curve CV is great for drawing in your own curves to be applied anywhere you like.

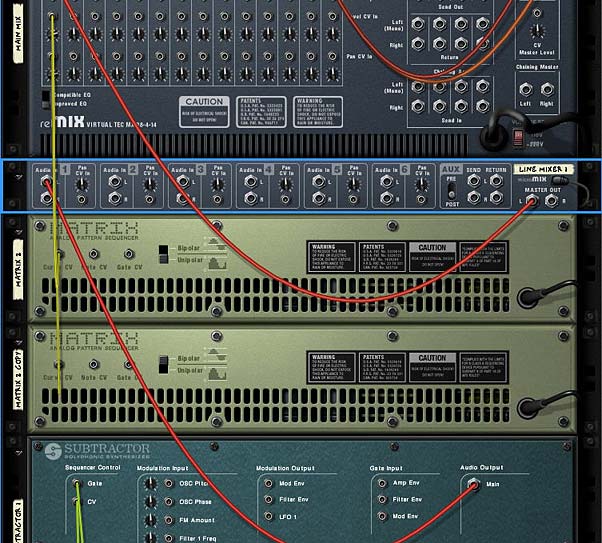
There is a special switch on the back of the Matrix device called “Bipolar / Unipolar.” Put simply, there are 2 possible CV algorithms that can be used: One is “Bipolar” which sets the CV from -64 to +64 and the second is “Unipolar” which sets the CV from 0 to 127.  To understand how this works, think of the difference between volume and Panning in the midi world. Volume is Unipolar: It can go from zero (0) volume to full volume (127). This is the way the fader operates on the 14:2 and 6:2 Mixers in Reason. Panning, on the other hand, is bipolar because it can go from fully left (-64) to fully right (+64). In this instance, zero would be the middle of the stereo field. This switch allows you to set how you want your source curve to act on the destination of the CV signal. And you can visually see how it is displayed on-screen in the “Curve / Keys Display area.

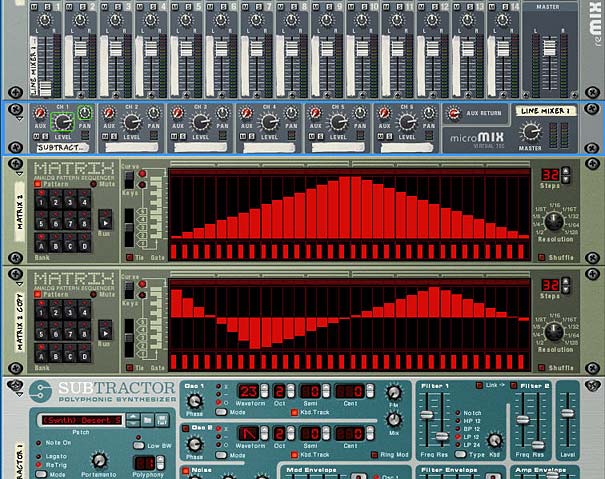
The Unipolar setting on the back of the Matrix produces a Unipolar Curve on the front panel display (CV value 0 - 127)
The Unipolar setting on the back of the Matrix produces a Unipolar Curve on the front panel display (CV value 0 – 127)
The Bipolar setting on the back of the Matrix produces a Bipolar Curve on the front panel display (CV value -64 to +64)
The same curve but shown in Bipolar mode (CV value -64 to +64). The line across the middle of the display is where the value is zero. Anything below this line is negative, and anything above this line is positive.

The Front Panel

From the front of the panel, you fill in your pattern information. Here’s a rundown of the front panel of the Matrix:
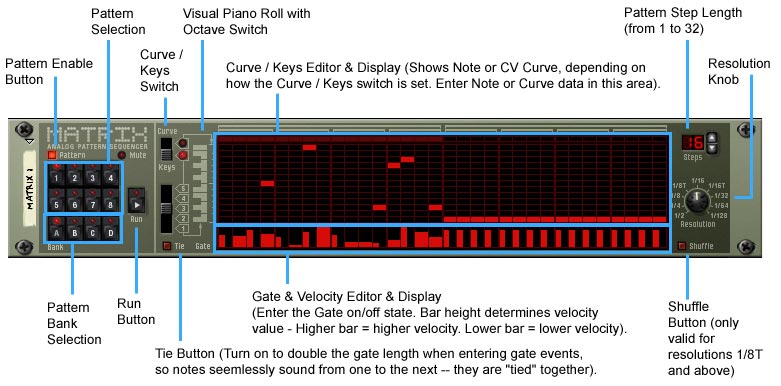
The Front of the Matrix Device with all parameters outlined.

Pattern Bank: Here you can select from 8 different patterns and 4 different banks (for a total of 32 patterns within a single Matrix). To work on entering a pattern, select an appropriate pattern in a specific bank (usually starting with A1), and then enter curve, note, and velocity (gate) information for the steps in that pattern (or any combination).

Curve / Keys Switch: This switches the display mode from Key display to Curve display. By default, the matrix is set to show Keys in the display (in a 5-octave range). When you switch to Curve display, the Curve can be visually drawn into the display.

Note: holding down the shift key and drawing across the Note or Curve steps creates an even line of note or curve events from the first click to when you let the mouse go. Also, the gate does not play a factor when working with Curves. Gates are a separate CV source from Curves. The curve simply provides a value from 0 – 127 that is represented visually by the bars in the Curve Display.

Curve / Keys Display: This area provides a visual display of the note events in the C1 – C6 range. When the Matrix is run using the Run button, the step sequencer starts and travels from left to right for the number of steps entered, then starts over from the left again and runs through the pattern again. It is forward-moving from left to right and repeating. This is the only direction of movement for the Matrix. In contrast, you can move the Thor Step Sequencer in a few different directions (Forward, Reverse, Random, Pendulum).

Enter note events using your mouse to click on the note value you want. The screen displays 13 notes (1 octave+1) at any given time. Use the “Octave Switch” to the left of the note area to move down or up to the next or previous octave.

Gate Velocity Display: This area runs along the bottom of the Matrix and provides Gate Velocity information. Use your mouse to determine the velocity level of the notes being played by lowering or raising this small bar. You can turn off a note (making it silent) by pulling the Velocity bar all the way down so it is no longer visible. In this case, no matter what note is entered in the Note Display for this event, the note acts as a “rest” for the duration of this gate event.

By default, the note duration is only half the length of the gate. You can enable the “Tie” button, and this allows you to enter full gate duration, so the notes seamlessly sound from one note to the next (or from one gate event to the next).

Note: You can also use Shift when entering Gate/Velocity events. By default, holding Shift down as you draw the events allows you to enter “Tied” gate events. If you have the “Tie” button on, holding Shift down enters non-tied gate events.

Think of it this way: There are 3 settings for a gate event in the Matrix

  1. None: In this case, there is no sound for the note on this step. In other words, the step is a full length of silence (when the Velocity bar is pulled all the way down). The event still occurs for a whole step of silence. This would be like looking at the “Gate” setting in Thor’s Step Sequencer, and having the Step Knob set to 0% (no gate).
  2. Half Step: the Velocity bar is visible and set to a value of some sort. This is the default setting where the velocity bar occupies half the length of the note (from left to right). This would be like looking at the “Gate” setting in Thor’s Step Sequencer, and having the Step Knob set to 50% (half).
  3. Whole Step: The Velocity bar is visible and set to a value of some sort. However, the “Tie” button is enable when you set it (click on the gate event). In this case, the gate is set to be the full length of the note (and glides into the next note/gate event). This would be like looking at the “Gate” setting in Thor’s Step Sequencer, and having the Step Knob set to 100% (full).

As you can start to see, there are some limitations to the Matrix. You cannot create step gate lengths other than these three states (though you can creatively workaround the situation — See Sterioevo’s comment below this post). You cannot change the play direction of the Matrix as you can in Thor (though a workaround is to create two patterns and chain them — for example, create one pattern with notes going forward, and another pattern with the notes going in reverse, and then put their clips on the sequencer back to back for a “Pendulum” direction. You also cannot see the CV’s numerical value for all three sources (Note / Gate / Curve). They appear visually on-screen as bars and note blips. Whereas, you can see the CV values clearly in Thor.

As a sidenote, if you ever want to see CV values for any parameter in Reason, send the CV value to a Combinator Rotary, and include a Thor device in the Combinator. Then on the Combinator Programmer, assign the Combinator’s Rotary 1 to Thor’s Rotary 1 with a min/max value of 0 / 100. Then you can hover your mouse cursor over Thor’s Rotary and see the readout of the value in the Tooltip. And if you want something a little more advanced, you should check out Meowsqueek’s CV Monitor Tool at his Off-White Noise site. But for something very basic, here’s a video for how to set up the Thor Rotary as a Monitor tool:

Steps: For each pattern, you can select the number of steps from 1 to 32. To create 4 1/4 note beats per bar, enter 4 in the number of steps, and dial in 1/4 for the Resolution (see “Resolution Knob” below).

Resolution Knob: While the Matrix adheres to the Global tempo value that you set, the Resolution knob allows you to force the Matrix to play at different tempos or speeds. For example, in 4/4 time, if you create a pattern with 4 steps, and want 1/2 notes, dial in 1/2 for the resolution. You’ll end up with 2 1/2 notes in your sequencer. In other words, the lower the resolution value, the slower the step sequencer runs (or the less notes that are entered per bar). The higher the resolution value, the faster the step sequencer runs (or the more notes that are entered per bar). There are 9 possible Resolution values from 1/2 to 1/128 (two of which, 1/8t and 1/16t, are triplet values).

Shuffle Button: Provides a swing feel to your notes. As the user manual puts it: “It delays all 1/16th notes that fall between the 1/8th notes.” This means, as far as I can see, the Matrix Shuffle setting only affects your output if you have the Resolution knob set to 1/8t or higher. Any setting below that will not change the “groove” of the Matrix pattern. In addition, the shuffle amount is set by the ReGroove “Global Shuffle” setting in the ReGroove Mixer. The “Shuffle can be set independently for each pattern.

Note that this “shuffle” feature is like a poor man’s single-setting ReGroove. All I can say is that it’s great for a quick shuffle feel, but you’re usually better off using the ReGroove in most cases. But since this is all about the Matrix, we need to explore all of its settings.

Matrix Quick-Start 1: Matrix as Sound Previewer

Long before we had the computer keyboard controller (F4 in Reason 5), in the days of old, the best way to preview a song was to use a Matrix. This probably goes without saying but create a sound device in Reason (synth or sampler), and then create a Matrix directly underneath. The Note / Gate CV outputs from the Matrix are connected to the device automatically. Now, with the Matrix still selected, press Ctrl+R to enter a random pattern into the Matrix on pattern A1. Then click the “Run” button on the Matrix (or the “Run” button on the main transport). Bingo! Instant sound previewer. This is great for situations when you want to listen to how a synth sounds as you’re making parameter changes to the synth. And it’s the most basic use of the Matrix.

Matrix Quick-Start 2: Matrix for Parameter Adjustment

Next up is still a very basic concept, but it’s worth exploring. Keep the setup you just created in the “Matrix as a Sound Previewer” section. Now flip to the back of the rack and connect the Curve CV from the Matrix to the Pan CV input on the channel of the mixer where the sound device is located. Turn the trim knob way up. Now set the Bipolar/Unipolar switch to “Bipolar.” Flip back to the front of the rack and press Run again. Voila! Not only is the matrix playing the sound device, it’s also changing the Panning for the device based on the Curve in the Curve display.
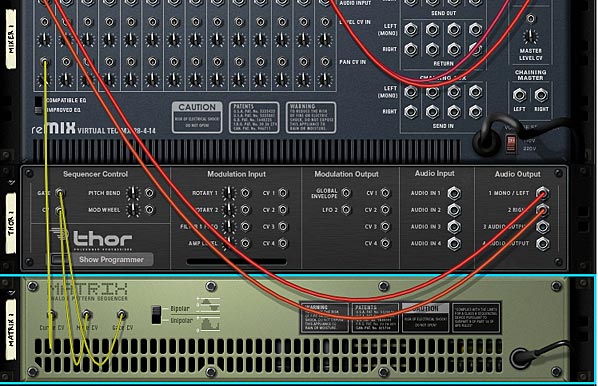
The Back of the Matrix with proper Note/Gate CV controlling Thor. And the curve controlling the Pan on the Mixer.

In Summary

As you start to work with the Matrix, you begin to realize how it is a poor cousin to Thor’s Step Sequencer, and you’d be very right. The Matrix has been around since the birth of Reason back in Version 1, and Thor, who came around in version 4, has opened us all up to an entirely revamped “Matrix” in its Step Sequencer. In this respect, Thor is more than just a synth. It’s an enhanced Matrix as well (on steroids, no less). For example, in Thor you have multiple directions your Pattern can take, you have a full 0 – 100% range for the gate length (the Matrix has 3 static states). And you have 2 available curves (the Matrix has one). Still, the Matrix does have at least one advantage over Thor: It can produce 64 patterns in a single device; whereas Thor can only produce one. So it might not come down to a question of who is bigger and badder (though I would still argue Thor wins out every time), it might also be about which device is right for the job.

So why on earth would you still use the Matrix? Because sometimes you don’t need all the power of Thor. Because you might want to create a lot of pattern variations with minimal fuss. Because sometimes it’s healthy to work within a device with set limitations. And most of all, because knowing one will help you learn about using the other. The Matrix is a great place to start. And it’s a wonderful stepping stone to understanding the Thor Sequencer. If Thor seems too intimidating, start with the Matrix and learn it inside out, You’ll be more than halfway to understanding what goes into Thor’s own Step Sequencer. It’s like learning the Subtractor synth before you jump into the Thor synth. And it can be a great creative way to learn how to use it in depth.

Please feel free to provide any comments or insights you might have about the Matrix, Thor, or anything else Reason-related. Stay with me until the next part in this series where I take you further down the Matrix rabbit hole.

45 – RPG-8 Arpeggio Fun (Pt.3)

And now for the third and final installment of my series which explores the RPG-8 in depth. In this tutorial, I’m going to go a little deeper and explore the CV and Pattern possibilities, using the Arpeggiator for some versatile sound control techniques.

And now for the third and final installment of my series which explores the RPG-8 in depth. In this tutorial, I’m going to go a little deeper and explore the CV and Pattern possibilities, using the Arpeggiator for some versatile sound control techniques. So let’s get started.

You can download the project files here: advanced-arp-setups. There is one .RNS file which contains the 3 setups discussed below. In addition, the 3 separate Combinators are included. The whole thing is in a zip file. Open them up to follow along with the ideas below.

The RPG-8 CV Inputs

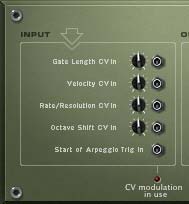
The 5 CV inputs on the back of the RPG-8 Monophonic Arpeggiator
The 5 CV inputs on the back of the Arpeggiator

Before jumping into the setups, it’s important to know some of the more advanced CV options that are available on the back of the RPG-8 device. These include the following 5 CV inputs:

  1. Gate Length CV In
  2. Velocity CV In
  3. Rate / Resolution CV In
  4. Octave Shift CV In
  5. Start of Arpeggio Trig In

Note that if you use any of these CV connections, the changes that they affect on your Arpeggio will not be reflected if you “Copy Arpeggio Notes to Track.” In other words, if you see the blinking light at the bottom of the CV connections on the back, AND you copy your arpeggio notes to track, the notes will not sound as intended (or with any CV input changes). But as I said in the first part of this series, there’s really very little need for you to copy the notes to track in the first place. Instead, keep any RPG-8 devices included in the .RNS file. This way, you’ll never come up against this problem.

Note: When using the CV inputs, the incoming CV is merged together with the setting on the front panel. For example, if your Gate Length is set to 40, and a CV value of +10 is sent to the Gate Length CV Input, then the resulting Gate Length will be 50. Same goes for the first 4 CV inputs. “Start of Arpeggio Trig In” is either in an “on” or “off” state, and therefore, this rule doesn’t apply.

If you look at how this graphs to the front of the RPG-8, you can make the following connections, which should help you to visualize what part of the RPG-8 is being controlled via CV:

The front of the RPG-8 highlighting which parameters can be modulated via CV input (on the back).

If you think about this for a moment, it takes a little to wrap your head around the concept. You are using CV to control a device, which in turn controls another device. That’s the gist of it. So armed with this knowledge, here are a few Arpeggiator setups to showcase some advanced Arpeggiator setups. Bear in mind there are probably a million and one ways to set things up. This is simply just a little taste of what can be done.

Note: For the following setups, you should add a simple chord that runs the length of 4-8 bars in a clip on the Combinator’s sequencer track. Then set the Left / Right locators at the start/end of the clip. In the transport bar, click the “Loop” button  so that the clip loops over and over (see the project download .RNS file for reference).  This ensures you can hear the effect of the Arpeggiator (s) as you play around with the settings.

Using 2 Arpeggiators to Control a Single Sound Source

This is a great way to get familiar with using both the CV input connections, as well as the Pattern section. First, let’s look at the video, and then I’ll briefly outline the setup.

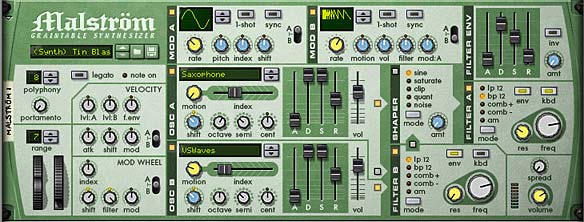
In this setup, you create a Combinator with a 6:2 line mixer. Then create a Malstrom. Set up a basic sound, as shown below. Then add an RPG-8 device underneath the Malstrom. It will automatically be routed to the Malstrom’s Note / Gate CV inputs.

The front of the Malstrom Panel, with the sound I've chosen to showcase this Arp setup

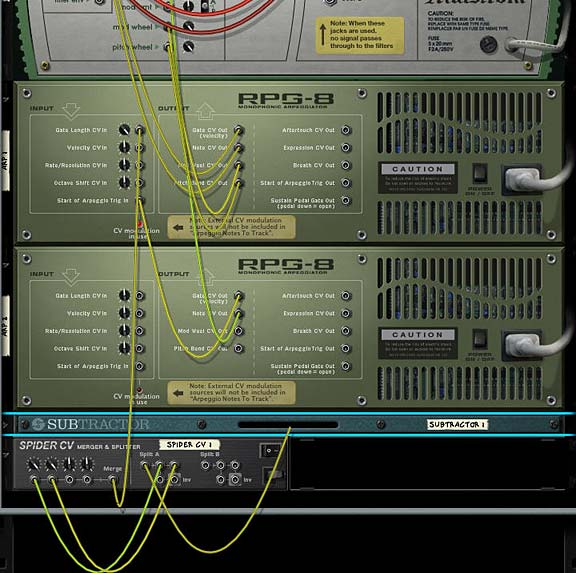
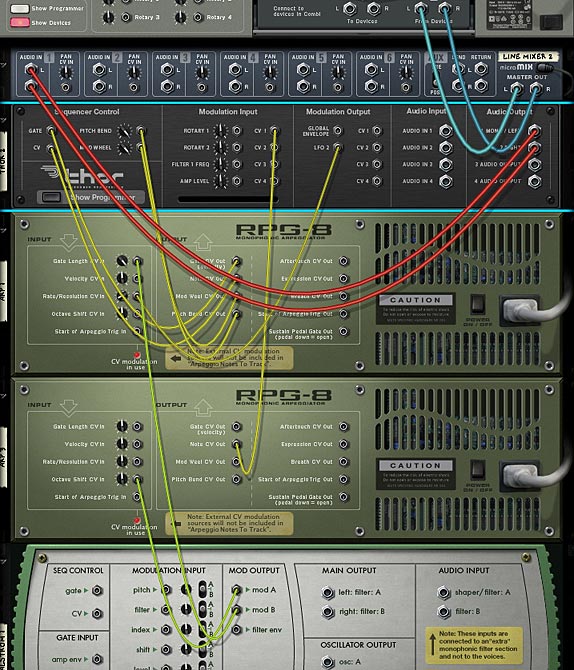
Now create another RPG-8 underneath the first. Flip it around and route the Note CV output into the “Shift” CV input on the Malstrom. Send the Gate CV output of the second RPG-8 into the “Start of Arpeggio Trig In” on the first RPG-8.  The note is now controlling the “Shift” parameter of the Malstrom’s sound. And the Gate is now controlling when the first Arpeggiator is going to start triggering (or rather, retriggering).

On the second RPG-8, press the “Pattern” button. Enter in a new pattern by skipping over a few steps (clicking the pattern step lights just above the Pattern window).

Now test it out by playing it. Notice that the notes played in the second RPG-8 determine how high or low the “Shift” parameter goes, and the “Gate” of the second RPG-8 determines the Starting of the first RPG-8 (retriggering). Since you entered a pattern on the second RPG-8, this pattern will determine when and which notes will be sent from the second RPG-8 to the first (as well as to the Malstrom).

The main CV routings on the back of the rack. Note the Subtractor's LFO1 is going into the Spider A Splitter.

The real fun comes when you start applying various modulations to the Combinator Rotaries and buttons. For example, try setting the “Pattern” of the second RPG-8 as the source for Rotary 1. Now you have a real-time pattern switcher. That’s just one example.

Controlling and Controlled by a Single Sound Source

In this setup, we’ll use Thor to both Control the Arpeggiator, which in turn is used to control the note/gate of the Thor sound source. It’s kind of cannibalistic because you’re using parameters on Thor to control a device which in turn is controlling itself. But you can get some really nice results this way. Here’s how it operates:

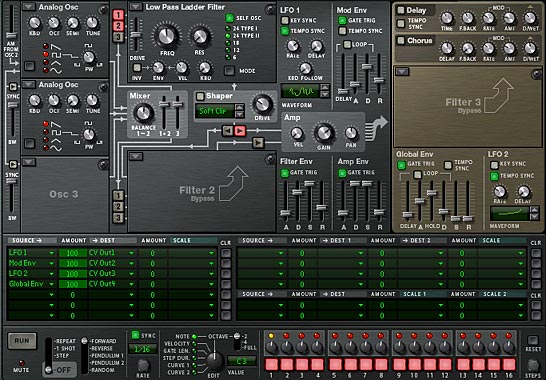
The first thing to do is create a Combinator with a 6:2 line mixer. Then create a Thor and RPG-8 device in that sequence. Everything will be auto-routed. Add in your favorite Thor patch. After this is done, create 4 CV parameters in Thor’s Modulation Bus Routing Section (MBRS) as follows:

LFO 1 : 100 > CV Out1

Mod Env : 100 > CV Out2

LFO 2 : 100 > CV Out3

Global Env : 100 > CV Out4

The front of the rack showing the Thor settings and MBRS routings.

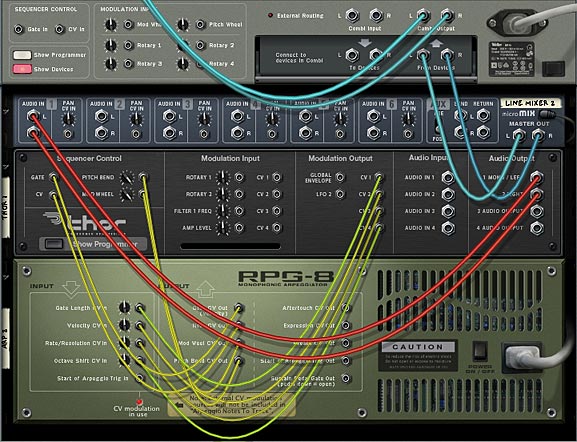
In this way, Thor has four modulations that can be applied to all four CV inputs on the back of the Arpeggiator. Next, flip the rack around and lead each CV Modulation Output to the four CV inputs in the RPG-8, respectively. From there, it’s just a matter of tweaking the settings for the front panel Thor modulations, as well as the front of the RPG-8 parameters and the trim trim pots on the back of the RPG-8 (Remember that the RPG-8 CV Inputs merge the incoming signal with the front panel parameter settings, so you have to strike the right balance between the CV input trim knobs and the front panel equivalents). All three of these things (Thor modulations, RPG-8 CV input trim knobs, and RPG-8 front panel settings) determine the final sound of the Arpeggio coming out of Thor.

The back of the rack showing the Thor modulating the RPG-8, which in turn is creating Arpeggios for Thor

Bringing Multiple CV Sources together with the RPG-8

In this type of setup, I’ll use the Waveforms in a Malstrom to affect parameters in an RPG-8, and in turn use 2 RPG-8 Arpeggiators to affect a Thor sound source.

In this setup, create a Combinator with a 6:2 Line Mixer. Then create a Thor device, and RPG-8 device under that. This RPG-8 will auto-route to the Thor device. Then create another RPG-8 underneath that, and finally, holding the shift key down, create a Malstrom device under the bottom RPG-8. Make the following additional CV connections at the back of the rack:

Thor LFO 2 Output > RPG-8 1 Rate/Resolution CV Input (Trim Knob = 12)

RPG-8 2 Note CV Output > Thor’s CV 1 Modulation Input (Thor’s front MBRS panel should be “CV In1 : 100 > Osc2 Pos”)

Malstrom Mod A Output > RPG-8 2 Octave Shift CV Input (Trim Knob = 64)

Malstrom Mod B Output > RPG-8 1 Gate Length CV Input (Trim Knob = 127)

The CV routings at the back of the rack

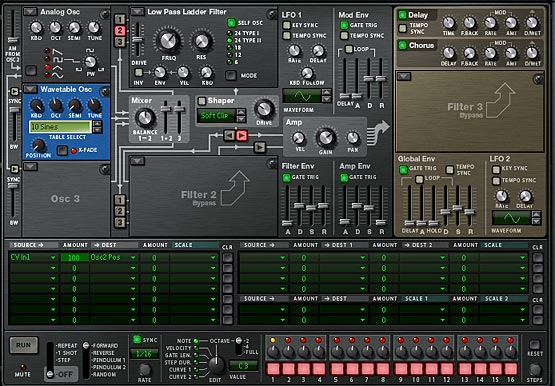
The front of the Thor device has an Analog Oscillator in the first slot and a Wavetable in the second slot, both going through a low pass ladder filter in Filter Slot 1. See below for the settings:

The settings on Thor's front panel.

Once this is done, set up the Malstrom to use both curves. The Curves should be set as follows:

Mod A:  Curve #3 (square wave) set to sync with a rate of 5/4

Mod B: Curve #2 (double saw wave) set to sync with a rate of 1/4

The following shows the settings:

The Malstrom Mod A and Mod B curves used to Modulate the Arpeggio

Now take a listen to what you’ve created. As in the previous examples, let the sound loop as you make any final settings to the Curve/Rates in the Malstrom, CV trim knobs on the back of the RPG-8 devices, and Arpeggiator settings on the front of the Arp devices. Remember, what I’m providing here are just a few examples of what can be done. There’s so much more you can explore on your own. So take it as a template and come up with your own designs.

Where do you go from here?

Anywhere quite frankly. Another thought I had, which I haven’t tried yet, is to try using the Arpeggiator to control the parameters of the Thor Step Sequencer. I haven’t tried it yet or worked on anything in that respect, but I think you could definitely find innovative uses like this.

I think, when it comes to the RPG-8, there are several interesting possibilities. Just always keep in mind the notes on the sequencer need to be on the Arpeggiator track. This one tip is the one that most pops up when people are trying to figure out how to use the device. So place clips either on the Arpeggiator track, or if the Arpeggiator is inside a Combinator, place the clips on the Combinator and ensure the RPG-8 is “receiving” notes in the Combinator’s Modulation section (it does by default).

So there you have it. A few different approaches to using the RPG-8 Monophonic Arpeggiator in Reason 4 or 5. As you can see, there’s a lot of flexibility to the device. Even those who claim to be purists; drawing in their notes by hand in the sequencer or playing them out on a keyboard controller should be encouraged to take a look at this versatile device. It’s not just for arpeggiating notes you know. Like Thor, there’s a lot under the hood of this device that may go unnoticed, even by professionals. I just hope this encourages them to take another look at one of my favorite Reason devices. Until next, time, thanks for reading and watching, and please leave a comment if you like what you see or you have any questions.

40 – Thor Oscillator Wave Mods

In this tutorial I’m going to jump into Thor’s oscillators and show you how a simple method to cycle through the oscillator’s waves (Carriers, Modulators, Phase Mod Waves) can create lots of unexpected outcomes (a la Glitch). It can also allow you to modulate the Oscillators in a way you might not have thought about previously.

In this tutorial I’m going to jump into Thor’s oscillators and show you how a simple method to cycle through the oscillator’s waves (Carriers, Modulators, Phase Mod Waves) can create lots of unexpected outcomes (a la Glitch). It can also allow you to modulate the Oscillators in a way you might not have thought about previously. So let’s jump right in.

The project files can be downloaded here: Glitch-Oscillatoriffic. This zip file contains a single RNS file with 2 different Combinators. You can use the mute buttons on the main mixer to highlight each Combinator and play with each one individually.

I also wanted to say thanks to Geoff Wakefield for talking over this idea through an email exchange. Your ideas are great, as is your music Geoff! Keep up the great work. And go check out his music here: http://soundcloud.com/raven-2741.

First, here’s a video that outlines the basic concepts of modulating Thor’s oscillator waves:

Modulating Thor’s “FM Pair” Oscillator’s Carrier and Modulator

The main trick here is to keep all the devices inside a Combinator so that you can use CV to trigger the Rotaries of the Combinator. The Modulation Bus in the Combinator is used to set up the Oscillator’s Carrier and Modulation waves in the FM Pair, so that when CV is cabled into Rotary 1 & 2, the CV triggers a “cycling” through the different waves. This in turn affects the sound coming out of Thor. You then use the Malstrom’s Mod A & Mod B to supply the CV source, which is sent to the Rotary 1 & 2 CV input.

Also in the Modulation Bus of the Combinator, you’re going to set it up so that Rotary 3 and Rotary 4 (sources) are set up to adjust the Malstrom’s Mod A and Mod B (the destination). You can adjust the Min/Max settings to be as wild and crazy (full 0/31) or as tempered as you like (1/3, for example). In this way, you can not only adjust the Carrier / Modulation waves of Thor’s Oscillator with Rotary 1 and 2, but you can also adjust the Modulation Curve settings of the Malstrom’s Mod A and Mod B with Rotary 3 and 4.

Modulating Thor’s “Phase Modulation” Oscillator’s Wave 1 & 2

Now that we have the basic concept down, it’s a snap to transfer this same idea over to the Phase Modulation Wave 1 and Wave 2. Simply switch the Thor oscillator in slot 1 to “Phase Modulation” and then go back into the Combinator Modulation Bus, and change Rotary 1 and Rotary 2 as follows:

Rotary 1 > Osc 1 Phase Modulation Wave 1

Rotary 2 > Osc 1 Phase Modulation Wave 2

Note: the actual Min/Max settings, as shown earlier, can be anything you like, depending how crazy you like things.

Modulating Thor’s “Wavetable” Oscillator’s Tables

Now instead of the Phase Modulation oscillator, switch to the Wavetable Oscillator. Personally, this is my favorite oscillators for this type of technique. The variety and timbre of the sounds make it a really nice glitch mayhem device for the task. In using it though, there’s only 1 parameter we can effect, which is the actual Wavetables themselves. So switch Rotary 1 in the Combinator Modulation Bus as follows:

Rotary 1 > Osc 1 Wavetable Table

Once again, the actual Min/Max settings are up to personal taste.

One Step Further with the Oscillator’s  “Modulation” Parameter

When it comes to any of these oscillators, there is a “Modulation” parameter that you can also control using CV. For example, when using the FM Pair oscillator, you can have CV control the “FM Amount” knob. When using the Phase Modulation oscillator, you can use CV to control the “PM Amount” knob. When using the Wavetable oscillator, you can use CV to control the “Position” knob.

If you want to do this, you can borrow from one of the existing CV cables coming from the Malstrom and split it using a Spider CV Merger/Splitter, then send one split to the original Rotary destination and send another split into Thor’s CV in. Then it’s a matter of going into Thor’s Modulation Bus Routing Section (MBRS) and entering the following:

CV In1 : 100 > Osc1 FM Amt / Osc1 PM Amt / Osc1 Pos

If you set the FM/PM/Pos on Oscillator 1 very low, then using a high Amount (100) in the MBRS makes sense. If, on the other hand, you set the FM/PM/Pos knob very high, using a lower setting (-100) makes more sense. It depends which direction you want the CV to influence the knob (upward or downward).

Now that we’ve done 3 different Oscillators, I’ll leave you to work your magic on Thor’s  “Multi Oscillator” — yes, you can certainly have a lot of fun with that oscillator as well.

Bringing it all Together

If you look in the project file, you’ll see a few Combinators that take this whole idea a step further by creating a 6:2 Mixer in the Combinator, and then creating three sets of devices (each set contains a different Thor Oscillator, 1 Matrix to use the Mod A/B curves, and an Equalizer at the end of the signal chain, which is then sent to the line mixer and back out to the Combinator’s “From Device” input).

Here’s a video that goes through the steps needed to build one such Combinator:

The idea is a simple one. Have a different oscillator in each of the Thors. Set up the amp envelope any way you see fit. I find a high Decay, Sustain, and Release setting works pretty well, but again, you may have a different preference. The Malstrom Modulation Curves are there for you to use to affect the Thor oscillator waves or even the Modulation knob of the oscillator. This is where experimentation comes in.

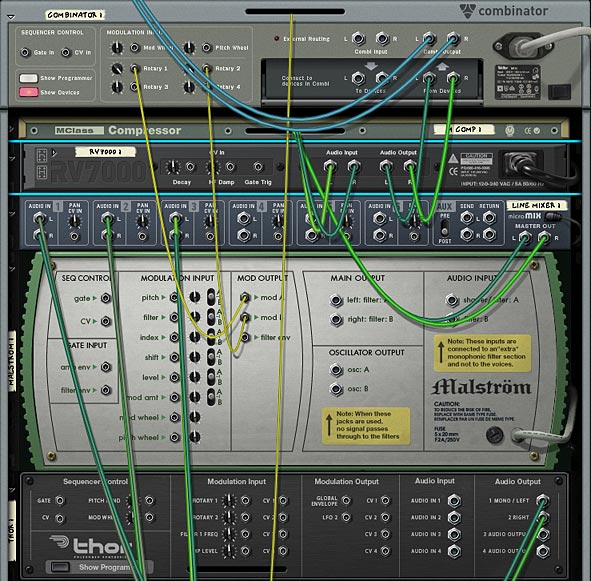
The back of the Rack showing the main components of the Combinator and how the devices are routed.

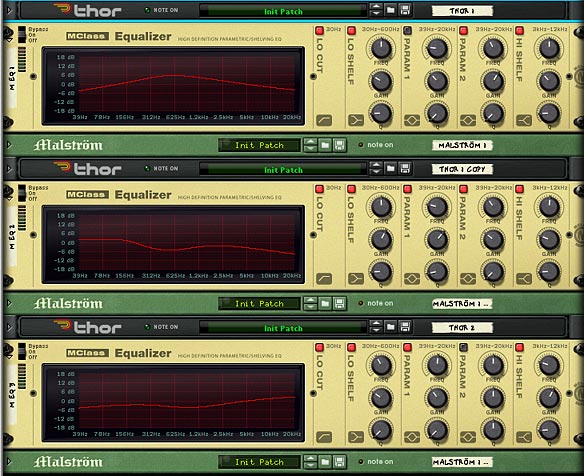
Finally, you have an Equalizer which is applied as a dynamic insert effect used to split each of the Thor sounds into their own specific range along the stereo field. This way, you can set up three oscillators and have each oscillator represent a place along the spectrum: Low, Mid and High. This way, you can balance out the sounds and let them shine in their own frequency range, without interfering with each other. Of course, these are all just suggestions. You might find some other ways to set things up for yourself.

The front of the Combinator, showing all 3 EQ devices to spread out the Oscillator sounds across Low, Mids, and Highs.

I hope this opens up some new creative avenues for you. There’s a lot more that can be done with the Thor oscillators, and this just attempts to scratch the surface or get your feet wet. Don’t be afraid to jump in though, and create your own masterpiece. Oh and if you do, please feel free to share it here. The more we see your ideas, the more we can learn from each other.

34 – Breaking out of Kong

Exploring the Advanced features of Kong, learn how to use Kong’s FX modules on audio from other devices, process your Kong sounds through other Effects units not included in Kong, expand your Drum processing abilities by parallel drum processing or processing each drum module individually.

In this tutorial I’m going to explore some of the advanced features of Kong. We’ll learn how to use Kong’s FX modules on audio from other devices, process your Kong sounds through other Effects units not included in Kong, expand your drum processing abilities by parallel drum processing, and process each drum module individually.

Break Out / Break In

The first foray into exploring some outside routing came from an email request I got. The person who emailed me wanted to know how the first tip from “Music Radar’s Top 10 Essential Reason 5 Tips” worked. The tip went like this:

“One of Kong’s best features is its powerful level-setting system, but another key point is its connectivity. Instead of mixing internally within Kong, try routing the pads out through a 14:2 Mixer and then back into Kong via the Break-in connections. This enables you to set levels and EQ with the mixer, and still use the powerful master output FX. Save your construction as a Combinator for future use.”

Well, here’s how it works. The basic idea is that the Break-out jacks on the back of Kong act as an additional way to insert Effect devices between the FX2 and Bus FX modules in the signal flow. The flow works something like this:

Drum Module > FX1 > FX2 > [Your Insert FX here / Break-out & Break-in jacks] > Bus FX > Master FX > Main Output

That’s essentially the signal flow. Keep in mind though, that if your Drum output is set to “Master FX” which is the default, or any of the output jacks (3-4, for example), you will need to use the Bus FX Send knob on the drum panel on the front of Kong to adjust the level of the external effects devices. Also note that the external effects devices are global. You can use them as an insert for all the drum modules inside Kong. If you don’t want them used on a specific drum, then just keep the Bus FX Send for that specific drum at it’s zero (0) default.

I know this sounds a little complex, so I put together this video to show you an example:

Parallel Drum Processing, Kong Style

Here’s an interesting way to create Parallel processing on your kick via Kong. And it’s stupid-easy!

Parallel processing is when you use the same drum sound both wet and dry at the same time. You can tune the amount of each, but both together add up to a beefier sound. Again, the idea is to trigger both a processed and unprocessed drum sound at once and then mix both together to create a punchier beefier kick. So here’s the easy way to do it in Kong. Note that we’ll do it inside a Combinator so you can save the patch for later use.

  1. First, Create a Combinator and inside create a 14:2 Line Mixer (we’ll do this to have access to the Mixer’s EQ, otherwise you can create a 6:2 mixer instead, that’s totally up to you). Then create a Kong.
  2. Open up Kong and add a Physical Bass Drum into drum module 1. Set the drum output to the 3/4 stereo pair. Add a Parametric EQ device into the Bus FX slot and a Compressor into the Master FX slot.
  3. Flip the rack around and send a pair of audio cables from the 3 / 4 Audio outputs on the back of Kong into the second channel of the 14:2 Mixer.
  4. Now comes the fun part. Flip back to the front. Turn up the Drum’s Bus FX send to about 100, and start playing the Drum Pad. As you play, adjust the EQ and Compressor to taste. You’ll hear the effect it has on the sound.

The reason this works is because you are sending the same drum sound two different places. The unprocessed sound is going straight through ouput 3/4 (and into channel 2 on the Mixer), while the processed sound is running through the Bus FX and Master FX and back out the main outputs into channel 1 of the 14:2 Mixer. Both are playing at once. Instant parallel sound.

If you want to ease back on the level of processed sound (ie: the sound going through the EQ and Compressor), simply reduce the Bus FX send knob. If you want to adjust the level of dry sound, use the Channel 2 Level fader. You can also turn on the EQ and adjust the EQ parameters directly on the 14:2 Mixer. This setup provides loads of options.

7 Drums to 7 Channels: Hooking up each Drum Module Separately

And now for something completely different. I’ve heard many people ask how they can send their drum pads to individual channels in the mixer. The easy answer is to send each drum module through the different outputs available on the back of Kong; 7 stereo pairs in all.

In actuality, if you count the Master FX, Bus FX, and Direct output, you have 10 in total. But for our purposes here, let’s focus on sending 7 drum pads out to 7 different channels in the Mixer. In this way, all the drums operate exactly the same in terms of signal path and it’s the easiest to work with when you’re first starting out.

To set this up, first create a Combinator as we did earlier (so we can save this as a template for use later). In the Combinator create a 14:2 Mixer and holding the shift key down, create a Kong device.

On Kong, click the Show Drum and FX button. Then load up 7 drums in the first 7 drum module slots. These can be any drum modules you like, and they can have any associated FX inserted into the FX1 and FX2 slots.

At the bottom right of the drum module select the appropriate outputs as follows:

Drum Module 1 > Output 3 – 4

Drum Module 2 > Output 5 – 6

Drum Module 3 > Output 7 – 8

Drum Module 4 > Output 9 – 10

Drum Module 5 > Output 11 – 12

Drum Module 6 > Output 13 – 14

Drum Module 7 > Output 15 – 16

Flip the rack around to the back, and route each of the above audio outputs to their own Left/Right channels in the 14:2 Mixer (7 channels in total).

That’s all there is to it. Now, you can control each of the drums via the Mixer channels. This means that you can control the Level, EQ, Panning, etc. from the Mixer channel strip. This also opens you up to using 4 different sends on the drums via the Mixer sends if you like (if you did everything through Kong, you’d have access to only 2 sends via the Aux 1 and Aux 2 cables on the back of Kong).

One caveat. In this type of setup, you can control the Level of the individual drums via the Drum Level knob on each drum panel, if you so choose. So don’t get confused. Essentially, this means you have three junctures at which to control each of the drum levels: The Drum Module’s Level knob, the Drum panel Level knob, and the Mixer Channel Level fader. It’s important to know the proper signal chain between all these various levels. It goes exactly in that order:

Drum Module Level > Drum Panel Level > Mixer Channel Fader > Mixer Master Fader

Since there is nothing routed from the main output of Kong, Kong’s Master Level isn’t even utilized (put another way, it’s useless and does nothing in this setup).

Processing Audio Through Kong

Finally, here’s how you can process your audio through Kong. It’s drop-dead simple, and you can process Any audio from any device (and from any audio track if you have Record) through any number of Kong FX devices. Watch the video to find out how it’s done.


So that’s it. A few advanced ideas for breaking outside Kong and using the device for more than just drum processing. I’m sure there’s many others. But these are the ones that came to my mind. What’s your favorite idea or feature of Kong? Drop me a line or comment on this post and let’s see just how far we can push Kong.

33 – One Rotary, 64 Patterns

This is a problem that plagued me for a long time but with Thor, I found a very easy workaround. The idea is simple. I wanted to gain access to more than 32 patterns with a single Rotary on a Combinator. For the longest time I couldn’t figure out how to do it. Then it hit me like a ton of bricks and I had one of those “of course!” moments. I mean come on. Doesn’t everyone feel limited with only 32 patterns accessible from a Combinator rotary? How about 64 patterns?

Let’s take a breather from all the Reason 5 action. Since many people are still on Reason 4, let’s do something that everyone in 4 & 5 can do together. This is a problem that plagued me for a long time but with Thor, I found a very easy workaround. The idea is simple. I wanted to gain access to more than 32 patterns with a single Rotary on a Combinator. For the longest time I couldn’t figure out how to do it. Then it hit me like a ton of bricks and I had one of those “of course!” moments. I mean come on. Doesn’t everyone feel limited with only 32 patterns accessible from a Combinator rotary? How about if I showed you how to double the amount of patterns you could access. Would that be worth 10 minutes of your time?

Here is the project file for this tutorial: 64-patterns. It contains an .rns file (it was created in Reason 5, so I’m not sure if those with Reason 4 can open it or not. If not, let me know and I can create the same file in R4 for you). In the rns file there are two Combinator ideas. One that contains 64-pattern switching, and the other contains 128-pattern switching. Note that I have not populated all the matrixes with fully loaded patterns. Instead there is a single pattern on A1 for all the Matrixes. This way I was able to test switching from one matrix to another. It’s up to you to load the Matrixes with your own patterns, random or otherwise. Both Combinators are connected to the same mixer, so you will need to mute one channel to hear the outcome of the other and vice-versa. Have fun with these!

So let’s get down to business. . .

So why would you ever want to do this. Well, it gets me closer to what I would like to see out of Reason: a way to create truly generative music, where you can press a button and set sail a sea of sound that is ever-changing. Great if you want to have some Pad or Ambient sounds drift on in the background, ever changing and always new and interesting. You could also incorporate this into your glitch effects as a controlling device to provide an endless range of chaotic buzzes, blips and shazams. How you use it is really up to your own creativity. But at least with 64 (and even 128) different patterns, you can create a pretty long string of variety that, if played through from start to finish, no human could discern the repetition (think of it this way: at 120 BPM, a normal 4/4 bar with 64 patterns shifting at every 4 bars would last 8.5 minutes before any repetition occurs. In the case of 128 patterns, you could end up with an ever-changing pattern lasting 17 minutes long without any repetition.

Yes, it’s a little spastic and insane, but it can definitely prove interesting, even as nothing more than a creative experiment. So let’s take a look at how you can create 64 patterns on one Combinator rotary knob.

  1. First, create a Combinator and inside create a 6:2 line mixer. Then, holding the Shift key down to force Reason not to autoroute the devices, create a sound source (let’s take a Subtractor so that we can differentiate from the Thor device which we’ll use as a CV switcher). Also create 2 Spider CV Mergers/Splitters, a Thor, and one Matrix pattern sequencer.
  2. Load up the Matrix sequencer with 32 patterns, then duplicate the matrix so that you have another copy with the same 32 patterns. At this point, change the patterns on the second matrix so that you have a new set of 32 unique patterns in the second matrix.

    You may want to temporarily tie the matrix to a sound source device so that you can audition the patterns and how they sound. You may alternately want random patterns, in which case you can select the Matrix device and press Ctrl+R in order to randomize a pattern into a pattern bank. Go to the next pattern (A2) and do the same. And so on, until you have all 32 pattern banks filled.

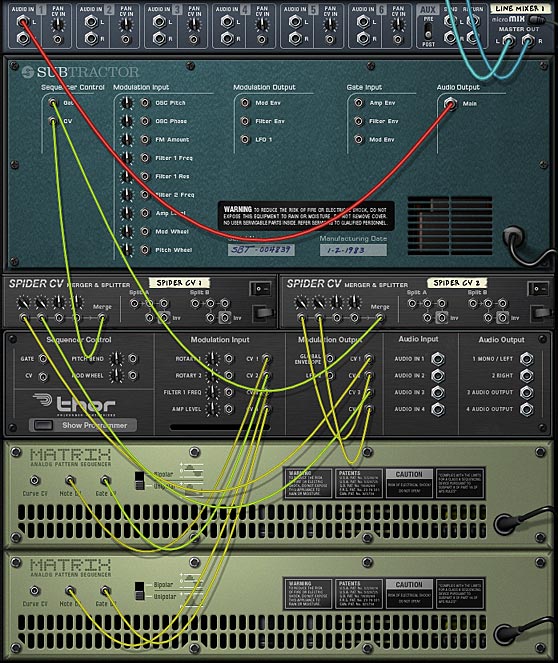
  3. Next, flip the rack around and start making connections. Send the Audio output of the Subtractor to the Audio Input of channel 1 on the Line Mixer. Send the Note CV output of Matrix 1 to the CV 1 input on the Thor. Send the Gate ouput of Matrix 1 to the CV 2 input on Thor. Then send the Note CV output of Matrix 2 to the CV 3 input on the Thor. Send the Gate ouput of Matrix 2 to the CV 4 input on Thor.
  4. Send CV 1 & CV3 outputs from Thor into the Merge input 1 & 2 on the first Spider. Then CV 2 & CV4 outputs from Thor into the Merge input 1 & 2 on the second Spider.
  5. Send the merge output from Spider 1 to the CV input on the Subtractor, and merge output from Spider 2 to the Gate input on the Subtractor. Also, turn the trim knobs on all the CV merge inputs that are occupied fully right (set to 127). If you don’t do this, you won’t get what you expect when you start playing the patterns.

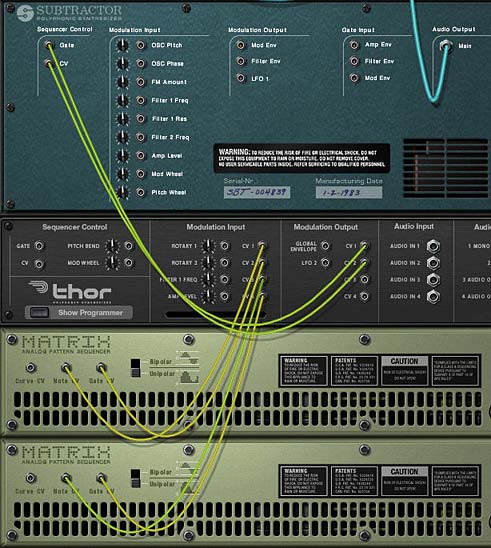
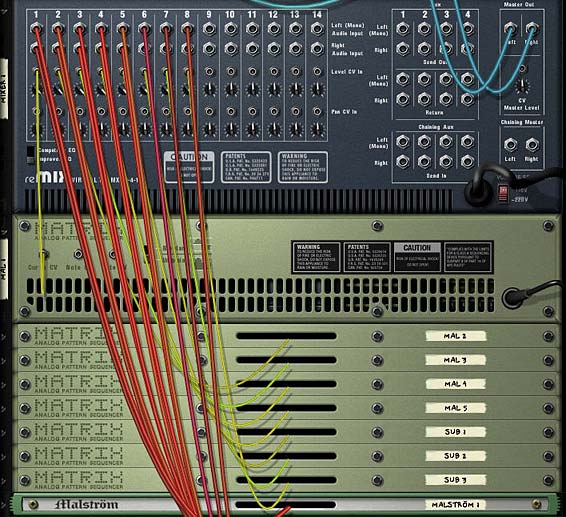
    The CV and audio routings on the back of the rack
    The CV and audio routings on the back of the rack
  6. Now that everything is routed, we need to tell Thor what do do with all that CV stuff. So flip the rack around to the front again, and click the “Show Programmer button on Thor.

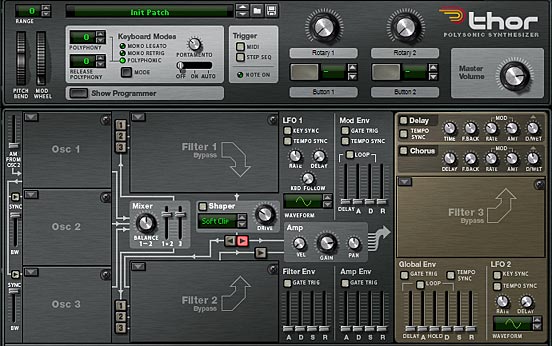
    Note: Since the Thor device is only used for CV purposes, you can remove all of Thor’s audio settings (bypass the Oscillator and Filter, turn off all the envelopes, etc.). Alternately, you can open up the Combinator Programming panel and deselect the “Receive Notes” checkbox for the Thor device. Either way will work.

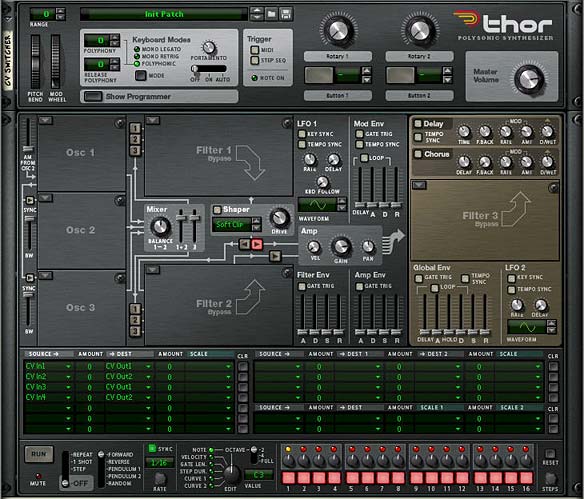
    A completely initialized Thor device
    A completely initialized Thor device
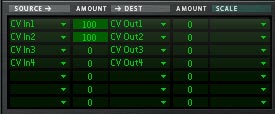
  7. Once the Thor programmer is open, enter the following in the Modulation Bus Routing System (MBRS):

    CV In1: 0 > CV Out1

    CV In2: 0 > CV Out2

    CV In3: 0 > CV Out3

    CV In4: 0 > CV Out4

    The Modulation Bus Routing Section (MBRS) in the Thor device
    The Modulation Bus Routing Section (MBRS) in the Thor device
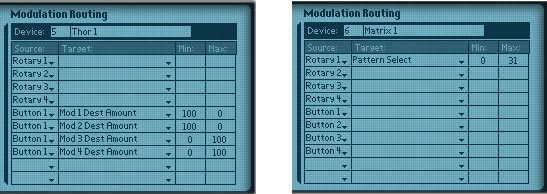
  8. Now let’s do a little programming in the Combinator. Open up the Programmer panel for the Combinator. Select the Thor device and enter the following:

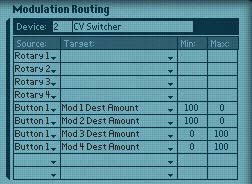
    Button 1 > Mod 1 Dest Amount: 100 / 0

    Button 1 > Mod 2 Dest Amount: 100 / 0

    Button 1 > Mod 3 Dest Amount: 0 / 100

    Button 1 > Mod 4 Dest Amount: 0 / 100

    Then select each matrix and tie them both to Rotary 1 as follows:

    Rotary 1> Pattern Select: 0 / 31

    The Modulation Bus of the Combinator: Thor settings on the left and the Matrix settings on the right.
    The Modulation Bus of the Combinator: Thor settings on the left and the Matrix settings on the right.

Press button 1 twice to initialize it (turn it on and off). Also turn Rotary 1 in order to initialize it. Now when you play the sound source, moving Rotary 1 around will select pattern 1 – 32 on Matrix 1. When you press Button 1, the Rotary switches to Matrix 2 and you’ll be hearing pattern 1-32 on Matrix 2. This switch is instantaneous simply because both Matrix patterns are running at the same time. Thor and the Spiders are used to switch from one matrix to the other on-the-fly. It’s really that simple.

And now let’s go for broke!

Awesome. We have 64 patterns. Let’s go for broke. Let’s create 128 patterns! Because you can never have enough patterns. In this case, you essentially have to duplicate what you did for the previous section, and create a second set of 64 patterns on Rotary 2 / Button 2 in your Combinator. Once you’ve created those, and routed them up and programmed them (Tip: duplicate all your devices, that way you don’t have to reprogram the Thor again, and instead just need to set up the routings).

Once that’s done, you’ll need to create yet one more Thor and 2 Spider Mergers/Splitters. This time, you’re going to take the merged output from the two spiders hooked up to Thor #1 and the merged output from the two spiders hooked up to Thor #2, and send them through the third Thor. The CV outs from Thor will then go into the 2 Spider Mergers/Splitters you just set up (on the merged side), and then the merged output from both will go into the CV / Gate inputs on the sound source device (in this case, the Subtractor).

Now the only thing left to do is to program the Combinator. Open up the Programmer, select Thor #3, and again enter the following:

Button 3 > Mod 1 Dest Amount: 100 / 0

Button 3 > Mod 2 Dest Amount: 100 / 0

Button 3 > Mod 3 Dest Amount: 0 / 100

Button 3 > Mod 4 Dest Amount: 0 / 100

Matrix 1 & 2 will need to have their “Pattern Select” both tied to Rotary 1, while Matrixes 3 & 4 will need to have their “Pattern Select” both tied to Rotary 2.

This way, Rotary 1 controls which pattern is selected on Matrix 1 & 2 (64 patterns in total), and Rotary 2 controls which pattern is selected on Matrix 3 & 4 (64 additional patterns). Button 3 acts as a toggle switch between the two sets of Matrixes (Matrixes 1 & 2 on Rotary 1, and Matrixes 3 & 4 on Rotary 2). Phew. That’s it. You’re all set to play with the Rotaries/Buttons to switch between 128 unique patterns programmed into 4 Matrixes. If that’s not enough patterns, then even Reason can’t help you out.

I know this might get a little confusing for some of you. It was confusing to set up the first few times. But if you run into trouble, just download the project files up at the beginning of this tutorial. There’s a fully-functional 128-pattern switcher Combinator in there. Good luck!


So as far as practical applications, if you really need 64 or 128 unique patterns affecting the same sound source, you can do it all within a Combinator. With a little routing ingenuity you could probably access the Redrum patterns in much the same way and extend your creativity further. How’s that for an idea? Do you have any comments or questions? please jump in and post them here. Until next time, happy reasoning!

25 – No-Nonsense Tips (Part 2)

In this second part, I’m going to provide even more quick tips that can be used as food for thought while you develop your tracks. These aren’t earth-shattering or advanced. They are just some easy tips to help out with some problems you might have or tips that show you a few capabilities you may have missed.

In this second part, I’m going to provide even more quick tips that can be used as food for thought while you develop your tracks. These aren’t earth-shattering or advanced. They are just some easy tips to help out with some problems you might have or tips that show you a few capabilities you may have missed. So let’s jump in.

Tip #1: Did you know this could be Automated? I didn’t.

This is probably the simplest of tips. While I learned about a year ago that you can assign the Destination and Scale Amount parameters from Thor’s Modulation Bus Routing System (MBRS) to a rotary on a Combinator, I completely neglected to realize that you can indeed automate any of the “Amount” parameters directly in Thor. So for example, if you setup a Vibrato in Thor, it would look something like this:

LFO2: 25 > Osc1 Pitch: 100 > ModWheel (Read Thor’s back panel — this is your basic Vibrato).

Great, but now, let’s automate that LFO2 amount so that the vibrato increases or decreases the pitch over time. Easy as easy can be. Simply right-click over the amount parameter on the front of Thor in the MBRS and select “Edit Automation.” Now you can automate the amount directly in the Sequencer. Pretty cool right?

The Amount settings in Thor's MBRS can also be automated

Tip #2: Stealing unused CV from devices that are already there.

This is a great tip, and it’s one I use all the time. Let’s say you have most of the sound sources set up in your track. Now you want to modulate and automate parameters. Instead of creating new devices like the Subtractor, Malstrom, Matrix, etc. to modulate those destinations, why not steal modulation sources from the devices that are already in your track. This saves on CPU, and it means you ultimately have a less cluttered rack with less devices. The only thing you need to be careful about is making things overly complex, as it can get confusing quickly. But this is another trick I use all the time.

For example, if you have a Thor as one of your devices in your rack, you have access to a multitude of CV sources you can use to modulate other parameters and devices. Here’s just a few:

  • Curve 1 in the Step Sequencer
  • Curve 2 in the Step Sequencer
  • LFO 1
  • LFO 2
  • Mod Envelope
  • Amp Envelope

So if any of these are not currently being tapped for use by the Thor sound itself (and even if they are, you can still use them for other purposes), you can enlist them for CV duty anywhere else in your rack. Simply create the CV connection from the back of Thor to the destination CV input in the other device location. If you are using LFO2 or the Global Envelope outputs, then all you need to do is set up the LFO 2 or Global Envelope parameters on the front of Thor and you’re done. If you are using LFO 1 or the Amp envelope, you’ll have to set these up using the CV outputs on the back of Thor, and then setting them up in the MBRS. If using the Curves in the Step Sequencer, you can route the CV from the Curve CV outputs on the back of Thor.

You literally have an amazing supply of CV modulation sources all from one Thor device. So much so, that this may be all you need. You might not need to use the LFO from another Subtractor or the Mod A and B from a Malstrom, and you may not need to add a bunch of Matrix units. With Thor, you can keep everything contained in one location. And chances are that you probably already have a Thor unit in your track already. So save yourself some CPU. That reminds me to put together a tutorial on all the CV possibilities of Thor. hmmm. Perhaps in a tutorial down the road. More to come on this. . .

Tip #3: Add a Scream to shape your sound.

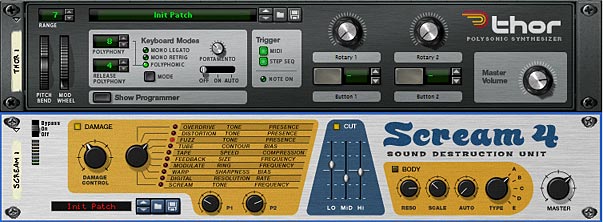
I have to say that this came out of watching Hydlide run through some videos about my latest refill. He had a really solid idea to turn pretty much any drum sound into a punchier kick sound. But this is also a nice trick to try out variations on your own sound and is kind of like the tip I showed you where we added a unison to give things a wider thicker sound. This time however, let’s add a Scream device after any sound source and just play with the settings until it shapes into a sound you like. Something a little beefier or meatier. And it only takes a minute or so.

The other added benefit to doing this is that you have access to a 3-band EQ using the “Cut” section. While this isn’t as powerful as the M-Class EQ, it does a great job for quickly sculpting the sound. So when you’re in a rut, try out a Unison on those thinner synth sounds, but try out a Scream as well, to sclupt your drum and bass sounds.

The Scream can be inserted anywhere as a great sound sculpting tool

Tip #4: Turn your Combinator buttons into Radio buttons.

This tip came out of a request on the PUF (Propellerhead User Forum) where the original poster wanted to convert the Combinator buttons into Radio buttons. If you don’t know what a Radio button is, it’s ok. You’ve used them everyday in all kinds of software. Here’s a quick rundown: Radio Buttons.

You can download the template for this trick here: radio-buttons. The zip file contains the RNS file (and Combinator) which turns your Combinator buttons into radio buttons. Don’t pay too much attention to the synths at work here. They are just put there at random to highlight the difference in sound when selecting each of the buttons. I didn’t choose them for their stunning sound quality when played together (reset).

Now as all of you know, you can’t change the way the buttons work. They are toggle buttons by design, turning something on or off. So to turn them into a radio button is like taking a two-dimensional object and turning it into a one-dimensional object. It’s going backwards slightly. But there’s a good reason behind it.

To start, you probably want to have the buttons trigger something. In this case, I’ll take something very basic like 4 synths tied to each of the 4 buttons. Pressing one button will trigger its corresponding synth. Pressing another button will trigger the next synth, and so on. So first create a Combinator, and inside create four 6:2 line mixers and four synth devices. And then tie each of the synths to its own line mixer by sending the audio output to channel 1 on each of the four line mixers. Then open up the Combinator programmer, and program the following:

Line Mixer 1:

Rotary 1: Master Level: 100 / 100

Button 1: Master Level: 100 / 100

Button 2: Master Level: 0 / 0

Button 3: Master Level: 0 / 0

Button 4: Master Level: 0 / 0

Line Mixer 2:

Rotary 1: Master Level: 100 / 100

Button 1: Master Level: 0 / 0

Button 2: Master Level: 100 / 100

Button 3: Master Level: 0 / 0

Button 4: Master Level: 0 / 0

Line Mixer 3:

Rotary 1: Master Level: 100 / 100

Button 1: Master Level: 0 / 0

Button 2: Master Level: 0 / 0

Button 3: Master Level: 100 / 100

Button 4: Master Level: 0 / 0

Line Mixer 4:

Rotary 1: Master Level: 100 / 100

Button 1: Master Level: 0 / 0

Button 2: Master Level: 0 / 0

Button 3: Master Level: 0 / 0

Button 4: Master Level: 100 / 100

You’re pretty much done. Now, the buttons act as rotaries. However, you’ll have to disregard the fact that they light up at all. The fact that they are enabled or disabled means nothing. The only thing that means anything is if you switch from one button to the next. Remember our analogy: we’re taking a 2-dimensional object and turning it into a one-dimensional object. There’s no toggling. It’s a straightforward button to button switch.

The front of the Combinator showing the Programmer and the Line Mixers. The Synths are stacked underneath.

Also, Rotary 1 acts as a “Reset” button. Turning this rotary to any location will turn all four attached synths on at the same time. The reason I did this is due to the fact that when you start pressing buttons you will only be able to hear one synth at any given time and there was no way to “go back” to having all of the synths on at once. So I programmed the rotary to do this. As any good programmer knows, you should always provide a way to get back to the default. So this was my “Default” — however, if you don’t need it, you can remove the programming behind Rotary 1 if you really want to.


As always, I hope you enjoyed some of these quick tips. They are definitely fun to figure out and dream up. So keep the questions coming, and share some of your favorite tips with the rest of us. Happy Reasoning!

24 – A few No-Nonsense Tips

In this tutorial I’m going to outline some of my favorite quick tips that you can use when you find yourself in a bit of a bind with Reason. Hopefully these little tips open you up to a new way of thinking with the software, or else at least point you in the right direction if you get stumped.

In this tutorial I’m not going to outline any grandiose Combinator or showcase some majorly complex CV routing scheme (though I have a few interesting ones that I may show down the road). Instead, I’m going to outline just some of my favorite quick tips that you can use when you find yourself in a bit of a bind with Reason. Hopefully these little tips open you up to a new way of thinking with the software, or else at least point you into a direction in case you get stumped.

All of the tips below came out of a need I had to get out of jail with the software. In other words, I’d find myself at a standstill unable to go further because I’d locked myself in a hole. Here’s a few ways I found to get out and escape. I hope you find these tidbits useful.

Tip #1: Unison = Stereo (It’s not just big fat sound).

The first tip came out of a post I’d seen on the PUF (Propellerhead User Forum) entitled “Confessions.” In this post, a few people had stated that they never used the Unison device, and didn’t really understand what it was for. “I think it has something to do with fattening up the sound, but I don’t really use it and don’t really know what it’s for.” Fair enough. Here’s what I think:

Yes, it fattens up the sound. But it does more than that. For instance, take any monophonic sound device; The Subtractor and Thor come to mind. If you start playing either device, you can tell it sounds monophonic. In the case of Thor, you can do some clever things like add some Chorus and Delay. Perhaps in the Subtractor, you’ll add some ring modulation or FM synthesis, detune two oscillators together. But here’s the dilemma: you add a Stereo Imager after the device and nothing happens? Why?

This is because the Stereo Imager only works on Stereo audio, and since you have a device which is monophonic, nothing is going to happen. The simple fix: add a Unison device between the sound source and the Stereo Imager. Instantly, you’ve turned your sound into a Stereo audio pair going into the Stereo Imager, which can now effect the sound as you want (point of fact, it’s more of a faux stereo, but it works).

The unison device is there to “Stereo-ize” your monophonic sound. At the same time, it fattens the sound by creating multiple detuned voices out of the audio you send into it. Good enough!

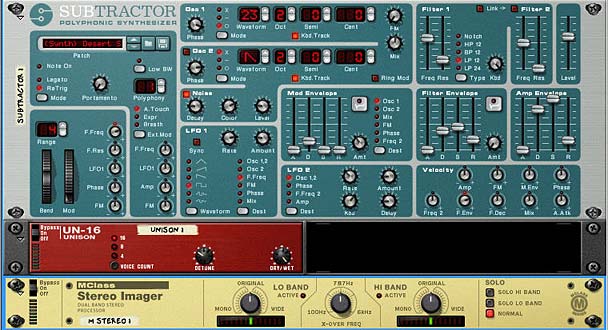
The front of the rack showing the Unison device creating Stereo out of Mono
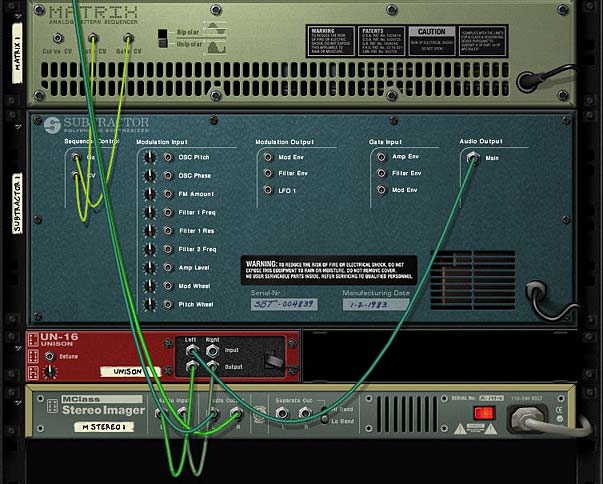
The back of the rack showing the Unison setup

Tip #2: Mixer Pan/Level CV automation is holding me back!

Ever automate the level and/or Pan info on your main mixer in Reason or Record and then realize you can’t alter it at all. For instance, if you send a Subtractor LFO to fully automate the level of your track, you end up unable to alter or change the level to fade it in or out right? Whatever is playing in a clip in your sequencer will be affected by the LFO as is. No fade ins, no fade outs, no changes along the way. Same goes for panning.

Here’s a simple tip to allow you to have both. And again it involves inserting a device between the sound source and the mixer. In this case, it’s another line mixer. Insert a 6:2 mixer between your main mixer and the sound source. Then flip the rack around and move the audio cables from the sound source into Channel 1 on the 6:2 line mixer. Then send some audio cables from the main output on the line mixer into the previous channel on the main mixer. Now you can flip back to the front again and right-click on the Channel 1 level knob, select “Edit Automation” and enter your fade-ins and fade-outs. You can also adjust your panning on this line mixer as well. This will affect the panning of the sound source before it gets sent into the main mixer where the CV is affecting the panning. In this case, the panning is combined together.

The front of the rack showing the Line Mixer inserted between the audio signal and main mixer.
The back of the rack showing the connections for the audio signal.

There you go. Total control over your mix, even when your mix is being controlled by CV.

Tip #3: While we’re on CV, don’t forget you can automate any CV trim knob on the back of any device

I discussed this tip in full here: #7 – Adjustable CV, but it bears repeating. If you want to control the trim pots for any CV connection (you know, the tiny knobs on the back of your devices into which you send the CV cables), simply insert a Thor device between the CV source and the CV destination. Route the CV into the CV in 1 within Thor, and send it out from CV out 1. Then in the modualtion Bus Routing Section of Thor (MBRS), use CVin1 as a source and CVout1 as a destination. Enter 100 as an Amount, and then use Thor’s Rotary 1 as a Scale (also with an amount of 100). Put everything (source/destination devices as well as the Thor “CV Pass-Through” device) into a Combinator, and program the Combinator’s Rotary 1 to adjust Thor’s Rotary 1.

This means that you’re adjusting the Scale amount value using the Combinator Rotary 1. Essentially, this will have the same effect of adjusting your CV trim pot. Sounds complicated, but it’s really quite simple.

Tip #4: Damn it, there’s no CV connection. But I want to automate it with an LFO!

Enter the Combinator to the rescue. For this trick to work, you have a device which has a parameter you want to affect with an LFO (or any other mod envelope or anything you like) and the device with the LFO which is going to affect it. This couldn’t be easier, but it’s not at first obvious. Here’s what you do:
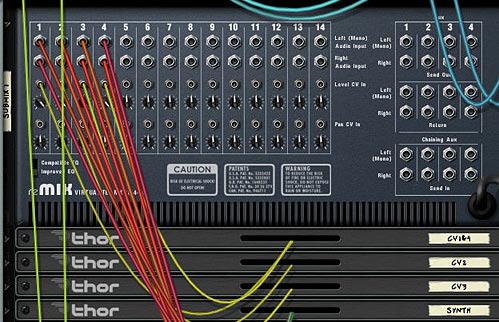
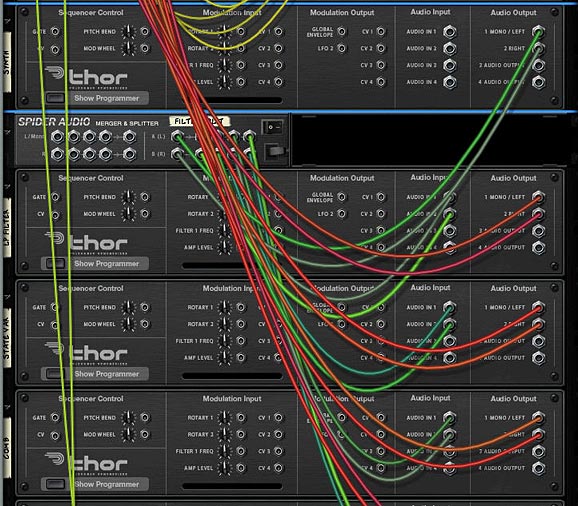
Put both devices in a Combinator. Flip the rack around. Send the CV from the LFO device into the Rotary 1 CV in of the Combinator. Then flip back around to the front, and open up the Combinator programmer. Select the sound device. In the Modulation Matrix, use Rotary 1 as the Source andthe parameter you want affected in the destination device as the “Destination.”

Now, when the LFO is enabled and running, it gets sent along the CV cable and affects Rotary 1 on the Combinator. Rotary 1 on the Combinator in turn is affecting the parameter on your destination device. In other words, the Combinator Rotary 1 is used as a CV pass-through to affect any parameter you like, not just the ones that have CV slots on the back of the devices.

Tip #5: That nasty bypass click.

Not all glitch sounds are good sounds. Such is life when you are dealing with bypass switches in Reason. Sometimes you’ll get this nasty clicking sound when switching from on to bypass or vice versa. Sometimes you’re lucky and you don’t get it. It’s like Russian Roulette audio-style. This is why I never ever use the bypass switch. And also why I never ever automate it. Instead, here’s a few simple ways to get the same benefit without the horrible clicks.

First off, if you’re using a device that has a dry/wet knob, put it in a combinator and tie the dry wet knob to a button or a rotary. There’s your bypass button.

If, on the other hand, you need to get around bypassing an entire Combinator, try this trick. Inside the combinator create a spider and a second line mixer (assuming you already have a line mixer for the main audio). Then split the audio coming into the combinator, and have one split going to the main line mixer and the other going to the second line mixer. Merge the master outputs of both line mixers in the merge section of the spider, and then back out to the Combinator “From Devices” output. Ensure all your FX and Instrument devices go into channels on the main mixer. Leave the second mixer for the dry signal only, and nothing else.

In the Combinator programmer, program a button to switch between the two mixers. So when the button is off, the master level on the main mixer is at 0, while the master level on the secondary mixer is at 100. When the button is on (lit), the master level on the main mixer is at 100, while the master level on the secondary mixer is at 0. The button now acts as a bypass. When off, the signal is bypassed and the audio goes right through the Combinator unaffected. When the button is on, the Contents of the Combinator are enabled and the sound affected can be heard. Instant bypass without any clicking issues.

The back of the rack with the Bypass setup
The front of the rack with the Bypass setup shown on Button 4

Keep in mind there are some things that just can’t be stopped on a dime. For instance, changing the delay time or automating changes to the delay time will result in a very distinct sound, almost like a pitch shifting. You just can’t get around this. That’s the nature of audio. So while bypassing most things works without any side effects, other things can still be noticeable. The idea, however, is to minimize the unwanted audio problems as much as you can.


I hope you found these tips useful. I’ll keep posting more as time permits. In the meantime, feel free to share your thoughts or your own tips here by posting a comment. Happy Reasoning!

20 – CV Switching

Learn how to switch between 2 CV sources that control a single destination. This method can expand the number of patterns you use in a Matrix (from 32 to 64) to control a single destination. It can also allow you to switch between two RPG-8 Arp devices or any two CV sources anywhere in Reason and Record for that matter.

At some point when working with CV, you end up wondering if you can expand beyond the limits. For example, if you have a Matrix loaded with 32 pattern banks, you’re going to wonder if you can push it to 64. If you have an Arp applied to an instrument, you’re going to wonder if you can have two Arps applied to the same instrument. I know that’s what I was wondering a few nights ago. And that’s the subject of this article. How to expand upon CV connections by switching between these CV devices in real-time.

You can download the project files in the following zip file: cv-switching. These project files include 2 Combinators that show you how to switch between two matrixes or two Arps on the fly. Both Combinators are connected to the same mixer, so to hear each one separately, just mute/solo each one and press play on the Transport bar.

Switching between 2 Matrixes

  1. First open up a new document, and first place a 14-2 Mixer at the top (if you are in Record, you won’t need the mixer, because everything gets tied to your BIG mixer).
  2. Now, open up a Combinator and holding Shift down, place a sound source at the top (for example, a Subtractor), a Thor underneath that, and then two Matrixes underneath the Thor.
  3. Next, flip the rack around and let’s route the audio up.  Route the Left Audio output from the Combinator to Channel 1 on the mixer. Then Route the Audio out of the Subtractor to the Left audio In of the Combinator (From Devices).
  4. Now for the CV routings. Route the CV 1 and CV 2 Modulation outputs from the Thor to the Gate and CV Sequencer Control section of the Subtractor, respectively. Take the Note and Gate CV of Matrix “A” and route them to the CV 1 and CV 2 Modulation inputs of the Thor, respectively. Finally, route the Note and Gate CV of Matrix “B” to the CV 3 and CV 4 Modulation inputs of the Thor, respectively.

    Proper CV routings for the Thor and Matrix A & B devices
    Proper CV routings for the Thor and Matrix A & B devices
  5. Flip the rack around. On the Subtractor, select a patch you like, or program in some patch parameters that you want to hear. Alternately, leave the default init patch as it is.
  6. On the Thor, completely initialize the patch by turning Oscillator 1 Off, Bypassing Filter 1, turning off the Mod/Filter/Amp/Global envelopes, and reducing the Range, Polyphony, and Release Polyphony down to zero (0) in the Global section. We’re using Thor purely as a CV switcher between the two Matrixes.
  7. In the Modulation Matrix area of Thor, enter the following:

    CV In1 : 0 > CV Out 1

    CV In2 : 0 > CV Out 2

    CV In3 : 0 > CV Out 1

    CV In4 : 0 > CV Out 2

    A completely initialized thor, with the proper routings in the Modulation Bus Routing Section (MBRS)
    A completely initialized thor, with the proper routings in the Modulation Bus Routing Section (MBRS)
  8. In the Matrix A, fill up all 32 of your pattern banks with random patterns or midi patterns that you want to use to play the Subtractor. Random patterns are just quicker for the purposes of this exercise.
  9. In the Matrix B, do the same. However, note that in the example file I have not loaded any patterns into Matrix B. This is so that you can hear the difference when you swtich between Matrix A and Matrix B. But for practical purposes you’ll want to load up all 32 pattern banks with more patterns with which to play the Subtractor sound source.
  10. In the Combinator’s Programmer, select the Thor device (I call it the CV Switcher) and enter the following settings for the Modulation Routing:

    Button 1 > Mod 1 Dest Amount : 100 / 0

    Button 1 > Mod 2 Dest Amount : 100 / 0

    Button 1 > Mod 3 Dest Amount : 0 / 100

    Button 1 > Mod 4 Dest Amount : 0 / 100

    The Combinator's Modulation Routings for the Thor device (CV Switcher)
    The Combinator's Modulation Routings for the Thor device (CV Switcher)
  11. For the Matrix A and Matrix B devices, enter the following programmer modulation (for both Matrixes):

    Rotary 1 > Pattern Select : 0 / 31

Now, when you press the play button on the Transport, both matrixes will engage, but only one will be used to play the Subtractor, depending on the on/off state of the first button on the Combinator. This first button determines which Matrix is used (if off, Matrix A is used. If on, Matrix B is used). The first Rotary on the Combinator moves through all 32 pattern banks of both Matrixes, thus allowing you access to 64 pattern banks to apply to your Subtractor sound source.

Everything gets switched using the Thor. And the beauty of this type of setup is that you don’t need to worry about Matrix delay problems. Since both Matrixes are always running, and the Thor is used to switch between them, the switching is done completely in real-time with no latency whatsoever.

Ramping it up with an Arp

I won’t go into too much detail about applying this same technique to an Arp. You have the sample file, and you can open this up and see how it’s done. But basically, instead of two Matrixes, you have two Arps that are going through two Thors (one Thor controls the Note / Gate CVs, and the other Thor controls the Pitch/Mod wheel CVs).

One other difference is that you will need a separate Matrix to play the Combinator (ie: the Matrix Note / Gate CV will be sent to the Combinator’s Sequencer Control). This is to ensure something is triggering your sound source, whereas in the previous Matrix example, the matrix units themselves were triggering the sound source.

Alternately, if you don’t want to trigger your sound source via the Matrix, you can set up two sequencer tracks (one for each Arp device) and add your midi note clips there. If you want to switch between both Arps and have them both playing the same part exactly, just duplicate the note clips on both Arp tracks so they are identical. Or have some fun switching up the notes. Experiment with this one.

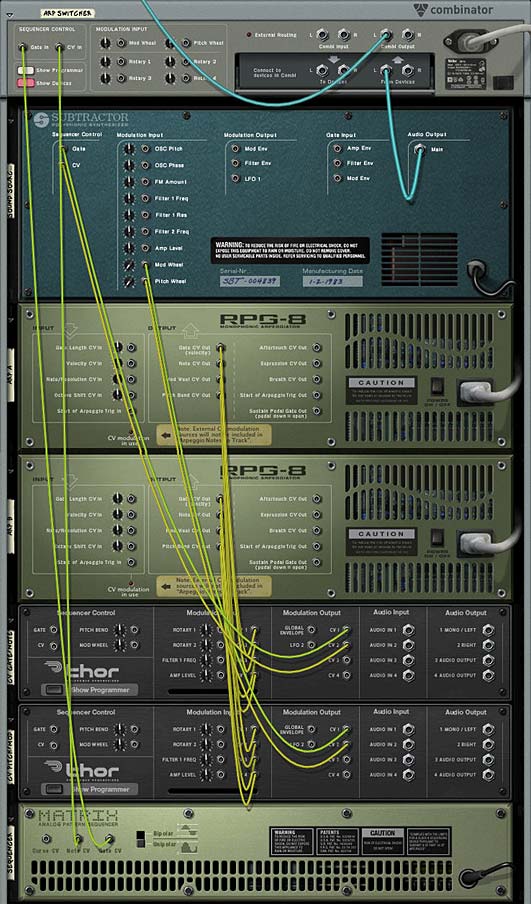
Proper routings on the back of the rack for the Arp Switcher Combinator

Where do I go from here?

Using this method you can switch between any two CV sources going to the same destination CV input. So let your mind wander and try it out using a Scream or RV7000 or any filter envelope. Anywhere you use CV, this method hopefully inspires you to try playing around with CV and using it more creatively when working on your songs.

Did you find this tutorial useful or beneficial? Let me know. And as always, if you have other ideas related to CV switching, please share them with all of us.

15 – Switch Devices with a Rotary

The Question: How do you switch between multiple devices using a single Combinator Rotary. There are two methods to do this, one being good for those who have Reason 3, and the other more advanced method for those that have Reason 4 or Reason+Record. Learn both of these methods.

The Question: How do you switch between multiple devices using a single Combinator Rotary. There are two methods to do this, one being good for those who have Reason 3, and the other more advanced method for those that have Reason 4 or Reason+Record. The first method I’m going to call the “Matrix” method. The second is brought to us by Ed of EditEd4TV fame, and I’ll call this the “Thor Step Sequencer CV” method.

You can download the project files here: instrument-switchers. These include 2 .rns files outlining both methods below. I’ve also included the proper way to create an “Equal-Power Crossfader,” which seemed appropriate given that we’re talking about how to switch from one instrument to another. So if you have only 2 instruments and want to crossfade between them, you can look at the .rns file in the project file download to see how it’s done. If you want to learn more about it, you should read Peff’s detailed tutorial explaining this process over at the Propellerhead User Forum: One Hand in the Mix — Building Crossfaders using the Combinator. Anytime Peff offers something for you to read or download, you should always take advantage of that. His work is several notches above everyone else. And I’m not kidding!

This crossfader method has always been one of my favorites and one of the most useful building blocks in Reason, simply because you can use it in a variety of interesting ways, and map it to your hardware controller’s crossfader, if it has one.

The “Matrix” Method (for Reason 3 and up)

This method is the less preferred of the two methods, because there is a delay or lag involved in using the Matrix in this way. You can, however, change the time signature to 1/4 to reduce the lag, but any way you slice it, there will be a slight pause when transitioning from one instrument to the other using the Combinator Rotary. This just can’t be fixed. However, it doesn’t mean you can’t find some use from this method, and if you’re using Reason 3.0, then this is really the only solution you have, short of programming your mute/solo buttons in the sequencer. The method works like this:

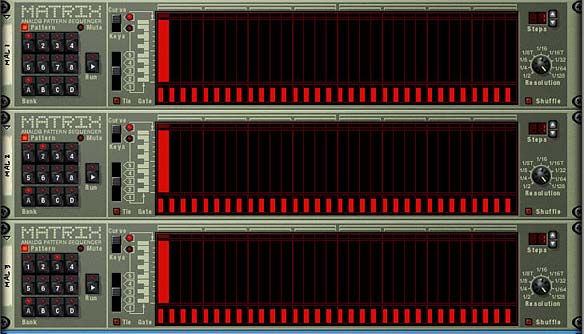
  1. In the combinator, let’s say you have 8 NN-XT devices, and all the devices are connected to a 14:2 mixer on their own channels. Create 8 matrix devices under the mixer and set them all to “Curve.” The curve should be unipolar. Program each of the matrixes to have the same 1-note, 1-step pattern. The level of the 1-step pattern should be raised fully. Now each subsequent matrix will have the pattern programmed on the next bank that follows, like below:

    Matrix 1: A1; Bank A2-A8 should have the curve set to zero (fully off)
    Matrix 2: A2; Bank A1 and A3-A8 should have the curve set to zero (fully off)
    Matrix 3: A3; Bank A1, A2, and A4-A8 should have the curve set to zero (fully off)
    Matrix 4: A4; Bank A1-A3 and A5-A8 should have the curve set to zero (fully off)
    and so on. . .

    The Matrix pattern banks
    The Matrix pattern banks: 1-step pattern for each bank. This image shows the first 3 matrixes -- Bank A1, A2, and A3. All other patterns on all other banks are turned completely off
  2. Flip the rack and connect the curve CV from each of the matrixes to the levels in on each of the 14:2 mixer channels for each of the devices. Then turn the trim knob all the way right for all the level CV ins on the mixer.

    The Matrix Curve CVs connected to the Level In CVs on the ixer
    The Matrix Curve CVs connected to the Level In CVs on the Mixer
  3. Flip the rack around to the front, and set all the fader levels for all 8 channels on the mixer to zero (fully down).

    The 14:2 Mixer with all Level Faders turned down
    The 14:2 Mixer with all Level Faders turned down
  4. Finally, program the same Combi Rotary for each matrix to affect the “Pattern Select” parameter with min: 0 and max: 7.

Now, when you turn the Rotary knob, it will run through all the matrix patterns and essentially only have one device playing at any given time. Each Matrix controls the level of each device, and only opens one device’s level at any one time.

It sounds much more complex than it is. But with this method, you can actually have the rotary adjust up to 32 different device levels; 1 device for each matrix pattern bank. There’s probably even a method to control more than this using 2 combinators linked together, but I haven’t delved that deeply into it, and I doubt you’d ever need to control more than 32 devices with a single Rotary. Perhaps that’s something which could be explored in another tutorial down the road. For right now, I’m much more excited about the next method below, used to control your instruments.

The “Thor Step Sequencer CV” Method (for Reason 4.0 or Reason+Record 1.0 and up — we hope!)

The second method capitalizes on a quirk in Reason which applies only to the Reverse or Random modes of the Thor Step Sequencer. Since this is a quirk, if the Props decide to “fix” this quirk in a future version of Reason or Record, we may be out of luck (and stuck with several Combinators that need to be redesigned), so hopefully this is a quirk that stays with Thor on into the future.

  1. First, let’s build on what we previously did with the “Matrix” method. So open up the Combinator that you just built, and delete all the Matrix devices. Instead, in their place, create a Thor sequencer, and turn everything off. All the green lights need to go off, all the polyphony and pitch bend settings should be set to zero, and all the sliders in all the envelopes need to be turned down. Then bypass all the oscillators and remove all the filters. Just start at ground zero.
  2. Next, in the Modulation Bus Routing Section (MBRS), enter the following settings:

    S.Curve 1: 100 > CV Out1

    S.Curve 2: 100 > CV Out2

    Seq.Note: 100 > CV Out3

    The MBRS settings and settings for Curve 1
    The MBRS settings and settings for Curve 1
  3. In the Step Sequencer, set the Run Mode to “Step” and the Direction to “Reverse.” Also set the Octave setting to “Full.” Set the Edit knob to “Curve 1,” and set up the Step 1 curve to “100.” Then set curve 1 steps 2-8 to zero.
  4. Move the Edit knob to “Curve 2,” and set up the Step 2 curve to “100.” Then set curve 2 steps 1 and 3-8 to zero.

    The Thor Step Sequencer with the Curve 2 settings
    The Thor Step Sequencer with the Curve 2 settings
  5. Turn the Edit knob to “Note” and set up the Step 3 note to “E6.” Then set the note value for steps 1, 2, and 4-8 to “C-2.” C2 gives off a CV value of zero, while E6 gives off a CV value of 100. In this respect it acts just like the Curve values.

    The Thor Step Sequencer with the third step "Note" setting
    The Thor Step Sequencer with the third step "Note" setting
  6. Flip the rack around and pipe the first 3 CV outs from Thor to the first 3 Level CV ins on channels 1-3 on the 14:2 Mixer. Duplicate the Thor two more times. The second Thor will handle steps 4-6 (Mixer channel 4-6 level CVs), and the third Thor will handle steps 7 & 8 (Mixer channel 7 & 8 level CVs).

    The Thor CV cabling into the Level CV ins on the Mixer
    The Thor CV cabling into the Level CV ins on the Mixer
  7. Finally, go into the Combinator Mod Matrix and program the following for each of the Thor devices:

    Rotary 1 > Step Count: 1 / 8

The Combinator setting for Rotary 1. All 3 Thors need this same setting
The Combinator setting for Rotary 1. All 3 Thors need this same setting. Note: The above image was taken with Reason 4. This used to be called the "16 S Sequencer Step Count" located at the bottom of that gargantuan list of assignable targets -- where you'd have to scroll to the bottom of the list. In version 5, it's now under "Sequencer > Step Count."

Now, when you turn the Rotary 1 knob, it will run through all 8 devices acting like a mute/solo button for all devices. If you think about the way this is working, it’s exactly like the Matrix idea, except you’re using the Step Sequencer in Thor. Each Thor handles 3 different mixer channels, and you can handle up to 15 devices at once with a Rotary (you can’t use the 16th step in the Step Sequencer in this way — but you can use all other 15 steps to control your instruments).

And here’s the magic numbers for the transitions between the 8 devices, using the Rotary:

Instrument 1: 0-18

Instrument 2: 19-36

Instrument 3: 37-54

Instrument 4: 55-72

Instrument 5: 73-90

Instrument 6: 91-108

Instrument 7: 109-126

Instrument 8: 127

Looking at these numbers, you’ll see that everything matches up just fine except the transition between instrument 7 and 8. Not sure why that is, but it’s a little quirky. Still, this technique is instantaneous between all the switches.

I haven’t yet taken a look to see what else can be done with this technique, but it certainly opens the door to a lot of other possibilities. If I get a chance, I’m going to try exploring some other avenues with this little trick and I’ll keep everyone posted. Let me know what you think of this tutorial, and if this will help you build your own patches. And thanks go out to Ed for taking the time to show me how this worked. If it weren’t for guys like Ed, we’d still be working on our patches in a cave.

Until next time, happy Reasoning and Recording!

12 – Crossfading Mals & Filters

Since Ed’s Thor Shaper article, I’ve been thinking about how to use this information in real-world examples. One idea is to crossfade the Grain Samples in the Malstrom and another idea is to crossfade all 4 Thor filters to affect one sound source. Lots of fun!

Since Ed’s Thor Shaper article, I’ve been thinking about how to use this information in real-world examples. One thought came from a post I saw on the Props forum. Basically, the issue was that you can’t assign the Malstrom Grains to a Combinator Rotary to effectively switch between the 80+ Grain Samples. It’s pretty easy to assign and switch between Modulator waveforms using a Rotary, but not the actual samples in the Malstrom. So this got me thinking of how you could go about switching between these Samples. And truth be told, there’s probably some really obscure way to do it which uses Thor and some heavy CV connections. But here is something that might just inspire you and be the next best thing.

You can download the project zip file here: crossfading-malstroms-and-filters. This file contains 2 rns files with the Combinator setups explained below. One is a 16-Malstrom crossfader, and the other is a 4-way Thor filter crossfader. I would recommend you download them and open them up as you read. It will make things a little easier that way.

Crossfading 16 Malstrom Grain Samples

In this setup, I’m using 16 Malstrom devices and each device is sent to a Mixer Channel in two 14:2 Mixers. The CV from the various Thors are sent to the Mixer Levels, where the level trim knobs are pushed all the way right, and the Mixer channel Levels are set to zero. If you haven’t already seen Ed’s interesting and enlightening tutorial on the subject, you should read it here: Ed’s Thor Shaper Tutorial. It goes through using the Sine Wave Shaper in Thor to create a 4-way Crossfader. In this way, you can cross-fade between 4 different Malstroms. Each Malstrom’s Oscillator A is set to a different Sample.

Since you have 4 Rotaries, each Rotary is set to 4 Malstrom devices. Giving you a total of 16 different Oscillators. Also, since one or more oscillators will be playing at any one given time, I’ve set up each button on the Combinator to mute the specific series of Oscillators. Button/Rotary 1 affects the first group of 4 (Malstroms 1-4), Button/Rotary 2 affects the second group of 4 (Malstroms 5-8), and so on. Only 10 Malstroms should be applied to a single Mixer because you can only map 10 parameters from any one device to the Combinator, and you need all 10 channel mutes mapped to the various Combinator buttons.

To take this a step further, you could create 6 Combinators, which together would contain the full 82 Oscillator Samples used by the Malstrom. Then you could crossfade between any oscillator you like. The sweet spots for each of the rotaries are as follows:

0 = Oscillator 1 Full Level

42 = Oscillator 2 Full Level

85 = Oscillator 3 Full Level

127 = Oscillator 4 Full Level

Any integer between those values will provide a crossfade between the two Oscillators on either side of the value. This can be seen as a downside or an upside. If you want a pure switch between Oscillator 2 and 4 for example, you can automate the Rotary to go straight from 40 to 85 in your sequencer using a Rotary automation lane. In this sense, you can use the Rotary as a 4-way button switcher between each Oscillator.

On the downside, you couldn’t effectively crossfade between Oscillator 2 and Oscillator 6 (on Rotary 2) the way the current Combinator is set up. But if you Reorganize the way the buttons mute, you could effectively do this. I’m open to anyone who has any other suggestions on how this could be achieved. Another downside is that since a different Malstrom is used for each Oscillator, you’ll have to tweak the settings on each Malstrom to get exactly the sound you want. If you want to keep everything consistent between all Malstroms, you’ll have to do it through automation (the easiest way I think). Simply automate one parameter on the first Malstrom in the sequencer, and copy that automation clip into every other Malstrom’s automation lane. It’s a bit of a pain, but it will keep all Malstroms in line, if that’s what you want.

On the upside, since there are 16 different Malstroms, you can fine tune the sound of each of them separately. If you have all the mutes off, you can effectively crossfade between 4-8 Malstrom sounds/devices at once just by shifting the Rotaries around. This adds some very interesting Sound Layering potential.

As it stands, the first 16 Oscillators from the Malstrom are applied to the 4 Rotaries on the Combinator. As I said, you could build up a stack of 6 Combinators to include all the Malstrom Oscillators. In this way you can build up various sounds and switch between the various Oscillators. Does this help anyone out?

Crossfading all 4 Thor Filters, and then some. . .

Next, let’s take a look at how we can crossfade all of Thor’s filters to affect one synth sound. In this case, it’s fairly simple to set up. First, create a Combinator, and set up Ed’s 3 Sine Shaper Thor’s to handle the CV like the previous example (along with a 14:2 Mixer). Then create a Thor and load up a synth sound. Start off with something simple so that you can really hear the different filters affecting the sound. Then create a Spider Audio CV Merger / Splitter, and send the synth’s Left and Right Audio Outputs to the splitter’s inputs. Create 4 Thors underneath the splitter and send each of the 4 splits to these respective Thor’s Audio Inputs 1 and 2. Finally, send the 4 Thor’s Left and Right Audio Outputs to the first four 14:2 Mixer channels.

The setup with The Sine Shaper CV and Audio outputs from Thor into the Mixer
The Thor Synth Audio being split and sent through the 4 Thor Filters

On the front of the Rack, add a Low Pass Ladder Filter in the first Thor’s Filter 3 Slot. The settings for this filter are shown in the image below. In addition, add the following into the Modulation Bus Routing System (MBRS):

Audio In1: 100 > Filt3 L.In

Audio In2: 100 > Filt3 R.In

The Low Pass Ladder Thor Filter settings on the front Panel

Enter the same settings in the other 3 Thors, but with different filters, so you have the State Variable filter in Thor 2, Comb filter in Thor 3, and Formant filter in Thor 4. While you’re at it, play around with the Global ADSR envelope so that it sounds to your liking for the 4 different filters. It’s ok if these settings are different for each filter. This will just make your sound more interesting. One thing I kept the same across all 4 Thor Filters is the FX section (Delay and Chorus). This way, when the filters are transitioned, the FX remain similar across the board.

Now let’s turn to our Combinator section and do some serious routings in the Mod Matrix. Here’s the settings you will need for each of the Thor Filters (they are the same for all 4, but must be applied to all 4):

Rotary 1 is reserved for the Filter Crossfade, so I’m not going to go over it here. You can see it in the Project File rns.

Rotary 2 > Filter 3 Freq: 0 / 127

Rotary 3 > Filter 3 Res: 0 / 127

Rotary 4 > Filter 3 Global Env Amount: 0 / 127

Button 1 > Delay On: 0 / 1

Button 2 > Delay Sync: 0 / 1

Button 3 > Chorus On: 0 / 1

Button 4 > Filter 3 Global Env Invert: 0 / 1

Mod.W > Filter 3 Drive: 50 / 127

The Combinator Mod Bus Routing settings for each of the Filters

Now, what’s happening is that the Mod Wheel controls the drive amount on each of the Filters, While Rotary 1 cross-fades all the filters. This is the main Rotary, and it has the same sweet spots as the previous Malstrom patch. Rotary 2 and 3 control the Frequency and Resonance of the filters, and Rotary 4 adjusts the Envelope of the filter. Button 4 inverts this envelope. The remaining buttons are left for the Delay, Delay Sync and Chorus. Since all the parameters are the same for all the filters, they all shift together. This can be a positive or a negative. You can’t individually set the filters, but at least they sound pretty good when transitioned. Depending on your ADSR settings for the Global Filter, the Envelope Rotary and Envelope Inversion Button may be different for each filter. But as I said before, this can add some nice variety to the sound.

Use this Combinator as a template for your own sounds. All you have to do is add your own patch into the Thor “Synth” or change the Thor “Synth” to any other Synth or Sampler device if you like. Then you’re in filter crossfading heaven.

A huge thanks to Ed for being the inspiration for these patches. Please let me know what you think and if you can think of any other applications that this crossfading technique can have, by all means share it with us. Until next time, have fun with these.