As a beta tester, when I got Record I was super excited. I promptly downloaded and installed, and went to open it up. I was salivating by the time all three record windows were opened stacked in front of me on my screen. The “AHHHHH” moment. A halo emanated around my computer. Come on, you know what I mean. I first saw the double rack and was amazed. Then I looked at the main mixer and my jaw hit the ground. Beautiful! A work of art. now I can finally work on making my tracks truly sing.
Then I opened a Reason song. And everything that I had hoped and dreamed got shattered in one swift moment. What? My mixer with 9 tracks and automation applied to the sends, EQ settings, panning, levels got reduced to a measly single track attached to the new main mixer in Record. All my earlier praise now turned to dismay.
I’m sure most of you know exactly what I mean. You’ve been there. You’ve gone through the same agony. So what do you do now? Curl up in a ball? Send Record back to the Props? Well, you could do that. Or you can read this tutorial and learn how to properly transfer all your settings from the 14:2 mixer in Reason into the SSL Main Mixer in Record. It’s not that hard, as you’ll see. But it is a little time consuming, depending how many tracks you have. And I’m not going to undertake doing an entire song mix. What I’ll do is show you how to transfer all settings from one channel in the Reason Mixer into one channel in the Record Main Mixer. Once you have that down, you can do any number of channels, no matter how complicated the song. So let’s get busy.
Before starting, I’ve put together a zip package with the project files. It contains the Reason song with a single channel and the Record version of the same song once it was converted: Download the Project Files.
It should be noted here that if you have not yet done any serious mixing in your main reason mixer, and don’t have any automation set up for any mixer parameters AND don’t have any CV setup for the Pans/Levels on the back of the mixer, then you can safely open the Reason song in Record and delete your main mixer. Then you can select all the (now disconnected) devices, right-click, and choose “Auto-route Device.” This will create Mix Channels for all the devices. Depending on how creative your connections were to begin with, you may find a few devices that require some custom routing after you do this. [thanks to Mattpiper from the Props forum for this excellent tip]
However, if you already have your mix set up with a lot of automation applied to the Reason main mixer device, then read onward, because this article is for you!
- First thing, open the Reason song, mixer and all, in Record.
- Next, you’re going to have to move any mastering Combinator or devices into the Master Section in Record. Let’s say we have a “Dance” Combinator inserted between the Reason Mixer and the Hardware Interface. Select all the devices in the Dance Combi and move it into the Master Section. Flip the rack around, and move the “From Devices” and “To Devices” cables from the Dance Combi to the same ins/outs of the Master Section. Then delete the audio ins/outs from the dance Combi, and delete the Dance Combi altogether. You don’t need it anymore.
- Now let’s assume you have a Matrix set up to control the Panning of the channel, and another Matrix set up to control the Level of the channel. You’ll have to flip to the back of the rack, and move the CV inputs from the Reason Mixer to the CV inputs of the Mix channel. Then adjust the pots to the same settings they were at in the Reason Mixer. Level and Pan is done. Note that if you have several channels set up in your song, you’ll have to create the same number of Mix devices in Record.
- Next, let’s move the Aux Sends/Returns from the Reason Mixer to the Master Section’s Sends/Returns in Record. This is pretty straightforward. Plus in Record you can now set up 8 Aux sends if you want, which is more than enough power. But in the example I’ve provided there was a Reverb and a Delay set up. So we’ll move those over now.
- Our last cable job is to move the Lead Audio Cables from the first channel in the Reason Mixer over to the Main L/R input on the Mix Device. You can now flip the rack around. You’re done with the cabling.
- Now let’s move to the Record mixer. Press F5 and F6 at the same time to show both the rack and the main mixer in record. If your channels have any settings that ARE NOT automated, but are static for the entire duration of the song (and are different from their default setting), then you can adjust those settings on the main mixer channels in Record. For example, if a channel is set to a level of 90 in the main Reason mixer, and stays at 90 through the duration of the entire song, then you can change the dB level on the Main Record Mixer’s channel to -2.8 dB and leave it there. If the Level stays at 100 for the duration of the entire song in Reason, then you won’t need to change a thing in Record, because the level is already set to 0.0 dB. Make sense so far?
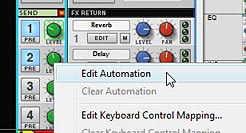
- Next, turn the sends 1 and 2 on in the Main Mixer’s Send section in Record. Since the example file has automation set up for these sends, right-click and select Automate. Do this for both sends. However, don’t move to the sequencer just yet. Instead, Look at the other elements on the channel that are automated, and do the same for those as well. So in our example, the solo and level parameters are automated, so right-click and select “Edit Automation” for those two parameters as well.
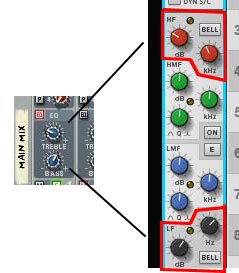
- One last thing in the Mixer. If you’ve adjusted the Reason Mixer’s EQ settings for Bass and Treble, you’ll have to map that over to the Record mixer as well. The best way to do this is to adjust the HF (High Frequency) and LF (Low Frequency) settings in the EQ section of Record’s main mixer. This is a shelving EQ which controls your bass and treble. Note that it gives you more control over the Bass/Treble settings that you’d find on the 14:2 Mixer in Reason, because it allows you to dial in the proper frequency range to affect. So you’ll have to use your ears for this one. For more on the EQ settings found in the new Record Mixer, you should read Ernie Rideout’s great article: Tools for Mixing: EQ (Parts 1 and 2).
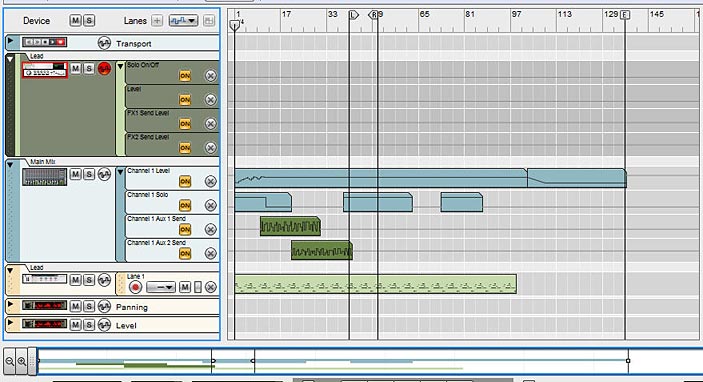
- Finally, we move to the sequencer. Press F7 on your keyboard to open the Sequencer. Notice that you have the Mixer with all the parameter automation, but since you selected “Edit Automation” for all those same parameters in Record’s mixer, you have all those lanes set up under the Mix Device. Now it’s just a matter of moving the clips from the Mixer into the proper lanes in the Mix Device. To make things easier (if your song is very long), expand the view by dragging the view window along the bottom of the sequencer all the way to the right, or click the “Zoom Out” magnifying glass at the bottom-left in the horizontal scroll view.
- When you move the automation over, some lanes may show “Alien Clips.” To convert the lanes to proper automation, right-click and select “Adjust Alien Clips to Lane.”
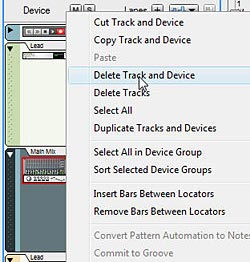
- And last but not least, right-click on the Mixer device in the sequencer and select “Delete Track and Device.” You won’t need it anymore. You’ve now converted your Reason song into Record and are free to mix and master your song using the SSL Mixer in Record. The sound should be pretty darn close to the original mix in Reason.
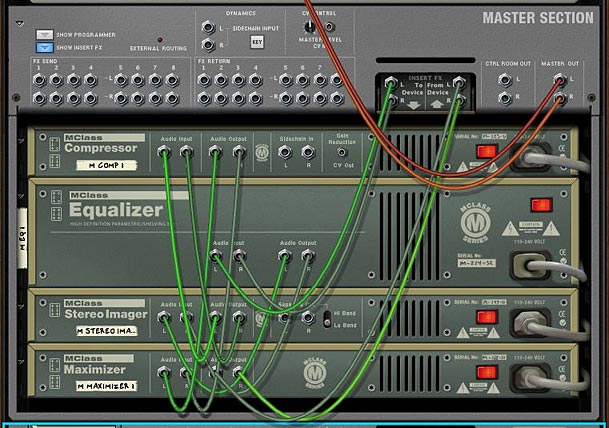
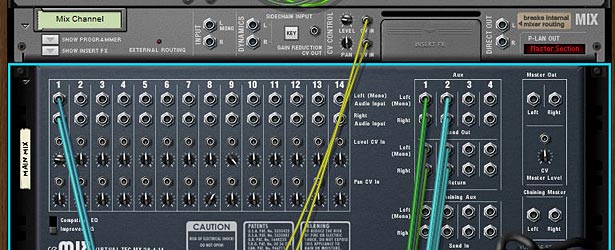
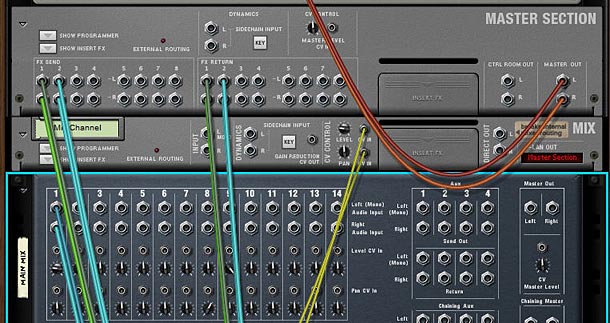

At this point, you’ve probably realized that the new Mixer in Record use decibel values, not midi values. This is a good change, however, it makes it a little difficult to translate levels and send values from the old mixer. So I put together this little chart in PDF format that you can download to see the values. You may not get to use those exact values shown in the chart due to the jumps between values in the Record Mixer, but you can get pretty close. Thanks to Selig on the Props forum for the chart values. Download the Midi to dB Conversion Chart. Note that the chart is also included in the Project Files zip above.
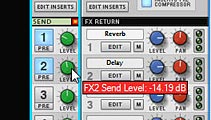

Be sure to save your song as a .record file. You’ll still have the original Reason song saved away which you can open as a reference, as opening Reason songs in Record does not overwrite your Reason song. It leaves it as is. The really nice thing about the Record mixer is that it gives you a wide array of other options which cannot be found on the Reason mixer, such as High and Low Pass filters, Compression, and a Main Compressor you can apply to the overall mix. More Sends, and handling of rotary and button controls for your devices makes this mixer a huge and powerful addition to your Reason software. So go forth and convert. It takes some time, but the more you do it the better you’ll get at it.
What are your experiences with song conversion from Reason to Record? Did you find this helpful? Is there anything I’ve missed? Please comment and let me know.

Hello,
Thanks for article. Everytime like to read you.
Dolly
Dolly,
Thank you very much. It’s nice of you to say. I hope the articles are helpful. 🙂
This is an outstanding tutorial! Thank you!
Robbneu,
Thanks. That’s very nice of you to say. I really like your site as well. The concept behind it is a wonderful idea. I don’t know if I could produce a patch a day. But it’s definitely something that can be a benefit to every Reason user!
Hey, thanks a lot for your kind words about my blog! Sometimes it is a little hard coming up with a new patch every day, but most days it comes pretty easily. Glad you like it!
A note on the mixer EQs that I took from the PH forums at some point:
The 14:2 mixer has a two-band EQ (24dB cut/boost at 80Hz and 12kHz)
Although it doesn’t sound like it to me! At least it gives the frequency ranges so you can set the shelving EQs in Record’s mixer though. Any further clarification on what’s going on with the 14:2 EQs would be appreciated!
Dioxide,
Honestly, I don’t use the 14:2 Mixer for any EQ work. I would rather use the M Class EQ device as an insert effect on any instrument or as an insert for the mix as a whole. This way you have finer tuning for your EQ. The 14:2 mixer was created before the time of the M Class EQ device, and so it’s somewhat more limited in what it can do. Once the M Class EQ came around there really wasn’t much reason to use the EQ on the mixer. Now with Record, you can use the EQ on the Main Mixer there and that has a very wide degree of power as well. So my advice would be not to worry or try too hard to learn the intricacies of the 14:2 mixer and instead devote some time to the SSL mixer or the M Class EQ device. I might work on an article that outlines how I use these devices in my own work. But again, anything I write about them would be very subjective, as each sound will require different settings, and there’s a lot involved in using EQ correctly (for mastering the sound and for a special effect).
Hope that helps somewhat. I’ll think about trying to put something together about EQ though. 🙂
Yes I wouldn’t suggest using the 14:2 EQs, in fact I’m convinced they haven’t actually worked properly since they added the improved mode (at least on OSX). This article is about converting Reason documents to Record documents, so it was more for if you needed to reproduce a specific EQ setting using the Record EQs. I’ve tried it and it works well.
Dioxide,
Not sure if they actually work correctly or not. They always sounded a little lacking to me. And in the software world, given the lines and lines of code that make up Reason, there’s bound to be a few bugs here and there. That being said, I do appreciate the fact that you provided the frequency ranges for the 14:2 EQs. Makes it easier to figure out how to convert over to the Big Mixer in Record. Always so much to explore with Reason. And every little detail helps.
Thanks!
Hey Phi here’s a question for you that I’m having a bit of a problem with. I created a 24 Channel and 32 Channel Record template all CC mapped to my faders, solo, mutes and pans on my Digi Command 8 controller. Now, how do I get tracks previously created in an older Reason 4 session onto those existing empty tracks in my Record template? I thought about exporting the Reason tracks as individual wav files and importing them back to Record, but I think there maybe an easier way that you may know. I really want to use the template and then save as a new file with the ability to use the Command 8 to mix the song with automation etc. Hope you understand. Please help.
Beatmaker E.I.
Uplifted Productions, LLC
Beatmaker,
If I have you right, you have the template open in Record. But the question is how to get the Reason song into the Record template right? Problem is that you can’t have Reason and Record open at the same time. So you’ll have to first open the Reason song via Record. Here’s the entire process:
A helpful note: By copying and pasting devices from one song to another, the devices do not automatically route anywhere, so you’ll have to flip the rack around and connect each device to the proper mix channel. Once this is done, you’ll be able to control the big mixer using your controller.
Please let me know if that answers your question, or if I can be of any other assistance.
All my best!
Phi,
Thanks for the help. I’m going to try this out today and will follow up with the results. By the way, is the Mackie Control Univer. Pro better for doing this kind of thing? I’ve been looking at it for awhile and it looks like it’s easier to map automatically with Record. Plus I can buy the extenders. I’m leaning more to Record and less to Pro Tools!
Beatmaker,
The kind of USB controller you use is really a matter of personal taste. And I’ve never used the Mackie Control Universal Pro. I looked it up and it seems pretty powerful. And I have no doubt that it can be used effectively with Reason or Record. Even so, I would still do your homework and see if anyone out there on the Propellerhead User Forum has used this with Record and Reason and try to get their take on it; whether they like it or not and what pitfalls to expect, if any. It’s like asking what is your favorite sounding guitar or synth? I can tell you two things I know for a fact:
This tutorial was great. The process was straight forward and my mixes were pretty close. I did need to make some tweaks with EQ and Dynamics but overall was impressed how smoothly it all went. I too, like some other posters, are trying to get away from the DAW. plug-in setup and work extensively in Record. It makes planning live shows much easier and the with everything in the box, I can focus on better performances and less about on hoping everything works when I get on stage. Thanks again for the great work!
EscapeFM
Well thanks Chris. Hopefully it helps out a few folks. There’s no easy way around getting down and dirty with the sequencers and tweaking the mixer to get things just right. But it’s pretty rewarding considering the power of the new mixer in Record. Good luck to you!
Finally… you win. Record is inside reason. Thats fix the problem?… excuse my english.
@Newie,
That’s a very good question. However, I don’t think this will “fix” the issue of bringing older reason tracks into the newer “Reason 6” version. You will still need to convert from the old style mixer to the new style mixer. And there is not any way to get around that. This tutorial can still be used as it is. However, I should probably change the name to “Mapping previous Reason versions (1-5) to Reason 6.”
Boy do I feel like a bit of a dumb knuckle dragger! For ages I have been re-creating the devices, then shifting the lines up to the new device within the document, it’s been painful and I have always wondered if there was another way. And here it is.
Thanks for this, it’s going to take the pain of converting tracks I’d given up on (no down to my feelings towards them but the laziness and dislike of the only conversion method I knew about) to R6.5.
The method is still a little fiddly (not your fault (: ) but leagues ahead of what I was doing before.
@pixelmasochist,
Glad this tutorial helped you out, though with a name like “masochist” I would think you’d want it to be harder? 😉 Thanks for your post!