Let’s have the capability to freely adjust and automate some CV Trim Pots.
I knew that would get your attention. What? I can’t freely adjust and automate the CV trim pots on the back of the rack. What the hell is he talking about? Has he lost his mind.
Yes. I’ve lost my mind long ago. But I’ve recently found it and I’m here to try and provide a few workarounds to do things such as creating adjustable CV levels, as well as provide the ability to adjust merged and split CV sources. All without having to resort to the CV Merger/Splitter. Sound interesting? Well then let’s dig in. . .
When it comes to Thor, you’ve got a very powerful and, in my opinion, wonderfully versatile and variable sounding synth. But Thor can do a lot more than generate great synth sounds. It can perform a set of functions that no other device in the Reason arsenal can. In a previous tutorial I walked through various ways you could use Thor as an audio filter and explored a few practical uses of routing your audio through Thor. Here I’m going to explore how to use Thor as a CV merger / splitter, and furthermore, how using Thor can allow you to automate your CV trim pots, without even breaking a sweat.
The project files used for this tutorial can be downloaded here: adjustable-cv-examples. There are 6 Combinator Examples, outlining the types of tricks we’ll be doing with CV, Thor, and the Combinator Programming below. There is also the original sound source so you can compare that to all the other sounds in the 6 Combinator Examples. The Matrix tied to all the Combinators plays a single note “Drone” sound at 1/4 resolution. In order to test the examples, mute out the other channels in the main mixer except the one you are testing.
Using Thor as a CV Merger
- Create a Combinator, and inside the Combinator, create a 6:2 Line Mixer. Then holding shift down, create a Thor. Without holding shift down, create a Malstrom. Then once again, hold shift down and create a Subtractor.
- On the Subtractor, set Polyphony to 0, and press the Sync button on the LFO 1. Then duplicate the Subtractor 3 more times. On each new subtractor, select a different LFO waveform. You’ll now have 4 Subtractors with 4 different Waveforms.
- On the Malstrom, open the “Electric Yawn” patch under the Factory Soundbank (in the Malstrom Patches > FX folder). This is going to be our sound source.
- On the Thor, Initialize the Patch, and click the Show Programmer button. Turn off the Oscillator 1, and bypass Filter 1. Also click the “1” button next to Filter 1. Finally, add a Low Pass Ladder Filter into the Filter 3 slot. We’ll use 4 LFOs to affect the Filter 3 Frequency from the Thor, which in turn affects the Filtering of the Malstrom sound.
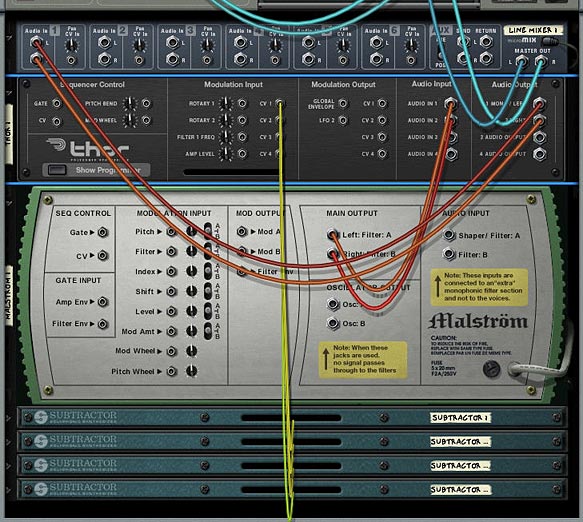
- Time to flip the rack around and do a little routing. Move the two audio plugs going into the Line Mixer, and plumb them into the Audio in 1 and 2 on the Thor inputs. Then plug the 1 Mono / Left and 2 Right outputs from the Thor into the Audio in on the Line Mixer’s first channel. Audio routing through Thor is setup.
- Next, on the back of the Subtractors, route the LFO 1 Output to the CV inputs on the back of the Thor; 1 for each of the 4 CV inputs on the back of the Thor.

Merged CV Routing through Thor - Flip the rack back to the front, and let’s move to the Thor’s Modulation Bus Routing Section (MBRS). On the right side of the mod bus, enter the following settings: Audio In1 > 100% > Filt3 L.In and on a second line on the right enter Audio In2 > 100% > Filt3 R.In. This sets up the Audio to be filtered through Thor.
- Next, on the left side of the MBRS, enter the following settings:
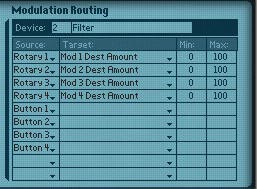
- Now let’s turn to the Combinator Programming. Let’s set up each Rotary to control the amount of CV applied to the Filter 3 Frequency. In this way, the Rotaries will work as the CV trim pots. So here’s where the magic happens. Set up the following modulation for the Thor:
Rotary 1 > Mod 1 Dest Amount: 0 / 100
Rotary 2 > Mod 2 Dest Amount: 0 / 100
Rotary 3 > Mod 3 Dest Amount: 0 / 100
Rotary 4 > Mod 4 Dest Amount: 0 / 100

Combinator Programming
CV In1 > 0 > Filt3 Freq.
CV In2 > 0 > Filt3 Freq.
CV In3 > 0 > Filt3 Freq.
CV In4 > 0 > Filt3 Freq.

This modulation setup means that you can control the Amount in the Thor Modulation Bus via the Rotary controls. It’s usually overlooked by many people. But at the bottom of the Thor’s Modulation Bus, after you scroll down through all of Thor’s parameters near the bottom lies the Modulation Destination Amount and Scaling Amount. In this way, you can control any one of the 13 modulation routings (amount and scaling).
To sum up, this Combinator we’ve created will use all 4 LFOs from the four Subtractors in unison to affect the Filter 3 Frequency of the Thor, which in turn affects the filtering of the sound source from the Malstrom. The true beauty of it all is that you can control the CV level using the Rotaries on the combinator. This works like a CV trim knob you’d find on the back of the rack.
Using Thor as a CV Pass-Through
Merging the CV signals and then controlling their level with multiple Rotaries on the Combinator are all well and good. But let’s say you don’t want to control any Thor parameters. What if you want to control an external CV source. For example, you want to control the “Shift” parameter on the Malstrom with a Subtractor LFO. This is pretty easy. Just route a CV connection from the Sub’s LFO to the Mal’s shift parameter on the back of the rack and you’re done. But you can’t control the Trim pot with this setup. So using the same kind of setup as above, here’s how you can use Thor as a Pass-Through for your CV source/destination, and at the same time tie the CV amount to a Combinator Rotary.
- Create a Combinator, and inside the Combinator, create a 6:2 Line Mixer. Then holding shift down, create a Thor. Without holding shift down, create a Malstrom. Then once again, hold shift down and create a Subtractor.
- On the Subtractor, set Polyphony to 0, and press the Sync button on the LFO 1. Select the Pulse Width waveform for the Subtractor.
- On the Malstrom, open the “Electric Yawn” patch under the Factory Soundbank (in the Malstrom Patches > FX folder). This is going to be our sound source.
- On the Thor, Initialize the Patch, and click the Show Programmer button. Turn off the Oscillator 1, and bypass Filter 1. Also click the “1” button next to Filter 1.
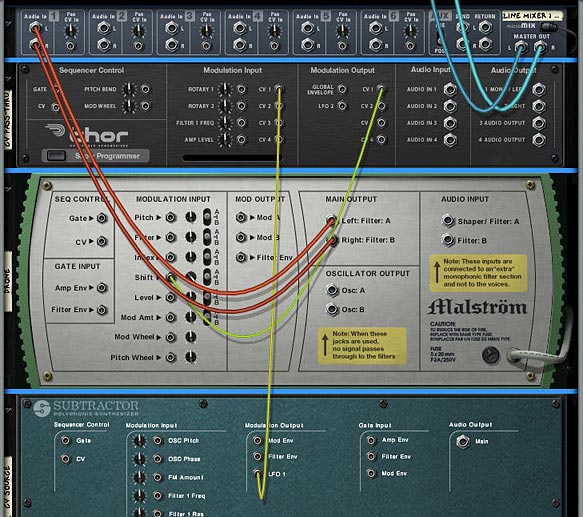
- Time to flip the rack around for our routing. On the back of the Subtractor, route the LFO 1 Output to the CV 1 Modulation Input on the back of the Thor; Then connect the CV 1 Modulation Output from Thor to the Shift Modulation Input on the Malstrom. Also turn the Shift Trim knob all the way right, so that it is completely controlled by the CV.
- Flip the rack back to the front, and let’s move to the Thor’s Modulation Bus Routing Section (MBRS). We only need one setting entered on the left side of the MBRS:
- Now we need to add one final programming setting on our Combinator. Open the Combinator’s Programmer, and set up Rotary 1 to control the amount of CV applied to the Shift parameter on the Malstrom. In this way, as before, the Rotary operates as the CV trim pot, moving from left (no CV applied) to fully right (100% CV applied). Set up the following modulation for the Thor:
Rotary 1 > Mod 1 Dest Amount: 0 / 100

CV In1 > 0 > CV Out1.
If you move the Rotary, you’ll hear the LFO operating on the Shift parameter of the Malstrom. So now using this technique you can apply CV from any source to any device that has a CV input destination on the back of the rack, and also adjust the level of that CV source.
Note: if you are trying to control the Level parameter, it’s best to control your level from the Main mixer to which the sound source is connected. This way, when the Rotary is set all the way left (zero), the mixer’s channel fader will be used for the level. When all the way right (at 127), the Level is controlled 100% by CV. If, on the other hand, you try to control the level via the Malstrom’s Level CV, when the Rotary is at zero, no sound will be heard. When the Rotary is all the way right, you will hear 100% CV. So depending on what outcome you want, you may want to set this up one way or the other. The downside to routing CV from the Combinator to the Mixer’s Level CV destination is that you are setting up external routing from the Combinator. Not a problem if you save the file as an .rns instead of saving the Combi on its own. You can see this Level Pass-Through set up in one of the Combinators in the Project Files.
Using Thor as a CV Splitter
Next, we’re going to look at how you can split CV signals with Thor. This time, we’re going to send 3 CV signals to adjust 3 different CV destinations. Then we’re going to use the Combinator Rotaries to adjust the CV source level (thereby adjusting the CV amount applied to all 3 destinations at once).
- By now you should be getting used to the type of setup we’re using. This time we’ll create the Combinator, then inside create the Line Mixer, Thor, Malstrom (with Electric Yawn patch), and Subtractor (to use the LFO 1). Alternately, you can select and copy the Combinator from the previous example, since it already has this kind of setup created.
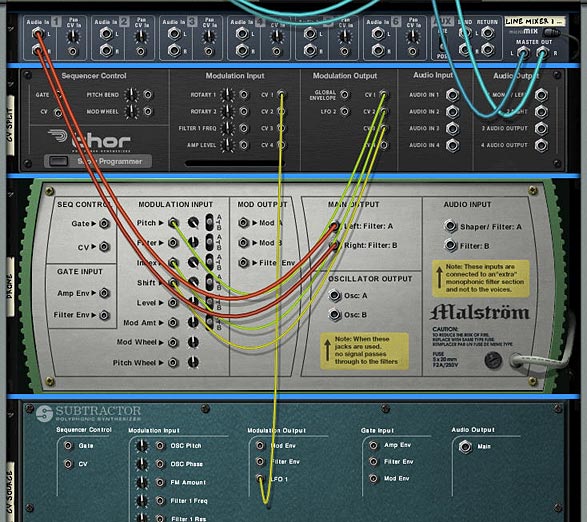
- Now we’ll flip to the back of the rack and connect the LFO1 Modulation output from the Subtractor to the CV 1 input on the Thor. Now, connect the Thor CV 1 output to the Malstrom Pitch CV input. Connect the Thor CV 2 output to the Malstrom Index CV input. Connect the Thor CV 3 output to the Malstrom Shift CV input. Finally, turn these three CV trim pots on the Malstrom all the way right.
- Flip the rack around again, and in the Thor MBRS, enter the following settings:
- In the Combinator Programming, you can set it up 2 ways, depending. If you want to control all 3 parameters’ CV levels at once with a single Rotary, Select Rotary 1 as the source on 3 different programmer lines. Then create 3 different Destinations: Mod 1, Mod 2, and Mod 3 Dest Amount. Enter 0 and 100 for the Min / Max settings respectively. If, on the other hand, you want to have separate control over the 3 different parameters, You can change the Source so that Rotary 1 controls Mod 1 (Pitch), Rotary 2 controls Mod 2 (Index), and Rotary 3 controls Mod 3 (Shift). It all depends how you want things set up.

CV1 > 0 > CV Out1.
CV1 > 0 > CV Out2.
CV1 > 0 > CV Out3.
Note: I haven’t yet tried this, but I think you can invert the signal (just like the spider CV splitter has an “inverted” CV out). To do this in our setup above, you can set the min / max values from -100 to +100 respectively. This way, your Rotary knob will be at 0 when dead center. Moving the knob left will invert the CV signal, and moving the knob right will give a positive signal. Like I said, I haven’t tried it out, but I think I’m on solid ground here.
So there you have it. Thor can merge CV signals together, split CV signals to send the same signal to multiple destinations, and can be used as a pass-through for CV signals to affect other devices via CV. While you can do all of this with the Spider Merger/Splitter, the advantage Thor offers is that you can adjust the level of CV incoming from the source and applied to the destination, and automate this in the sequencer via the Rotaries on the Combinator. This is something that cannot be done using the Merger/Splitter alone. I hope this leads you into other avenues of exploration with Thor and CV modulation. If you have any other ideas that come to mind, please let me know. And if you have anything to add to this, please comment. I’d love to hear your thoughts.

“I haven’t yet tried this, but I think you can invert the signal (just like the spider CV splitter has an “inverted” CV out). To do this in our setup above, you can set the min / max values from -100 to +100 respectively. This way, your Rotary knob will be at 0 when dead center. Moving the knob left will invert the CV signal, and moving the knob right will give a positive signal. Like I said, I haven’t tried it out, but I think I’m on solid ground here.”
Yes, you’re right, you can do that. We could spend hours and hours on all the things possible with Thor as a CV source/destination/mangler. I think nearly all of my recent Combinators rely on Thor CV manipulation… it’s crazy mad scientist stuff, so very very cool to have something this powerful in Reason… I’m learning new stuff every day just by staring at Thor and thinking and experimenting. I *HIGHLY* recommend that people do that. Just *experiment* and try to understand what everything in Thor does. It takes time, but it’s soooo worth it.
Thanks for the comment Ed. I agree that it can get very intense very quickly, and Thor can be a mad CV powerhouse. I wanted to try to get some of the basics down for those that A) wanted to understand that you can merge/split/pass-thru Thor with your CV signals and B) wanted to figure out a way to control and automate the CV Trim knobs — which you can’t do unless you use something like my setups above.
Where others take these simple principles is totally wide open and the setups are endless. But before jumping there, it’s important to know the basics.
Thanks Ed. Any of your contributions are always welcome.
That was quick! I asked about CV merging and you’ve done pass through and splitting as well. Thanks so much for this. Unfortunately I haven’t got time now to comment on the tutorial fully (I’m off for a 4 day fishing trip -YES!!!), but for now:
With the merging example, if you set all 4 LFOs to Triangle and set the rates to 4/4, 3/4, 3/8, and 3/16th, with the levels set around 50 you get instant Coil ala their Time Machines album :).
Cheers!
Another great tutorial. Good work! I have been playing around with these ideas quite a bit also. An example of my usage involves using the buttons in thor to select between different cv sources – i.e. to change a kick drum trigger from a automated bank of redrum patterns using gate out (breaks) to a 4/4 signal either coming from a lfo or a matrix, and vice versa.
You can get some very deep and complex setups using CV routings in Thor. If you haven’t already, you should check out Ed Bauman’s Reasonable Help. Once he ships the product there’s going to be a boatload of interesting routings in there to sink your teeth into. I haven’t thought too much about CV switching, but I can certainly see how you could easily implement this in Thor. If you’re willing to do a write-up or tutorial, I’d gladly post it under the “Contributions” section of the Blog. Shoot me an email if you’re interested (webmaster@reason101.net).
All my best!
Great tutorial! I’ve used Thor as a pass thru CV before, but hadn’t given too much thought to controlling CV Trim pots…. I’ll be exploring this all day ;-).
Thanks Lewis,
Please let me know what you come up with. I’m always interested to see how people use these tutorials and Combi’s and such. Just posted a new Arp Box today. Cheers!
yeah i should buy editeds help for myself as a chrissy prez. i have read him talking about this a few times, certainly tweaked my interest. i could post a .record file for dissection? . . ….
Sure. A record file that can be dissected would be great! A few words to explain it would be good too, if you get a chance. As for Ed’s RH’10 -> It’s going to be completely worth it. I’ve seen some of his patches and all of them are winners. As someone else said on the Props forum, if Ed or Peff provide a patch anywhere, DOWNLOAD IT! — Good advice.
Good article. Just a quick comment – the “destination amount” control in Thor is a cubic function, it’s not linear. If you want a linear control, you have to use the “scale” control instead.
meow,
thanks for the tip. I didn’t know that. So it shouldn’t be that difficult to switch the destination amount over to the scale amount. Interesting that it’s cubic and not linear, and nowhere is that documented (I don’t think) in their user documentation. grrrrr.
Phi – yes, not documented. But here’s some more info: http://offwhitenoise.blogspot.com/2009/02/thors-destination-amount.html
🙂
Meowsqueak,
I never would have known. You had to really dig deep to figure this out, and I really appreciate it. I’m sure my readers do as well. So I guess it’s back to the drawing board to reconfigure the combinators I made. You know it’s funny because there was a point when I was toying with the values that I thought things sounded a little “light” or “off” when I was tweaking. I didn’t think much of it. But now that seems to make sense. But at least switching over to the scaling amount shouldn’t be difficult. I’d love to see what interesting things you can do using the destination amount, since it’s cubic. Have you found any practical and promising uses for this feature that you’d care to share?
Thanks again!
beat exploration. here is a record for further dissection. http://www.mutated.biz/node/944
contains a couple of redrums and some effects. the combinator rotaries, mod and pitch do interesting things. i have 2 touch pads controlling r1, r4 and r2, r3, respectively. makes for some warped out fun. button 1 changes the beat from breaks (bass drums redrum 2) to 4/4 (bass drum redrum 1). messing with the redrum patches gives some instant randomness.
Sterioevo,
I haven’t had a chance to look through the Record file as of yet, but I will. Things are just crazy around the holidays. But I’ll comment more fully when I have a chance to look it over. Sounds like some interesting beat fun. 😉 Thanks for sharing.
this i completely understand….. the file isn’t earthshattering in any sense – just a few ideas… the idea comes from a track i am currently working on and I have since developed further since the previous posting. when i get a chance i will update.
Thank you SOOO much! I’ve been designing my own organ patch and have been scratching my head for hours trying to figure out how to vary the pan intensity to replicate a leslie speaker. Your blog has answered some of my most difficult questions in my on-going quest to master Reason.
@BeardyKeys,
Glad I could help you work out some of the difficulties. Always good to hear that. Cheers!