With the introduction of Rack Extensions from Propellerhead, we see a major shift of the company into the Plugin arena, although Rack Extensions are expressed as “plugins done right.” And the Props have introduced 3 new Re devices (Radical Piano, Polar, and Pulsar). Not too bad for a point release. Instead of focusing on the 6.5 release itself, and debating the cost (it’s been done to death in the forums), I thought I would start by taking a tour of Pulsar, a device that is free for 3 months, and $49 thereafter. Hopefully, by the end of this article, you’ll see why the price is justified. Pulsar is simple, fun, and capable of some very unique sound ideas. Let’s take a look at why this is the case.
You can download the project files here: pulsar-synths. This zip file contains some Combinators and .reason files which go through some of the concepts I’ll discuss below.
Starting off with a simple LFO
At it’s most basic, Pulsar is a Dual LFO. But when you first add a Pulsar to your project, you’ll only be using LFO 1. In many cases, this may be all you need. And if that’s the case, you may be wondering why you would need yet another LFO in the Reason arsenal? Doesn’t Thor, Subtractor, Malstrom, and even some other devices have one or two LFOs that can be used (and have been used) by many since the birth of Reason? Sure. But Pulsar delivers something the other LFOs do not (apart from Pulveriser). It comes with a “Lag” feature. Furthermore, it comes with two other unique features: “Phase” and “Shuffle.”
To recap, the “Lag” feature is an LFO filter which smooths out the shape of the LFO. If you are using an LFO with a sharp edge (Square or Stepped, for example), increasing the Lag feature curves those sharp edges, and can reduce a lot of the abrupt “clicking” that can result from these LFOs.
“Phase” is used to shift the LFO forward or backward, kind of like a pulse width modulation for your LFO. Look at Thor’s Analogue oscillator set to a square wave. The Mod parameter works the same way by shifting the LFO forward or backward (widening or narrowing the LFO). When using two similar LFOs in Pulsar and adjusting their Phases (or automating Phase movement in real-time), you can create some really interesting modulations with the LFOs.
Finally, there’s a parameter we’ve seen time and time again, though not in an LFO: “Shuffle.” This parameter shuffles the LFO, making the movement or LFO automation more erratic. Keep in mind though, that while “Shuffle” provides some randomness to your LFO cycles, the cycles themselves will always be in sync. In other words, the start and stop of the waveform will be random, but their duration will always equal the time cycle that you set up in the timing of the LFO. And it’s important to note that “Shuffle” works in 2-cycle pairs. So looking at a 2-cycle waveform set to 1/4 Tempo Sync means that you have two cycles of the wave that equal 1/4 each. Cycle 1 will always start at the beginning of the cycle, but can end anywhere within both cycles. Then cycle 2 starts and always ends at the end of both cycles. Kind of an interesting strategy if you ask me. But putting the theory aside for a moment, the best way to get a feel for it is to try it out for yourself.
All three of these parameters are fairly unique to Pulsar. And so it might be worth your while to try using this LFO on it’s own the next time your modulation calls for it in your track.
There’s also lots of other interesting things you can do with Pulsar: Sync LFO 2 with LFO 1, Have the Level of LFO 2 affect LFO 1 (AM), have the Rate of LFO 2 affect LFO 1 (FM), trigger the envelope via LFO 2, and this doesn’t begin to get into the CV / Audio modulations on the back of the device. Using all of these features allows you to set up some very complex modulations and even use Pulsar’s LFOs as Oscillators to create some very unique sounding (somewhat Analog-style) synth instruments. We’ll dig into that further below.
But before going further, you should definitely check out the introductory video from the Props on how Pulsar can be used as an LFO and how those LFOs can be used as Oscillators. This is perfect for getting your feet wet with the device. And the final song result at the end of this tutorial is truly inspiring. So before doing anything more, let’s take a first look at Pulsar:
Accessing the Pulsar Patches
Pulsar can’t load or save patches. However, you can contain a Pulsar (along with any other devices to which Pulsar is connected) inside a Combinator and then save the Combinator. And this is a great time to bring up the fact that Pulsar comes with a wide variety of effects and instruments that were put together by some very talented patch designers. Here’s how you can access them:
- Right-click on the Rack and select “Create Instrument” or “Create Effect,” depending which option you want.
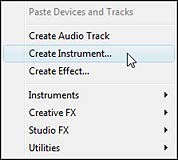
Right-clicking on the rack and selecting “Create Instrument” or “Create Effect” - The Reason Browser opens. Notice the “Rack Extensions” option under the “Locations and Favorites” area on the left side of the window? Click it, and you’ll see all your loaded Rack Extensions displayed on the right side.
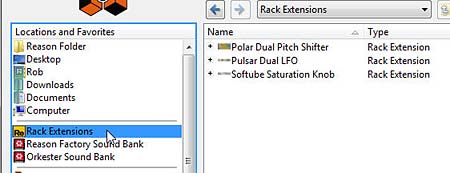
The new “Rack Extensions” stock patch bank in Reason 6.5 - From this list, select Pulsar directly by double-clicking it and navigating down the folders to all the available patches. Alternately, you can click the plus (+) sign and drill down to the patch you like.
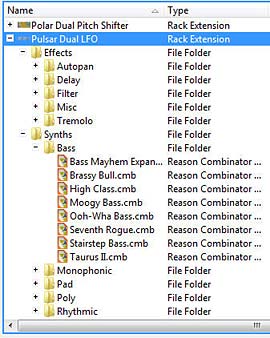
The Pulsar stock patch bank expanded on the right side of the Browser window. - Double-click on the patch of your choice to open it in the Rack.

The Pulsar patch loaded into the Rack (with a great new Combinator backdrop by the way – nice job Propellerheads!).
Of course, if you’re saving your own patches, you’ll have to save them to your own computer location. All Pulsar patches need to be saved as a Combinator device. So all the patches you’ll find underneath the Pulsar stock patches are Combinators.
I strongly urge you to have a look at these patches. They showcase how you can use Pulsar in all manner of ways. There’s a way to use it as a dual gate, dual wah, LFO filter wobbler, FM, AM, etc. So opening the patches to get a feel for Pulsar is a great way to learn how to use it.
Pulsar as Dual Oscillators: Cheap on CPU, not Cheap on Sound.
And now for the major coup. Yes, you can use Pulsar as a dual Oscillator to create all manner of synth sounds. Trust me, I’ve tried. For those using Reason essentials, this provides a great alternative to the Subtractor synth. You now have a second synth inside Reason. And for those using Reason, you’ll be thrilled to know you not only have a simple synth, but process this synth through Thor, and you have a very amazing sound generation tool that is quite unlike the other sounds in Reason (whether that sound is good or bad is something I’ll leave for you to decide, as it’s a raw aliased sound that some like and some don’t). But nevertheless, it’s a unique sound with which you should experiment.
First, the video:
Let’s start off slow and figure out how to use Pulsar as a synth on its own. Since Reason Essentials doesn’t come with Thor, this is really the only way to go for that group of users. And yes, you can most definitely use Pulsar as a synth on its own. This is really great for Bass sounds, and in my opinion, this is where it shines. So let’s get started with a very simple setup:
- Right-click on the rack and select Utilities > Combinator. Inside the Combinator, right-click and select Utilities > Pulsar Dual LFO.
- Flip to the back of the rack and send LFO 1 Audio Output 1 from Pulsar to the Left “From Devices” Combinator Audio input. Then send LFO 2 Audio Output 1 from Pulsar to the Right “From Devices” Combinator Audio input. This way, LFO 1 produces the sound for the Left side of the stereo field, and LFO 2 produces the sound for the Right side of the stereo field.
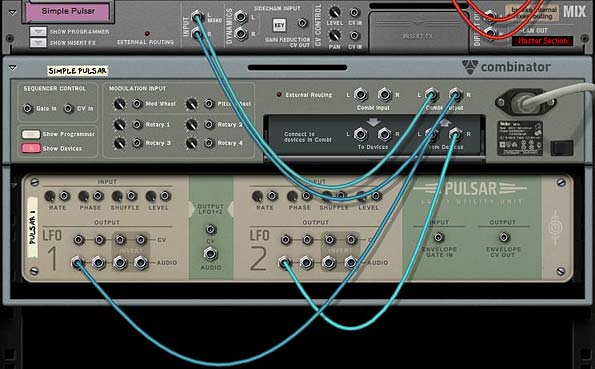
The Routings from the Pulsar to the Combinator - Open the Combinator’s programmer and select the Pulsar device. At the bottom left side of the screen place a checkmark in the “Receive Notes” checkbox. This allows you to play the Pulsar through the Combinator’s MIDI note input.
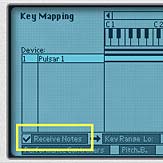
Selecting the Pulsar device in the Combinator’s Programmer and ensuring it “Receives Notes” - It’s important in this kind of setup to ensure that the parameters for both LFOs are set exactly the same, otherwise you’ll hear differences in the sound coming from both the left and right sides of the stereo field. Start by turning Off the Tempo Sync for LFO 1, and turn On LFO 2 (On/Off button). Switch LFO 1 and LFO 2 Waveforms to Sawtooth waves. Then reduce the “Level” rotaries to 0% for both LFOs. Increase the Shuffle knobs to 70% for both LFOs.
- In the Pulsar Envelope section at the right side of the device, reduce the Release amount to zero (0) ms. Increase the Envelope Rate for both LFOs to 100%, and increase the Envelope Level to about 60% for both LFOs.
- If you play the Combinator through your MIDI keyboard at this point, there is no key scaling. No matter what key you play, you’ll hear the same note pitch. In order to scale the keyboard, you must turn the MIDI KBD Follow knob on Pulsar fully right to 100%. Once you do that, you’ll have yourself a nice little patch that should play a pretty cool bassline in the C-1 to C2 range.
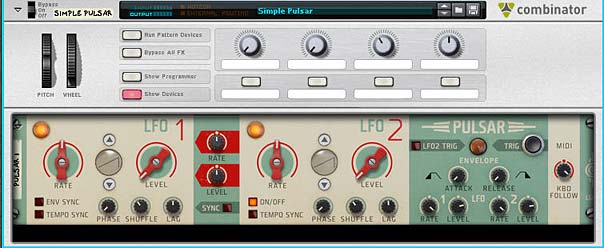
The Pulsar’s front panel setup
Advanced Pulsar Synth Processing through Thor
Let’s take it up a notch:
There’s two ways you can process Pulsar through Thor: Both methods involve sending the audio outputs from LFO 1 and LFO 2 into Thor and then entering the following two lines into Thor’s Modulation Bus Routing Section (MBRS):
Audio In1 : 100 > Filt1 In
Audio In2 : 100 > Filt1 In
As long as both the Pulsar and Thor are receiving notes, and are inside a Combinator, you’re all set. Ensure that both LFO 1 and 2 on Pulsar are not Tempo Synced, and turn the rates all the way up (fully to the right). Also keep the Pulsar Envelope settings at their default, and turn the MIDI KBD Follow knob all the way right to 100%.
The cool thing about this setup is that you can use Thor’s Portamento, Shaper, Filter 1, Filter 2, Amp Envelope, Amp section, and pretty much everything else in Thor to shape the sound of the Pulsar LFOs. In this instance, you’re simply replacing Thor’s Oscillators with Pulsar’s LFOs (which are used as Oscillators).
One thing to keep in mind with this approach is that since you’re processing the audio through the Amp section, the levels of your audio are going to be adjusted using both the Thor Amp Gain and Pulsar’s LFO Level controls. So watch those levels!
The second approach builds on the first and bypasses most of Thor by sending the audio into Filter 3. So after you’ve entered the two audio lines in the MBRS as above, enter the following two lines in the bottom right two MBRS entries as follows:
Filter 1 : 100 > Filt3 L.In : 100 > Amp Env : 100 > MIDI Vel
Filter 1 : 100 > Filt3 R.In : 100 > Amp Env : 100 > MIDI Vel
With this approach, you’re bypassing everything between Filter 1 and Filter 3. This means no Shaper, no Filter 1 and 2, and normally, no Amp Envelope either. However, since you’re scaling the audio using the Amp Envelope explicitly in the MBRS, then you can still use the Amp Envelope to adjust your audio. The advantage is that you gain a 4-stage envelope (Attack, Decay, Sustain, and Release) with Thor, instead of a 2-stage envelope with Pulsar (Attack and Release). Also, you can use the Delay and Chorus FX in Thor to affect the synth sound.
One note though. You can’t use Thor’s Amp section for any adjustments. So all the volume control resides in Pulsar’s LFO 1 and 2. And it suddenly occurs to me that all of this is in the video, so check it out if any of this sounds esoteric to you. Have fun!
Oh and in case you missed it, here’s James Bernard’s take on Pulsar. Pretty awesome sampling technique. Don’t miss this one either:
The downside is that you need Reason to do these wonderful Thor processing tricks. No can do with Reason Essentials. So upgrade already!
So that’s how you set up Pulsar as a synth. Try out the different waveforms and have a blast making some new sounds. And if you have any other Pulsar tricks, be sure to let us all know. Cheers!

Thanks Rob,very nice tutorial.
Pulsar is a must-have device in Reason IMO.
And again,as most of the time i visit your site,i learned a few new tricks.
This time how to use Thor´s matrix it still is a closed book for me sometimes.
Cheers to that!
Ingo
@Ingo,
Thanks for the post. I try to give a few new ideas with each tutorial I write. It’s nice to know that comes through. I agree that Pulsar is an excellent device. Very versatile and with a lot of great connections on the back. Polar is a “must-have” as well IMHO. Cheers! Rob 😉
Great tutorial. I messed around with Pulsar a bit and started getting frustrated. This helped a ton.
I think I hear a lot of aliasing when I play high-pitched notes with Pulsar. Do you hear that too?
@Carl,
Yes indeed I do. You can try raising the Rates on both LFOs to full, and then don’t use the Envelope “Rate” knobs (have them set to middle center position). This will bring the LFOs in line with the keyboard’s tuning in a 1:1 ratio. I forgot to go over that in the first tutorial video I did. But the aliasing is audible, and this is why I feel that Pulsar does better for Bass sounds in general. However, the aliasing can be a refreshing change to the more “clean” sounding oscillators you get in the other Reason synths. It gives Pulsar a dirtier sound, which can be what you’re looking for. Also don’t forget to try out the various effect devices along with Pulsar. A lot of times Pulsar may sound crude, but mix it with an echo, delay, chorus, reverb, vocoder, etc, or a few combinations of effects, and you get some interesting sounds that you couldn’t get otherwise.
All my best, and thanks for posting!
Rob
Soundclips: I’m no whizz bang guitarist, so I’ve booekd a session with my tame guitar hero buddy for later this week, so clips are pending. They will be in depth and will explore every feature and combination.Sonic Death Ray vs Gemini: Hmmm, SDR is a FET based phaser, Gemini is OTA based that’s a technical difference and may not make sense to anyone but techies think Phase 90 vs Small Small. SDR and Gemini have different feature sets, SDR specialises in huge’ with a broad range of different phase sounds courtesy of it’s various regen option. Gemini, having two configurable phaser cores, specialises in flexible’ with it’s series/parallel choices. Both phasers are capable of some really complex sounds, both have two LFOs. Don’t ask me to choose between them they’re so different both in concept and in sound palette.