In this third part of Reason 101’s guide to creating better patches, I’m going to continue to focus on Performance parameters in Thor. This time, I’m going to go over Key Scaling / Key Tracking, both in Thor’s Programmer panel, as well as in the Modulation Bus Routing Section (MBRS), as well as touch upon Aftertouch. Finally, I’ll go over a strategy you can use to approach setting up your Key Scaling parameters to get the most out of your patch and the keyboard’s range.
Key Scaling / Key Tracking
Key Scaling or Key Tracking allows the designer to use pitch information to modulate any other synth parameter. If Velocity is the vertical aspect of playing a keyboard (how hard you press down on the keyboard), Key Scaling refers to the horizontal aspect of playing a keyboard. It refers to where you play the keyboard along the key register. Put simply, which notes are you playing? And what happens to the sound when you play different notes along that key scale (from -C2 to G8).
Many times when you build a patch, it will sound really great on a certain section of the keyboard (a specific range), but seldom does the sound work well across the whole keyboard range. If you go too low on the scale, sounds can become distorted or muddy, and if you play too high, they can become too bright or ear-piercing. To rectify this, you can employ some key scaling modulations to counteract these effects. For example, you can instruct Thor to lower the amplitude at one end or the other, or you can have Thor open up a filter at higher registers and close the filter more at lower registers. Or you can reverse this relationship if that works better for your sound. In much the same way that you can alter the Velocity of a patch in the MBRS, you can also alter the Key Scaling of almost any Thor parameter in the MBRS to create wild Key Scaling modulations, or very subtle variations in sound, based on the pitch information coming into Thor from your MIDI keyboard.
Typically, you would employ Key Scaling modulations for the following reasons:
- To extend the range of usefulness in your sound / patch to work farther up or down the keyboard scale.
- To restrict the usefulness of a patch to a specific range along the keyboard.
- To better mimic the way a traditional instrument sounds when played further up or down the keyboard scale. For example, both pianos and guitars become brighter at the high end and deeper at the bottom end. In addition, there is less sustain at the top end (faster), and more sustain at the bottom end (slower). You can use Key Scaling to mimic this behavior by applying the key scaling as a source to affect both filter frequency and amp envelope sustain as destinations.
- For some kind of special effect. For example, key tracking an LFO so that it is slow on the lower end of the scale and faster on the higher end. Or key tracking FM modulation between two oscillator, across the range of the keyboard.
Note: If you plan on restricting your sound to a specific range along the keyboard, I find it prudent to convey this to the user in the device’s patch name, so that the musician knows the location on the keyboard you intend them to play. For example, if your patch name is “Best Piano Ever,” rename the patch to “Best Piano Ever (C2-C4).” Otherwise, the musician might start playing the patch at C1 and wonder what Kool-Aid you were sipping when designing the patch. It’s not foolproof, but it’s a nice touch to improve the communication between designer and musician.
Fixed Key Tracking Parameters in Thor
So let’s take a look at the different ways you can use the fixed Key Tracking inside Thor. As with the fixed Velocity settings in Thor, you can turn Key Scaling parameters “on” or “off” (“enabled” or “disabled”). But before doing that, we need to know how all the fixed Key Tracking parameters work in Thor.

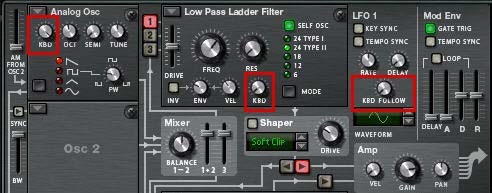
Oscillator KBD knob: Every Oscillator in Reason has the Oscillator KBD knob. This sets up how the pitch of the oscillator follows the keyboard scale. Put simply, when this knob is turned fully right, the pitch of the notes you play on the keyboard will play the pitch you expect. Higher KBD tracking = wider pitch range = more variation in pitch with each keyboard note played. However, if you turn the knob left, the pitch of the oscillator is reduced into a narrower pitch range. The Octave / Semitone / Tune knobs determine the base pitch of the oscillator (i.e.: determine how the keyboard scale is reduced). Think of this as your focal point for the base oscillator pitch. Lower KBD tracking = narrower pitch range = less variation in pitch with each keyboard note played.
Note: The Noise Oscillator is a special case. If set to the “Band” mode, Keyboard tracking has an effect on the Oscillator. All other modes cannot be tracked by the keyboard.
With the KBD knob set fully left, the base pitch of the oscillator is fully set by the Octave / Semitone / Tune knobs. In other words, no matter where you play the oscillator on your keyboard, the pitch of the oscillator will remain exactly the same. This can be useful if you are using your patch to create a drum sound perhaps, where you want the pitch of the drum to remain the same, no matter where the musician plays the sound on their keyboard.
When the value of the KBD knob is lowered (from right to left), the frequencies that are played on your keyboard are spread farther apart, resulting in pushing your Oscillator out of a traditional tuning. While there may be instances where this is the effect you are shooting for (an example would be if you use your Oscillator as a modulator for another Thor parameter, instead of a sound source), the majority of the time you’ll want this knob set either fully left or fully right.
Note: I’m not going to get into tuning your oscillators and discussing harmonics between oscillators in this tutorial. You could write books about it. But you might want to read up on the subject online. A few good resources are http://www.beatportal.com/feed/item/oscillators-mixing-and-blending/ and http://en.wikipedia.org/wiki/Harmonic_series_%28music%29
Filter KBD knob: All filters in Reason have the Filter KBD knob. This knob tracks the frequency of the filter across the entire range of the keyboard. It uses the pitch information from your MIDI keyboard to increase or decrease the filter frequency across the range of the keyboard. This works the same way as the oscillator KBD knob, except it’s the filter that is tracked along the keyboard. In plain english, the filter frequency is opened or closed depending on the the incoming pitch data from the MIDI keyboard.
In the case of the filter tracking, the Filter Frequency knob determines the base filter frequency. With the filter’s KBD knob turned fully right, the further up the keyboard you play, the more the filter is opened from this base frequency. The further down the keyboard you play, the more the filter frequency is closed from this base frequency.
If you turn the filter KBD knob fully left, there is no filter frequency keyboard tracking. Wherever you play the keyboard, the filter’s frequency will always remain static (based on the Filter Frequency knob). In other words, the pitch you play your keyboard does not change the filter frequency.
LFO 1 KBD Follow: As with the other KBD knobs, I’m sure you can now figure out how the LFO 1 KBD Follow works. You set the base LFO rate with the Rate knob, and then use the KBD Follow to track this rate along the keyboard. When set fully right, the higher up the keyboard you play, the faster the LFO rate becomes. The lower you play on the keyboard, the slower the rate becomes. This can be useful for all kinds of modulations.
Key Tracking and the MBRS
Now let’s turn to the MBRS and see how to apply Key Tracking there. As with the Velocity settings, Key Tracking in the MBRS works “in conjunction with” the fixed key tracking settings in the Thor panel. So you can use one or the other, or a combination of both, when creating your sounds.
The fixed Key Scaling parameters in Thor are good, but they are only a start. If you really want to get into interesting patch designs, you’ll need to break out into the MBRS. For example, the free-running LFO 2 does not have a KBD Follow knob, as its brother (LFO 1) does. So you will need to turn to the MBRS and put in a line that looks something like this:
KeyNote : 100 > LFO 2 Rate
This tells Thor to fully track the LFO 2 Rate along the entire length of the keyboard. Then you would use the Fixed LFO 2 Rate parameter knob to set the baseline LFO 2 Rate.
The following outlines the available Key Scaling options in the MBRS:

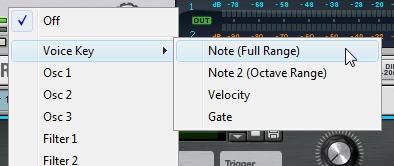
Voice Key > Note (Full Range): This is the keyboard tracking in the voice (per note) section. It allows you to modulate any destination (or track, if you prefer) across the entire keyboard range. For example, let’s say we use it to track the pitch of the oscillator like so:
KeyNote : 100 > Osc1 Pitch
This is the same as if you were using the Oscillator KBD knob. However, remember that since both work in tandem, you will need to set the Oscillator KBD knob to zero (fully left) before adding this to the MBRS. Once you do so, you are now using the MBRS to set the pitch of the oscillator. Furthermore, there’s one other nice thing you can do in the MBRS that you can’t do with the KBD knob. Since the KBD knob is positive in value, you cannot set up a negative pitch. However, in the MBRS, change the amount setting to “-100” which reverses the pitch of the oscillator across the keyboard. Playing lower on the keyboard results in a higher pitch sound, while playing higher on the keyboard results in a lower sound. Very odd I know, and I can’t possibly think of why you would set it up this way or for what reason to be honest, but Thor allows you to do some pretty wild things. This being one of them.
Voice Key > Note 2 (Octave Range): This is exactly the same as the above “Note (Full Range)” setting, except for one very important point. If you use this setting, the key tracking spans a single octave, and will repeat itself each subsequent octave along the keyboard. So if, for example, you want to modulate the LFO 2 tracking using “Note 2 (Octave Range)” setting in a positive way, the LFO rate will go from slow to fast in the first octave on the keyboard, then will repeat and go from slow to fast again in the next octave, and so on, for the full range of the keyboard.
So if you want to create something really interesting in your patch, try setting it up using this “Note 2” value. Or, if you find that your patch is very specialized and only really works well over an octave or two, try removing all the key scaling settings which are applied over the entire length of the keyboard, and instead set them up in the MBRS using the “Note 2” source. What might have sounded like crap outside that 1- or 2-octave range, could end up sounding great with the key scaling modulations repeated from one octave to the next.

Last Key > Note: This parameter is similar to the “Last Key > Velocity” parameter I discussed in part 2 of this series of tutorials. The key scaling works based on incoming MIDI or Step Sequencer note data, and this can be applied to any Thor destination. The main advantage to using this setting is that you can key scale destinations based on the note being played in the Step Sequencer, which you can’t do with the Voice Key sources.
MIDI Key > Note: Again, this parameter is similar to the “MIDI Key > Velocity” parameter I discussed in part 2 of this series of tutorials. In this case, you’re sourcing the pitch information on a global or “monophonic” level, to key scale a Thor destination.

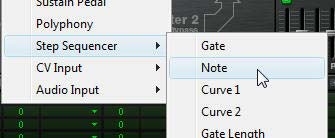
Step Sequencer > Note: This is one other way you can source Key scaling, however, this setting sources the note data directly from the sequencer. It’s similar to the “Last Key > Note” setting, except while “Last Key > Note” can accept both MIDI & Step Sequencer note data, the “Step Sequencer > Note” source can only accept Step Sequencer note data.
As with setting up Velocity parameters using the MBRS, you can extend the range of Key Scaling parameters. For example, if you apply the highest LFO 2 rate to control another Thor parameter, and then create 3 identical lines in the MBRS as follows: Key Note : 100 > LFO 2 Rate, you can extend the range of the LFO 2 rate to about 400% (The LFO 2 Rate knob (100%) + 3 MBRS rows (300%) = 400% of the LFO 2 Rate in total). Anything beyond this seems to result in a point of no return. I’m not completely certain how this would work for the filter or oscillator key tracking, but it’s probably the same theory. Of course, once a filter is “open” or “closed,” there’s no further you can go with it. So there are limitations.
Key Scaling Strategy
Most times I am trying to get the widest possible usable range out of a sound design. Here is the strategy I employ when attempting to do this:
First, I always think of the baseline at middle “C.” If you are working with a single Oscillator, this means you first set the Tuning (Octave / Semitone / Tune) knobs to play your intended sound design or sound idea at Middle “C.” If you have more than one Oscillator in the mix, set their tuning up as well, and ensure that they are tuned to work together to produce the sound you intend the musician to play at “Middle C.”
Once you set the Oscillator(s) baseline, move to the filters, and ensure you have the filter frequency and resonance set up correctly for the same sound played at middle “C.” Same goes if you have the LFOs modulating any of the Thor parameters. In essence, set up your baselines first.
Once that’s done, start adjusting the KBD tracking for the Oscillators, Filters, and LFOs. Play the patch at the bottom end of the keyboard and adjust the settings until you hear the sound you want. Once that sounds the way you want, move to the upper end of the keyboard and play the patch up high. If it sounds good to you, then you’re done.
However, at this point, if the patch sounds too bright, for example, you may need to adjust the Filter frequency knob or the Filter KBD knob. It’s at this point that things can become tricky. The reason is that modifying key scaling affects the entire range of the keyboard. If you change the key tracking settings at this point, you are changing them for both the low and high end at the same time. What affects the bottom will affect the top. So any changes you make at this point will force you to test out the patch at the bottom end of the keyboard again. It’s a bit of a balancing act and you may need to make a few compromises. But the goal should be to try to get the widest usable range for your sound construction out of your keyboard.
Aftertouch
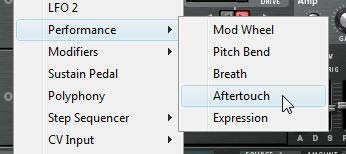
Aftertouch, or “pressure sensitivity” is employed after the key on your keyboard is initially struck, and allows you to modulate a synth parameter based on how hard you press the key (during the sustain phase). You can, for example, modulate a filter opening or a slight positive amplitude based on aftertouch. This will force the sound to gradually brighten or become louder the harder you press on the keys. As I stated in Part 2 of this series, not all keyboards come equipped with Aftertouch, but you should still try to employ it in your patches to make the sounds respond more dynamically to the musician’s playing style. Once again, all the same rules that apply for Velocity and Key Scaling also apply for Aftertouch. The only difference where Thor is concerned, is the fact that there is no “fixed” control for Aftertouch on the Thor panel. To program Aftertouch into your patches, you’ll have to use the MBRS and create a destination or multiple destinations for the Aftertouch parameter. But since I’ve explained how the MBRS works, you should now be a pro at how to do this. 😉

So that does it for the keyboard performance parameters. In the next series, I’ll go through the Wheels, Buttons and Rotaries you can use in Thor. In the meantime, please let me know if you have any ideas that come out of these tutorials, or if you have any tricks to teach us when it comes to Key Tracking and Aftertouch. I’m always looking to find new sound design techniques. Happy Reasoning!

Great article! Key scaling is essential for designing playable FM patches, IMO. I’m going to go review your previous “Creating Better Patches” articles.
@Timmy,
Thanks for commenting. I agree, you really need good Key Scaling for FM patches, and for many other things. Key Scaling, Velocity, and Aftertouch are essential for adding so much dynamics to the way the patch is performed by the musician. If you can connect the dots between your patch design and the performance, that’s half the battle. The actual sound being the other half.
Thanks again Phi. Maybe it might not be a bad idea to write a Reason book.
@Thomas,
I appreciate the encouragement. The problem with a Reason book is that the Propellerheads are developing the software so fast, that I probably wouldn’t be able to keep up. And there’s so many great free resources out there that a book may not even be necessary. Anyone else think I should write a book? If so, what would you like to see covered?