Thor Tremolo-Pan-Freq FX

This patch came out of a request to have a Tremolo effect in Reason. There’s many ways you can create one. But this time I wanted to expand upon that a little bit and create a triple effect using a single Thor device. So here is a Tremolo / Pan / Frequency Modulation effect patch that you can use.

This patch came out of a request to have a Tremolo effect in Reason. There’s many ways you can create one. But this time I wanted to expand upon that a little bit and create a triple effect using a single Thor device. So here is a Tremolo / Pan / Frequency Modulation effect patch that you can use.

Download the 2 Combinator patches here in zip file format: thor-tremolo-pan-freq-fx. Note: You will need Reason 5 or above to use the Combinators, because they both use the CV inputs on the Combinator, which was a new feature of Reason 5. If you have a previous version of Reason, the Combinator will give you a “bad format” error message.

(FX) Thor Tremolo-Pan-Frequency Combinator
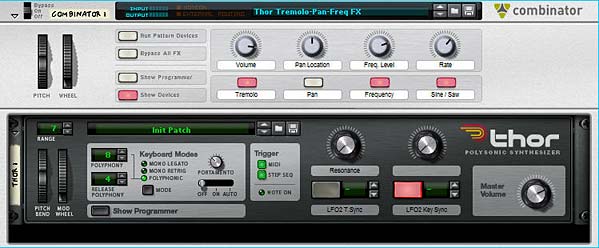
Thor Triple effect patch: Tremolo, Pan, and Frequency Modulations

This patch uses the Combinator Mod Wheel to trigger the level of the effect(s) in question. The patch is very simple in design, using only a single Thor inside the Combinator. The LFO 2 in Thor is used to modulate the following 3 effects:

  1. Tremolo
  2. Pan Modulation
  3. Frequency Modulation

Note: You must use the Mod Wheel in order to trigger these effects. You won’t hear anything happening to your audio if you don’t use the Mod Wheel!

The other nice thing about this patch is that you can have any combination of these three effects running at the same time. Or you can use only one of the effects at a time. The choice is yours.

The following explains how the patch rotaries and buttons work:

Pitch Bend: This parameter is not used.

Mod Wheel: Controls the level of the effects globally (i.e.: all three at once).

Rotary 1: Volume – Controls the global volume of the audio going out of the Combinator via the Master Level on the Thor device.

Rotary 2: Pan Location – Controls the location of the Audio in the stereo field. If the Pan modulation is turned on (see Button 2), then the panning still floats from left to right and back again like a pendulum, however, the Pan location is static and can be set anywhere along the stereo field. Try using this rotary in tandem with the Pan modulation turned on to get a feel for it.

Rotary 3: Frequency Level – Controls the Frequency of the incoming audio. Fully right cuts off the frequency entirely. Fully left opens the frequency completely. Use this in tandem with the Frequency Modulation enabled (see Button 3) for some interesting effects.

Rotary 4: Rate – This controls the rate of Thor’s LFO 2, which affects the modulation of the three effects globally.

Button 1: Tremolo – Turns on the Tremolo effect, which basically modulates the Amp Gain in Thor based on Thor’s LFO 2.

Button 2: Pan – Turns on the Panning modulation effect, which pans based on Thor’s LFO 2.

Button 3: Frequency – Turns on the Frequency modulation effect, with is modulated based on Thor’s LFO 2.

Button 4: Sine / Saw – Determines whether a Sine waveform is used or a Sawtooth wave is used. Sine is used if the button is off (disabled), and a Sawtooth waveform is used if the button is on (enabled).

And there are some extensions to this patch that I’ve set up on the Thor Rotaries and Buttons which can be accessed by Showing the Combinator devices:

Thor Rotary 1: Resonance – Controls the Resonance of Thor’s Filter 3. Minimum is set to zero (0) and Maximum is set to 96.

Thor Rotary 2: This parameter is not used.

Thor Button 1: LFO 2 Tempo Sync – Turns on the Tempo Sync for Thor’s LFO 2. When turned on, the LFO 2 Rate is tied to the song Tempo. When turned off, it is free-running.

Thor Button 2: LFO 2 Key Sync – Turns on the Key Sync for Thor’s LFO2. When turned on, the LFO 2 is re-triggered each time a key is pressed. When turned off, the LFO 2 wave is not re-triggered.

(FX) Thor Vibrato-Tremolo Combinator

This patch idea came courtesy of Eric Kloeckner. He said you could create a Vibrato in Thor by sending the audio through the Chorus effect and turning down the feedback. And voila, there it was. So now, I’ve created a second patch and placed both in the download file at the top of this posting. I also separated the LFOs in Thor, so that you can adjust the two LFOs independantly; meaning, you can turn on both the Vibrato and Tremolo and have them cycling at different rates and modulate both differently as they both act on your audio. Fun stuff.
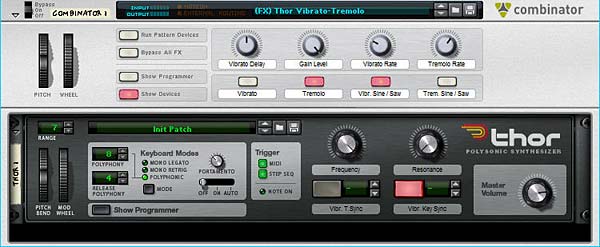
Second Thor FX Patch with separate Vibrato and Tremolo effects

The following explains how the patch rotaries and buttons work:

Pitch Bend: This parameter is not used.

Mod Wheel: Controls the level of the effects globally (i.e.: all three at once). Note again, you must use the Mod wheel to use the effect. No Mod Wheel, no effect. Very important to remember!

Rotary 1: Vibrato Delay – Controls the Chorus Delay, which can give some interesting effects and add a little more life to your Vibrato.

Rotary 2: Gain Level – Controls the Gain position of the Audio. In other words, it’s a volume level, but it’s most useful if you use it while the Tremolo is on. This way you can adjust the amount of gain (Tremolo) and the range at which the Mod Wheel affects the Tremolo.

Rotary 3: Vibrato Rate – Controls the rate of the Vibrato by adjusting the Rate of Thor’s LFO 2. In this patch, LFO 2 is tied to the Vibrato, and LFO 1 is tied to the Tremolo.

Rotary 4: Tremolo Rate – This controls the rate of the Tremolo by adjusting the Rate of Thor’s LFO 1. In this patch, LFO 2 is tied to the Vibrato, and LFO 1 is tied to the Tremolo.

Button 1: Vibrato – Turns the Vibrato effect on or off.

Button 2: Tremolo – Turns the Tremolo effect on or off.

Button 3: Vibrato Sine / Saw – Switches LFO 2 between a Sine and Sawtooth waveform, which in turn affects the shape of the Vibrato.

Button 4: Tremolo Sine / Saw – Switches LFO 2 between a Sine and Sawtooth waveform, which in turn affects the shape of the Tremolo.

And there are some extensions to this patch that I’ve set up on the Thor Rotaries and Buttons which can be accessed by Showing the Combinator devices:

Thor Rotary 1: Frequency – Controls the Frequency of Thor’s Filter 3. Minimum is set to zero (0) and Maximum is set to 127.

Thor Rotary 2: Resonance – Controls the Resonance of Thor’s Filter 3. Minimum is set to zero (0) and Maximum is set to 96.

Thor Button 1: Vibrato Tempo Sync – Turns on the Tempo Sync for Thor’s LFO 2. When turned on, the LFO 2 Rate is tied to the song Tempo. When turned off, it is free-running.

Thor Button 2: Vibrato Key Sync – Turns on the Key Sync for Thor’s LFO 2. When turned on, the LFO 2 is re-triggered each time a key is pressed. When turned off, the LFO 2 wave is not re-triggered.

Hope you find this useful. Let me know what you think?

42 – Stacking Modulated Filters

In this tutorial I’m going to show you two things: 1. How to Stack multiple filters together to process a sound, and 2. How to use Thor’s filters to supplement other devices in Reason that don’t have those same filters (think of the Formant and some parts of the State Variable Filter).

In this tutorial I’m going to show you two things: 1. How to Stack multiple filters together to process a sound, and 2. How to use Thor’s filters to supplement other devices in Reason that don’t have those same filters (think of the Formant and some parts of the State Variable Filter).

You can download the project file here: stacking-filters. This is a zip file that contains the .rns file with the two Combinators used in the making of this tutorial. Those same two Combinators are provided separately as well. The files work with Reason 4 and above.

Stacking Thor Filters (In a Nutshell)

Before jumping into the tutorial, if you are a primarily visual person (or just a YouTube whore), you can watch the video below to see the process outlined:

It should be noted that this is merely one method to stack a few filters. I find this method gives you a lot of flexibility when it comes to processing the sound, because you can adjust the amount of filtered sound which is mixed with the original sound (in other words, parallel processing). So let’s get started.

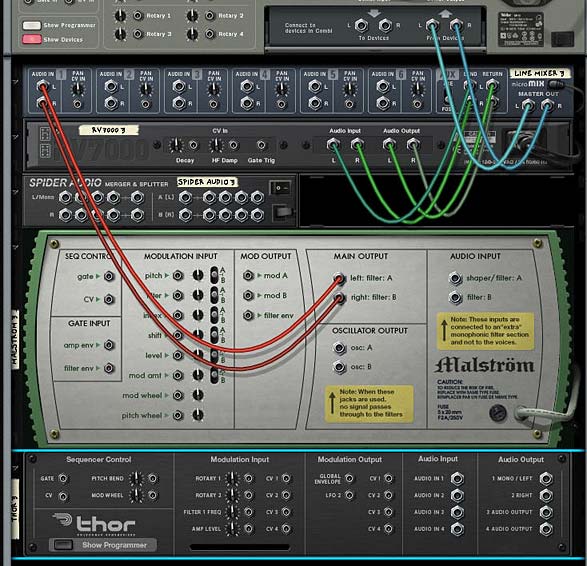
  1. First off, Create a Main 14:2 Mixer at the top of your rack. Then create a Combinator. Then inside the Combinator, create in order a 6:2 Line Mixer, RV7000, Spider Audio Merger/Splitter, and Malstrom. Then holding the shift key down (to prevent auto-routing), create a Thor synth device.
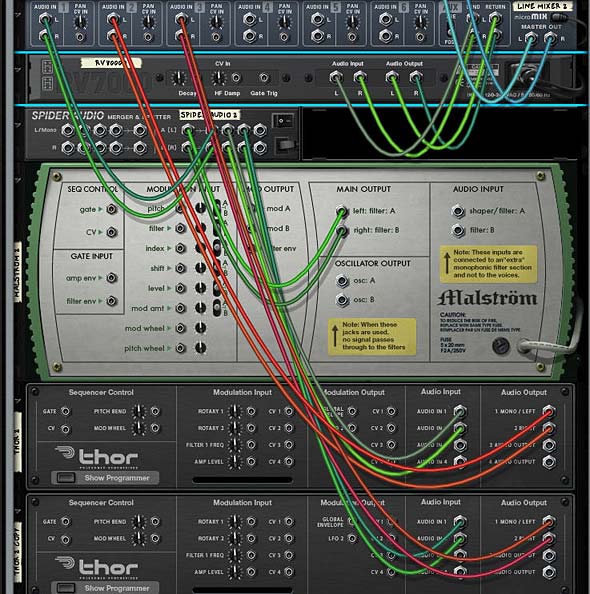
  2. Flip the rack around (Tab) and create the following routings: Remove the Malstrom Main A/B Outputs and reroute them to the Main Left/Right splits in the Audio Splitter. Then send one pair of splits to Channel 1 on the Line Mixer. Send another Split into Thor’s Audio Input 1 & 2. Then Send the Left/Right Audio outputs from Thor into Channel 2 on the Mixer.
    The view of the back of the Rack before all the routing
    The view of the back of the Rack before all the routing.

    The view at the back of the rack after all the routings -- we'll get to the second Thor's routing in a bit. . .
    The view at the back of the rack after all the routing -- we'll get to the second Thor's routing in a bit. . .
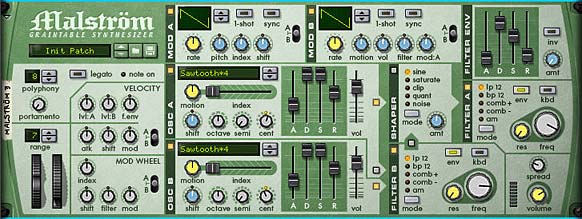
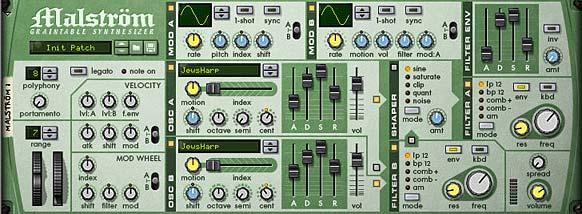
  3. Flip back around to the Front (Tab). In the Malstrom, turn on Oscillator 2, and set both Oscillators to “Sawtooth*4” and both Waveshapes in Mod A and Mod B to “Curve 2.” Set the ADSR envelopes of  both Oscillators to 40/127/127/75, respectively (This turns the sound into a much more progressive slow-moving Pad). Route Oscillator A to the Shaper and Oscillator B to the Filter B (Note: Do not turn on the Shaper). Set Filter A’s Frequency to somwhere around 116 or so. Set Filter B’s Frequency to somewhere around 106. This is so that we remove a bit of harshness in the final sound we’ll be building up. Set Oscillator A’s Cent value to “+7” and Oscillator B’s Cent value to “-7” which detunes the Oscillators from each other.

    The Malstrom settings
    The Malstrom settings
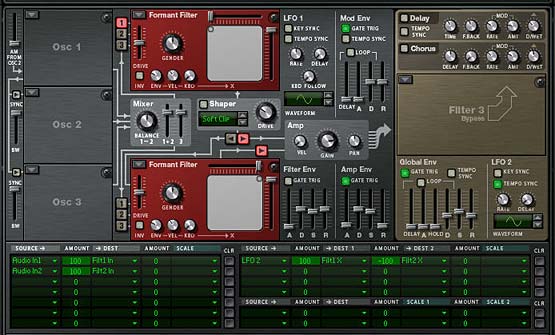
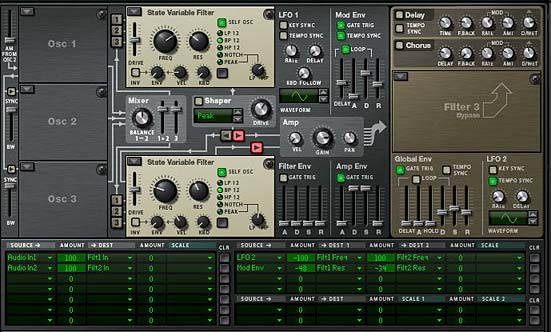
  4. Moving to the Thor, Turn Oscillator 1 Off, and uncheck the “1” button which routes Osc.1 to Filter 1. You don’t need Oscillators in Thor. We’re only using the Filters in Thor. Turn on the Formant Filter in both the first and second Filter Slots and set up Filter 1’s X/Y value to “0/127” and Filter 2’s X/Y value to “127/127.” Turn off the Filter Envelope’s “Gate Trig” button as well so that the Filters are not affected by the Filter Envelope. Then enable Filter 2 to be sent to the Amp section (the small arrow that leads from Filter 2 to Amp). Turn on the Tempo Sync for LFO2 and set the Rate to 6/4. Finally, set the Amp Envelope’s ADSR to the following values: 396 ms / 29.6 s / -0.0 dB / 6.98 s.
  5. Next, in Thor’s Modulation Bus Routing Section (MBRS), enter the following slots/lines:

    Slot 1 – Audio In1 : 100 > Filt1 In

    Slot 2 –  Audio In2 : 100 > Filt2 In

    Slot 8 – LFO2 : 100 > Filt1 X : -100 > Filt2 X

    The Thor Filter settings and Modulation Bus Routing Section (MBRS) settings.
    The Thor Filter settings and Modulation Bus Routing Section (MBRS) settings.

    The first 2 slots are telling Thor to take the audio input of the Left and Right Audio cables we set up previously, and sent them to Filter 1 and Filter 2 respectively. From that point onward, the signal travels through Thor as it normally would and then outputs to Channel 2 on the Line Mixer. The last line is what modulates the filter parameters in Thor. This basically creates a cross-over between filter 1 and filter 2 based on the default Sine wave in LFO2. Ok so far.

  6. Now with the Thor still selected, right-click and select “Duplicate Devices and Tracks.” In the duplicated Thor, set the LFO2 rate to 2/1 and change the Filter 1 X/Y value to “0/0” Then change the slot 8 line in the MBRS to the following:

    LFO2: 100 > Filt1 Y : -100 > Filt2 Y

  7. Flip the rack around and connect another split pair from the Audio Splitter to this new Thor’s Audio Input 1 & 2. Then Send the Left/Right Audio outputs from the new Thor into Channel 3 on the Mixer.
  8. Flip back around to the front of the rack and on the Line Mixer adjust the following:

    Channel 1 : Aux = 34; Level = 36; Pan = -14

    Channel 2: Aux = 50; Level = 92; Pan = 18

    Channel 3: Aux = 53; Level = 90; Pan = 22

  9. Finally, let’s take a look at the RV7000. Truth be told, you could enter whatever preset you like here which would work for a Pad sound. So enter your favorite RV7000 Patch. My settings were a low HF Damp, High EQ, with EQ turned on, and a lowering of the EQ curve on the low end with the gain set on the high EQ end to affect the midtones more than any other area. I also smoothed out the curve and made a few adjustments to the overall Reverb default “Hall” settings, as shown below.
    The RV7000 settings for the Hall Reverb
    The RV7000 settings for the Hall Reverb

    The settings for the Reverb's EQ.
    The settings for the Reverb's EQ.

Now give it a play and see how it sounds. By layering the filters and sending Left and Right to different filters that are modulated with a simple Sine wave, you can create some very complex tones that you couldn’t get using the Malstrom on its own.

Quickly Converting to a Whole New Sound

Now we can do a few interesting things with our setup. For example, duplicate the Combinator and change all four filters to “State Variable Filters.” Set the Resonance in the two filters in the first Thor to 54 and 82 respectively. In the second Thor, set both filters to “BP” mode and set the first filter’s Frequency to 3.28 kHz and Resonance to 38. Set the second filter’s Frequency to 158 kHz and Resonance to 50. Reduce the Attack and Release settings on the first Thor’s Amp Envelope a little bit. And Reduce them completely on the second Thor’s Amp Envelope. You can also use the Mod Envelope to affect the Resonance of the filters as I have done here:

Switching Filters and a few Parameters to get a completely different sound

Solo each Channel on the Mixer and see if the levels are ok. I found I had to insert a Maximizer after the second Thor just to boost things a bit. Trial and error is the key.

Finally, go into the Malstrom and change the two Oscillators to use the “JewsHarp” graintable in both. Reduce the Filter A & B Frequencies to your liking, and have a listen by playing a few notes. You end up with a very different sound altogether; like a slow meandering rumble. With just a few minor changes you get all sorts of different sounds.

The Malstrom Settings for this brand new sound. Use the JewsHarp Oscillators

Where do you go from here?

Anyplace you like is the short answer. But try out different filters and different Malstrom Oscillators. You could also insert a Scream device with some mild settings to completely alter the sound. Or try your hand modulating the filters in different unexpected ways using different LFO waves and rates. The sky is really the limit.

The only thing I might be wary of doing is creating delays on any of the parallel signals, as this can cause some phase shifting. But that might be something you are trying to achieve. It’s really up to you.

Let me know what you think of this tutorial and please add your comments if you come up with something far more interesting than these designs. I’d love to hear your own sound designs and creations. Until next time, good luck in all your endeavors.

41 – Layered FM Pair Oscillators

In this article, I’m going to tackle a very simple idea from which you can end up creating several interesting patches. The idea is to create several layers of the FM Pair Oscillators in multiple Thors, which are mixed together for a final output that sounds very thick and rich, and is capable of several sounds from Bell-like high pitched to Deep thick Organ sounds (think the Wedding March to get a mental picture of where this can take you). So jump on the train and let’s go for an orgasmic FM ride.

In this article, I’m going to tackle a very simple idea from which you can end up creating several interesting patches. The idea is to create several layers of the FM Pair Oscillators in multiple Thors, which are mixed together for a final output that sounds very thick and rich, and is capable of several sounds from Bell-like high pitched to Deep thick Organ sounds (think the Wedding March to get a mental picture of where this can take you). So jump on the train and let’s go for an orgasmic FM ride.

If you really can’t wait and just want to get to the good stuff, here it is: Layered-FM-Pair-Synthesis. The download contains 4 Combinators that are variations on the Multiple FM Pair Oscillator Synthesis. The Combinators are in a single .rns file which is zipped up. Try playing around with the different Rotaries and Buttons to come up with a wide variety of sounds. It’s like an extended Thor FM Pair Oscillator playground.

When I was building my FM 4-Operator System way back when, I went over most of the basics of FM synthesis. So I won’t rehash that again here. Instead, I’m going to outline one idea that I’ve noticed with FM which I’m hoping will help you build better patches. The idea is simple but very powerful, and if you haven’t played around with FM yet, you’ll soon realize it. The idea is this: when you have a modulator that is a multiple of the Carrier (or vice versa), you end up with very harmonic sounds. If you use a Carrier / Mod combination that are not multiples of each other, you end up with inharmonic sounds. This makes perfect sense when you read the technical description of what inharmonicity means. Namely, that when you depart from whole multiples of the fundamental frequency, you end up in a land where things start sounding strange (how’s that for a technical description?)

So we can start making some interesting musical choices based on this idea. Namely, if we want something very harmonic, we can build ourselves a patch with Oscillators that contain exact multiples of the fundamental frequencies. If we want something outside this harmonic realm, we can mix things up and create odd relationships between Carriers and Modulators, and even between Oscillators. Let’s start off by seeing how we can create a “Harmonic 12-Oscillator FM Pair Synthesis Combinator” — in 3 parts below:

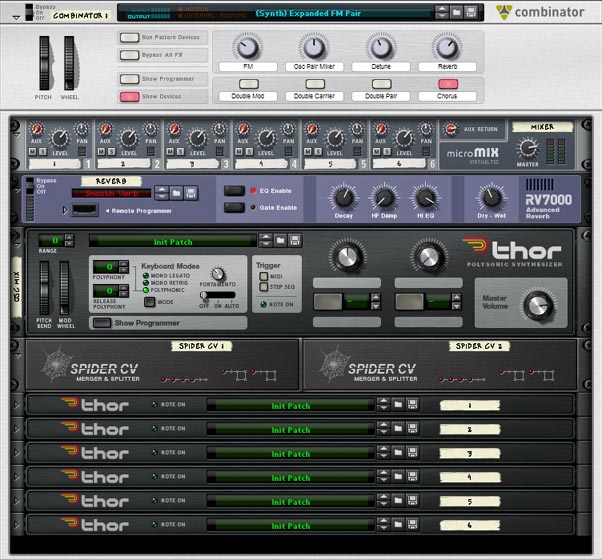
The idea behind this is pretty simple, you set up 6 Thor devices and place an FM Pair Oscillator in both Slot 1 and Slot 2. The “Slot 1” Oscillator’s Carrier and Mod are set to 1/1, 2/2, 3/3, 4/4, 5/5, and 6/6 respectively. The Oscillators in slot 2 continue from the first Thor (7/7) to the sixth Thor (12/12).  In this way you have a layer of 12 Oscillators in total. However, you can effectively double the settings using some clever button assignments so that you can have button 1 affect the Modulators, and button 2 affect the Carriers. When pressed, the Carrier/Mod buttons are set to double their values, providing 4 different settings as follows:

  • Both buttons off: Carrier/Mod are set from 1/1 up to 12/12
  • With the Mod button on, but the Carrier button off: Carrier/Mod set from 1/2 up to 12/24
  • With the Mod button off, but the Carrier button on: Carrier/Mod set from 2/1 up to 24/12
  • With both Mod and Carrier buttons on: Carrier/Mod set from 2/2 up to 24/24

The Combinator also allows for many other settings, as follows:

  • Rotary 1: Adjusts the FM knob on all Oscillator’s at the same time.
  • Rotary 2: Allows you to mix between Oscillator 1 and Oscillator 2 on all the Thor devices at once.
  • Rotary 3: Adjusts the Detuning amount by 12 ticks between Oscillator 1 and 2 on all the Thor devices at once.
  • Rotary 4: Adds some Reverb to the final audio output of all the Thors mixed together.
  • Button 3: Selects between only having 1 Oscillator per Thor (in slot 1), or having both Oscillators turned on (both slots 1 & 2).
  • Button 4: Turns on the Chorus setting in all the Thor devices (the Chorus is set to the default, but don’t be afraid to play around and get a Chorus setting that you like).

The FM Layers shown from the front inside the Combinator.
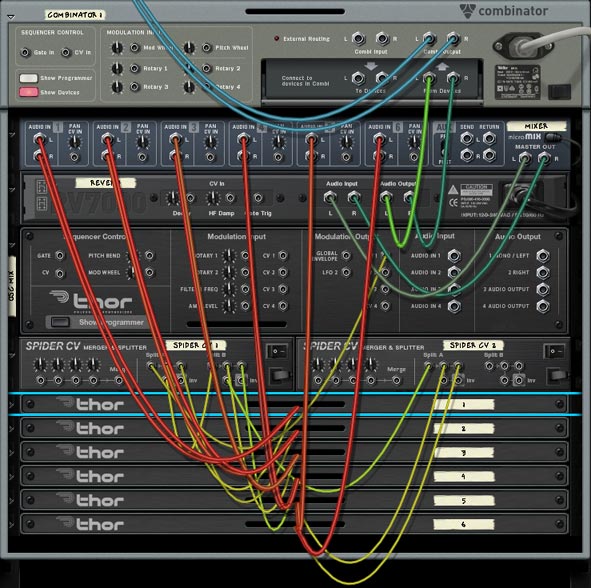
The Thor routings shown at the back of the rack inside the Combinator.

I’ve also included a few other variations on this style of patch in the project files (found at the top of this article). I’m not going to go over all the settings in those patches, as you can open them up and see for yourself. Play around with the settings and you will see that it offers a wide variety of sounds.

That about does it. And now that you have some of these ideas down, have a go at putting together multiple layered Analog, Wavetable, Phase Modulation, or Multi-Oscillator creations, using some of the techniques outlined here. And if you have any great creations that you’ve made or any ideas that you would like to share, I invite you to do so. Leave a comment and let me know what you think.

All my best for now.

40 – Thor Oscillator Wave Mods

In this tutorial I’m going to jump into Thor’s oscillators and show you how a simple method to cycle through the oscillator’s waves (Carriers, Modulators, Phase Mod Waves) can create lots of unexpected outcomes (a la Glitch). It can also allow you to modulate the Oscillators in a way you might not have thought about previously.

In this tutorial I’m going to jump into Thor’s oscillators and show you how a simple method to cycle through the oscillator’s waves (Carriers, Modulators, Phase Mod Waves) can create lots of unexpected outcomes (a la Glitch). It can also allow you to modulate the Oscillators in a way you might not have thought about previously. So let’s jump right in.

The project files can be downloaded here: Glitch-Oscillatoriffic. This zip file contains a single RNS file with 2 different Combinators. You can use the mute buttons on the main mixer to highlight each Combinator and play with each one individually.

I also wanted to say thanks to Geoff Wakefield for talking over this idea through an email exchange. Your ideas are great, as is your music Geoff! Keep up the great work. And go check out his music here: http://soundcloud.com/raven-2741.

First, here’s a video that outlines the basic concepts of modulating Thor’s oscillator waves:

Modulating Thor’s “FM Pair” Oscillator’s Carrier and Modulator

The main trick here is to keep all the devices inside a Combinator so that you can use CV to trigger the Rotaries of the Combinator. The Modulation Bus in the Combinator is used to set up the Oscillator’s Carrier and Modulation waves in the FM Pair, so that when CV is cabled into Rotary 1 & 2, the CV triggers a “cycling” through the different waves. This in turn affects the sound coming out of Thor. You then use the Malstrom’s Mod A & Mod B to supply the CV source, which is sent to the Rotary 1 & 2 CV input.

Also in the Modulation Bus of the Combinator, you’re going to set it up so that Rotary 3 and Rotary 4 (sources) are set up to adjust the Malstrom’s Mod A and Mod B (the destination). You can adjust the Min/Max settings to be as wild and crazy (full 0/31) or as tempered as you like (1/3, for example). In this way, you can not only adjust the Carrier / Modulation waves of Thor’s Oscillator with Rotary 1 and 2, but you can also adjust the Modulation Curve settings of the Malstrom’s Mod A and Mod B with Rotary 3 and 4.

Modulating Thor’s “Phase Modulation” Oscillator’s Wave 1 & 2

Now that we have the basic concept down, it’s a snap to transfer this same idea over to the Phase Modulation Wave 1 and Wave 2. Simply switch the Thor oscillator in slot 1 to “Phase Modulation” and then go back into the Combinator Modulation Bus, and change Rotary 1 and Rotary 2 as follows:

Rotary 1 > Osc 1 Phase Modulation Wave 1

Rotary 2 > Osc 1 Phase Modulation Wave 2

Note: the actual Min/Max settings, as shown earlier, can be anything you like, depending how crazy you like things.

Modulating Thor’s “Wavetable” Oscillator’s Tables

Now instead of the Phase Modulation oscillator, switch to the Wavetable Oscillator. Personally, this is my favorite oscillators for this type of technique. The variety and timbre of the sounds make it a really nice glitch mayhem device for the task. In using it though, there’s only 1 parameter we can effect, which is the actual Wavetables themselves. So switch Rotary 1 in the Combinator Modulation Bus as follows:

Rotary 1 > Osc 1 Wavetable Table

Once again, the actual Min/Max settings are up to personal taste.

One Step Further with the Oscillator’s  “Modulation” Parameter

When it comes to any of these oscillators, there is a “Modulation” parameter that you can also control using CV. For example, when using the FM Pair oscillator, you can have CV control the “FM Amount” knob. When using the Phase Modulation oscillator, you can use CV to control the “PM Amount” knob. When using the Wavetable oscillator, you can use CV to control the “Position” knob.

If you want to do this, you can borrow from one of the existing CV cables coming from the Malstrom and split it using a Spider CV Merger/Splitter, then send one split to the original Rotary destination and send another split into Thor’s CV in. Then it’s a matter of going into Thor’s Modulation Bus Routing Section (MBRS) and entering the following:

CV In1 : 100 > Osc1 FM Amt / Osc1 PM Amt / Osc1 Pos

If you set the FM/PM/Pos on Oscillator 1 very low, then using a high Amount (100) in the MBRS makes sense. If, on the other hand, you set the FM/PM/Pos knob very high, using a lower setting (-100) makes more sense. It depends which direction you want the CV to influence the knob (upward or downward).

Now that we’ve done 3 different Oscillators, I’ll leave you to work your magic on Thor’s  “Multi Oscillator” — yes, you can certainly have a lot of fun with that oscillator as well.

Bringing it all Together

If you look in the project file, you’ll see a few Combinators that take this whole idea a step further by creating a 6:2 Mixer in the Combinator, and then creating three sets of devices (each set contains a different Thor Oscillator, 1 Matrix to use the Mod A/B curves, and an Equalizer at the end of the signal chain, which is then sent to the line mixer and back out to the Combinator’s “From Device” input).

Here’s a video that goes through the steps needed to build one such Combinator:

The idea is a simple one. Have a different oscillator in each of the Thors. Set up the amp envelope any way you see fit. I find a high Decay, Sustain, and Release setting works pretty well, but again, you may have a different preference. The Malstrom Modulation Curves are there for you to use to affect the Thor oscillator waves or even the Modulation knob of the oscillator. This is where experimentation comes in.

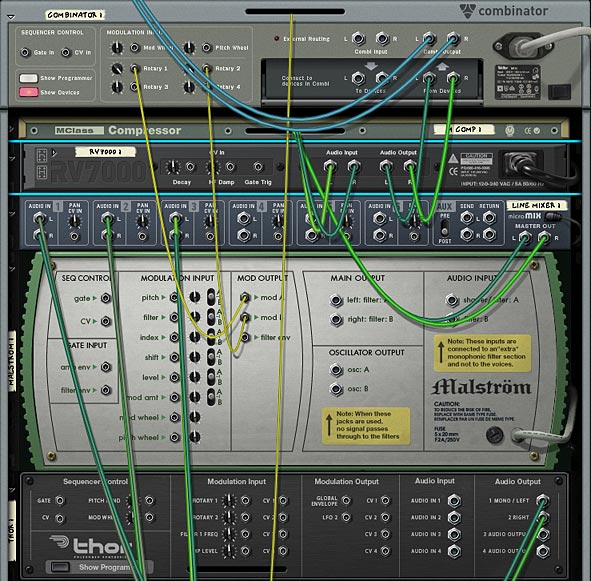
The back of the Rack showing the main components of the Combinator and how the devices are routed.

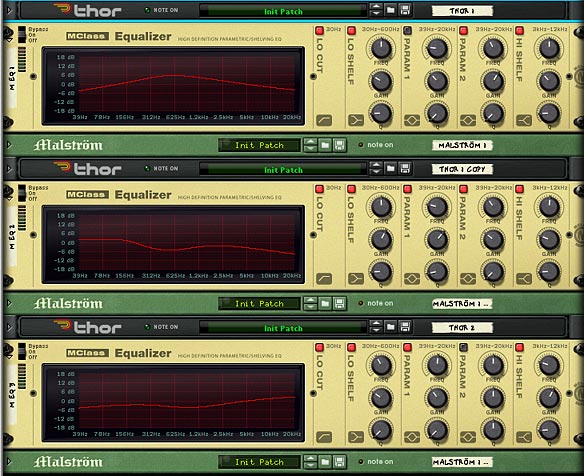
Finally, you have an Equalizer which is applied as a dynamic insert effect used to split each of the Thor sounds into their own specific range along the stereo field. This way, you can set up three oscillators and have each oscillator represent a place along the spectrum: Low, Mid and High. This way, you can balance out the sounds and let them shine in their own frequency range, without interfering with each other. Of course, these are all just suggestions. You might find some other ways to set things up for yourself.

The front of the Combinator, showing all 3 EQ devices to spread out the Oscillator sounds across Low, Mids, and Highs.

I hope this opens up some new creative avenues for you. There’s a lot more that can be done with the Thor oscillators, and this just attempts to scratch the surface or get your feet wet. Don’t be afraid to jump in though, and create your own masterpiece. Oh and if you do, please feel free to share it here. The more we see your ideas, the more we can learn from each other.

35 – Glitch Box Redux (R4 & 5)

In this tutorial, I’m going to show you some new ideas for Glitch Boxes in Reason 4 and Reason 5. Because, hey, we can never have enough glitch boxes or IDM-style sounds. Just like you can never have enough creativity. Consider this a “Glitch Box (Part 2)” for those that missed my first installment.

In this tutorial, I’m going to show you some new ideas for Glitch Boxes in Reason 4 and Reason 5. Because, hey, we can never have enough glitch boxes or IDM-style sounds. Just like you can never have enough creativity. Consider this a “Glitch Box (Part 2)” for those that missed my first installment. And if you’re interested, go here for more: Glitch Boxes (Part 1).

Download the project files here: more-glitch-boxes This is a single zip file with one RNS file containing both Combinators. Since those with Reason 4 won’t be able to open the file, I’ve included the Combinators separately. Note that one of the Combinators is for Reason 4 and up, while the other one is for Reason 5. Sorry to those who can’t open the R5 file, but you at least get to use the R4 Glitch Box Combinator right?

Glitching up Keith LeBlanc via the Dr. OctoRex (for Reason 5)

I’ll start with the Reason 5 approach, which uses a Dr. OctoRex to apply some interesting variations to a single loop, then copies that loop multiple times into various different slots. Once that’s done, you change all the slice parameters in all the different loops. Then send the 8 audio outputs of the OctoRex to different FX devices (even the Kong FX) and back into the Mixer channels. Using this setup, you could even apply different mastering FX to the different outputs.

Incidentally, I’m using a rex file that’s located in the Factory Soundbank that was created by drummer Keith LeBlanc. I was supremely excited to see some of his material included in the FSB (among other very talented individuals). If you haven’t heard of him; he, along with Adrian Sherwood, Doug Wimbish, Skip McDonald, and even Mark Stewart, formed a group back in the 80’s called “Tackhead” which were revolutionary at the time. I would highly suggest you visit these links and explore them further on your own. While not the first band to ever use samples, they were one of the first bands to heavily rely on them for their music. And they ushered in the industrial hip hop genre which was an amazingly ecclectic mix of genres. Their music may sound a little dated now, but still gets me going. Definitely worth your time to explore. Luckily I have the original “Tackhead Tape Time” LP (yes, an actual original issue LP). But enough about that. Let’s get busy Glitching up Keith LeBlanc!

Once the basic setup is in place, you can go crazy editing all the slice parameters, but pay special attention to the “Out” or “Output” parameter. This is what will send the various slices to the various FX devices. So that’s going to have the most impact on how the slice is played.

Lastly (and this is discussed in Part 3 below), you can set up a few CV sources via Thor devices, and send them to the different FX device CV sources. In this way, you can take the Glitch Box to a whole new level of crazy. Don’t miss it.

Glitch Box (Redux – for Reason 4)

In this second approach, I wanted to give Reason 4 users another way to create some Glitch in their rack. This is an idea I got from delving into the Glitch Box Combinator that comes with the Factory Soundbank. It was an old patch that has been around since R3, and so it uses a few NN19s hooked up to a 14:2 Mixer, and the mixer levels are triggered by the Redrum CV Gate outs. In this one, I update the idea by using a few Thor devices. You can really have a lot of fun using a few different Wavetable oscillators, and changing around the LFO2 Wave types and rates between all the Thor devices (this is something I neglected to do in the video below, but I would think it would produce some interesting variations).  Anyway, this method can be used in R4 and above and is for all those who haven’t yet purchased Reason 5. But seriously, what are you waiting for?


So does anyone else out there have some good glitch ideas or know ways in which these combinators can be improved? Possibly adding some mastering or Reverb before they hit the mixer is one thought I had. Any other ideas?

Reese Bass & Trance Lead

This time, I was trying out various Reese Bass ideas and other trance lead ideas after watching Hydlide do a few interesting tutorial videos on putting together a trance lead. So I thought I would try out creating some trancey sounds in a Combinator which everyone can use if they wish.

Download the RNS file and two Combinators (in a single zip file) here: trance-leads.

Description: This time, I was trying out various Reese Bass ideas and other trance lead ideas after watching Hydlide do a few interesting tutorial videos on putting together a trance lead. So I thought I would try out creating some trancey sounds in a Combinator which everyone can use if they wish.

Features: The Combinators are pretty simple. Mostly, they use saw waveforms which are detuned. Add in a few special effects and you have some highly customizable sounds. The Reese’s Pieces Combinator was created with a Reese Bass sound in mind, so it’s better if you use this in the lower registers of your keyboard. The Trance Lead Combinator is pretty much what it says on the tin: a Trance Lead. Here are a rundown of each Combinator’s controls:

Reese’s Pieces

Reese's Pieces - Just one of my takes on a Reese Bass

Here’s how the patch was put together:

Pitch Bend: The pitch bend adjusts the Pitch up or down by 7 semitones.

Mod Wheel: The mod wheel is assigned to the Malstrom only. Index is increased, Shift is reduced, and the Filter is increased.

Rotary 1: Filter Frequency – This affects the Thor’s Filter 1 Frequency and allows you to play with the full frequency range. This knob is also tied to the ECF filter frequency which affects the sound coming out of the Malstrom in the same way. Essentially you can create a filter sweep with this Rotary.

Rotary 2: Resonance – This gives you a limited, but useful range affecting the Thor and Malstrom Resonance kn0bs.

Rotary 3: Unison – This Rotary affects the impact of the Unison affecting the Thor Oscillators. Fully left, and there is no Unison (fully dry), while turning the knob fully right provides you with a full Unison detuned sound (fully wet).

Rotary 4: + Shift – This changes the Shift of the two Malstrom Oscillators (A and B) from 0 to +63. You just have to try this out to hear for yourself. It’s a very interesting and quirky application to the sound. But I personally like playing around with this rotary.

Button 1: Twist 1 – This turns on the Thor Shaper. It provides a slightly overloaded or overdriven sound on top of all three sawtooth waves in Thor. It’s not overly heavy though, so it’s pretty safe to use. However, depending on how your Frequency and Resonance are set, this will affect how much you will hear the Shaper affect the sound.

Button 2: Twist 2 – This turns on the Malstrom Shaper. It provides an overdriven sound effect. This is much higher pitched or brighter than the Thor Shaper, so it provides a more distinctive sound. However, depending on how your Frequency and Resonance are set, this will affect how much you will hear the Shaper affect the sound.

Button 3: Reverb – Adds in a strong reverb sound, which I find is pretty common in these types of patches.

Button 4: Unassigned

Usage: You can use this any way you like. But mainly it can provide a very bass-heavy sound (my take on a Reese Synth Bass sound).

Trance Lead

A simple Trance Lead Combinator
My take on a simple Trance Lead with lots of parameters to tweak.

Pitch Bend: The pitch bend adjusts the Pitch up or down by 7 semitones.

Mod Wheel: Unassigned

Rotary 1: Bass Increase – As the name suggests, the bass is increased by increasing the Filter Frequency of Thor’s Filter 2.

Rotary 2: Motion – This affects the Motion of the Malstrom Oscillators A and B from -64 to +30.

Rotary 3: Reverb – Adds Reverb to the overall sound coming out of the Combinator. This is a Dry/Wet Reverb knob going from 0 to 70.

Rotary 4: Filter Sweep: This affects the frequency of all the Oscillators. Use this rotary to create a simple filter sweep for build-ups in your songs.

Button 1: FX 1 – Each of the buttons adds a specific effect which you may or may not like. I added these in as an afterthought just to provide more flexibility with the Combinator. Play around and experiment with them to see if they enhance the sound for you. Button 1 here Changes the Modulator A to Index from 0 to -64.

Button 2: FX 2 – Changes Thor’s Oscillator 1 Octave from 3 to 4. Also changes the Malstrom’s Oscillator B Octave from 4 to 5.

Button 3: FX 3 – Changes the Malstrom’s Modulator A to Shift from 0 to 22 and Modulator B to Motion from 0 to -10

Button 4: FX 4 – Changes the Malstrom’s Modulator B to Filter from 0 to -64

Usage: You can use this any way you like, but mainly it provides a basic trance lead sound.

Other Notes: For both Combinators, you can really change this sound around quite a bit just by playing with all the parameters. So you’ll have to experiment to find something that suits your taste. In addition, you can use the Frequency rotary to create a frequency sweep or build-up in your tunes.

As always, please let me know what you think or let me know if and how you use this in your own projects. Happy Reasoning!

33 – One Rotary, 64 Patterns

This is a problem that plagued me for a long time but with Thor, I found a very easy workaround. The idea is simple. I wanted to gain access to more than 32 patterns with a single Rotary on a Combinator. For the longest time I couldn’t figure out how to do it. Then it hit me like a ton of bricks and I had one of those “of course!” moments. I mean come on. Doesn’t everyone feel limited with only 32 patterns accessible from a Combinator rotary? How about 64 patterns?

Let’s take a breather from all the Reason 5 action. Since many people are still on Reason 4, let’s do something that everyone in 4 & 5 can do together. This is a problem that plagued me for a long time but with Thor, I found a very easy workaround. The idea is simple. I wanted to gain access to more than 32 patterns with a single Rotary on a Combinator. For the longest time I couldn’t figure out how to do it. Then it hit me like a ton of bricks and I had one of those “of course!” moments. I mean come on. Doesn’t everyone feel limited with only 32 patterns accessible from a Combinator rotary? How about if I showed you how to double the amount of patterns you could access. Would that be worth 10 minutes of your time?

Here is the project file for this tutorial: 64-patterns. It contains an .rns file (it was created in Reason 5, so I’m not sure if those with Reason 4 can open it or not. If not, let me know and I can create the same file in R4 for you). In the rns file there are two Combinator ideas. One that contains 64-pattern switching, and the other contains 128-pattern switching. Note that I have not populated all the matrixes with fully loaded patterns. Instead there is a single pattern on A1 for all the Matrixes. This way I was able to test switching from one matrix to another. It’s up to you to load the Matrixes with your own patterns, random or otherwise. Both Combinators are connected to the same mixer, so you will need to mute one channel to hear the outcome of the other and vice-versa. Have fun with these!

So let’s get down to business. . .

So why would you ever want to do this. Well, it gets me closer to what I would like to see out of Reason: a way to create truly generative music, where you can press a button and set sail a sea of sound that is ever-changing. Great if you want to have some Pad or Ambient sounds drift on in the background, ever changing and always new and interesting. You could also incorporate this into your glitch effects as a controlling device to provide an endless range of chaotic buzzes, blips and shazams. How you use it is really up to your own creativity. But at least with 64 (and even 128) different patterns, you can create a pretty long string of variety that, if played through from start to finish, no human could discern the repetition (think of it this way: at 120 BPM, a normal 4/4 bar with 64 patterns shifting at every 4 bars would last 8.5 minutes before any repetition occurs. In the case of 128 patterns, you could end up with an ever-changing pattern lasting 17 minutes long without any repetition.

Yes, it’s a little spastic and insane, but it can definitely prove interesting, even as nothing more than a creative experiment. So let’s take a look at how you can create 64 patterns on one Combinator rotary knob.

  1. First, create a Combinator and inside create a 6:2 line mixer. Then, holding the Shift key down to force Reason not to autoroute the devices, create a sound source (let’s take a Subtractor so that we can differentiate from the Thor device which we’ll use as a CV switcher). Also create 2 Spider CV Mergers/Splitters, a Thor, and one Matrix pattern sequencer.
  2. Load up the Matrix sequencer with 32 patterns, then duplicate the matrix so that you have another copy with the same 32 patterns. At this point, change the patterns on the second matrix so that you have a new set of 32 unique patterns in the second matrix.

    You may want to temporarily tie the matrix to a sound source device so that you can audition the patterns and how they sound. You may alternately want random patterns, in which case you can select the Matrix device and press Ctrl+R in order to randomize a pattern into a pattern bank. Go to the next pattern (A2) and do the same. And so on, until you have all 32 pattern banks filled.

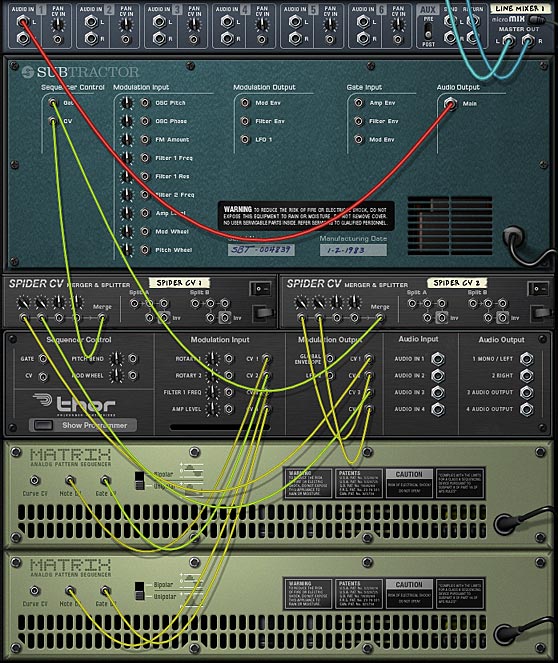
  3. Next, flip the rack around and start making connections. Send the Audio output of the Subtractor to the Audio Input of channel 1 on the Line Mixer. Send the Note CV output of Matrix 1 to the CV 1 input on the Thor. Send the Gate ouput of Matrix 1 to the CV 2 input on Thor. Then send the Note CV output of Matrix 2 to the CV 3 input on the Thor. Send the Gate ouput of Matrix 2 to the CV 4 input on Thor.
  4. Send CV 1 & CV3 outputs from Thor into the Merge input 1 & 2 on the first Spider. Then CV 2 & CV4 outputs from Thor into the Merge input 1 & 2 on the second Spider.
  5. Send the merge output from Spider 1 to the CV input on the Subtractor, and merge output from Spider 2 to the Gate input on the Subtractor. Also, turn the trim knobs on all the CV merge inputs that are occupied fully right (set to 127). If you don’t do this, you won’t get what you expect when you start playing the patterns.

    The CV and audio routings on the back of the rack
    The CV and audio routings on the back of the rack
  6. Now that everything is routed, we need to tell Thor what do do with all that CV stuff. So flip the rack around to the front again, and click the “Show Programmer button on Thor.

    Note: Since the Thor device is only used for CV purposes, you can remove all of Thor’s audio settings (bypass the Oscillator and Filter, turn off all the envelopes, etc.). Alternately, you can open up the Combinator Programming panel and deselect the “Receive Notes” checkbox for the Thor device. Either way will work.

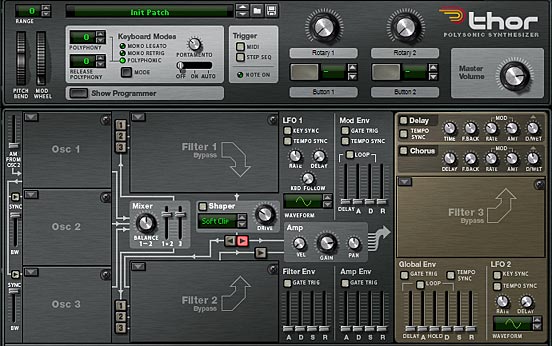
    A completely initialized Thor device
    A completely initialized Thor device
  7. Once the Thor programmer is open, enter the following in the Modulation Bus Routing System (MBRS):

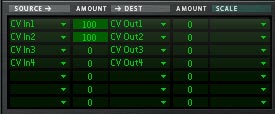
    CV In1: 0 > CV Out1

    CV In2: 0 > CV Out2

    CV In3: 0 > CV Out3

    CV In4: 0 > CV Out4

    The Modulation Bus Routing Section (MBRS) in the Thor device
    The Modulation Bus Routing Section (MBRS) in the Thor device
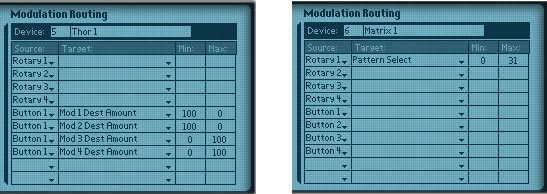
  8. Now let’s do a little programming in the Combinator. Open up the Programmer panel for the Combinator. Select the Thor device and enter the following:

    Button 1 > Mod 1 Dest Amount: 100 / 0

    Button 1 > Mod 2 Dest Amount: 100 / 0

    Button 1 > Mod 3 Dest Amount: 0 / 100

    Button 1 > Mod 4 Dest Amount: 0 / 100

    Then select each matrix and tie them both to Rotary 1 as follows:

    Rotary 1> Pattern Select: 0 / 31

    The Modulation Bus of the Combinator: Thor settings on the left and the Matrix settings on the right.
    The Modulation Bus of the Combinator: Thor settings on the left and the Matrix settings on the right.

Press button 1 twice to initialize it (turn it on and off). Also turn Rotary 1 in order to initialize it. Now when you play the sound source, moving Rotary 1 around will select pattern 1 – 32 on Matrix 1. When you press Button 1, the Rotary switches to Matrix 2 and you’ll be hearing pattern 1-32 on Matrix 2. This switch is instantaneous simply because both Matrix patterns are running at the same time. Thor and the Spiders are used to switch from one matrix to the other on-the-fly. It’s really that simple.

And now let’s go for broke!

Awesome. We have 64 patterns. Let’s go for broke. Let’s create 128 patterns! Because you can never have enough patterns. In this case, you essentially have to duplicate what you did for the previous section, and create a second set of 64 patterns on Rotary 2 / Button 2 in your Combinator. Once you’ve created those, and routed them up and programmed them (Tip: duplicate all your devices, that way you don’t have to reprogram the Thor again, and instead just need to set up the routings).

Once that’s done, you’ll need to create yet one more Thor and 2 Spider Mergers/Splitters. This time, you’re going to take the merged output from the two spiders hooked up to Thor #1 and the merged output from the two spiders hooked up to Thor #2, and send them through the third Thor. The CV outs from Thor will then go into the 2 Spider Mergers/Splitters you just set up (on the merged side), and then the merged output from both will go into the CV / Gate inputs on the sound source device (in this case, the Subtractor).

Now the only thing left to do is to program the Combinator. Open up the Programmer, select Thor #3, and again enter the following:

Button 3 > Mod 1 Dest Amount: 100 / 0

Button 3 > Mod 2 Dest Amount: 100 / 0

Button 3 > Mod 3 Dest Amount: 0 / 100

Button 3 > Mod 4 Dest Amount: 0 / 100

Matrix 1 & 2 will need to have their “Pattern Select” both tied to Rotary 1, while Matrixes 3 & 4 will need to have their “Pattern Select” both tied to Rotary 2.

This way, Rotary 1 controls which pattern is selected on Matrix 1 & 2 (64 patterns in total), and Rotary 2 controls which pattern is selected on Matrix 3 & 4 (64 additional patterns). Button 3 acts as a toggle switch between the two sets of Matrixes (Matrixes 1 & 2 on Rotary 1, and Matrixes 3 & 4 on Rotary 2). Phew. That’s it. You’re all set to play with the Rotaries/Buttons to switch between 128 unique patterns programmed into 4 Matrixes. If that’s not enough patterns, then even Reason can’t help you out.

I know this might get a little confusing for some of you. It was confusing to set up the first few times. But if you run into trouble, just download the project files up at the beginning of this tutorial. There’s a fully-functional 128-pattern switcher Combinator in there. Good luck!


So as far as practical applications, if you really need 64 or 128 unique patterns affecting the same sound source, you can do it all within a Combinator. With a little routing ingenuity you could probably access the Redrum patterns in much the same way and extend your creativity further. How’s that for an idea? Do you have any comments or questions? please jump in and post them here. Until next time, happy reasoning!

29 – Synth Drums from Scratch

The subject of today’s tutorial is how to create your own standard drum sounds via synthesis. Here, I’m going to show you a few techniques to bring these drums to life, with little more than a Thor, Malstrom, or Subtractor synth, and some supporting modules. This is a great alternative to using Drum samples or relying on sample CDs for your drum sounds, though those are both great alternatives that should not be overlooked.

Often times we don’t have access to a real drum kit and it’s not feasible to get real true-to-life drum samples to use in your own work. Or you may just want the sound of a synthetic drum as opposed to the real thing. One option is to purchase some sample CDs. Another is to create your own drum sounds from scratch, using the synths provided in Reason. That’s the subject of today’s tutorial. Here, I’m going to show you a few techniques to bring some standard drums to life, with little more than a Thor, Malstrom, or Subtractor synth, and some supporting modules.

I should start by saying that with the addition of Kong in Reason 5, creating drums has never been easier. Load up a physical drum or a synth drum module and you’re more than halfway there. However, for those that don’t have Reason 5 yet, then this tutorial is for you. Everything below is created using the Reason 4 devices. This goes to show you that you don’t necessarily need Kong to create interesting drum sounds. So let’s get started.

You can download the project files here: Synth Drums from Scratch. This is a zip file that contains 3 Combinators and 1 Thor patch outlining the different drum sounds from the tutorials below. The Combinator parameters will affect the sound of each drum. I’ve tried to tailor them so that you can get a very wide variety of drum sounds out of each Combinator. Have fun with the various buttons and rotaries to get the sound you want out of them.

The Bass Drum

The first drum we’ll emulate is a Kick or Bass drum. This is probably one of the easier drums to emulate because it has that very bassy deep and punchy feel to it. The hardest part about programming this kind of drum I think is in the Compression, which most every Kick drum should have. How it is compressed is really a matter of taste, but getting just the right sound you want is probably going to rely on the way you compress it. A close second in terms of seasoning your Bass Drum is using EQ to accentuate the correct frequency or frequencies. Here’s how I would go about creating a Kick Drum using Thor.

The Tom Drum

The second drum type we’ll create is a Tom Tom drum. This time, I’ll use a Malstrom with a TubeSlap Oscillator to emulate it. This oscillator is great for sounds like these, and can produce just the formant sound that is needed with a typical Tom drum. Of course, you can emulate all of these different drums using any of the synths. This is just one way to recreate the sound. You could instead, try using a Thor oscillator with a Formant filter to get the Tom Drum sound you’re after. Be sure to explore more on your own to find the sounds that truly inspire you.

The Snare Drum

The third type of drum I’ll recreate is a Snare drum. For this, I’ll use a subtractor with two Oscillators and a Bandpass filter. Then we’ll use a Noise Oscillator in Thor to add that extra tail that a Snare drum can have. To wrap it all up, we’ll combine them both and set up a little programming to the rotaries in order to get a little more out of our Snare sounds. Using these parameters we can create a variety of Snares, instead of a single type of sound. See how it’s done:

The Hi Hat

Finally, there is the tried and true Hi Hat sound, both open and closed. To emulate this one, we’ll use a Thor FM pair and Noise oscillator going through two State Variable filters set to High Pass and Notch mode in Thor. I’ll emulate the open and closed Hi Hat and tie it to a Thor button. This way, you can access both the closed and open state of the drum with the click of a button (and from within the same Thor synth, which makes it very CPU friendly). Of course, if you want to separate them, you can duplicate the Thor device and use one Thor for the “Open” Hi Hat position and one Thor for the “Closed” Hi Hat position. It’s all up to you and very flexible.

So there you have it. Four basic drums created with the three different synths in Reason 4. If you have any other drum sounds that you would like to contribute or tips for drum creation, please feel free to share with us. Until next time, have fun working your own magic in Reason and Record!

28 – Weird Sci-Fi Synth Sounds

Here are a few ways you can create some trippy and out-there sounds using the synths in Reason. I’ve had a lot of requests for these kinds of sound creations, so I thought I would throw a few ideas out there. These sounds provide you with three different patch ideas for three different Sci-Fi type sounds. Enjoy!

Here are a few ways you can create some trippy and out-there sounds using the synths in Reason. I’ve had a lot of requests for these kinds of sound creations, so I thought I would throw a few ideas out there.

Sure. This time around I’ll provide the patches found in this project here: weird-sci-fi-patches The file contains 2 Thor patches with 2 variations on the Sci-Fi sound, a Malstrom with an Alien voice, and a Subtractor ominous spacey patch. Enjoy!

First off, here’s an idea which uses the Noise Oscillator and a Multi-Oscillator to create some really weird sounds in Thor. The key features here are the use of the Bipulse Shaper and the Self-Oscillating filters. In this example, they are probably even a little more important than the actual Oscillators that you’re using. So here’s the video:


The second kind of other-worldly sound is brought to you by the Malstrom. In this case, I tried to create an Alien from outer space voice using the Electronik voice and the Jews Harp grains inside the Malstrom. As you’ll see, the Malstrom is exceptional for these kinds of crazy effects. You can have a field day tweaking knobs on here. The main focus should be on utilizing the Pitch knob, as well as all the other knobs to affect the Oscillators. In this way, you can mangle your audio beyond any human recognition. Makes for exactly what we need to build our Alien Voice. Here’s the video:

Now of course we shouldn’t forget the Subtractor in our quest to create some freaky sound effects. So let’s try giving it a whirl. This time I’m going to go for a more Ominous space sound, almost a Pad-like sound. This seems like it would be great as an intro for a huge and ominous scene and reminds me of when the Borg attacked the Enterprise in the feature-length movie: “Star Trek: First Contact.” Yes, I know. Major geek right? Well, anyway, this uses some FM for the deep bassy sound, and a low Octave Oscillator. From there, you just need to adjust the filter. One other interesting thing you could do is sweep the filter frequency from Closed to open and back again. The key of course is to experiment, experiment, and experiment some more!

So there you have it. A few different Sci-Fi sounds for you to jump into. There’s billions more sounds just waiting to be created. If these help as a starting off point for you, then great. Glad I could help. And if you have any comments, suggestions, tips or tricks, please let me know. It’s from your requests that I end up making these tutorials in the first place. So keep the requests coming. And Happy Reasoning!

25 – No-Nonsense Tips (Part 2)

In this second part, I’m going to provide even more quick tips that can be used as food for thought while you develop your tracks. These aren’t earth-shattering or advanced. They are just some easy tips to help out with some problems you might have or tips that show you a few capabilities you may have missed.

In this second part, I’m going to provide even more quick tips that can be used as food for thought while you develop your tracks. These aren’t earth-shattering or advanced. They are just some easy tips to help out with some problems you might have or tips that show you a few capabilities you may have missed. So let’s jump in.

Tip #1: Did you know this could be Automated? I didn’t.

This is probably the simplest of tips. While I learned about a year ago that you can assign the Destination and Scale Amount parameters from Thor’s Modulation Bus Routing System (MBRS) to a rotary on a Combinator, I completely neglected to realize that you can indeed automate any of the “Amount” parameters directly in Thor. So for example, if you setup a Vibrato in Thor, it would look something like this:

LFO2: 25 > Osc1 Pitch: 100 > ModWheel (Read Thor’s back panel — this is your basic Vibrato).

Great, but now, let’s automate that LFO2 amount so that the vibrato increases or decreases the pitch over time. Easy as easy can be. Simply right-click over the amount parameter on the front of Thor in the MBRS and select “Edit Automation.” Now you can automate the amount directly in the Sequencer. Pretty cool right?

The Amount settings in Thor's MBRS can also be automated

Tip #2: Stealing unused CV from devices that are already there.

This is a great tip, and it’s one I use all the time. Let’s say you have most of the sound sources set up in your track. Now you want to modulate and automate parameters. Instead of creating new devices like the Subtractor, Malstrom, Matrix, etc. to modulate those destinations, why not steal modulation sources from the devices that are already in your track. This saves on CPU, and it means you ultimately have a less cluttered rack with less devices. The only thing you need to be careful about is making things overly complex, as it can get confusing quickly. But this is another trick I use all the time.

For example, if you have a Thor as one of your devices in your rack, you have access to a multitude of CV sources you can use to modulate other parameters and devices. Here’s just a few:

  • Curve 1 in the Step Sequencer
  • Curve 2 in the Step Sequencer
  • LFO 1
  • LFO 2
  • Mod Envelope
  • Amp Envelope

So if any of these are not currently being tapped for use by the Thor sound itself (and even if they are, you can still use them for other purposes), you can enlist them for CV duty anywhere else in your rack. Simply create the CV connection from the back of Thor to the destination CV input in the other device location. If you are using LFO2 or the Global Envelope outputs, then all you need to do is set up the LFO 2 or Global Envelope parameters on the front of Thor and you’re done. If you are using LFO 1 or the Amp envelope, you’ll have to set these up using the CV outputs on the back of Thor, and then setting them up in the MBRS. If using the Curves in the Step Sequencer, you can route the CV from the Curve CV outputs on the back of Thor.

You literally have an amazing supply of CV modulation sources all from one Thor device. So much so, that this may be all you need. You might not need to use the LFO from another Subtractor or the Mod A and B from a Malstrom, and you may not need to add a bunch of Matrix units. With Thor, you can keep everything contained in one location. And chances are that you probably already have a Thor unit in your track already. So save yourself some CPU. That reminds me to put together a tutorial on all the CV possibilities of Thor. hmmm. Perhaps in a tutorial down the road. More to come on this. . .

Tip #3: Add a Scream to shape your sound.

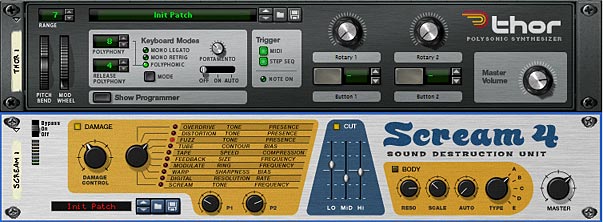
I have to say that this came out of watching Hydlide run through some videos about my latest refill. He had a really solid idea to turn pretty much any drum sound into a punchier kick sound. But this is also a nice trick to try out variations on your own sound and is kind of like the tip I showed you where we added a unison to give things a wider thicker sound. This time however, let’s add a Scream device after any sound source and just play with the settings until it shapes into a sound you like. Something a little beefier or meatier. And it only takes a minute or so.

The other added benefit to doing this is that you have access to a 3-band EQ using the “Cut” section. While this isn’t as powerful as the M-Class EQ, it does a great job for quickly sculpting the sound. So when you’re in a rut, try out a Unison on those thinner synth sounds, but try out a Scream as well, to sclupt your drum and bass sounds.

The Scream can be inserted anywhere as a great sound sculpting tool

Tip #4: Turn your Combinator buttons into Radio buttons.

This tip came out of a request on the PUF (Propellerhead User Forum) where the original poster wanted to convert the Combinator buttons into Radio buttons. If you don’t know what a Radio button is, it’s ok. You’ve used them everyday in all kinds of software. Here’s a quick rundown: Radio Buttons.

You can download the template for this trick here: radio-buttons. The zip file contains the RNS file (and Combinator) which turns your Combinator buttons into radio buttons. Don’t pay too much attention to the synths at work here. They are just put there at random to highlight the difference in sound when selecting each of the buttons. I didn’t choose them for their stunning sound quality when played together (reset).

Now as all of you know, you can’t change the way the buttons work. They are toggle buttons by design, turning something on or off. So to turn them into a radio button is like taking a two-dimensional object and turning it into a one-dimensional object. It’s going backwards slightly. But there’s a good reason behind it.

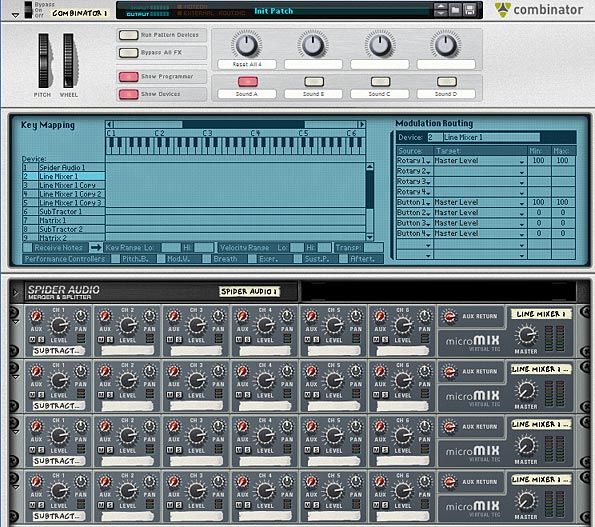
To start, you probably want to have the buttons trigger something. In this case, I’ll take something very basic like 4 synths tied to each of the 4 buttons. Pressing one button will trigger its corresponding synth. Pressing another button will trigger the next synth, and so on. So first create a Combinator, and inside create four 6:2 line mixers and four synth devices. And then tie each of the synths to its own line mixer by sending the audio output to channel 1 on each of the four line mixers. Then open up the Combinator programmer, and program the following:

Line Mixer 1:

Rotary 1: Master Level: 100 / 100

Button 1: Master Level: 100 / 100

Button 2: Master Level: 0 / 0

Button 3: Master Level: 0 / 0

Button 4: Master Level: 0 / 0

Line Mixer 2:

Rotary 1: Master Level: 100 / 100

Button 1: Master Level: 0 / 0

Button 2: Master Level: 100 / 100

Button 3: Master Level: 0 / 0

Button 4: Master Level: 0 / 0

Line Mixer 3:

Rotary 1: Master Level: 100 / 100

Button 1: Master Level: 0 / 0

Button 2: Master Level: 0 / 0

Button 3: Master Level: 100 / 100

Button 4: Master Level: 0 / 0

Line Mixer 4:

Rotary 1: Master Level: 100 / 100

Button 1: Master Level: 0 / 0

Button 2: Master Level: 0 / 0

Button 3: Master Level: 0 / 0

Button 4: Master Level: 100 / 100

You’re pretty much done. Now, the buttons act as rotaries. However, you’ll have to disregard the fact that they light up at all. The fact that they are enabled or disabled means nothing. The only thing that means anything is if you switch from one button to the next. Remember our analogy: we’re taking a 2-dimensional object and turning it into a one-dimensional object. There’s no toggling. It’s a straightforward button to button switch.

The front of the Combinator showing the Programmer and the Line Mixers. The Synths are stacked underneath.

Also, Rotary 1 acts as a “Reset” button. Turning this rotary to any location will turn all four attached synths on at the same time. The reason I did this is due to the fact that when you start pressing buttons you will only be able to hear one synth at any given time and there was no way to “go back” to having all of the synths on at once. So I programmed the rotary to do this. As any good programmer knows, you should always provide a way to get back to the default. So this was my “Default” — however, if you don’t need it, you can remove the programming behind Rotary 1 if you really want to.


As always, I hope you enjoyed some of these quick tips. They are definitely fun to figure out and dream up. So keep the questions coming, and share some of your favorite tips with the rest of us. Happy Reasoning!